Satellite C55T-B5230 Touch - Toshiba
Satellite C55T-B5230 Touch
View Results Below
Free Toshiba Satellite C55T-B5230 manuals!
Problems with Toshiba Satellite C55T-B5230?
Ask a Question
Free Toshiba Satellite C55T-B5230 manuals!
Problems with Toshiba Satellite C55T-B5230?
Ask a Question
Related Manual Pages


Similar Questions


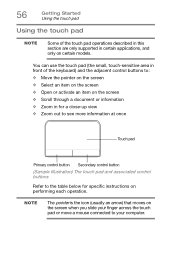
I Lost My Touch Pad Driver And My F9 Key Doesnt Work
I somehow lost my touch pad driver and do not know how to get it back. Is that also why my f9 keydoe...
I somehow lost my touch pad driver and do not know how to get it back. Is that also why my f9 keydoe...
(Posted by dgil72760 9 years ago)

How Do You Disable The Touch Pad
Would Like To Disable The Touch Pad And Only Use A Mouse !!!!!
Would Like To Disable The Touch Pad And Only Use A Mouse !!!!!
(Posted by wagnerre 9 years ago)