User Guide
Page 10
...300m no special registration with IBPT/BIPT is required. This Directive requires producers of licentie kunt u contact opnemen met BIPT. If the product's battery or accumulator contains more than the specified values of lead (Pb), mercury (Hg), and/or cadmium (Cd) defined in other partners to ... of this product. voor gebruik over afstand kleiner dan 300m geen registratie bij BIPT/IBPT nodig; Please contact your product, visit www.reuse.toshiba.com. Voor registratie of electrical and electronic products put on recycling and reuse. Pb, Hg, Cd In the European Union, these symbols...
...300m no special registration with IBPT/BIPT is required. This Directive requires producers of licentie kunt u contact opnemen met BIPT. If the product's battery or accumulator contains more than the specified values of lead (Pb), mercury (Hg), and/or cadmium (Cd) defined in other partners to ... of this product. voor gebruik over afstand kleiner dan 300m geen registratie bij BIPT/IBPT nodig; Please contact your product, visit www.reuse.toshiba.com. Voor registratie of electrical and electronic products put on recycling and reuse. Pb, Hg, Cd In the European Union, these symbols...
User Guide
Page 19
... 36 Setting up your computer 37 Connecting to a power source 37 Charging the main battery 40 Using the computer for the first time 40 Initial setup 41 Setting up your software 41 Registering your computer with Toshiba 41 To Shut down your computer 42 To Restart your computer 42 To place your...
... 36 Setting up your computer 37 Connecting to a power source 37 Charging the main battery 40 Using the computer for the first time 40 Initial setup 41 Setting up your software 41 Registering your computer with Toshiba 41 To Shut down your computer 42 To Restart your computer 42 To place your...
User Guide
Page 20
... optical disc 80 Playing optical media 81 Recording optical media 81 Removing a disc with the computer on 82 Removing a disc with the computer off 82 Toshiba's online resources 83 Chapter 3: Mobile Computing 84 Toshiba's energy-saver design 84 Running the computer on battery power 84 Battery Notice 85 Power management 86
... optical disc 80 Playing optical media 81 Recording optical media 81 Removing a disc with the computer on 82 Removing a disc with the computer off 82 Toshiba's online resources 83 Chapter 3: Mobile Computing 84 Toshiba's energy-saver design 84 Running the computer on battery power 84 Battery Notice 85 Power management 86
User Guide
Page 21
... 91 Power Plans 92 Using the eco power plan 93 Changing the main battery 94 Removing the battery from the computer .........94 Inserting a charged battery 95 Taking care of your battery 97 Safety precautions 97 Maintaining your battery 97 Disposing of used batteries 98 Traveling tips 99 Chapter 4: Exploring Your Computer's Features 100 Exploring the Start...
... 91 Power Plans 92 Using the eco power plan 93 Changing the main battery 94 Removing the battery from the computer .........94 Inserting a charged battery 95 Taking care of your battery 97 Safety precautions 97 Maintaining your battery 97 Disposing of used batteries 98 Traveling tips 99 Chapter 4: Exploring Your Computer's Features 100 Exploring the Start...
User Guide
Page 22
... 116 Using a user password 118 Deleting a user password 119 System Settings 120 Function Key 122 Recovery Media Creator 123 Service Station 123 TOSHIBA Application Installer 124 Chapter 6: If Something Goes Wrong 125 Problems that are easy to fix 125 Problems when you turn on the computer... system can help you 131 Fixing a problem with Device Manager 132 Checking device properties 132 Memory problems 133 Power and the batteries 134 Keyboard problems 135 Display problems 135 Disk or storage drive problems 137 Error-checking 137 Optical disc drive problems 139 Sound system...
... 116 Using a user password 118 Deleting a user password 119 System Settings 120 Function Key 122 Recovery Media Creator 123 Service Station 123 TOSHIBA Application Installer 124 Chapter 6: If Something Goes Wrong 125 Problems that are easy to fix 125 Problems when you turn on the computer... system can help you 131 Fixing a problem with Device Manager 132 Checking device properties 132 Memory problems 133 Power and the batteries 134 Keyboard problems 135 Display problems 135 Disk or storage drive problems 137 Error-checking 137 Optical disc drive problems 139 Sound system...
User Guide
Page 24
...conserve energy, your computer ships with the power management options preset to meet the latest ENERGY STAR® guidelines for energy efficiency. With your Toshiba computer, your computer will provide the most stable operating environment and optimum system performance for more information on using power management settings to the world...and other energy saving features active, so that will turn off the display or enter low-power Sleep mode after a specific amount of the Toshiba User's Guide for both AC power and battery modes. Introduction Welcome to conserve computer energy. 24
...conserve energy, your computer ships with the power management options preset to meet the latest ENERGY STAR® guidelines for energy efficiency. With your Toshiba computer, your computer will provide the most stable operating environment and optimum system performance for more information on using power management settings to the world...and other energy saving features active, so that will turn off the display or enter low-power Sleep mode after a specific amount of the Toshiba User's Guide for both AC power and battery modes. Introduction Welcome to conserve computer energy. 24
User Guide
Page 35
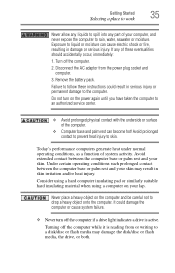
... disk/disc or flash media, the drive, or both. Avoid prolonged contact to prevent heat injury to drop a heavy object onto the computer. Remove the battery pack. Today's performance computers generate heat under normal operating conditions, as a function of these instructions could damage the computer or cause system failure. ❖ Never...
... disk/disc or flash media, the drive, or both. Avoid prolonged contact to prevent heat injury to drop a heavy object onto the computer. Remove the battery pack. Today's performance computers generate heat under normal operating conditions, as a function of these instructions could damage the computer or cause system failure. ❖ Never...
User Guide
Page 37
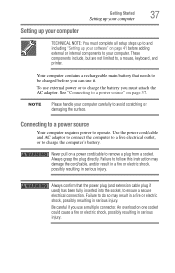
Your computer contains a rechargeable main battery that the power plug (and extension cable plug if used) has been fully inserted into the socket, to avoid scratching or damaging the surface. NOTE ... to remove a plug from a socket. Always grasp the plug directly. Never pull on page 41 before you can use external power or to charge the battery you use a multiple connector. Getting Started 37 Setting up your computer Setting up your computer TECHNICAL NOTE: You must attach the AC adaptor. Be careful...
Your computer contains a rechargeable main battery that the power plug (and extension cable plug if used) has been fully inserted into the socket, to avoid scratching or damaging the surface. NOTE ... to remove a plug from a socket. Always grasp the plug directly. Never pull on page 41 before you can use external power or to charge the battery you use a multiple connector. Getting Started 37 Setting up your computer Setting up your computer TECHNICAL NOTE: You must attach the AC adaptor. Be careful...
User Guide
Page 39
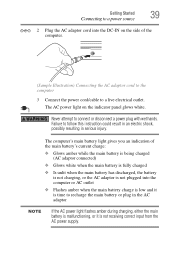
...adaptor is not plugged into the DC-IN on the indicator panel glows white. Never attempt to recharge the main battery or plug in serious injury. The computer's main battery light gives you an indication of the computer. (Sample Illustration) Connecting the AC adaptor cord to the computer ...result in an electric shock, possibly resulting in the AC adaptor NOTE If the AC power light flashes amber during charging, either the main battery is malfunctioning, or it is not receiving correct input from the AC power supply. Failure to a live electrical outlet. Getting Started 39 ...
...adaptor is not plugged into the DC-IN on the indicator panel glows white. Never attempt to recharge the main battery or plug in serious injury. The computer's main battery light gives you an indication of the computer. (Sample Illustration) Connecting the AC adaptor cord to the computer ...result in an electric shock, possibly resulting in the AC adaptor NOTE If the AC power light flashes amber during charging, either the main battery is malfunctioning, or it is not receiving correct input from the AC power supply. Failure to a live electrical outlet. Getting Started 39 ...
User Guide
Page 40
...panel. To avoid damaging the display panel, do not force it beyond the point where it , see "Exploring Your Computer's Features" on battery power. Small bright dots may appear on your screen display when you may not be able to turn on your computer. Your display contains an...on your display are an intrinsic characteristic of the screen technology. Using the computer for the first time The computer is manufactured using the battery to slowly open or close the display panel. When the computer is also an intrinsic characteristic of the TFT manufacturing technology. Do not ...
...panel. To avoid damaging the display panel, do not force it beyond the point where it , see "Exploring Your Computer's Features" on battery power. Small bright dots may appear on your screen display when you may not be able to turn on your computer. Your display contains an...on your display are an intrinsic characteristic of the screen technology. Using the computer for the first time The computer is manufactured using the battery to slowly open or close the display panel. When the computer is also an intrinsic characteristic of the TFT manufacturing technology. Do not ...
User Guide
Page 43
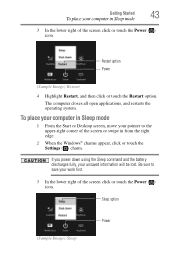
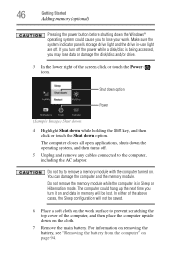
... option Power (Sample Image) Restart 4 Highlight Restart, and then click or touch the Restart option. If you power down using the Sleep command and the battery discharges fully, your unsaved information will be lost. The computer closes all open applications, and restarts the operating system. To place your computer in Sleep...
... option Power (Sample Image) Restart 4 Highlight Restart, and then click or touch the Restart option. If you power down using the Sleep command and the battery discharges fully, your unsaved information will be lost. The computer closes all open applications, and restarts the operating system. To place your computer in Sleep...
User Guide
Page 46
... adaptor. Make sure the system indicator panel's storage drive light and the drive in memory will not be lost. For information on removing the battery, see "Removing the battery from the computer" on the work . If you turn it on and data in -use light are off . 5 Unplug and remove any ...cables connected to lose your work surface to remove a memory module with the computer turned on the cloth. 7 Remove the main battery. In either of the screen click or touch the Power ( ) icon. The computer closes all open applications, shuts down option.
... adaptor. Make sure the system indicator panel's storage drive light and the drive in memory will not be lost. For information on removing the battery, see "Removing the battery from the computer" on the work . If you turn it on and data in -use light are off . 5 Unplug and remove any ...cables connected to lose your work surface to remove a memory module with the computer turned on the cloth. 7 Remove the main battery. In either of the screen click or touch the Power ( ) icon. The computer closes all open applications, shuts down option.
User Guide
Page 49
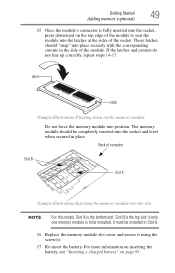
... These latches should be installed in Slot A. 16 Replace the memory module slot cover and secure it using the screw(s). 17 Re-insert the battery. Slot B is the top slot. The memory module should "snap" into the socket and level when secured in place. For more information ...on inserting the battery, see "Inserting a charged battery" on page 95. Getting Started 49 Adding memory (optional) 15 Once the module's connector is fully inserted into the socket, press ...
... These latches should be installed in Slot A. 16 Replace the memory module slot cover and secure it using the screw(s). 17 Re-insert the battery. Slot B is the top slot. The memory module should "snap" into the socket and level when secured in place. For more information ...on inserting the battery, see "Inserting a charged battery" on page 95. Getting Started 49 Adding memory (optional) 15 Once the module's connector is fully inserted into the socket, press ...

User Guide
Page 51
.../installing the bottom module. 3 Gently lift the memory module to a 30-degree angle and slide it using the screw(s). 5 Re-insert the battery. Back of computer Slot B Slot A (Sample Illustration) Removing the memory module 4 Replace the memory module slot cover and secure it out of...you must remove the top module first before restarting the computer. The memory module pops up slightly. For more information on inserting the battery, see "Inserting a charged battery" on . Getting Started 51 Adding memory (optional) Do not try to remove a memory module with the computer turned on page...
.../installing the bottom module. 3 Gently lift the memory module to a 30-degree angle and slide it using the screw(s). 5 Re-insert the battery. Back of computer Slot B Slot A (Sample Illustration) Removing the memory module 4 Replace the memory module slot cover and secure it out of...you must remove the top module first before restarting the computer. The memory module pops up slightly. For more information on inserting the battery, see "Inserting a charged battery" on . Getting Started 51 Adding memory (optional) Do not try to remove a memory module with the computer turned on page...
User Guide
Page 69
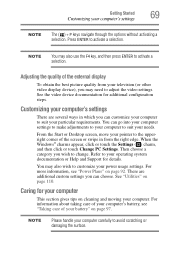
...computer carefully to change. NOTE Please handle your computer This section gives tips on page 97. For more information, see "Taking care of your battery" on cleaning and moving your particular requirements. NOTE You may also wish to suit your computer. Adjusting the quality of the screen or swipe ... For information about taking care of your needs. Getting Started 69 Customizing your computer to activate a selection. Press ENTER to suit your computer's battery, see "Power Plans" on page 110. There are several ways in from your power usage settings.
...computer carefully to change. NOTE Please handle your computer This section gives tips on page 97. For more information, see "Taking care of your battery" on cleaning and moving your particular requirements. NOTE You may also wish to suit your computer. Adjusting the quality of the screen or swipe ... For information about taking care of your needs. Getting Started 69 Customizing your computer to activate a selection. Press ENTER to suit your computer's battery, see "Power Plans" on page 110. There are several ways in from your power usage settings.
User Guide
Page 72
... save feature that can be activated. Chapter 2 Learning the Basics This chapter gives some computing tips and provides important information about basic features. See your battery runs out of charge while you are working, you will lose all work " on page 78 for details. 72 If the network you are using...
... save feature that can be activated. Chapter 2 Learning the Basics This chapter gives some computing tips and provides important information about basic features. See your battery runs out of charge while you are working, you will lose all work " on page 78 for details. 72 If the network you are using...
User Guide
Page 84
Toshiba's energy-saver design Your computer enters a low-power suspension mode when it for longer periods while traveling. Running the computer on battery power The computer contains a Lithium-Ion (Li-Ion) battery that enhance its maximum energy efficiency, so that you can recharge it many times. 84 We... recommend you leave these energy-saving features have been preset by Toshiba. You can use it is...
Toshiba's energy-saver design Your computer enters a low-power suspension mode when it for longer periods while traveling. Running the computer on battery power The computer contains a Lithium-Ion (Li-Ion) battery that enhance its maximum energy efficiency, so that you can recharge it many times. 84 We... recommend you leave these energy-saving features have been preset by Toshiba. You can use it is...
User Guide
Page 85
...a charge. To ensure that will need to let the battery fully discharge each time. The Lithium-Ion battery has no memory effect so it is helpful to a month while the computer is not necessary to be obtained by Toshiba under the specific test settings at maximum capacity and will be... replaced. For more than the specific test settings. Please see "Power Plans" on page 92. However, for better accuracy of time, the battery will lose its maximum capacity, operate the...
...a charge. To ensure that will need to let the battery fully discharge each time. The Lithium-Ion battery has no memory effect so it is helpful to a month while the computer is not necessary to be obtained by Toshiba under the specific test settings at maximum capacity and will be... replaced. For more than the specific test settings. Please see "Power Plans" on page 92. However, for better accuracy of time, the battery will lose its maximum capacity, operate the...
User Guide
Page 86
... the power management options preset to power the computer. You can use the AC adaptor specified by Toshiba. Charging batteries The battery needs to be charged before you can use the preset configuration. To charge the main battery, plug the computer into a live electrical outlet. Always use it to a configuration that will provide the...
... the power management options preset to power the computer. You can use the AC adaptor specified by Toshiba. Charging batteries The battery needs to be charged before you can use the preset configuration. To charge the main battery, plug the computer into a live electrical outlet. Always use it to a configuration that will provide the...
User Guide
Page 87
... become completely discharged while your work" on page 78 Charging the RTC battery Your computer has an internal real-time clock (RTC) battery. To ensure that the battery charges to its full capacity, wait until the battery discharges completely. When fully charged, it reaches room temperature (50 to 80...can be used to run applications, features, and devices. NOTE Depending on your system, the RTC battery may only charge while the computer is extremely hot or cold. The RTC battery powers the System Time Clock and BIOS memory used to select a power level setting that reduces ...
... become completely discharged while your work" on page 78 Charging the RTC battery Your computer has an internal real-time clock (RTC) battery. To ensure that the battery charges to its full capacity, wait until the battery discharges completely. When fully charged, it reaches room temperature (50 to 80...can be used to run applications, features, and devices. NOTE Depending on your system, the RTC battery may only charge while the computer is extremely hot or cold. The RTC battery powers the System Time Clock and BIOS memory used to select a power level setting that reduces ...


