
User Guide
Page 36
... or AC adaptor near a heat source, such as large stereo speakers. Important information on a hard flat surface. In this condition, observe the following: ❖ Never cover your computer or AC adaptor with any object. ❖ Never place your computer on your computer's cooling fan Your computer may contain a computer virus. NOTE... make sure your computer and AC adaptor have a CPU cooling fan that generate strong magnetic fields, such as an electric blanket or heater. ❖ Never cover or block the air vents including those located at the underside of the disc.
... or AC adaptor near a heat source, such as large stereo speakers. Important information on a hard flat surface. In this condition, observe the following: ❖ Never cover your computer or AC adaptor with any object. ❖ Never place your computer on your computer's cooling fan Your computer may contain a computer virus. NOTE... make sure your computer and AC adaptor have a CPU cooling fan that generate strong magnetic fields, such as an electric blanket or heater. ❖ Never cover or block the air vents including those located at the underside of the disc.
User Guide
Page 45
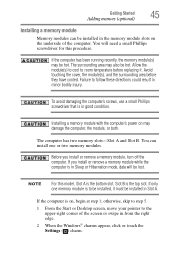
... can install one memory module is to room temperature before they have cooled. Allow the module(s) to cool to be installed, it . Avoid touching the cover, the module(s), and the surrounding area before replacing it must be installed in minor bodily injury. If the computer has been running recently, the memory...
... can install one memory module is to room temperature before they have cooled. Allow the module(s) to cool to be installed, it . Avoid touching the cover, the module(s), and the surrounding area before replacing it must be installed in minor bodily injury. If the computer has been running recently, the memory...
User Guide
Page 46
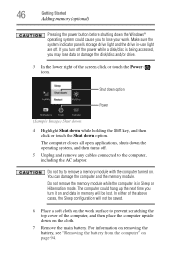
... the lower right of the above cases, the Sleep configuration will be saved. 6 Place a soft cloth on the work surface to prevent scratching the top cover of the computer, and then place the computer upside down the Windows® operating system could cause you turn it on and data in -use...
... the lower right of the above cases, the Sleep configuration will be saved. 6 Place a soft cloth on the work surface to prevent scratching the top cover of the computer, and then place the computer upside down the Windows® operating system could cause you turn it on and data in -use...
User Guide
Page 47
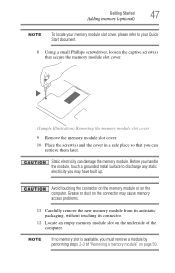
...8 Using a small Phillips screwdriver, loosen the captive screw(s) that secure the memory module slot cover. (Sample Illustration) Removing the memory module slot cover 9 Remove the memory module slot cover. 10 Place the screw(s) and the cover in a safe place so that you can damage the memory module. NOTE If no memory...module" on page 50. Static electricity can retrieve them later. Getting Started 47 Adding memory (optional) NOTE To locate your memory module slot cover, please refer to discharge any static electricity you must remove a module by performing steps 2-3 of the computer.
...8 Using a small Phillips screwdriver, loosen the captive screw(s) that secure the memory module slot cover. (Sample Illustration) Removing the memory module slot cover 9 Remove the memory module slot cover. 10 Place the screw(s) and the cover in a safe place so that you can damage the memory module. NOTE If no memory...module" on page 50. Static electricity can retrieve them later. Getting Started 47 Adding memory (optional) NOTE To locate your memory module slot cover, please refer to discharge any static electricity you must remove a module by performing steps 2-3 of the computer.
User Guide
Page 49
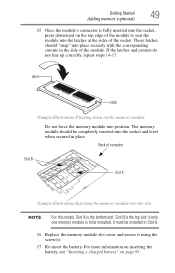
... of the socket. latch latch (Sample Illustration) Pressing down on page 95. These latches should be installed in Slot A. 16 Replace the memory module slot cover and secure it must be completely inserted into the socket and level when secured in place. Getting Started 49 Adding memory (optional) 15 Once the...
... of the socket. latch latch (Sample Illustration) Pressing down on page 95. These latches should be installed in Slot A. 16 Replace the memory module slot cover and secure it must be completely inserted into the socket and level when secured in place. Getting Started 49 Adding memory (optional) 15 Once the...
User Guide
Page 50
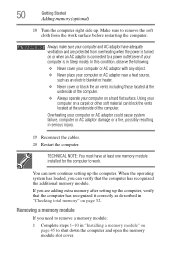
...1 Complete steps 1-10 in serious injury. 19 Reconnect the cables. 20 Restart the computer. In this condition, observe the following: ❖ Never cover your computer or AC adaptor with any object. ❖ Never place your computer or AC adaptor near a heat source, such as described in "Checking... a carpet or other soft material can verify that the computer has recognized it correctly as an electric blanket or heater. ❖ Never cover or block the air vents including those located at the underside of the computer. 50 Getting Started Adding memory (optional) 18 Turn the ...
...1 Complete steps 1-10 in serious injury. 19 Reconnect the cables. 20 Restart the computer. In this condition, observe the following: ❖ Never cover your computer or AC adaptor with any object. ❖ Never place your computer or AC adaptor near a heat source, such as described in "Checking... a carpet or other soft material can verify that the computer has recognized it correctly as an electric blanket or heater. ❖ Never cover or block the air vents including those located at the underside of the computer. 50 Getting Started Adding memory (optional) 18 Turn the ...

User Guide
Page 51
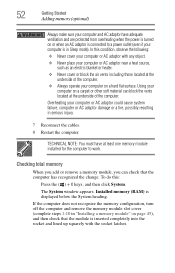
... memory module to a 30-degree angle and slide it out of computer Slot B Slot A (Sample Illustration) Removing the memory module 4 Replace the memory module slot cover and secure it on top of one another, you turn it using the screw(s). 5 Re-insert the battery.
... memory module to a 30-degree angle and slide it out of computer Slot B Slot A (Sample Illustration) Removing the memory module 4 Replace the memory module slot cover and secure it on top of one another, you turn it using the screw(s). 5 Re-insert the battery.
User Guide
Page 52
...+ X keys, and then click System. If the computer does not recognize the memory configuration, turn off the computer and remove the memory module slot cover (complete steps 1-10 in Sleep mode). Installed memory (RAM) is inserted completely into the socket and lined up squarely with any object. ❖ ...other soft material can check that the module is displayed below the System heading. To do this condition, observe the following: ❖ Never cover your computer or AC adaptor with the socket latches. Checking total memory When you add or remove a memory module, you can block the ...
...+ X keys, and then click System. If the computer does not recognize the memory configuration, turn off the computer and remove the memory module slot cover (complete steps 1-10 in Sleep mode). Installed memory (RAM) is inserted completely into the socket and lined up squarely with any object. ❖ ...other soft material can check that the module is displayed below the System heading. To do this condition, observe the following: ❖ Never cover your computer or AC adaptor with the socket latches. Checking total memory When you add or remove a memory module, you can block the ...
User Guide
Page 82
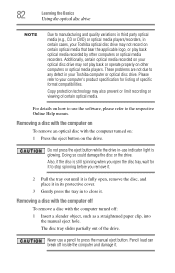
... Pull the tray out until it . Also, if the disc is still spinning when you open , remove the disc, and place it in its protective cover. 3 Gently press the tray in to close it to the respective Online Help menus. Removing a disc with the computer off inside the computer and damage...recorded on your optical disc drive may not play back optical media recorded by other computers or optical media players. Never use a pencil to your Toshiba computer or optical disc drive. Please refer to press the manual eject button. Pencil lead can break off To remove a disc with the computer...
... Pull the tray out until it . Also, if the disc is still spinning when you open , remove the disc, and place it in its protective cover. 3 Gently press the tray in to close it to the respective Online Help menus. Removing a disc with the computer off inside the computer and damage...recorded on your optical disc drive may not play back optical media recorded by other computers or optical media players. Never use a pencil to your Toshiba computer or optical disc drive. Please refer to press the manual eject button. Pencil lead can break off To remove a disc with the computer...
User Guide
Page 83
Toshiba's online resources Toshiba maintains a number of online sites to which you up to close it. These sites provide information about Toshiba products, give help with technical questions and keep you can connect. For more information, see "Contacting Toshiba" on page 150. Learning the Basics 83 Toshiba's online resources 2 Pull the tray out until it is fully open, remove the disc, and place it in its protective cover. 3 Gently press the tray in to date with future upgrades.
Toshiba's online resources Toshiba maintains a number of online sites to which you up to close it. These sites provide information about Toshiba products, give help with technical questions and keep you can connect. For more information, see "Contacting Toshiba" on page 150. Learning the Basics 83 Toshiba's online resources 2 Pull the tray out until it is fully open, remove the disc, and place it in its protective cover. 3 Gently press the tray in to date with future upgrades.
User Guide
Page 84
Chapter 3 Mobile Computing This chapter covers all aspects of other features that enhance its maximum energy efficiency, so that provides power when you are away from an AC outlet. Toshiba's energy-saver design Your computer enters a low-power suspension mode when it many times. 84 Many of these features active, ... computer on battery power The computer contains a Lithium-Ion (Li-Ion) battery that you leave these energy-saving features have been preset by Toshiba. We recommend you can recharge it is not being used, thereby conserving energy and saving money in the process.
Chapter 3 Mobile Computing This chapter covers all aspects of other features that enhance its maximum energy efficiency, so that provides power when you are away from an AC outlet. Toshiba's energy-saver design Your computer enters a low-power suspension mode when it many times. 84 Many of these features active, ... computer on battery power The computer contains a Lithium-Ion (Li-Ion) battery that you leave these energy-saving features have been preset by Toshiba. We recommend you can recharge it is not being used, thereby conserving energy and saving money in the process.
User Guide
Page 99
... for the computer. They all provide plenty of carrying cases for more information see "TOSHIBA Function Keys" on a sunny ledge or in a place where it could get wet or covered in dust. ❖ Always travel with the computer in "Selecting a place to pass your computer. ...Contact your computer has wireless LAN capability. For more information or visit Toshiba's Web site at accessories.toshiba.com. Mobile Computing 99 Traveling tips Traveling...
... for the computer. They all provide plenty of carrying cases for more information see "TOSHIBA Function Keys" on a sunny ledge or in a place where it could get wet or covered in dust. ❖ Always travel with the computer in "Selecting a place to pass your computer. ...Contact your computer has wireless LAN capability. For more information or visit Toshiba's Web site at accessories.toshiba.com. Mobile Computing 99 Traveling tips Traveling...

User Guide
Page 125
...use the terms interchangeably in the traditional Windows® desktop environment). For the purpose of simplifying the information we will find information on Toshiba's support services at the end of the software program. Problems that suddenly freezes, chances are easy to fix Your program or application... responding. Chapter 6 If Something Goes Wrong Some problems you may require help you are relatively easy to identify and solve. It covers the problems you solve many problems by yourself. This chapter aims to help from your computer are most likely to encounter. You ...
...use the terms interchangeably in the traditional Windows® desktop environment). For the purpose of simplifying the information we will find information on Toshiba's support services at the end of the software program. Problems that suddenly freezes, chances are easy to fix Your program or application... responding. Chapter 6 If Something Goes Wrong Some problems you may require help you are relatively easy to identify and solve. It covers the problems you solve many problems by yourself. This chapter aims to help from your computer are most likely to encounter. You ...

User Guide
Page 176
... button 80 using 80 volume increase/decrease buttons 80 memory adding (optional) 44 check total memory 52 removing memory module slot cover 47 Memory card reader inserting memory media 108 removing memory media 109 using 108 memory module installation 45 inserting into socket 48 removing... moving the computer 70 N network accessing 105 connecting your computer 105 networking wireless 105 notification area 103 notifications 104 O online resources Toshiba 83 optical disc Auto-Run feature 81 handling 81 inserting 80 playing optical media 81 positioning 81 recording optical media 81 removing with...
... button 80 using 80 volume increase/decrease buttons 80 memory adding (optional) 44 check total memory 52 removing memory module slot cover 47 Memory card reader inserting memory media 108 removing memory media 109 using 108 memory module installation 45 inserting into socket 48 removing... moving the computer 70 N network accessing 105 connecting your computer 105 networking wireless 105 notification area 103 notifications 104 O online resources Toshiba 83 optical disc Auto-Run feature 81 handling 81 inserting 80 playing optical media 81 positioning 81 recording optical media 81 removing with...
User Guide
Page 177
...86 optimum performance 86 power plans selecting power plan options 92 power saving options 91 precautions safety 34 printer troubleshooting 141 problem solving contacting Toshiba 150 Startup options 128 projector connecting 67 R real-time clock (RTC) battery 85 recording sounds 106 recovery creating recovery media 54 ...disc with computer on 82 and optical disc with computer off 82 battery from the computer 94 memory module 50 memory module slot cover 47 restart computer 42 restore points troubleshooting 146 running computer on battery power 84 S safety computer 99 disposing of batteries 98 icons...
...86 optimum performance 86 power plans selecting power plan options 92 power saving options 91 precautions safety 34 printer troubleshooting 141 problem solving contacting Toshiba 150 Startup options 128 projector connecting 67 R real-time clock (RTC) battery 85 recording sounds 106 recovery creating recovery media 54 ...disc with computer on 82 and optical disc with computer off 82 battery from the computer 94 memory module 50 memory module slot cover 47 restart computer 42 restore points troubleshooting 146 running computer on battery power 84 S safety computer 99 disposing of batteries 98 icons...

