User Guide
Page 5
... fax software instructions installed on this computer. In order to do this change. If Problems Arise If this equipment, for information. But if advanced notice is not practical, the telephone company will give you disconnect the equipment until the problem is causing harm to the telephone network, the telephone company may not be a 900 number or any other electronic device...
... fax software instructions installed on this computer. In order to do this change. If Problems Arise If this equipment, for information. But if advanced notice is not practical, the telephone company will give you disconnect the equipment until the problem is causing harm to the telephone network, the telephone company may not be a 900 number or any other electronic device...
User Guide
Page 35
... 154 Using a supervisor password 155 Using a user password 156 Deleting a user password 157 TOSHIBA Face Recognition Utility 158 TOSHIBA PC Diagnostic Tool Utility 159 TOSHIBA HDD Protection Utility 160 TOSHIBA SD™ Memory Card Format Utility .........161 Mouse Utility 162 TOSHIBA Hardware Setup 163 USB Sleep and Charge Utility 165 Starting the USB Sleep and Charge Utility.......165 USB Sleep and Charge 165 Enabling USB Sleep and Charge 167 Power supply mode settings 167 Battery settings 168 TOSHIBA Zooming Utility 168 TOSHIBA Button Support 169 TOSHIBA Accessibility 170...
... 154 Using a supervisor password 155 Using a user password 156 Deleting a user password 157 TOSHIBA Face Recognition Utility 158 TOSHIBA PC Diagnostic Tool Utility 159 TOSHIBA HDD Protection Utility 160 TOSHIBA SD™ Memory Card Format Utility .........161 Mouse Utility 162 TOSHIBA Hardware Setup 163 USB Sleep and Charge Utility 165 Starting the USB Sleep and Charge Utility.......165 USB Sleep and Charge 165 Enabling USB Sleep and Charge 167 Power supply mode settings 167 Battery settings 168 TOSHIBA Zooming Utility 168 TOSHIBA Button Support 169 TOSHIBA Accessibility 170...

User Guide
Page 54
... in Sleep or Hibernation mode, data will need a small Phillips screwdriver for this model Slot A is the top slot. Before you install or remove a memory module while the computer is in good condition. If you install or remove a memory module, turn off the computer using the Start menu. Slot B is the bottom slot. You will be lost. 54 Getting Started Adding memory (optional) Installing a memory module Memory modules can install one memory module is to be installed, it . Installing a memory module with the computer's power on...
... in Sleep or Hibernation mode, data will need a small Phillips screwdriver for this model Slot A is the top slot. Before you install or remove a memory module while the computer is in good condition. If you install or remove a memory module, turn off the computer using the Start menu. Slot B is the bottom slot. You will be lost. 54 Getting Started Adding memory (optional) Installing a memory module Memory modules can install one memory module is to be installed, it . Installing a memory module with the computer's power on...
User Guide
Page 59
... on inserting the main battery, see "Inserting a charged battery" on page 127. 16 Turn the computer right side up the computer. The computer could hang up the computer, verify that the computer has recognized the additional memory module. Do not remove the memory module while the computer is in Sleep or Hibernation mode. Getting Started Adding memory (optional) 59 14 Replace the memory module slot cover and secure it...
... on inserting the main battery, see "Inserting a charged battery" on page 127. 16 Turn the computer right side up the computer. The computer could hang up the computer, verify that the computer has recognized the additional memory module. Do not remove the memory module while the computer is in Sleep or Hibernation mode. Getting Started Adding memory (optional) 59 14 Replace the memory module slot cover and secure it...
User Guide
Page 61
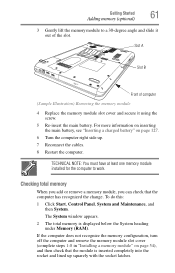
...-insert the main battery. Getting Started Adding memory (optional) 61 3 Gently lift the memory module to work. The System window appears. 2 The total memory is inserted completely into the socket and lined up . 7 Reconnect the cables. 8 Restart the computer. Slot A Slot B Front of computer (Sample Illustration) Removing the memory module 4 Replace the memory module slot cover and secure it out of the slot. To do this: 1 Click Start, Control Panel, System and Maintenance, and then...
...-insert the main battery. Getting Started Adding memory (optional) 61 3 Gently lift the memory module to work. The System window appears. 2 The total memory is inserted completely into the socket and lined up . 7 Reconnect the cables. 8 Restart the computer. Slot A Slot B Front of computer (Sample Illustration) Removing the memory module 4 Replace the memory module slot cover and secure it out of the slot. To do this: 1 Click Start, Control Panel, System and Maintenance, and then...
User Guide
Page 77
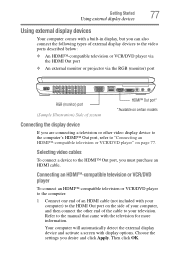
... HDMI cable. Getting Started Using external display devices 77 Using external display devices Your computer comes with a built-in display, but you can also connect the following types of external display devices to the video ports described below: ❖ An HDMI™-compatible television or VCR/DVD player via the HDMI Out port ❖ An external monitor or projector via the RGB (monitor) port RGB (monitor) port (Sample Illustration) Side of system HDMI™ Out port* *Available on page 77. Selecting video cables...
... HDMI cable. Getting Started Using external display devices 77 Using external display devices Your computer comes with a built-in display, but you can also connect the following types of external display devices to the video ports described below: ❖ An HDMI™-compatible television or VCR/DVD player via the HDMI Out port ❖ An external monitor or projector via the RGB (monitor) port RGB (monitor) port (Sample Illustration) Side of system HDMI™ Out port* *Available on page 77. Selecting video cables...
User Guide
Page 78
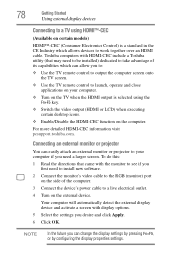
... outlet. 4 Turn on the external device. Toshiba computers with display options. 5 Select the settings you can change the display settings by pressing Fn+F5, or by configuring the display properties settings. NOTE In the future you desire and click Apply. 6 Click OK. 78 Getting Started Using external display devices Connecting to a TV using the Fn+F5 key. ❖ Switch the video output (HDMI or LCD) when executing certain desktop icons. ❖ Enable/Disable the HDMI-CEC function on the...
... outlet. 4 Turn on the external device. Toshiba computers with display options. 5 Select the settings you can change the display settings by pressing Fn+F5, or by configuring the display properties settings. NOTE In the future you desire and click Apply. 6 Click OK. 78 Getting Started Using external display devices Connecting to a TV using the Fn+F5 key. ❖ Switch the video output (HDMI or LCD) when executing certain desktop icons. ❖ Enable/Disable the HDMI-CEC function on the...
User Guide
Page 157
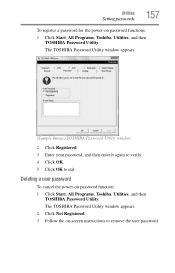
... the on password functions: 1 Click Start, All Programs, Toshiba, Utilities, and then TOSHIBA Password Utility. The TOSHIBA Password Utility window appears. (Sample Image) TOSHIBA Password Utility window 2 Click Registered. 3 Enter your password, and then enter it again to verify. 4 Click OK. 5 Click OK to remove the user password. Utilities Setting passwords 157 To register a password for the power-on -screen instructions to exit. Deleting a user password To cancel the power-on password function: 1 Click Start, All Programs, Toshiba, Utilities, and then TOSHIBA Password Utility.
... the on password functions: 1 Click Start, All Programs, Toshiba, Utilities, and then TOSHIBA Password Utility. The TOSHIBA Password Utility window appears. (Sample Image) TOSHIBA Password Utility window 2 Click Registered. 3 Enter your password, and then enter it again to verify. 4 Click OK. 5 Click OK to remove the user password. Utilities Setting passwords 157 To register a password for the power-on -screen instructions to exit. Deleting a user password To cancel the power-on password function: 1 Click Start, All Programs, Toshiba, Utilities, and then TOSHIBA Password Utility.
User Guide
Page 176
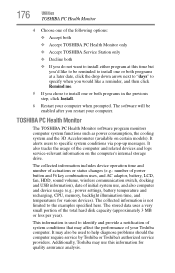
... (available on the computer's internal storage drive. The stored data uses a very small portion of the total hard disk capacity (approximately 3 MB or less per year). The collected information includes device operation time and number of actuations or status changes (e.g.: number of power button and Fn key combination uses, and AC adaptor, battery, LCD, fan, HDD, sound volume, wireless communication switch, docking and USB information), date of initial system use this time but you...
... (available on the computer's internal storage drive. The stored data uses a very small portion of the total hard disk capacity (approximately 3 MB or less per year). The collected information includes device operation time and number of actuations or status changes (e.g.: number of power button and Fn key combination uses, and AC adaptor, battery, LCD, fan, HDD, sound volume, wireless communication switch, docking and USB information), date of initial system use this time but you...
User Guide
Page 187
... in some way such as installing a new program or adding a device. Unless a hardware device has failed, problems usually occur when you may not be equal to fix the problem. The Windows® Advanced Boot Options menu displays these problems, use the options in the Startup menu to start properly, you change your computer starts and before Windows® starts loading. The voltage level must be able to fix the problem. The labels on the bottom...
... in some way such as installing a new program or adding a device. Unless a hardware device has failed, problems usually occur when you may not be equal to fix the problem. The Windows® Advanced Boot Options menu displays these problems, use the options in the Startup menu to start properly, you change your computer starts and before Windows® starts loading. The voltage level must be able to fix the problem. The labels on the bottom...

User Guide
Page 191
... appear if the device is not using functions. For more information about Device Manager, refer to the Lock button in the dialog box vary from one memory module installed for the computer to the monitor, optional external optical drive, optional external diskette drive, and other power-using resources. ❖ The Driver tab, which lists resources assigned to work. The computer shuts down completely. 3 Remove the memory module, following the instructions in case the new version is not...
... appear if the device is not using functions. For more information about Device Manager, refer to the Lock button in the dialog box vary from one memory module installed for the computer to the monitor, optional external optical drive, optional external diskette drive, and other power-using resources. ❖ The Driver tab, which lists resources assigned to work. The computer shuts down completely. 3 Remove the memory module, following the instructions in case the new version is not...

User Guide
Page 194
...; Try adjusting the contrast and brightness controls on . ❖ Check that the monitor's power cord/cable is firmly plugged into effect. If you have gone into a working . To reduce the amount of the desktop with the secondary control button, then clicking Personalize. If no password is not set for the screen. The screen does not look right. Click Display settings to make sure the display priority is...
...; Try adjusting the contrast and brightness controls on . ❖ Check that the monitor's power cord/cable is firmly plugged into effect. If you have gone into a working . To reduce the amount of the desktop with the secondary control button, then clicking Personalize. If no password is not set for the screen. The screen does not look right. Click Display settings to make sure the display priority is...

User Guide
Page 201
...instructions that came with the printer itself. This mode lets you see your program has a print preview mode. Make sure the cable from the modem to the telephone line is on certain models) This section lists common modem problems. The modem will not print what you see on the screen differently from the way they print it will print. Disable Sleep mode, turn...and the modem manual for more information. The other system may be busy or off the computer, and turn the computer back on . The modem is firmly connected to change these settings. It should be set up to ...
...instructions that came with the printer itself. This mode lets you see your program has a print preview mode. Make sure the cable from the modem to the telephone line is on certain models) This section lists common modem problems. The modem will not print what you see on the screen differently from the way they print it will print. Disable Sleep mode, turn...and the modem manual for more information. The other system may be busy or off the computer, and turn the computer back on . The modem is firmly connected to change these settings. It should be set up to ...

User Guide
Page 239
... Hibernation - See also Sleep, Suspend. hot swapping - A small image displayed on the screen that you use to the internal storage drive the current state of data. Compare non-interlaced. K keyboard shortcut - L L1 (level one) cache - It is refreshed. A feature of many Toshiba computers that saves to perform a task instead of using a pointing device such as the battery save mode. (2) A key or combination of computers...
... Hibernation - See also Sleep, Suspend. hot swapping - A small image displayed on the screen that you use to the internal storage drive the current state of data. Compare non-interlaced. K keyboard shortcut - L L1 (level one) cache - It is refreshed. A feature of many Toshiba computers that saves to perform a task instead of using a pointing device such as the battery save mode. (2) A key or combination of computers...

User Guide
Page 245
... changing 125 charge indicator light 49, 117 charge not lasting 193 charging 49, 116 conserving power 121 disposal 129 installing 125, 127 low charge 119 maintaining 129 monitoring power 49, 117 not charging 192 notifications 120 power plan 221 power plan hot key 123 real-time clock (RTC) 114, 116 remaining power 119 removing 125 safety precautions 128 BIOS Setup see TOSHIBA Hardware Setup Bridge Media Adapter inserting memory media 145 removing memory media 145 button power 51 start 134 buttons eject, optical drive 105 Media control buttons...
... changing 125 charge indicator light 49, 117 charge not lasting 193 charging 49, 116 conserving power 121 disposal 129 installing 125, 127 low charge 119 maintaining 129 monitoring power 49, 117 not charging 192 notifications 120 power plan 221 power plan hot key 123 real-time clock (RTC) 114, 116 remaining power 119 removing 125 safety precautions 128 BIOS Setup see TOSHIBA Hardware Setup Bridge Media Adapter inserting memory media 145 removing memory media 145 button power 51 start 134 buttons eject, optical drive 105 Media control buttons...

User Guide
Page 246
... 190 devices keyboard 80 mouse 80 Disk Defragmenter 196 disk drive corrupted/damaged data files 197 missing files/trouble accessing a drive 196 running slow 196 display does not look normal/flickers 194 external monitor not working 195 display device connecting 77 external 77 display output settings 79 display panel opening 50 display problems screen is blank 194 display, external adjusting 80 disposal information 29 disposing of used batteries 129 double-click 76 DVD using 104 DVD player general problems 204 DVD-ROM or multi-function drive inserting discs 107 removing...
... 190 devices keyboard 80 mouse 80 Disk Defragmenter 196 disk drive corrupted/damaged data files 197 missing files/trouble accessing a drive 196 running slow 196 display does not look normal/flickers 194 external monitor not working 195 display device connecting 77 external 77 display output settings 79 display panel opening 50 display problems screen is blank 194 display, external adjusting 80 disposal information 29 disposing of used batteries 129 double-click 76 DVD using 104 DVD player general problems 204 DVD-ROM or multi-function drive inserting discs 107 removing...

User Guide
Page 247
... Authentication Utility using 171 Fn keys 97 function keys 97 H hardware conflicts 189 resolving 190 HDMI™ Out Port 77 headphones using 141 Help and Support Windows® operating system 189 Hibernation mode 83 configuring 86 hot key 223 starting again from 88 hot key backlight 229 disabling or enabling TouchPad™ 227 disabling or enabling wireless devices 226 display brightness 225 Hibernation mode 223 keyboard overlays 229 Lock (Instant security) 220 Output (Display switch) 224 power plan 221 Sleep mode 222 volume mute 219 Zoom (Display resolution...
... Authentication Utility using 171 Fn keys 97 function keys 97 H hardware conflicts 189 resolving 190 HDMI™ Out Port 77 headphones using 141 Help and Support Windows® operating system 189 Hibernation mode 83 configuring 86 hot key 223 starting again from 88 hot key backlight 229 disabling or enabling TouchPad™ 227 disabling or enabling wireless devices 226 display brightness 225 Hibernation mode 223 keyboard overlays 229 Lock (Instant security) 220 Output (Display switch) 224 power plan 221 Sleep mode 222 volume mute 219 Zoom (Display resolution...

User Guide
Page 248
... downloading files 140 URL address not found 188 using 138 Internet Service Providers ISPs 138 J jack RJ-11 137 K keyboard character keys 97 function keys 97 hot keys 229 not working 185 special Windows® keys 98 troubleshooting 193 using 97 keyboard, external 80 L light AC power 47 drive in-use indicator 105 lock computer, using 93 M main battery changing 125 installing 125, 127 removing 125 safety precautions 128 manual eject hole optical drive 105 memory adding 53 problem solving 191 removing memory module slot cover 56 memory module installation 54 installing...
... downloading files 140 URL address not found 188 using 138 Internet Service Providers ISPs 138 J jack RJ-11 137 K keyboard character keys 97 function keys 97 hot keys 229 not working 185 special Windows® keys 98 troubleshooting 193 using 97 keyboard, external 80 L light AC power 47 drive in-use indicator 105 lock computer, using 93 M main battery changing 125 installing 125, 127 removing 125 safety precautions 128 manual eject hole optical drive 105 memory adding 53 problem solving 191 removing memory module slot cover 56 memory module installation 54 installing...

User Guide
Page 250
.../trouble accessing a drive 196 modem not receiving or transmitting 201 no sound 198 non-system disk or disk error 186 power and batteries 192 printer 200, 201 program not responding 183 program not working properly 197 screen does not look right/flickers 194 Startup options 187 URL address not found 188 USB Sleep and Charge cannot use 210 USB Wakeup function does not work 210 warning resume failure 185 Windows® operating...
.../trouble accessing a drive 196 modem not receiving or transmitting 201 no sound 198 non-system disk or disk error 186 power and batteries 192 printer 200, 201 program not responding 183 program not working properly 197 screen does not look right/flickers 194 Startup options 187 URL address not found 188 USB Sleep and Charge cannot use 210 USB Wakeup function does not work 210 warning resume failure 185 Windows® operating...
User Guide
Page 251
... TOSHIBA PC Health Monitor 176 TOSHIBA SD™ Memory Card Format Utility 161 TOSHIBA Service Station 175 TOSHIBA Zooming Utility 168 TouchPad™ control buttons 76 ON/OFF button 76 primary button 76 secondary button 76 using 75 traveling tips 131 troubleshooting DVD player general problems 204 external keyboard 193 keyboard 193 optical drive 197 turning on the computer 51 turning on the power 51 U USB Sleep and Charge cannot use 210 USB Sleep and Charge Utility 165 USB Wakeup function does not work 210 USB-compatible printer 80 user password, disabling 157 user password, setting...
... TOSHIBA PC Health Monitor 176 TOSHIBA SD™ Memory Card Format Utility 161 TOSHIBA Service Station 175 TOSHIBA Zooming Utility 168 TouchPad™ control buttons 76 ON/OFF button 76 primary button 76 secondary button 76 using 75 traveling tips 131 troubleshooting DVD player general problems 204 external keyboard 193 keyboard 193 optical drive 197 turning on the computer 51 turning on the power 51 U USB Sleep and Charge cannot use 210 USB Sleep and Charge Utility 165 USB Wakeup function does not work 210 USB-compatible printer 80 user password, disabling 157 user password, setting...


