
User Guide
Page 29
Contents 29 Caring for your computer 86 Cleaning the computer 86 Moving the computer 87 Using a computer lock 87 Chapter 2: Learning the Basics 88 Computing tips 88 Using the keyboard 90 Character keys 90 Making your keyboard emulate a full-size keyboard 90 Ctrl, ... media 103 Recording optical media 104 Removing a disc with the computer on...........104 Removing a disc with the computer off ..........105 Caring for optical discs 105 Toshiba's online resources 105
Contents 29 Caring for your computer 86 Cleaning the computer 86 Moving the computer 87 Using a computer lock 87 Chapter 2: Learning the Basics 88 Computing tips 88 Using the keyboard 90 Character keys 90 Making your keyboard emulate a full-size keyboard 90 Ctrl, ... media 103 Recording optical media 104 Removing a disc with the computer on...........104 Removing a disc with the computer off ..........105 Caring for optical discs 105 Toshiba's online resources 105
User Guide
Page 33
...Windows® operating system 195 If you need further assistance 199 Before you contact Toshiba 199 Contacting Toshiba 199 Other Toshiba Internet Web sites 200 Toshiba's worldwide offices 200 Appendix A: Hot Keys/TOSHIBA Cards 202 Hot Key Cards 202 Using the Hot Key Cards 203 Application Cards ...204 Using the Application Cards 205 Card Case 205 Hot key functions 206 Volume Mute 206 Lock ...
...Windows® operating system 195 If you need further assistance 199 Before you contact Toshiba 199 Contacting Toshiba 199 Other Toshiba Internet Web sites 200 Toshiba's worldwide offices 200 Appendix A: Hot Keys/TOSHIBA Cards 202 Hot Key Cards 202 Using the Hot Key Cards 203 Application Cards ...204 Using the Application Cards 205 Card Case 205 Hot key functions 206 Volume Mute 206 Lock ...
User Guide
Page 52
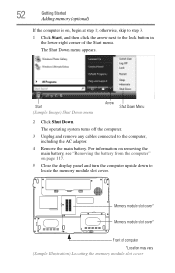
... remove any cables connected to locate the memory module slot cover. otherwise, skip to step 3. 1 Click Start, and then click the arrow next to the lock button in the lower-right corner of computer *Location may vary (Sample Illustration) Locating the memory module slot cover Start (Sample Image) Shut Down menu...
... remove any cables connected to locate the memory module slot cover. otherwise, skip to step 3. 1 Click Start, and then click the arrow next to the lock button in the lower-right corner of computer *Location may vary (Sample Illustration) Locating the memory module slot cover Start (Sample Image) Shut Down menu...

User Guide
Page 78
.... To use this method, you first need to activate it using the Shut Down command: 1 Click Start, and then click the arrow next to the Lock button in the lower-right part of the computer. The Power Options window appears. 2 Click Change plan settings under the power plan to turn off...
.... To use this method, you first need to activate it using the Shut Down command: 1 Click Start, and then click the arrow next to the Lock button in the lower-right part of the computer. The Power Options window appears. 2 Click Change plan settings under the power plan to turn off...

User Guide
Page 80
... files, turns off the display, and then turns off the computer using the Hibernation command: 1 Click Start, and then click the arrow next to the Lock button in the lower-right part of the Start menu. Using and configuring Hibernation mode To turn it again by either pressing the power button...
... files, turns off the display, and then turns off the computer using the Hibernation command: 1 Click Start, and then click the arrow next to the Lock button in the lower-right part of the Start menu. Using and configuring Hibernation mode To turn it again by either pressing the power button...
User Guide
Page 83
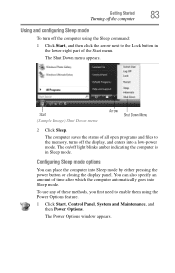
... lower-right part of the Start menu. Configuring Sleep mode options You can also specify an amount of all open programs and files to the Lock button in Sleep mode.
... lower-right part of the Start menu. Configuring Sleep mode options You can also specify an amount of all open programs and files to the Lock button in Sleep mode.

User Guide
Page 87
... are disconnected. The computer is to slip the cable off the object. 2 Pass the locking end through the loop. 3 Insert the cable's locking end into the security lock slot on purchasing a cable lock, visit accessories.toshiba.com. (Sample Illustration) Computer lock cable To secure the computer: 1 Wrap the cable through or around some part of a heavy...
... are disconnected. The computer is to slip the cable off the object. 2 Pass the locking end through the loop. 3 Insert the cable's locking end into the security lock slot on purchasing a cable lock, visit accessories.toshiba.com. (Sample Illustration) Computer lock cable To secure the computer: 1 Wrap the cable through or around some part of a heavy...

User Guide
Page 99
... eject button or turn off the computer while the drive in ." Note that came with your computer. Eject button-Press to region 1 is open, be "locked in -use . Doing so could damage the disc or the drive. On the fourth change regions four times. NOTE When viewing DVD movies use the...
... eject button or turn off the computer while the drive in ." Note that came with your computer. Eject button-Press to region 1 is open, be "locked in -use . Doing so could damage the disc or the drive. On the fourth change regions four times. NOTE When viewing DVD movies use the...
User Guide
Page 118
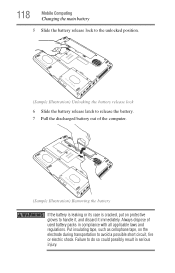
118 Mobile Computing Changing the main battery 5 Slide the battery release lock to the unlocked position. (Sample Illustration) Unlocking the battery release lock 6 Slide the battery release latch to release the battery. 7 Pull the discharged battery out of used battery packs in serious injury. Failure to avoid a possible ...
118 Mobile Computing Changing the main battery 5 Slide the battery release lock to the unlocked position. (Sample Illustration) Unlocking the battery release lock 6 Slide the battery release latch to release the battery. 7 Pull the discharged battery out of used battery packs in serious injury. Failure to avoid a possible ...
User Guide
Page 119
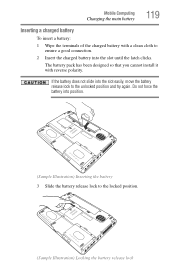
...unlocked position and try again. The battery pack has been designed so that you cannot install it with a clean cloth to the locked position. (Sample Illustration) Locking the battery release lock Mobile Computing Changing the main battery 119 Inserting a charged battery To insert a battery: 1 Wipe the terminals of the charged ...battery with reverse polarity. If the battery does not slide into position. (Sample Illustration) Inserting the battery 3 Slide the battery release lock to ensure a good connection. 2 Insert the charged battery into the slot until the latch clicks.
...unlocked position and try again. The battery pack has been designed so that you cannot install it with a clean cloth to the locked position. (Sample Illustration) Locking the battery release lock Mobile Computing Changing the main battery 119 Inserting a charged battery To insert a battery: 1 Wipe the terminals of the charged ...battery with reverse polarity. If the battery does not slide into position. (Sample Illustration) Inserting the battery 3 Slide the battery release lock to ensure a good connection. 2 Insert the charged battery into the slot until the latch clicks.
User Guide
Page 136
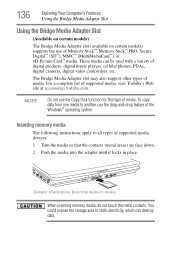
... type of supported media devices. 1 Turn the media so that the contacts (metal areas) are face down. 2 Push the media into the adapter until it locks in place. (Sample Illustration) Inserting memory media When inserting memory media, do not touch the metal contacts. 136 Exploring Your Computer's Features Using the Bridge... to all types of media. Inserting memory media The following instructions apply to static electricity, which can be used with a variety of supported media, visit Toshiba's Web site at accessories...
... type of supported media devices. 1 Turn the media so that the contacts (metal areas) are face down. 2 Push the media into the adapter until it locks in place. (Sample Illustration) Inserting memory media When inserting memory media, do not touch the metal contacts. 136 Exploring Your Computer's Features Using the Bridge... to all types of media. Inserting memory media The following instructions apply to static electricity, which can be used with a variety of supported media, visit Toshiba's Web site at accessories...

User Guide
Page 162
... access all of the system settings in the list. ❖ Register-Registers a new window (dialog or Web page). ❖ Lock/unlock My Safe-Opens or closes My Safe folder. ❖ Control Center-Displays Control Center. ❖ Help-Displays this information. ...access these system settings, click "Elevate administrative privileges" on the reader. The Biomenu contains the following menu options: ❖ Lock computer-Locks your computer. You enter the required information only once, during Web page or dialog registration. 162 Utilities Fingerprint Authentication Utility Elevate...
... access all of the system settings in the list. ❖ Register-Registers a new window (dialog or Web page). ❖ Lock/unlock My Safe-Opens or closes My Safe folder. ❖ Control Center-Displays Control Center. ❖ Help-Displays this information. ...access these system settings, click "Elevate administrative privileges" on the reader. The Biomenu contains the following menu options: ❖ Lock computer-Locks your computer. You enter the required information only once, during Web page or dialog registration. 162 Utilities Fingerprint Authentication Utility Elevate...

User Guide
Page 172
... lower-right part of the Start menu. Problems when you turn on /off your computer: 1 Click Start, and then click the arrow next to the Lock button in another device, such as a lamp. Verify that the wall outlet is working . If the indicator is glowing, the computer is on by selecting...
... lower-right part of the Start menu. Problems when you turn on /off your computer: 1 Click Start, and then click the arrow next to the Lock button in another device, such as a lamp. Verify that the wall outlet is working . If the indicator is glowing, the computer is on by selecting...
User Guide
Page 179
... memory module may cause errors that appear in the lower-right part of the Start menu. For more information about Device Manager, refer to the Lock button in the dialog box vary from one memory module installed for these first: 1 Click Start, and then click the arrow next to Windows®...
... memory module may cause errors that appear in the lower-right part of the Start menu. For more information about Device Manager, refer to the Lock button in the dialog box vary from one memory module installed for these first: 1 Click Start, and then click the arrow next to Windows®...
User Guide
Page 182
... , press Fn and F5 simultaneously (once). If you are some typical display problems and their solutions: The screen is registered, press any key to the Lock button in screen. To do this does not correct the problem, press Fn and F5 simultaneously again to return the display priority to make sure...
... , press Fn and F5 simultaneously (once). If you are some typical display problems and their solutions: The screen is registered, press any key to the Lock button in screen. To do this does not correct the problem, press Fn and F5 simultaneously again to return the display priority to make sure...

User Guide
Page 194
.... You can follow every time you to reformat your hard disk and start again, reloading all your programs and data files from a backup source will lock, forcing you should back up files or your entire computer to an optical disc, or external hard disk. ❖ Copy files to a rewritable external storage...
.... You can follow every time you to reformat your hard disk and start again, reloading all your programs and data files from a backup source will lock, forcing you should back up files or your entire computer to an optical disc, or external hard disk. ❖ Copy files to a rewritable external storage...

User Guide
Page 202
Hot Key Cards The Hot Key Cards are two types of TOSHIBA Cards: Hot Key Cards and Application Cards. There are used to launch applications. Appendix A Hot Keys/TOSHIBA Cards Hot keys and TOSHIBA Cards provide a quick way to modify selected system functions and to set or modify the following system functions: ❖ Mute ❖ Lock (Instant security) ❖ Power Plan ❖ Sleep ❖ Hibernation ❖ Output (Display switch) ❖ Brightness control ❖ Wireless ❖ TouchPad ❖ Zoom (Display resolution) 202
Hot Key Cards The Hot Key Cards are two types of TOSHIBA Cards: Hot Key Cards and Application Cards. There are used to launch applications. Appendix A Hot Keys/TOSHIBA Cards Hot keys and TOSHIBA Cards provide a quick way to modify selected system functions and to set or modify the following system functions: ❖ Mute ❖ Lock (Instant security) ❖ Power Plan ❖ Sleep ❖ Hibernation ❖ Output (Display switch) ❖ Brightness control ❖ Wireless ❖ TouchPad ❖ Zoom (Display resolution) 202

User Guide
Page 207
The Fn + F1 hot key function activates instant security. The user logon screen will appear and a user with a valid account will need to log back on to gain access to the computer. Selecting this Card or pressing the hot key displays the following options: or Fn + (Sample Image) Security options ❖ To enable lock, select . ❖ To cancel, select . Hot Keys/TOSHIBA Cards Hot key functions 207 Lock (Instant security) This TOSHIBA Card or hot key blanks the display.
The Fn + F1 hot key function activates instant security. The user logon screen will appear and a user with a valid account will need to log back on to gain access to the computer. Selecting this Card or pressing the hot key displays the following options: or Fn + (Sample Image) Security options ❖ To enable lock, select . ❖ To cancel, select . Hot Keys/TOSHIBA Cards Hot key functions 207 Lock (Instant security) This TOSHIBA Card or hot key blanks the display.

User Guide
Page 216
Fn + This hot key turns the numeric overlay on and off . Fn + This hot key turns the scroll lock feature on and off. Fn + This hot key turns the TOSHIBA Zooming Utility to zoom-in. Fn + This hot key turns the TOSHIBA Zooming Utility to zoom-out. 216 Hot Keys/TOSHIBA Cards Hot key functions Keyboard hot key functions Fn + This hot key turns the cursor control overlay on and off .
Fn + This hot key turns the numeric overlay on and off . Fn + This hot key turns the scroll lock feature on and off. Fn + This hot key turns the TOSHIBA Zooming Utility to zoom-in. Fn + This hot key turns the TOSHIBA Zooming Utility to zoom-out. 216 Hot Keys/TOSHIBA Cards Hot key functions Keyboard hot key functions Fn + This hot key turns the cursor control overlay on and off .

User Guide
Page 233
... or disk error message 174 not accessing disk drives 173 running on battery power 106 setting up 42, 52 warning resume failure message 173 computer lock 87 computing tips 88 ConfigFree® 167 connecting to a power source 45 connection set up 128 control buttons 69 Ctrl keys 91 D desktop creating new...
... or disk error message 174 not accessing disk drives 173 running on battery power 106 setting up 42, 52 warning resume failure message 173 computer lock 87 computing tips 88 ConfigFree® 167 connecting to a power source 45 connection set up 128 control buttons 69 Ctrl keys 91 D desktop creating new...

