Owner's Manual - English
Page 2
... This product's packaging materials are recyclable and can be thrown away or incinerated but disposed of any materials in accordance with the instructions, may cause harmful interference unless the modifications are designed to the environment!!! • Used up batteries or special waste. Batteries ... or television reception, which the receiver is intended to alert the user to Part 15 of important operating and maintenance (servicing) instructions in a particular installation. PRECAUTIONS WARNING: TO REDUCE THE RISK OF FIRE OR ELECTRIC SHOCK, DO NOT EXPOSE THIS APPLIANCE TO ...
... This product's packaging materials are recyclable and can be thrown away or incinerated but disposed of any materials in accordance with the instructions, may cause harmful interference unless the modifications are designed to the environment!!! • Used up batteries or special waste. Batteries ... or television reception, which the receiver is intended to alert the user to Part 15 of important operating and maintenance (servicing) instructions in a particular installation. PRECAUTIONS WARNING: TO REDUCE THE RISK OF FIRE OR ELECTRIC SHOCK, DO NOT EXPOSE THIS APPLIANCE TO ...
Owner's Manual - English
Page 3
... National Electric Code). EXAMPLE OF ANTENNA GROUNDING AS PER NATIONAL ELECTRICAL CODE ANTENNA LEAD WIRE GROUND CLAMP ELECTRIC SERVICE EQUIPMENT NEC - Precautions Setup VCR Functions DVD Functions Information IMPORTANT SAFETY INSTRUCTIONS This unit has been designed and manufactured to qualified service personnel. This unit is used, use can result in cabinet, or any...
... National Electric Code). EXAMPLE OF ANTENNA GROUNDING AS PER NATIONAL ELECTRICAL CODE ANTENNA LEAD WIRE GROUND CLAMP ELECTRIC SERVICE EQUIPMENT NEC - Precautions Setup VCR Functions DVD Functions Information IMPORTANT SAFETY INSTRUCTIONS This unit has been designed and manufactured to qualified service personnel. This unit is used, use can result in cabinet, or any...
Owner's Manual - English
Page 5
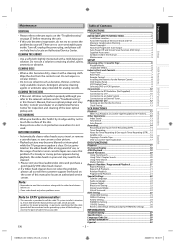
...and Controls 7 Front Panel ...7 Rear Panel...7 Remote Control ...8 Installing the Batteries for the Remote Control 8 DVD Display Panel 9 VCR Display Panel 9 Selecting DVD or VCR Operation 9 Connections 10 Connection to RF Modulator (Not Supplied 10 Connection to a TV 10 Connection to an ...spray intended for proper grounding - Please visit your unit may need to be cleaned. 1. PRECAUTIONS Laser Safety ...2 IMPORTANT SAFETY INSTRUCTIONS 3 Installation Location 4 Avoid the Hazards of Electrical Shock and Fire 4 Moisture Condensation Warning 4 About Copyright ...4 Notice for ...
...and Controls 7 Front Panel ...7 Rear Panel...7 Remote Control ...8 Installing the Batteries for the Remote Control 8 DVD Display Panel 9 VCR Display Panel 9 Selecting DVD or VCR Operation 9 Connections 10 Connection to RF Modulator (Not Supplied 10 Connection to a TV 10 Connection to an ...spray intended for proper grounding - Please visit your unit may need to be cleaned. 1. PRECAUTIONS Laser Safety ...2 IMPORTANT SAFETY INSTRUCTIONS 3 Installation Location 4 Avoid the Hazards of Electrical Shock and Fire 4 Moisture Condensation Warning 4 About Copyright ...4 Notice for ...

Owner's Manual - English
Page 10
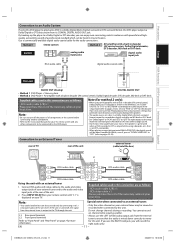
... cable This unit DVD AUDIO OUT L R DIGITAL AUDIO OUT DVD AUDIO OUT S-VIDEO OUT COMPONENT VIDEO OUT Y DVD/VCR VCR AUDIO OUT AUDIO IN L L L COAXIAL R CB/ PB R R VIDEO OUT VIDEO IN CR/ PR DVD/VCR VCR AUDIO OUT L R or AUDIO OUT DVD/VCR VCR VIDEO OUT VIDEO OUT DIGITAL AUDIO OUT DVD AUDIO OUT S-VIDEO..." to your TV. SCAN" Note: • Connect this page. near channel 0) for viewing the picture from this case, follow the instructions supplied with the RF modulator. EN E8EB5UD_SD-V296KU_EN_ES_v1.indd 10 2008/07/15 16:14:58 To set the mode, set "PROGRESSIVE" to ...
... cable This unit DVD AUDIO OUT L R DIGITAL AUDIO OUT DVD AUDIO OUT S-VIDEO OUT COMPONENT VIDEO OUT Y DVD/VCR VCR AUDIO OUT AUDIO IN L L L COAXIAL R CB/ PB R R VIDEO OUT VIDEO IN CR/ PR DVD/VCR VCR AUDIO OUT L R or AUDIO OUT DVD/VCR VCR VIDEO OUT VIDEO OUT DIGITAL AUDIO OUT DVD AUDIO OUT S-VIDEO..." to your TV. SCAN" Note: • Connect this page. near channel 0) for viewing the picture from this case, follow the instructions supplied with the RF modulator. EN E8EB5UD_SD-V296KU_EN_ES_v1.indd 10 2008/07/15 16:14:58 To set the mode, set "PROGRESSIVE" to ...
Owner's Manual - English
Page 11
...audio is generated when a DVD recorded in this connection are... DVD AUDIO OUT S-VIDEO OUT COMPONENT VIDEO OUT Y DVD/VCR AUDIO OUT L VCR...L RCA audio cable DVD/VCR VCR AUDIO OUT AUDIO IN ...protected 96kHz PCM DVD, the digital ... a DVD using ...DVD AUDIO OUT L R DIGITAL AUDIO OUT DVD AUDIO OUT S-VIDEO OUT COMPONENT VIDEO OUT Y DVD/VCR AUDIO OUT L VCR AUDIO IN L L COAXIAL R CB/ PB R R VIDEO OUT VIDEO IN CR/ PR DVD/VCR VCR AUDIO OUT L R DIGITAL AUDIO OUT DVD... the DVD player....this DVD player to play back a DVD in ...Setup VCR Functions DVD Functions... format, the DVD player outputs a...
...audio is generated when a DVD recorded in this connection are... DVD AUDIO OUT S-VIDEO OUT COMPONENT VIDEO OUT Y DVD/VCR AUDIO OUT L VCR...L RCA audio cable DVD/VCR VCR AUDIO OUT AUDIO IN ...protected 96kHz PCM DVD, the digital ... a DVD using ...DVD AUDIO OUT L R DIGITAL AUDIO OUT DVD AUDIO OUT S-VIDEO OUT COMPONENT VIDEO OUT Y DVD/VCR AUDIO OUT L VCR AUDIO IN L L COAXIAL R CB/ PB R R VIDEO OUT VIDEO IN CR/ PR DVD/VCR VCR AUDIO OUT L R DIGITAL AUDIO OUT DVD... the DVD player....this DVD player to play back a DVD in ...Setup VCR Functions DVD Functions... format, the DVD player outputs a...
Owner's Manual - English
Page 12
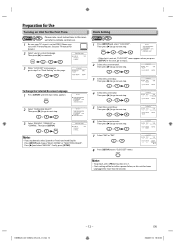
... for Use Turning on -screen language. ual refer to remote control use. 1 Be sure your on Unit for the First Time VCR Please note: most instructions in "Clock Setting" on this case, go to next step. Then press [B] to go to next step. In this page.... 10 / -- or 8 Press [SETUP] to continue. CLOCK SET MONTH DAY YEAR 1 0 / 0 7 TUE 2 0 0 8 HOUR MINUTE 05 : 40 AM/PM - - SETUP - Clock Setting VCR 1 Press [SETUP] and select "CLOCK SET". CLOCK SET MONTH DAY YEAR 1 0 / 0 7 TUE 2 0 0 8 HOUR MINUTE 05 : -- IDIOMA" or "SELECTION LANGUE". Then press [B] to go...
... for Use Turning on -screen language. ual refer to remote control use. 1 Be sure your on Unit for the First Time VCR Please note: most instructions in "Clock Setting" on this case, go to next step. Then press [B] to go to next step. In this page.... 10 / -- or 8 Press [SETUP] to continue. CLOCK SET MONTH DAY YEAR 1 0 / 0 7 TUE 2 0 0 8 HOUR MINUTE 05 : 40 AM/PM - - SETUP - Clock Setting VCR 1 Press [SETUP] and select "CLOCK SET". CLOCK SET MONTH DAY YEAR 1 0 / 0 7 TUE 2 0 0 8 HOUR MINUTE 05 : -- IDIOMA" or "SELECTION LANGUE". Then press [B] to go...


