
User Guide
Page 28
28 Record Mode LCD touch screen information 9 Video Resolution Full HD (1080p 30) HD60 (720p 60) HD30 (720p 30) VGA (480p 30) WQVGA (while the Slow Motion function is active, the video resolution is 432 x 240 [QVGA]) Photo Resolution High-16MP (interpolated) Standard-5MP Low-3MP 10 Video Record mode Backlight On / Off Photo Record mode Self-timer On / Off 11 Displays the menu options 12 Playback mode On 13 Photo mode On 14 Video mode On 15 Displays the deletion options
28 Record Mode LCD touch screen information 9 Video Resolution Full HD (1080p 30) HD60 (720p 60) HD30 (720p 30) VGA (480p 30) WQVGA (while the Slow Motion function is active, the video resolution is 432 x 240 [QVGA]) Photo Resolution High-16MP (interpolated) Standard-5MP Low-3MP 10 Video Record mode Backlight On / Off Photo Record mode Self-timer On / Off 11 Displays the menu options 12 Playback mode On 13 Photo mode On 14 Video mode On 15 Displays the deletion options
User Guide
Page 29
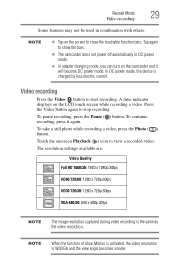
... To take a still photo while recording a video, press the Photo ( ) button. The resolution settings available are: Video Quality Full HD 1080/30: 1920 x 1080p 30fps HD60 720/60:...x 720p 30fps VGA 480/30: 640 x 480p 30fps NOTE The image resolution captured during video recording is charged by less electric current. Record Mode 29...the device is the same as the video resolution. To continue recording, press it will become DC power mode. NOTE... When the function of Slow Motion is activated, the video resolution is WQVGA and the view angle becomes smaller. Video recording...
... To take a still photo while recording a video, press the Photo ( ) button. The resolution settings available are: Video Quality Full HD 1080/30: 1920 x 1080p 30fps HD60 720/60:...x 720p 30fps VGA 480/30: 640 x 480p 30fps NOTE The image resolution captured during video recording is charged by less electric current. Record Mode 29...the device is the same as the video resolution. To continue recording, press it will become DC power mode. NOTE... When the function of Slow Motion is activated, the video resolution is WQVGA and the view angle becomes smaller. Video recording...
User Guide
Page 31
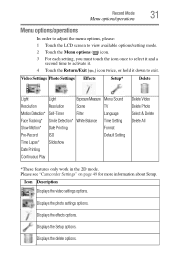
Record Mode 31 Menu options/operations Menu options/operations In order to adjust the menu options, please: 1 Touch the LCD screen to view available options/setting mode. 2 Touch the Menu options ( ) icon. 3 For each setting, you must... Settings" on page 49 for more information about Setup. Icon Description Displays the video settings options. Displays the Setup options. Video Settings Photo Settings Effects Setup* Delete Light Light ExposureMeasure Menu Sound Resolution Resolution Scene TV Motion Detection* Self-Timer Filter Language Face Tracking* Smile Detection...
Record Mode 31 Menu options/operations Menu options/operations In order to adjust the menu options, please: 1 Touch the LCD screen to view available options/setting mode. 2 Touch the Menu options ( ) icon. 3 For each setting, you must... Settings" on page 49 for more information about Setup. Icon Description Displays the video settings options. Displays the Setup options. Video Settings Photo Settings Effects Setup* Delete Light Light ExposureMeasure Menu Sound Resolution Resolution Scene TV Motion Detection* Self-Timer Filter Language Face Tracking* Smile Detection...

User Guide
Page 53
... TV Connecting to a high-definition 16:9 (wide) TV To view images or videos from 3D recorded content played on a non-3D display by pressing the 3D button. The video resolution from your camcorder on an HDTV: 1 Connect the mini HDMI® cable to your camcorder's mini HDMI® Out port. 2 Connect...photos and videos on a TV are the same steps used for viewing them on the LCD screen. (16:9) (Sample Illustration) Connecting a high-definition TV NOTE You can view 3D content on a non-3D display is still in 2D mode. NOTE Some functions may not be accessible while the camcorder is...
... TV Connecting to a high-definition 16:9 (wide) TV To view images or videos from 3D recorded content played on a non-3D display by pressing the 3D button. The video resolution from your camcorder on an HDTV: 1 Connect the mini HDMI® cable to your camcorder's mini HDMI® Out port. 2 Connect...photos and videos on a TV are the same steps used for viewing them on the LCD screen. (16:9) (Sample Illustration) Connecting a high-definition TV NOTE You can view 3D content on a non-3D display is still in 2D mode. NOTE Some functions may not be accessible while the camcorder is...