User Guide
Page 2
... or television reception, which the receiver is no guarantee that to operate the equipment. If this equipment, not expressly approved by TOSHIBA or parties authorized by one or more of the following measures: ❖ Reorient or relocate the receiving antenna. ❖ Increase...correct the interference by TOSHIBA could void the user's authority to which can radiate radio frequency energy and, if not installed and used in accordance with the limits for help. 2 Regulatory Information FCC Information Product Name: Camcorder Model number: CAMILEO® CLIP FCC notice "Declaration of...
... or television reception, which the receiver is no guarantee that to operate the equipment. If this equipment, not expressly approved by TOSHIBA or parties authorized by one or more of the following measures: ❖ Reorient or relocate the receiving antenna. ❖ Increase...correct the interference by TOSHIBA could void the user's authority to which can radiate radio frequency energy and, if not installed and used in accordance with the limits for help. 2 Regulatory Information FCC Information Product Name: Camcorder Model number: CAMILEO® CLIP FCC notice "Declaration of...

User Guide
Page 3
... voided. 2 Avoid all contact with water, and dry hands before using the camcorder when there is a storm or lightning. 6 Use only the accessories supplied by the manufacturer. 7 Keep the camcorder out of the reach of the FCC Rules. Contact Address: TOSHIBA America Information Systems, Inc. 9740 Irvine Boulevard Irvine, California 92618-1697 Telephone...
... voided. 2 Avoid all contact with water, and dry hands before using the camcorder when there is a storm or lightning. 6 Use only the accessories supplied by the manufacturer. 7 Keep the camcorder out of the reach of the FCC Rules. Contact Address: TOSHIBA America Information Systems, Inc. 9740 Irvine Boulevard Irvine, California 92618-1697 Telephone...

User Guide
Page 4
...can explode if not used properly. ❖ Do not attempt to the seriousness of data. Additional Information © Copyright 2012 TOSHIBA CORPORATION. TOSHIBA assumes no liability for damages incurred directly or indirectly from errors, omissions or discrepancies between 41 and 95 degrees Fahrenheit (5 and 35...highlight these instructions as follows: Indicates an imminently hazardous situation which, if not avoided, will result in death or serious injury. TOSHIBA reserves the right to avoid potential hazards that must be shortened. About the built-in battery ❖ The built-in battery...
...can explode if not used properly. ❖ Do not attempt to the seriousness of data. Additional Information © Copyright 2012 TOSHIBA CORPORATION. TOSHIBA assumes no liability for damages incurred directly or indirectly from errors, omissions or discrepancies between 41 and 95 degrees Fahrenheit (5 and 35...highlight these instructions as follows: Indicates an imminently hazardous situation which, if not avoided, will result in death or serious injury. TOSHIBA reserves the right to avoid potential hazards that must be shortened. About the built-in battery ❖ The built-in battery...

User Guide
Page 5
...; Charge the battery in accordance with the instructions. ❖ Only use the supplied USB cable or an optional Toshiba charger to charge the camcorder with any other charger. Never attempt to charge the camcorder. Trademarks CAMILEO is a registered trademark of ArcSoft, Inc. HDMI, the HDMI Logo and High-Definition Multimedia Interface are registered trademarks...
...; Charge the battery in accordance with the instructions. ❖ Only use the supplied USB cable or an optional Toshiba charger to charge the camcorder with any other charger. Never attempt to charge the camcorder. Trademarks CAMILEO is a registered trademark of ArcSoft, Inc. HDMI, the HDMI Logo and High-Definition Multimedia Interface are registered trademarks...

User Guide
Page 6
Standby Mode active..17 Turning the Camcorder Off 18 Menu options 18 Video Mode Menu 18 Photo Mode Menu 20 6 Contents Chapter 1: Getting to Know Your Camcorder 9 Overview 9 Check the components 10 Splash-proof design 11 System requirements 11 Front view 12 Underside view 12 Rear view 13 Chapter 2: Getting Started 15 Charge the Built-in Battery 15 Inserting and Removing the Micro SD Card............16 About the Clip 17 Turning the Camcorder On and Getting Started ......17 Turning on the Camcorder -
Standby Mode active..17 Turning the Camcorder Off 18 Menu options 18 Video Mode Menu 18 Photo Mode Menu 20 6 Contents Chapter 1: Getting to Know Your Camcorder 9 Overview 9 Check the components 10 Splash-proof design 11 System requirements 11 Front view 12 Underside view 12 Rear view 13 Chapter 2: Getting Started 15 Charge the Built-in Battery 15 Inserting and Removing the Micro SD Card............16 About the Clip 17 Turning the Camcorder On and Getting Started ......17 Turning on the Camcorder -

User Guide
Page 7
Contents 7 Chapter 3: Preview/Record Mode 22 Button Functions 22 LCD screen information 23 Video recording 25 Taking photos 26 Using Anti-Glare Function 26 Using Digital Zoom 26 Options for Menu 27 Video Mode Menu 27 Photo Mode Menu 28 Video setup 29 Resolution 29 Stabilization 30 Motion detection 30 Face tracking 31 Slow motion 31 Pre-record 32 Time lapse 32 Continuous play 33 Photo setup 34 Resolution 34 Self-timer 35 Smile detection 35 Date printing 36 ISO 36 Slide show 37 Settings 38 Sound 38 TV format 39 Language 39 Time 40 Format 40 Restore default 41 ...
Contents 7 Chapter 3: Preview/Record Mode 22 Button Functions 22 LCD screen information 23 Video recording 25 Taking photos 26 Using Anti-Glare Function 26 Using Digital Zoom 26 Options for Menu 27 Video Mode Menu 27 Photo Mode Menu 28 Video setup 29 Resolution 29 Stabilization 30 Motion detection 30 Face tracking 31 Slow motion 31 Pre-record 32 Time lapse 32 Continuous play 33 Photo setup 34 Resolution 34 Self-timer 35 Smile detection 35 Date printing 36 ISO 36 Slide show 37 Settings 38 Sound 38 TV format 39 Language 39 Time 40 Format 40 Restore default 41 ...

User Guide
Page 8
... Mode 53 Chapter 6: Viewing Files on the computer 54 Installing bundled software 54 Transferring files to a computer 55 Chapter 7: Uploading Files to the Internet 56 CAMILEO® Uploader 56 Set up account information for the web site ...........59 Chapter 8: Webcam Mode 60 Chapter 9: Troubleshooting 61 Chapter 10: Other Information 62...
... Mode 53 Chapter 6: Viewing Files on the computer 54 Installing bundled software 54 Transferring files to a computer 55 Chapter 7: Uploading Files to the Internet 56 CAMILEO® Uploader 56 Set up account information for the web site ...........59 Chapter 8: Webcam Mode 60 Chapter 9: Troubleshooting 61 Chapter 10: Other Information 62...
User Guide
Page 9
... via a mini HDMITM cable (Mini HDMITM cable must be adjusted automatically or changed manually. 9 This guide introduces the camcorder's features as well as some basic procedures to 16MP can either be purchased separately), and easily playback the recorded high-...smoother videos. ❖ Pause function to record multiple moments in a single file. ❖ This camcorder integrates function of 1920 x 1080p. This format allows for buying the CAMILEO Clip camcorder. Overview Your Toshiba camcorder comes equipped with less memory. ❖ High-quality images up to operate this product.
... via a mini HDMITM cable (Mini HDMITM cable must be adjusted automatically or changed manually. 9 This guide introduces the camcorder's features as well as some basic procedures to 16MP can either be purchased separately), and easily playback the recorded high-...smoother videos. ❖ Pause function to record multiple moments in a single file. ❖ This camcorder integrates function of 1920 x 1080p. This format allows for buying the CAMILEO Clip camcorder. Overview Your Toshiba camcorder comes equipped with less memory. ❖ High-quality images up to operate this product.

User Guide
Page 10
...10 Getting to increase the storage capacity. Check the components Unpack the package and make sure all standard accessories listed are included: Camcorder USB Cable Strap Cleaning Cloth CD-ROM Software, User's Guide (this document), and Warranty information (Sample Illustration) Components Quick Start ...audio files. ❖ The built-in memory is used for the camcorder's Firmware code. With the exclusive built-in CAMILEO UPLOADER application, you can upload the videos or photos captured by the camcorder to the Internet more effortlessly. ❖ Splash resistant and ruggedized finish...
...10 Getting to increase the storage capacity. Check the components Unpack the package and make sure all standard accessories listed are included: Camcorder USB Cable Strap Cleaning Cloth CD-ROM Software, User's Guide (this document), and Warranty information (Sample Illustration) Components Quick Start ...audio files. ❖ The built-in memory is used for the camcorder's Firmware code. With the exclusive built-in CAMILEO UPLOADER application, you can upload the videos or photos captured by the camcorder to the Internet more effortlessly. ❖ Splash resistant and ruggedized finish...

User Guide
Page 11
...dots are a normal result of the ports is manufactured using extremely high-precision technology. However, some tiny black and/or bright dots (white, red, blue or green) may appear on the LCD screen. System requirements ❖ Microsoft® Windows® XP/Windows Vista®/Windows® ... NOTE The LCD screen is not guaranteed in all environments or conditions. Getting to Know Your Camcorder 11 Overview Splash-proof design ❖ Splash-proof design protects your camcorder from damage that accidental splashes can cause. ❖ Always keep the lens clean and wipe the...
...dots are a normal result of the ports is manufactured using extremely high-precision technology. However, some tiny black and/or bright dots (white, red, blue or green) may appear on the LCD screen. System requirements ❖ Microsoft® Windows® XP/Windows Vista®/Windows® ... NOTE The LCD screen is not guaranteed in all environments or conditions. Getting to Know Your Camcorder 11 Overview Splash-proof design ❖ Splash-proof design protects your camcorder from damage that accidental splashes can cause. ❖ Always keep the lens clean and wipe the...

User Guide
Page 12
12 Getting to Know Your Camcorder Overview Front view Microphone Lens Record button LED indicator Speaker (Sample Illustration) Front view Underside view Mini-HDMI™ port Mini USB 2.0 port Strap hook Tripod socket Reset button Micro SD™ Card slot (Sample Illustration) Underside view
12 Getting to Know Your Camcorder Overview Front view Microphone Lens Record button LED indicator Speaker (Sample Illustration) Front view Underside view Mini-HDMI™ port Mini USB 2.0 port Strap hook Tripod socket Reset button Micro SD™ Card slot (Sample Illustration) Underside view

User Guide
Page 13
If no operation is made in three minutes, the camcorder will turn itself off automatically to Know Your Camcorder 13 Overview Record button LCD screen Clip Menu button Power button Up button Left button Camera mode button Record/OK button Down button Right button (Sample Illustration) Rear view QUICK TOUR Power button Camera mode button Menu button Press the Power button for one second. Exit Menu / Playback Mode. Rear view Getting to conserve battery power. Press to toggle Video Mode or Photo Mode Menu ON.
If no operation is made in three minutes, the camcorder will turn itself off automatically to Know Your Camcorder 13 Overview Record button LCD screen Clip Menu button Power button Up button Left button Camera mode button Record/OK button Down button Right button (Sample Illustration) Rear view QUICK TOUR Power button Camera mode button Menu button Press the Power button for one second. Exit Menu / Playback Mode. Rear view Getting to conserve battery power. Press to toggle Video Mode or Photo Mode Menu ON.
User Guide
Page 14
... Mode, go to Playback Mode. To stop recording, press it again. Zoom out. In VOICE RECORDING, press to increase volume. 14 Getting to Know Your Camcorder Overview Record button Record / OK button Up button Down button Left button Right button In Video Mode, press to take video.
... Mode, go to Playback Mode. To stop recording, press it again. Zoom out. In VOICE RECORDING, press to increase volume. 14 Getting to Know Your Camcorder Overview Record button Record / OK button Up button Down button Left button Right button In Video Mode, press to take video.
User Guide
Page 15
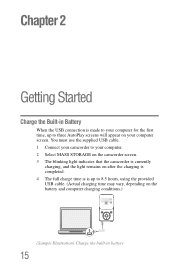
...1 Connect your camcorder to 8.5 hours, using the provided USB cable. (Actual charging time may vary, depending on after the charging is completed. 4 The full charge time is is up to three AutoPlay screens will appear on your computer. 2 Select MASS STORAGE on the camcorder screen. 3 ...The blinking light indicates that the camcorder is currently charging, and the light remains on the battery and computer charging conditions.) (Sample Illustration) Charge the built...
...1 Connect your camcorder to 8.5 hours, using the provided USB cable. (Actual charging time may vary, depending on after the charging is completed. 4 The full charge time is is up to three AutoPlay screens will appear on your computer. 2 Select MASS STORAGE on the camcorder screen. 3 ...The blinking light indicates that the camcorder is currently charging, and the light remains on the battery and computer charging conditions.) (Sample Illustration) Charge the built...

User Guide
Page 16
... SD card, press inward to charge the built-in battery. Doing so may be purchased separately). Inserting and Removing the Micro SD Card (optional) The camcorder comes with a limited internal memory which allows you to 2.5 hours (optional USB AC adaptor may cause a fire or explosion possibly resulting in memory. NOTE When...
... SD card, press inward to charge the built-in battery. Doing so may be purchased separately). Inserting and Removing the Micro SD Card (optional) The camcorder comes with a limited internal memory which allows you to 2.5 hours (optional USB AC adaptor may cause a fire or explosion possibly resulting in memory. NOTE When...

User Guide
Page 17
... battery power, the LCD will turn off automatically to normal mode by pressing any button. Turning the Camcorder On and Getting Started ❖ To turn on the camcorder, press the Power button ( ) for one minute to switch to standby mode. ❖ When standyby... the camcorder will automatically turn itself off after idling about one second. ❖ To record video: In Video Mode, press the Record button ( ) / ( ) to be utilized, depending on the Camcorder - Getting Started 17 About the Clip About the Clip ❖ Pull the clip slightly and clip the camcorder onto ...
... battery power, the LCD will turn off automatically to normal mode by pressing any button. Turning the Camcorder On and Getting Started ❖ To turn on the camcorder, press the Power button ( ) for one minute to switch to standby mode. ❖ When standyby... the camcorder will automatically turn itself off after idling about one second. ❖ To record video: In Video Mode, press the Record button ( ) / ( ) to be utilized, depending on the Camcorder - Getting Started 17 About the Clip About the Clip ❖ Pull the clip slightly and clip the camcorder onto ...

User Guide
Page 18
...actual recording time. When the video is played, the playback time will display for one second. 18 Getting Started Turning the Camcorder Off Turning the Camcorder Off ❖ To turn off the camcorder, press the Power button ( ) for 3 seconds, then disappear. Video Mode Menu In Video Mode, press ( ) to... mode button ( ) to the recorded video files carousel. VIDEO GALLERY Go to toggle between the two modes. ON Face tracking OFF The camcorder can check the recorded video files. Menu options There are two camera modes, Video and Photo. You can detect human face(s) and focus on...
...actual recording time. When the video is played, the playback time will display for one second. 18 Getting Started Turning the Camcorder Off Turning the Camcorder Off ❖ To turn off the camcorder, press the Power button ( ) for 3 seconds, then disappear. Video Mode Menu In Video Mode, press ( ) to... mode button ( ) to the recorded video files carousel. VIDEO GALLERY Go to toggle between the two modes. ON Face tracking OFF The camcorder can check the recorded video files. Menu options There are two camera modes, Video and Photo. You can detect human face(s) and focus on...

User Guide
Page 19
... 5 seconds ON OFF Enable pre-recording. TV output setting is pressed. SETTINGS Sound TV format ON OFF NTSC (60Hz) PAL (50Hz) Enable operation sound. The camcorder records a few seconds more natural. YES Format NO Format memory/ card. VOICE RECORDING You can start recording.
... 5 seconds ON OFF Enable pre-recording. TV output setting is pressed. SETTINGS Sound TV format ON OFF NTSC (60Hz) PAL (50Hz) Enable operation sound. The camcorder records a few seconds more natural. YES Format NO Format memory/ card. VOICE RECORDING You can start recording.

User Guide
Page 20
... OFF Activate 10-second-delayed self timer. Use under outsides light condition. ON Smile detection The camcorder can capture image automatically when detecting a smile in photo mode. OFF Disable Smile detection. auto ISO 800 The camcorder adjusts the ISO sensitivity of the normal. ON Date printing OFF Imprint the date and time...
... OFF Activate 10-second-delayed self timer. Use under outsides light condition. ON Smile detection The camcorder can capture image automatically when detecting a smile in photo mode. OFF Disable Smile detection. auto ISO 800 The camcorder adjusts the ISO sensitivity of the normal. ON Date printing OFF Imprint the date and time...

User Guide
Page 21
Slideshow SETTINGS VOICE RECORDING EFFECTS 2 seconds 5 seconds 10 seconds OFF Getting Started Menu options Display one photo every 5 seconds. Disable slide show. (Refer to the video mode menu.) 21 Display one photo every 2 seconds. Display one photo every 10 seconds.
Slideshow SETTINGS VOICE RECORDING EFFECTS 2 seconds 5 seconds 10 seconds OFF Getting Started Menu options Display one photo every 5 seconds. Disable slide show. (Refer to the video mode menu.) 21 Display one photo every 2 seconds. Display one photo every 10 seconds.