Owners Manual
Page 4
Preface Before Using Your Camera Accessories Safety Precautions Contents Handling Your Camera and Cradle Handling the AC Adapter Handling the Battery About the Built-in Hard Disk Drive About SD Memory Cards
Preface Before Using Your Camera Accessories Safety Precautions Contents Handling Your Camera and Cradle Handling the AC Adapter Handling the Battery About the Built-in Hard Disk Drive About SD Memory Cards
Owners Manual
Page 6
... • In this Software and Owner's Manual. • Computer screens in the Owner's Manual are given as "images". DISPOSE OF USED BATTERIES ACCORDING TO LOCAL ORDINANCES OR REGULATIONS. This hard disk camera supports Exif Print. This product supports PRINT Image Matching III. Please responsibly manage data ...Memory Card after having completely erased any data on the built-in hard disk drive and SD Memory Card. CAUTION RISK OF EXPLOTION IF BATTERY IS REPLACED BY AN INCORRECT TYPE. Software and Owner's Manual • Neither the entirety nor a portion of the accompanying Software or ...
... • In this Software and Owner's Manual. • Computer screens in the Owner's Manual are given as "images". DISPOSE OF USED BATTERIES ACCORDING TO LOCAL ORDINANCES OR REGULATIONS. This hard disk camera supports Exif Print. This product supports PRINT Image Matching III. Please responsibly manage data ...Memory Card after having completely erased any data on the built-in hard disk drive and SD Memory Card. CAUTION RISK OF EXPLOTION IF BATTERY IS REPLACED BY AN INCORRECT TYPE. Software and Owner's Manual • Neither the entirety nor a portion of the accompanying Software or ...

Owners Manual
Page 7
... cord Lens cap Remote control USB cable (only with GSC-R60 for cradle connection) USB cable (only with GSC-R30 for camera connection) Battery for Canada). If any item is missing, damaged or mismatched, please contact the Toshiba Customer Service Department [(800) 319-6684] (for U.S.A.) or Toshiba Customer Support Department [(800) 268-3404] (for remote control...
... cord Lens cap Remote control USB cable (only with GSC-R60 for cradle connection) USB cable (only with GSC-R30 for camera connection) Battery for Canada). If any item is missing, damaged or mismatched, please contact the Toshiba Customer Service Department [(800) 319-6684] (for U.S.A.) or Toshiba Customer Support Department [(800) 268-3404] (for remote control...
Owners Manual
Page 9
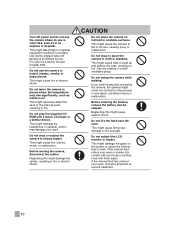
...water. If the camera has fallen or its case has been damaged, turn the power OFF and remove the battery and AC adapter. Consult the Toshiba Customer Service Department or Toshiba Customer Support Department. Do not touch power cables, TV cables, or LAN/USB cables during rain, snow, on... repair, consult the Toshiba Customer Service Department or Toshiba Customer Support Department. Take care not to fall over or result in a traffic accident. 9 Continued use the camera in the battery/SD card slot, terminals, or other holes or openings. Do not...
...water. If the camera has fallen or its case has been damaged, turn the power OFF and remove the battery and AC adapter. Consult the Toshiba Customer Service Department or Toshiba Customer Support Department. Do not touch power cables, TV cables, or LAN/USB cables during rain, snow, on... repair, consult the Toshiba Customer Service Department or Toshiba Customer Support Department. Take care not to fall over or result in a traffic accident. 9 Continued use the camera in the battery/SD card slot, terminals, or other holes or openings. Do not...
Owners Manual
Page 10
.... Do not drop or subject the camera to impact. This might damage the glass on inclined or unstable surfaces. Before cleaning the camera, remove the battery and AC adapter. If the internal fluid enters your eyes or comes into contact to receive treatment. 10 Neglecting this might cause heat to the...
.... Do not drop or subject the camera to impact. This might damage the glass on inclined or unstable surfaces. Before cleaning the camera, remove the battery and AC adapter. If the internal fluid enters your eyes or comes into contact to receive treatment. 10 Neglecting this might cause heat to the...
Owners Manual
Page 12
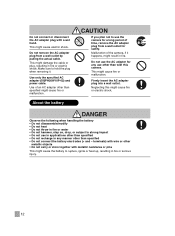
... plug when removing it happens, might result in any use the AC adapter for safety. Do not use other than with a wet hand. About the battery CAUTION If you plan not to strong impact • Do not use the camera for a long period of the camera, if it . This might cause... electric shock. This might cause fire or electric shock. DANGER Observe the following when handling the battery • Do not disassemble/modify • Do not heat • Do not throw in fire or water • Do not hammer, step on, drop, or...
... plug when removing it happens, might result in any use the AC adapter for safety. Do not use other than with a wet hand. About the battery CAUTION If you plan not to strong impact • Do not use the camera for a long period of the camera, if it . This might cause... electric shock. This might cause fire or electric shock. DANGER Observe the following when handling the battery • Do not disassemble/modify • Do not heat • Do not throw in fire or water • Do not hammer, step on, drop, or...
Owners Manual
Page 13
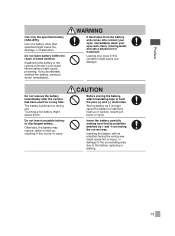
... tape to leak fluid, heat up , resulting in this condition might cause poisoning. Preface Use only the specified battery (GSC-BT5). If you accidentally swallow the battery, contact a doctor immediately. WARNING If fluid leaks from the battery and comes into contact your eyes, immediately wash your eyes in fire, burns, or injury. Inserting the...
... tape to leak fluid, heat up , resulting in this condition might cause poisoning. Preface Use only the specified battery (GSC-BT5). If you accidentally swallow the battery, contact a doctor immediately. WARNING If fluid leaks from the battery and comes into contact your eyes, immediately wash your eyes in fire, burns, or injury. Inserting the...
Owners Manual
Page 14
... About the Built-in Hard Disk Drive 21 About SD Memory Cards 22 Preparation Component Names 24 Inserting and Removing the Battery 28 Charging 30 Inserting and Removing SD Cards 33 Turning the Camera On and Off 34 Setting the Date and Time 35 Creating Albums 36 ...
... About the Built-in Hard Disk Drive 21 About SD Memory Cards 22 Preparation Component Names 24 Inserting and Removing the Battery 28 Charging 30 Inserting and Removing SD Cards 33 Turning the Camera On and Off 34 Setting the Date and Time 35 Creating Albums 36 ...
Owners Manual
Page 18
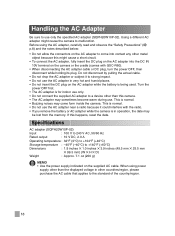
... hot and humid places. • Do not insert the DC plug on the AC adapter while the battery is normal. • Buzzing noises may come into contact any other metal object because this might cause... by pulling the actual cable. • Do not drop the AC adapter or subject it could interfere with GSC-R60). • When disconnecting the AC adapter cable or DC plug, turn the power OFF, then disconnect ...10V terminal on the camera or the cradle (comes with the radio. • If you remove the battery or AC adapter while the camera is for indoor use only. • Do not connect the supplied AC...
... hot and humid places. • Do not insert the DC plug on the AC adapter while the battery is normal. • Buzzing noises may come into contact any other metal object because this might cause... by pulling the actual cable. • Do not drop the AC adapter or subject it could interfere with GSC-R60). • When disconnecting the AC adapter cable or DC plug, turn the power OFF, then disconnect ...10V terminal on the camera or the cradle (comes with the radio. • If you remove the battery or AC adapter while the camera is for indoor use only. • Do not connect the supplied AC...
Owners Manual
Page 19
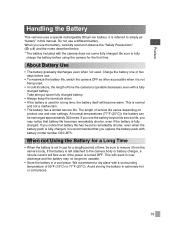
... observe the "Safety Precautions" ( p.8) and the notes described below. * The battery included with battery model number GSC-BT5. When not Using the Battery for the first time. Charge the battery one or two days before using the camera for a Long Time • When the battery is fully charged. Do not use and user settings. If the...
... observe the "Safety Precautions" ( p.8) and the notes described below. * The battery included with battery model number GSC-BT5. When not Using the Battery for the first time. Charge the battery one or two days before using the camera for a Long Time • When the battery is fully charged. Do not use and user settings. If the...
Owners Manual
Page 20
... the camera for a long time, be sure to charge the battery before use the battery for the first time or when the battery has not been used . If the battery is returned to obtain maximum battery performance. • Do not recharge a fully charged battery. Specifications Lithium-ion battery (GSC-BT5) Nominal voltage : 7.4 V Nominal capacity : 1200 mAh Operating temperature...
... the camera for a long time, be sure to charge the battery before use the battery for the first time or when the battery has not been used . If the battery is returned to obtain maximum battery performance. • Do not recharge a fully charged battery. Specifications Lithium-ion battery (GSC-BT5) Nominal voltage : 7.4 V Nominal capacity : 1200 mAh Operating temperature...
Owners Manual
Page 23
Preparation Component Names Inserting and Removing the Battery Charging Inserting and Removing SD Cards Turning the Camera On and Off Setting the Date and Time Creating Albums Using the LCD Monitor About the Remote Control Quick Reference Guide
Preparation Component Names Inserting and Removing the Battery Charging Inserting and Removing SD Cards Turning the Camera On and Off Setting the Date and Time Creating Albums Using the LCD Monitor About the Remote Control Quick Reference Guide
Owners Manual
Page 24
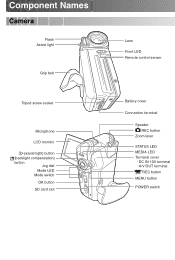
Component Names Camera Flash Assist light Grip belt Tripod screw socket Microphone LCD monitor (assist light) button (backlight compensation) button Jog dial Mode LED Mode switch OK button SD card slot Lens Front LED Remote control sensor Battery cover Connection terminal Speaker REC button Zoom lever STATUS LED MEDIA LED Terminal cover · DC IN 10V terminal · A/V OUT terminal REC button MENU button POWER switch
Component Names Camera Flash Assist light Grip belt Tripod screw socket Microphone LCD monitor (assist light) button (backlight compensation) button Jog dial Mode LED Mode switch OK button SD card slot Lens Front LED Remote control sensor Battery cover Connection terminal Speaker REC button Zoom lever STATUS LED MEDIA LED Terminal cover · DC IN 10V terminal · A/V OUT terminal REC button MENU button POWER switch
Owners Manual
Page 28
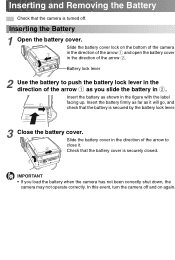
...been correctly shut down, the camera may not operate correctly. Slide the battery cover lock on again. Battery lock lever 2 Use the battery to close it will go, and check that the battery is secured by the battery lock lever. 3 Close the battery cover. In this event, turn the camera off . Check that the... and on the bottom of the camera in the direction of the arrow . Inserting the Battery 1 Open the battery cover. Insert the battery firmly as far as shown in the direction of the arrow and open the battery cover in the figure with the label facing up. Inserting and Removing the...
...been correctly shut down, the camera may not operate correctly. Slide the battery cover lock on again. Battery lock lever 2 Use the battery to close it will go, and check that the battery is secured by the battery lock lever. 3 Close the battery cover. In this event, turn the camera off . Check that the... and on the bottom of the camera in the direction of the arrow . Inserting the Battery 1 Open the battery cover. Insert the battery firmly as far as shown in the direction of the arrow and open the battery cover in the figure with the label facing up. Inserting and Removing the...
Owners Manual
Page 29
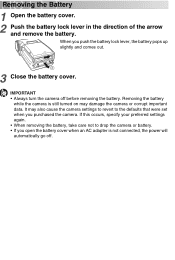
...the camera is not connected, the power will automatically go off before removing the battery. It may also cause the camera settings to revert to drop the camera or battery. • If you open the battery cover when an AC adapter is still turned on may damage the camera or .... • When removing the battery, take care not to the defaults that were set when you push the battery lock lever, the battery pops up slightly and comes out. 3 Close the battery cover. When you purchased the camera. Removing the Battery 1 Open the battery cover. 2 Push the battery lock lever in the direction of...
...the camera is not connected, the power will automatically go off before removing the battery. It may also cause the camera settings to revert to drop the camera or battery. • If you open the battery cover when an AC adapter is still turned on may damage the camera or .... • When removing the battery, take care not to the defaults that were set when you push the battery lock lever, the battery pops up slightly and comes out. 3 Close the battery cover. When you purchased the camera. Removing the Battery 1 Open the battery cover. 2 Push the battery lock lever in the direction of...
Owners Manual
Page 30
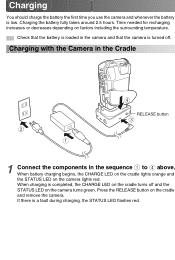
...factors including the surrounding temperature. If there is low. When charging is turned off and the STATUS LED on the camera turns green. When battery charging begins, the CHARGE LED on the cradle lights orange and the STATUS LED on the cradle and remove the camera. Check that the... battery is loaded in the sequence to above. Press the RELEASE button on the camera lights red. Charging the battery fully takes around 2.5 hours. Time needed for recharging increases or decreases depending on the ...
...factors including the surrounding temperature. If there is low. When charging is turned off and the STATUS LED on the camera turns green. When battery charging begins, the CHARGE LED on the cradle lights orange and the STATUS LED on the cradle and remove the camera. Check that the... battery is loaded in the sequence to above. Press the RELEASE button on the camera lights red. Charging the battery fully takes around 2.5 hours. Time needed for recharging increases or decreases depending on the ...
Owners Manual
Page 31
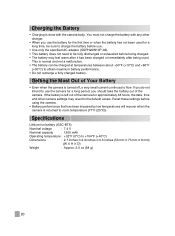
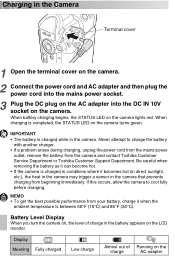
... problem arises during charging, unplug the power cord from the mains power outlet, remove the battery from beginning immediately. Charging in the battery appears on the LCD monitor. When battery charging begins, the STATUS LED on the camera turns green. Display Meaning Fully charged Low ... charged while in the camera that prevents charging from the camera and contact Toshiba Customer Service Department or Toshiba Customer Support Department. MEMO • To get the best possible performance from your battery, charge it becomes hot (in direct sunlight, etc.), the heat in ...
... problem arises during charging, unplug the power cord from the mains power outlet, remove the battery from beginning immediately. Charging in the battery appears on the LCD monitor. When battery charging begins, the STATUS LED on the camera turns green. Display Meaning Fully charged Low ... charged while in the camera that prevents charging from the camera and contact Toshiba Customer Service Department or Toshiba Customer Support Department. MEMO • To get the best possible performance from your battery, charge it becomes hot (in direct sunlight, etc.), the heat in ...

Owners Manual
Page 32
... Shooting time: Approx. 60 min. * The figures above relating to video recording time are for which the camera will operate on battery power varies considerably depending on the corresponding terminals in the camera, can obstruct current flow and the camera to touch the... battery or camera terminals. Camera Operation Time Using the Battery The length of time for reference purposes only and are not guaranteed. Continuous video recording Conditions: Recording a video...
... Shooting time: Approx. 60 min. * The figures above relating to video recording time are for which the camera will operate on battery power varies considerably depending on the corresponding terminals in the camera, can obstruct current flow and the camera to touch the... battery or camera terminals. Camera Operation Time Using the Battery The length of time for reference purposes only and are not guaranteed. Continuous video recording Conditions: Recording a video...
Owners Manual
Page 34
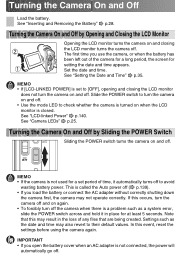
..."Setting the Date and Time" p.35. MEMO • If the camera is not used for at least 5 seconds. IMPORTANT • If you load the battery or connect the AC adapter without correctly shutting down the camera first, the camera may not operate correctly. See "LCD-linked Power" p.140. See "Camera... LEDs" p.25. Note that are being created. See "Inserting and Removing the Battery" p.28. Turning the Camera On and Off by Sliding the POWER Switch Sliding the POWER switch turns the camera on and off . Slide the POWER...
..."Setting the Date and Time" p.35. MEMO • If the camera is not used for at least 5 seconds. IMPORTANT • If you load the battery or connect the AC adapter without correctly shutting down the camera first, the camera may not operate correctly. See "LCD-linked Power" p.140. See "Camera... LEDs" p.25. Note that are being created. See "Inserting and Removing the Battery" p.28. Turning the Camera On and Off by Sliding the POWER Switch Sliding the POWER switch turns the camera on and off . Slide the POWER...
Owners Manual
Page 35
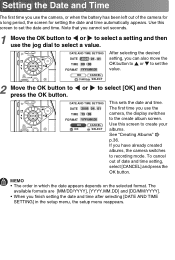
... a setting and then use the jog dial to select a value. Setting the Date and Time The first time you use the camera, or when the battery has been left out of date and time setting, select [CANCEL] and press the OK button. DATE AND TIME SETTING DATE 2006 04 . 01 TIME...
... a setting and then use the jog dial to select a value. Setting the Date and Time The first time you use the camera, or when the battery has been left out of date and time setting, select [CANCEL] and press the OK button. DATE AND TIME SETTING DATE 2006 04 . 01 TIME...
