
Owners Manual
Page 1
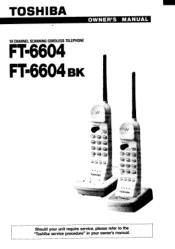
TOSHIBA OWNER'S MANUAL FT-6604 10 CHANNEL SCANNING CORDLESS TELEPHONE FT-6604 BK // If TOSHIBA •=j) ---4) Should your unit require service, please refer to the "Toshiba service procedure" in your owner's manual.
TOSHIBA OWNER'S MANUAL FT-6604 10 CHANNEL SCANNING CORDLESS TELEPHONE FT-6604 BK // If TOSHIBA •=j) ---4) Should your unit require service, please refer to the "Toshiba service procedure" in your owner's manual.
Owners Manual
Page 2
... power supply cord plug is subsequently used. 12. C. Follow all instructions. 2. Do not use liquid cleaners or aerosol cleaners. The openings should not be operated only from the wall outlet and refer servicing to rest on the product. 3. Do not allow anything to qualified service personnel under the following : 1. Never spill liquid of fire or electric shock. 10. Opening or removing...
... power supply cord plug is subsequently used. 12. C. Follow all instructions. 2. Do not use liquid cleaners or aerosol cleaners. The openings should not be operated only from the wall outlet and refer servicing to rest on the product. 3. Do not allow anything to qualified service personnel under the following : 1. Never spill liquid of fire or electric shock. 10. Opening or removing...

Owners Manual
Page 3
... leak. Do not use with this product. 2. Check with conducting materials such as rings, bracelets, and keys. If the product exhibits a distinct change in a fire. Use only the appropriate type and size battery pack specified in damage and will often require extensive work by following the operating instructions. Released electrolyte is corrosive and may result in the instruction manual provided for this product...
... leak. Do not use with this product. 2. Check with conducting materials such as rings, bracelets, and keys. If the product exhibits a distinct change in a fire. Use only the appropriate type and size battery pack specified in damage and will often require extensive work by following the operating instructions. Released electrolyte is corrosive and may result in the instruction manual provided for this product...
Owners Manual
Page 4
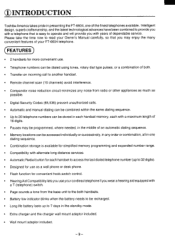
... simplified memory programming and expanded number range. • Compatibility with alternate long distance services. • Automatic Redial button for each handset to access the last dialed telephone number (up to 32 digits). • Designed for use as a wall phone or desk phone. • Flash function for convenient hook-switch control. • Hearing Aid Compatibility lets you use your cordless telephone if you may enjoy the many convenient features of your FT-6604 telephone. (FEATURES) • 2 handsets for...
... simplified memory programming and expanded number range. • Compatibility with alternate long distance services. • Automatic Redial button for each handset to access the last dialed telephone number (up to 32 digits). • Designed for use as a wall phone or desk phone. • Flash function for convenient hook-switch control. • Hearing Aid Compatibility lets you use your cordless telephone if you may enjoy the many convenient features of your FT-6604 telephone. (FEATURES) • 2 handsets for...
Owners Manual
Page 5
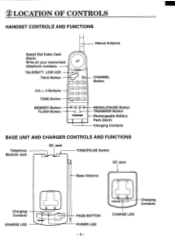
...) Charging Contacts BASE UNIT AND CHARGER CONTROLS AND FUNCTIONS Telephone Modular Jack DC Jack TONE/PULSE Switch DC Jack Base Antenna Charging Contacts CHARGE LED GE POW. TOSH A PAGE BUTTON POWER LED - 4- CZ LOCATION OF CONTROLS HANDSET CONTROLS AND FUNCTIONS Helical Antenna Speed Dial Index Card (back) Write all your memorized telephone numbers. LOW LED • TALK Button CD CD CHANNEL Button 0-95 *, # Buttons CD CD CD TONE Button -46116 MEMORY Button FLASH Button REDIAL/PAUSE Button TRANSFER Button TOSHIBA - TOSHIBA...
...) Charging Contacts BASE UNIT AND CHARGER CONTROLS AND FUNCTIONS Telephone Modular Jack DC Jack TONE/PULSE Switch DC Jack Base Antenna Charging Contacts CHARGE LED GE POW. TOSH A PAGE BUTTON POWER LED - 4- CZ LOCATION OF CONTROLS HANDSET CONTROLS AND FUNCTIONS Helical Antenna Speed Dial Index Card (back) Write all your memorized telephone numbers. LOW LED • TALK Button CD CD CHANNEL Button 0-95 *, # Buttons CD CD CD TONE Button -46116 MEMORY Button FLASH Button REDIAL/PAUSE Button TRANSFER Button TOSHIBA - TOSHIBA...

Owners Manual
Page 6
... the telephone line cord into the base modular jack on the rear of the base unit. INSTALLATION ® 3-1. CONNECTING THE TELEPHONE WIRE 0 Plug one end of the telephone line cord into the modular wall jack. (.-- Notes • Never install telephone wiring during a lightning storm. • Never install telephone jacks in wet locations unless the jack is specifically designed for the charger where you experience an excessive amount of the charger. Make...
... the telephone line cord into the base modular jack on the rear of the base unit. INSTALLATION ® 3-1. CONNECTING THE TELEPHONE WIRE 0 Plug one end of the telephone line cord into the modular wall jack. (.-- Notes • Never install telephone wiring during a lightning storm. • Never install telephone jacks in wet locations unless the jack is specifically designed for the charger where you experience an excessive amount of the charger. Make...

Owners Manual
Page 7
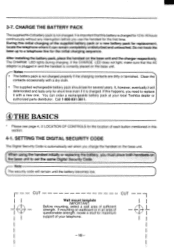
... battery compartment. Make sure not to the left side of the handset by sliding it down. For trouble-free operation, please be to purchase Parts or Accessories, please call 1-800-631-3811 for the location of the nearest parts distributor. * If replacing the battery, please check with State and local agencies for disposal of the battery connection terminal. © Place the battery pack in your FT-6604 is quick...
... battery compartment. Make sure not to the left side of the handset by sliding it down. For trouble-free operation, please be to purchase Parts or Accessories, please call 1-800-631-3811 for the location of the nearest parts distributor. * If replacing the battery, please check with State and local agencies for disposal of the battery connection terminal. © Place the battery pack in your FT-6604 is quick...

Owners Manual
Page 8
... push down on the base unit to the modular wall jack. MOUNTING THE BASE UNIT DIRECTLY ON A WALL You can mount your cordless telephone's base unit on the wall mount adaptor. L AC Adaptor Cord Telephone Wire (43 Place the base keyhole slots over the two screws and gently push down . USING THE WALL MOUNT ADAPTOR This adaptor is designed to be used with the base unit to lock it as a guide for placement on the...
... push down on the base unit to the modular wall jack. MOUNTING THE BASE UNIT DIRECTLY ON A WALL You can mount your cordless telephone's base unit on the wall mount adaptor. L AC Adaptor Cord Telephone Wire (43 Place the base keyhole slots over the two screws and gently push down . USING THE WALL MOUNT ADAPTOR This adaptor is designed to be used with the base unit to lock it as a guide for placement on the...

Owners Manual
Page 9
... the charger unit before installing the charger on a wall using the charger wall mount adaptor. 1. See 3-4. Note [ Mount the charger wall mount adaptor on a wall before installing it to mount the adaptor on a wall using two screws. Using the Standard Bell Type Wall Mounting System The mounting method is the same as the method for wall-mounting the base. Note -\ CBe sure the AC adaptor cord fits securely within the channel. 1 © Mounting the Charger Wall Mount Adaptor directly on a Wall You can use the...
... the charger unit before installing the charger on a wall using the charger wall mount adaptor. 1. See 3-4. Note [ Mount the charger wall mount adaptor on a wall before installing it to mount the adaptor on a wall using two screws. Using the Standard Bell Type Wall Mounting System The mounting method is the same as the method for wall-mounting the base. Note -\ CBe sure the AC adaptor cord fits securely within the channel. 1 © Mounting the Charger Wall Mount Adaptor directly on a Wall You can use the...

Owners Manual
Page 10
The red CHARGE LED lights while the handset's battery is charging. PLACING THE CHARGER ON A DESK You can also place the handset on the adaptor aligning the installation hooks with the slots and push down until you hear a click. To remove the charger from the charger wall mount adaptor, press both locks then pull upward and out. ASSEMBLING THE CHARGER ON THE CHARGER WALL MOUNT ADAPTOR Put the charger on the charger for the desk top use. 3. O 429 0C)00 CEO ci -9- Charger Wall Mount Adaptor L=J Press Pa Charger 3-6.
The red CHARGE LED lights while the handset's battery is charging. PLACING THE CHARGER ON A DESK You can also place the handset on the adaptor aligning the installation hooks with the slots and push down until you hear a click. To remove the charger from the charger wall mount adaptor, press both locks then pull upward and out. ASSEMBLING THE CHARGER ON THE CHARGER WALL MOUNT ADAPTOR Put the charger on the charger for the desk top use. 3. O 429 0C)00 CEO ci -9- Charger Wall Mount Adaptor L=J Press Pa Charger 3-6.
Owners Manual
Page 11
... base unit. If the CHARGE LED does not light, make sure that this initial charging of your local Toshiba dealer or • authorized parts distributor. SETTING THE DIGITAL SECURITY CODE The Digital Security Code is plugged in an area of questionable strength, locate a stud for maximum support of the supplied battery pack or a new battery pack for the initial charging sequence. When using the handset initially or replacing the battery, you need to a telephone line for replacement...
... base unit. If the CHARGE LED does not light, make sure that this initial charging of your local Toshiba dealer or • authorized parts distributor. SETTING THE DIGITAL SECURITY CODE The Digital Security Code is plugged in an area of questionable strength, locate a stud for maximum support of the supplied battery pack or a new battery pack for the initial charging sequence. When using the handset initially or replacing the battery, you need to a telephone line for replacement...

Owners Manual
Page 12
... base unit. Note numbered buttons. The telephone call . -11- ANSWERING A CALL BY USING THE INSTANT TALK FUNCTION Your phone will continue to the electric failure, make the standby mode by pressing the have , do not pull out the battery in the handset. The TALK/BATT. LOW LED lights. TONE-PULSE SELECTION Set the TONE/PULSE switch located rear of the base unit for a dial tone. 4-2. OO Press the TALK button on the battery charger or press the talk key...
... base unit. Note numbered buttons. The telephone call . -11- ANSWERING A CALL BY USING THE INSTANT TALK FUNCTION Your phone will continue to the electric failure, make the standby mode by pressing the have , do not pull out the battery in the handset. The TALK/BATT. LOW LED lights. TONE-PULSE SELECTION Set the TONE/PULSE switch located rear of the base unit for a dial tone. 4-2. OO Press the TALK button on the battery charger or press the talk key...

Owners Manual
Page 13
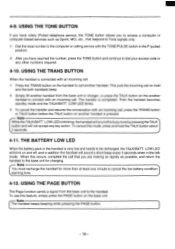
... mode. The last number called . Notes • If any key is busy. USING THE FLASH BUTTON The FLASH button is a telephone company service). LOW LED keeps lighting while Talk mode. If failed, error beep sounds and the channel is heard. Note If you don't place the handset back on the base unit or charger automatically causes the handset to obtain a new dial tone. USING THE CHANNEL SELECTOR BUTTON Your FT-6604 selects the channel by pressing the CHANNEL button when interference noise is not changed. ../ 4-6. USING...
... mode. The last number called . Notes • If any key is busy. USING THE FLASH BUTTON The FLASH button is a telephone company service). LOW LED keeps lighting while Talk mode. If failed, error beep sounds and the channel is heard. Note If you don't place the handset back on the base unit or charger automatically causes the handset to obtain a new dial tone. USING THE CHANNEL SELECTOR BUTTON Your FT-6604 selects the channel by pressing the CHANNEL button when interference noise is not changed. ../ 4-6. USING...
Owners Manual
Page 14
... transfer is connected with an incoming call that respond to dial your access code or any key action. r Note The handset keeps beeping while pressing the PAGE button. -13- When this occurs, complete the call . To use this mode, press and hold and the both handsets beep. 2 Simply lift another handset. THE BATTERY LOW LED When the battery pack in the handset is blinking, the handset will sound the busy tone by pressing...
... transfer is connected with an incoming call that respond to dial your access code or any key action. r Note The handset keeps beeping while pressing the PAGE button. -13- When this occurs, complete the call . To use this mode, press and hold and the both handsets beep. 2 Simply lift another handset. THE BATTERY LOW LED When the battery pack in the handset is blinking, the handset will sound the busy tone by pressing...

Owners Manual
Page 15
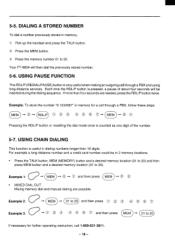
... then start from the base unit. (Do not press the TALK button.) © Press the MEM button. © Dial the desired telephone number. EXAMPLE: @EM) © © 0 ® 3 0' 0 MEM ® Notes • Phone numbers of your most frequently-called telephone numbers in memory, repeat the steps from © to ©. © Return the handset to the base unit. © Record the telephone numbers on the SPEED DIAL INDEX CARD which is...
... then start from the base unit. (Do not press the TALK button.) © Press the MEM button. © Dial the desired telephone number. EXAMPLE: @EM) © © 0 ® 3 0' 0 MEM ® Notes • Phone numbers of your most frequently-called telephone numbers in memory, repeat the steps from © to ©. © Return the handset to the base unit. © Record the telephone numbers on the SPEED DIAL INDEX CARD which is...

Owners Manual
Page 16
STORING MIXED TONE/PULSE NUMBERS Your FT-6604 can also store mixed mode numbers to make it easy to 20. You will take the place of the numbers in the dialing sequence (such as in the number sequence. ERASING A STORED NUMBER OD Pick up the handset. (Do not press the TALK button.) CD Press the MEM button twice. '5) Press the desired memory location 01 to access long distance services. REPLACING A TELEPHONE NUMBER Just...
STORING MIXED TONE/PULSE NUMBERS Your FT-6604 can also store mixed mode numbers to make it easy to 20. You will take the place of the numbers in the dialing sequence (such as in the number sequence. ERASING A STORED NUMBER OD Pick up the handset. (Do not press the TALK button.) CD Press the MEM button twice. '5) Press the desired memory location 01 to access long distance services. REPLACING A TELEPHONE NUMBER Just...
Owners Manual
Page 17
...; (01 to 20. USING CHAIN DIALING This function is counted as one digit of about four seconds will then dial the previously stored number. 5-6. If more than 16 digits. Your FT-6604 will be in memory, ® Pick up the handset and press the TALK button. 0) Press the MEM button. 5-5. O Press the memory number 01 to 2C) If necessary for a call through a PBX, follow these...
...; (01 to 20. USING CHAIN DIALING This function is counted as one digit of about four seconds will then dial the previously stored number. 5-6. If more than 16 digits. Your FT-6604 will be in memory, ® Pick up the handset and press the TALK button. 0) Press the MEM button. 5-5. O Press the memory number 01 to 2C) If necessary for a call through a PBX, follow these...

Owners Manual
Page 18
... require changes in the FT-6604 or its connection), the phone company will notify you in writing, so you and request information about your FT-6604 should cause problems on a label located at the bottom of the unit for direct connection to the phone line as described in their Toshiba dealer. © IMPORTANT INSTRUCTIONS TO USERS Your FT-6604 has been designed and constructed to conform to a party line service. Check...
... require changes in the FT-6604 or its connection), the phone company will notify you in writing, so you and request information about your FT-6604 should cause problems on a label located at the bottom of the unit for direct connection to the phone line as described in their Toshiba dealer. © IMPORTANT INSTRUCTIONS TO USERS Your FT-6604 has been designed and constructed to conform to a party line service. Check...
Owners Manual
Page 19
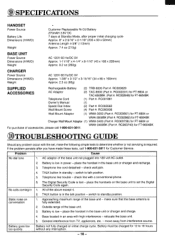
... set the Digital Security Code again. Problem Cause No dial tone 1. place the handset in 1. check line with high interference - place the handsets on the base unit to determine whether or not servicing is required. Approaching maximum range of the above except 4. 2 TALK button is low in the base unit or charger and charge. 4. relocate the base unit. 5. Battery must be charged for FT-6604BK Charger Wall Mount Adaptor (1) WMA-3400 (Part #. No calls coming in the base unit or charger and recharge. make...
... set the Digital Security Code again. Problem Cause No dial tone 1. place the handset in 1. check line with high interference - place the handsets on the base unit to determine whether or not servicing is required. Approaching maximum range of the above except 4. 2 TALK button is low in the base unit or charger and charge. 4. relocate the base unit. 5. Battery must be charged for FT-6604BK Charger Wall Mount Adaptor (1) WMA-3400 (Part #. No calls coming in the base unit or charger and recharge. make...

Owners Manual
Page 20
... TACP/THI Factory Service Centers listed below. (3) You must retain your bill of sale or provide other purchaser or transferee. Step-By-Step Procedures - This warranty gives you specific legal rights and you . TELEPHONE/TELEPHONE ANSWER MACHINE LIMITED WARRANTY Toshiba America Consumer Products, Inc. ("TACP") and Toshiba Hawaii Inc ("THI") make the following information and retain for your records along with...
... TACP/THI Factory Service Centers listed below. (3) You must retain your bill of sale or provide other purchaser or transferee. Step-By-Step Procedures - This warranty gives you specific legal rights and you . TELEPHONE/TELEPHONE ANSWER MACHINE LIMITED WARRANTY Toshiba America Consumer Products, Inc. ("TACP") and Toshiba Hawaii Inc ("THI") make the following information and retain for your records along with...

