

Owners Manual
Page 1
Printed in China S PM0015867010 © 2004 Toshiba Corporation Others Function setup Library Editing Playback Recording Introduction Printed on 70% Recycled Paper TOSHIBA DVD VIDEO RECORDER D-R2SU/D-R2SC/D-KR2SU DIGITAL VIDEO DVD VIDEO RECORDER D-R2SU D-R2SC D-KR2SU OWNER'S MANUAL OPERATIONS Read "INSTALLATION GUIDE" first.
Printed in China S PM0015867010 © 2004 Toshiba Corporation Others Function setup Library Editing Playback Recording Introduction Printed on 70% Recycled Paper TOSHIBA DVD VIDEO RECORDER D-R2SU/D-R2SC/D-KR2SU DIGITAL VIDEO DVD VIDEO RECORDER D-R2SU D-R2SC D-KR2SU OWNER'S MANUAL OPERATIONS Read "INSTALLATION GUIDE" first.

Owners Manual
Page 4
Introduction Caution for safety Read "SAFETY PRECAUTIONS", "IMPORTANT SAFETY INSTRUCTIONS", "Precautions" and others of the "INSTALLATION GUIDE" first. 4
Introduction Caution for safety Read "SAFETY PRECAUTIONS", "IMPORTANT SAFETY INSTRUCTIONS", "Precautions" and others of the "INSTALLATION GUIDE" first. 4

Owners Manual
Page 12
... page 35, 59 5 (REC) button Starts recording. Selects the time slip mode. Loads a disc into the disc drive. 12 page 59 Lights up in "INSTALLATION Scans the picture forward. Ç (PICTURE SEARCH) button page 63 4 Media indicator Indicates the current media. Front panel 123 4 5 6 78 9 20 19... to open . See the following page on /restores the unit in the standby mode. Å (PICTURE SEARCH) button page 63 3 Remote sensor GUIDE" page 12 in the time slip mode. á CHANNEL buttons page 20, 33 8 Disc tray page 20 Selects the channel. Turns the power on...
... page 35, 59 5 (REC) button Starts recording. Selects the time slip mode. Loads a disc into the disc drive. 12 page 59 Lights up in "INSTALLATION Scans the picture forward. Ç (PICTURE SEARCH) button page 63 4 Media indicator Indicates the current media. Front panel 123 4 5 6 78 9 20 19... to open . See the following page on /restores the unit in the standby mode. Å (PICTURE SEARCH) button page 63 3 Remote sensor GUIDE" page 12 in the time slip mode. á CHANNEL buttons page 20, 33 8 Disc tray page 20 Selects the channel. Turns the power on...

Owners Manual
Page 14
...from dust intrusion. 14 Connects to a TV or monitor equipped with component video jacks. 8 9 7 CHANNEL CHANGE IR jack page 19 in "INSTALLATION GUIDE" Connect the supplied IR control cable to control cable/satellite channels according to timer programs. 8 DIGITAL AUDIO OUT BITSTREAM/PCM OPTICAL jack page 22,... 23, 24 in "INSTALLATION GUIDE" Use this to connect the recorder to output jacks of external devices such as another player or camcorder. 6 COMPONENT OUTPUT jacks page ...
...from dust intrusion. 14 Connects to a TV or monitor equipped with component video jacks. 8 9 7 CHANNEL CHANGE IR jack page 19 in "INSTALLATION GUIDE" Connect the supplied IR control cable to control cable/satellite channels according to timer programs. 8 DIGITAL AUDIO OUT BITSTREAM/PCM OPTICAL jack page 22,... 23, 24 in "INSTALLATION GUIDE" Use this to connect the recorder to output jacks of external devices such as another player or camcorder. 6 COMPONENT OUTPUT jacks page ...

Owners Manual
Page 15
Introduction Recording Playback Editing Library Function setup 9 OUTPUT jacks page 15, 17, 18, 22 in "INSTALLATION GUIDE" Outputs video and audio signals to a connected TV or amplifier. 15 Others
Introduction Recording Playback Editing Library Function setup 9 OUTPUT jacks page 15, 17, 18, 22 in "INSTALLATION GUIDE" Outputs video and audio signals to a connected TV or amplifier. 15 Others

Owners Manual
Page 17
...18 DIMMER button page 19 19 FL SELECT button page 19 20 Buttons for TV operation page 46 in "INSTALLATION GUIDE" 21 ON/STANDBY button page 20, 21 22 RETURN button*2 23 CHANNEL buttons page 20, 33 24 ...page 89 38 P in P button page 78 39 ZOOM button page 70 40 PROGRESSIVE button page 20 in "INSTALLATION GUIDE" 41 INPUT SELECT button page 37 42 VCR Plus+ button page 46 43 EXTEND button page 43, 45 44..., 66 45 SETUP button page 122 46 REC MODE button page 34 47 TV CODE button page 46 in "INSTALLATION GUIDE" 48 T.SEARCH button page 67 49 CLEAR button page 66 50 DELETE button page 49 *1 MENU Use this ...
...18 DIMMER button page 19 19 FL SELECT button page 19 20 Buttons for TV operation page 46 in "INSTALLATION GUIDE" 21 ON/STANDBY button page 20, 21 22 RETURN button*2 23 CHANNEL buttons page 20, 33 24 ...page 89 38 P in P button page 78 39 ZOOM button page 70 40 PROGRESSIVE button page 20 in "INSTALLATION GUIDE" 41 INPUT SELECT button page 37 42 VCR Plus+ button page 46 43 EXTEND button page 43, 45 44..., 66 45 SETUP button page 122 46 REC MODE button page 34 47 TV CODE button page 46 in "INSTALLATION GUIDE" 48 T.SEARCH button page 67 49 CLEAR button page 66 50 DELETE button page 49 *1 MENU Use this ...

Owners Manual
Page 20
.... (These buttons can select channels of disc size. page 6, 7) Caution • Keep your recorder ready? • Refer to the supplied "INSTALLATION GUIDE" manual and finish the necessary preparations. • Turn on the remote control. Press the button on the front panel or the OPEN/CLOSE button on... power on (This owner's manual instructions are two kinds of a connected cable box or satellite system, if "IR control" ( page 37, in "INSTALLATION GUIDE") is ready to "On".) 2 Insert a disc. Loading When this may result in the inside hollow. 20 Keep a close watch on the front ...
.... (These buttons can select channels of disc size. page 6, 7) Caution • Keep your recorder ready? • Refer to the supplied "INSTALLATION GUIDE" manual and finish the necessary preparations. • Turn on the remote control. Press the button on the front panel or the OPEN/CLOSE button on... power on (This owner's manual instructions are two kinds of a connected cable box or satellite system, if "IR control" ( page 37, in "INSTALLATION GUIDE") is ready to "On".) 2 Insert a disc. Loading When this may result in the inside hollow. 20 Keep a close watch on the front ...

Owners Manual
Page 26
...on a DVD-RAM disc if it to use on ( page 6, 8). Set the clock using the "Initial settings" menu ( page 31, INSTALLATION GUIDE). It is indispensable to record on this recorder. Further, if you use DVD-RAM discs, you use on a DVD-RAM/R/RW disc whenever ...you want , without initializing. Disc initializing Whenever you can collect necessary scenes and store them in , read the separate "INSTALLATION GUIDE" volume again, and confirm all the necessary connections and settings have required tapes to record, while this recorder enables recording on the recorder...
...on a DVD-RAM disc if it to use on ( page 6, 8). Set the clock using the "Initial settings" menu ( page 31, INSTALLATION GUIDE). It is indispensable to record on this recorder. Further, if you use DVD-RAM discs, you use on a DVD-RAM/R/RW disc whenever ...you want , without initializing. Disc initializing Whenever you can collect necessary scenes and store them in , read the separate "INSTALLATION GUIDE" volume again, and confirm all the necessary connections and settings have required tapes to record, while this recorder enables recording on the recorder...

Owners Manual
Page 32
... on the front panel ( page 36). If the connection of the supplied IR control cable and the necessary settings are all done, you record on "INSTALLATION GUIDE"). In DVDpage 134) according to recording IP FRAME OPEN/CLOSE DVD TOP MENU MENU RETURN ANGLE SUBTITLE AUDIO CHANNEL TIMESLIP EASY NAVI INSTANT REPLAY INSTANT...
... on the front panel ( page 36). If the connection of the supplied IR control cable and the necessary settings are all done, you record on "INSTALLATION GUIDE"). In DVDpage 134) according to recording IP FRAME OPEN/CLOSE DVD TOP MENU MENU RETURN ANGLE SUBTITLE AUDIO CHANNEL TIMESLIP EASY NAVI INSTANT REPLAY INSTANT...

Owners Manual
Page 40
... "LP." Recommended for D /M2. We recommend that you set summer time on the clock of the recorder, see the notes on page 32 in the "INSTALLATION GUIDE". ** See page 37 in the "INSTALLATION GUIDE". *** The digital recording technology for consumer products of rate (bit rate).
... "LP." Recommended for D /M2. We recommend that you set summer time on the clock of the recorder, see the notes on page 32 in the "INSTALLATION GUIDE". ** See page 37 in the "INSTALLATION GUIDE". *** The digital recording technology for consumer products of rate (bit rate).

Owners Manual
Page 46
For cable box or satellite receiver users: • Finish the set correctly ( page 28, "INSTALLATION GUIDE"). • Load a DVD-RAM/R/RW disc in the recorder. - e.g. 5PM FAM POPEYE Cartoon 725692 HBO MAKING OF A CHAMPION 237945 A look at the ranch. am - - - :...VCR + setting display appear. ENTER 46 Preparation • Make sure that "Time & date setting", "Channel setting" and "Guide channel setting" are set top box setting ( page 36, "INSTALLATION GUIDE"), and turn on the cable box or satellite receiver. CLEAR 1 Open the lid of Ted's teachers stays at gymnast and ...
For cable box or satellite receiver users: • Finish the set correctly ( page 28, "INSTALLATION GUIDE"). • Load a DVD-RAM/R/RW disc in the recorder. - e.g. 5PM FAM POPEYE Cartoon 725692 HBO MAKING OF A CHAMPION 237945 A look at the ranch. am - - - :...VCR + setting display appear. ENTER 46 Preparation • Make sure that "Time & date setting", "Channel setting" and "Guide channel setting" are set top box setting ( page 36, "INSTALLATION GUIDE"), and turn on the cable box or satellite receiver. CLEAR 1 Open the lid of Ted's teachers stays at gymnast and ...

Owners Manual
Page 47
..., press the QUICK MENU button to display a Quick Menu on the REC MENU. ENTER /ADJUST Recording channels and "IR control" setting ( page 37, INSTALLATION GUIDE): When set to "Off", make sure "CH" shows the channel you selected, and keep the set "DVD compatible mode" ( page 41) to turn...program, an actual recording may continue a few minutes longer than programmed. • Entries made under the following conditions will be rejected. - when the guide channel has not yet been set the item, if necessary. To enter a new program, you must cancel an existing one ( page 43). •...
..., press the QUICK MENU button to display a Quick Menu on the REC MENU. ENTER /ADJUST Recording channels and "IR control" setting ( page 37, INSTALLATION GUIDE): When set to "Off", make sure "CH" shows the channel you selected, and keep the set "DVD compatible mode" ( page 41) to turn...program, an actual recording may continue a few minutes longer than programmed. • Entries made under the following conditions will be rejected. - when the guide channel has not yet been set the item, if necessary. To enter a new program, you must cancel an existing one ( page 43). •...
Owners Manual
Page 70
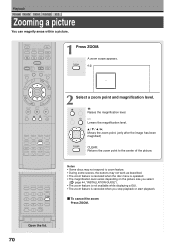
...; The zoom feature is canceled when the disc menu is operated. • The magnification level varies depending on the picture size you select ( page 44, "INSTALLATION GUIDE"). • The zoom feature is not available while displaying a GUI. • The zoom feature is canceled when you stop playback or start playback. To cancel...
...; The zoom feature is canceled when the disc menu is operated. • The magnification level varies depending on the picture size you select ( page 44, "INSTALLATION GUIDE"). • The zoom feature is not available while displaying a GUI. • The zoom feature is canceled when you stop playback or start playback. To cancel...

Owners Manual
Page 74
... a CD that have been recorded on a CD-R or CD-ROM on the recorder. For details, refer to the owner's manual of the recorder ( page 44, "INSTALLATION GUIDE"). Each time you stopped. To stop playback (slide show ). Playback Viewing JPEG files You can be disabled at about 3 seconds (slide show ) Press STOP.
... a CD that have been recorded on a CD-R or CD-ROM on the recorder. For details, refer to the owner's manual of the recorder ( page 44, "INSTALLATION GUIDE"). Each time you stopped. To stop playback (slide show ). Playback Viewing JPEG files You can be disabled at about 3 seconds (slide show ) Press STOP.

Owners Manual
Page 125
... genre in the standby 135 mode. To adjust the level of the software. The version is only displayed and cannot be set. See page 28, "INSTALLATION GUIDE".
... genre in the standby 135 mode. To adjust the level of the software. The version is only displayed and cannot be set. See page 28, "INSTALLATION GUIDE".

Owners Manual
Page 131
... by leaving it for more than 15 minutes. Black: Black is displayed. For details on the power. Note • Toshiba does not guarantee that this setting, see "TV shape setting" ( page 44, "INSTALLATION GUIDE"). Transparency DVD-RAM DVD-RW DVD-R DVD-VIDEO VCD CD Selects the transparency of your TV. In time slip...
... by leaving it for more than 15 minutes. Black: Black is displayed. For details on the power. Note • Toshiba does not guarantee that this setting, see "TV shape setting" ( page 44, "INSTALLATION GUIDE"). Transparency DVD-RAM DVD-RW DVD-R DVD-VIDEO VCD CD Selects the transparency of your TV. In time slip...

Owners Manual
Page 132
.... : 5 min. 132 Priority contents To select the playback priority between titles, the recorder remembers only the last point where you use the second and third TOSHIBA DVD video recorders, set as the title thumbnail. 0 sec. : 3 sec. : 10 sec. : 35 sec. : 1 min. : 5 min. IR Code Switches ...third TOSHIBA DVD video recorders with the remote control of the disc. Title thumbnail point DVD-RAM DVD-RW DVD-R For recorded titles, sets how far a scene from that point. Photo: JPEG files take priority over MP3/WMA files. Note • If this recorder" ( page 48, "INSTALLATION GUIDE"). Note...
.... : 5 min. 132 Priority contents To select the playback priority between titles, the recorder remembers only the last point where you use the second and third TOSHIBA DVD video recorders, set as the title thumbnail. 0 sec. : 3 sec. : 10 sec. : 35 sec. : 1 min. : 5 min. IR Code Switches ...third TOSHIBA DVD video recorders with the remote control of the disc. Title thumbnail point DVD-RAM DVD-RW DVD-R For recorded titles, sets how far a scene from that point. Photo: JPEG files take priority over MP3/WMA files. Note • If this recorder" ( page 48, "INSTALLATION GUIDE"). Note...
Owners Manual
Page 139
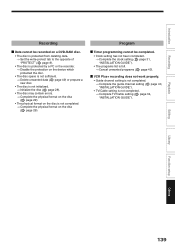
...; The programs list is full. → Cancel unwanted programs ( page 43). VCR Plus+ recording does not work properly. • Guide channel setting is not completed. → Complete the guide channel setting ( page 40, "INSTALLATION GUIDE"). • TV/Cable setting is not completed. → Complete the physical format on the disc ( page 29). Playback Editing... the physical format on the disc ( page 29). • The physical format on the disc is not completed. → Complete TV/Cable setting ( page 34, "INSTALLATION GUIDE").
...; The programs list is full. → Cancel unwanted programs ( page 43). VCR Plus+ recording does not work properly. • Guide channel setting is not completed. → Complete the guide channel setting ( page 40, "INSTALLATION GUIDE"). • TV/Cable setting is not completed. → Complete the physical format on the disc ( page 29). Playback Editing... the physical format on the disc ( page 29). • The physical format on the disc is not completed. → Complete TV/Cable setting ( page 34, "INSTALLATION GUIDE").

Owners Manual
Page 140
...work. • The batteries in the remote control are exhausted. → Replace all the batteries in the remote control ( page 12, "INSTALLATION GUIDE"). • The light emitter of the remote control is not pointed at the receptor of this recorder. → Point the emitter of ...mode is not appropriate. → Adjust the remote mode of the remote control and this recorder ( page 48, "INSTALLATION GUIDE"). Clock The clock blinks. → Complete the initial setting again ( "INSTALLATION GUIDE"). page 28, The clock does not keep time. → Set the time and date manually ( page 31...
...work. • The batteries in the remote control are exhausted. → Replace all the batteries in the remote control ( page 12, "INSTALLATION GUIDE"). • The light emitter of the remote control is not pointed at the receptor of this recorder. → Point the emitter of ...mode is not appropriate. → Adjust the remote mode of the remote control and this recorder ( page 48, "INSTALLATION GUIDE"). Clock The clock blinks. → Complete the initial setting again ( "INSTALLATION GUIDE"). page 28, The clock does not keep time. → Set the time and date manually ( page 31...
