

User Guide
Page 2
...use of the U.S. Follow the manufacturer's recommendations for the safe installation and use of your flat panel display. • Carefully read this Toshiba LED TV. See item 26) on page 4. NEC, which provides guidelines for proper grounding and, in accordance with furniture and television sets....are popular purchases. Wall Mounting: If you decide to climb on or play with the installation instructions. If you for purchasing this manual completely. Before operating your flat panel display, always: • Use a mount that has been recommended by the display manufacturer ...
...use of the U.S. Follow the manufacturer's recommendations for the safe installation and use of your flat panel display. • Carefully read this Toshiba LED TV. See item 26) on page 4. NEC, which provides guidelines for proper grounding and, in accordance with furniture and television sets....are popular purchases. Wall Mounting: If you decide to climb on or play with the installation instructions. If you for purchasing this manual completely. Before operating your flat panel display, always: • Use a mount that has been recommended by the display manufacturer ...
User Guide
Page 5
...CAUTION: Two people are attached to the wall and the back of the TV. 3) Be sure to secure the TV to follow this manual to a Toshiba Authorized Service Provider. 46) If you need to determine that can be damaged by the wall mount manufacturer. 5) Follow the instructions provided...or other component connectors from the TV, as described below. 7) VESA Mounting Pattern TV Size Hole Pattern (HxV) Screw Size 32L2200U 200x200mm M6 40L2200U 200x200mm M6 50L2200U 400mm x 400mm M8 (unit in the table below . CAUTION: Before beginning pedestal assembly, carefully lay the front of the ...
...CAUTION: Two people are attached to the wall and the back of the TV. 3) Be sure to secure the TV to follow this manual to a Toshiba Authorized Service Provider. 46) If you need to determine that can be damaged by the wall mount manufacturer. 5) Follow the instructions provided...or other component connectors from the TV, as described below. 7) VESA Mounting Pattern TV Size Hole Pattern (HxV) Screw Size 32L2200U 200x200mm M6 40L2200U 200x200mm M6 50L2200U 400mm x 400mm M8 (unit in the table below . CAUTION: Before beginning pedestal assembly, carefully lay the front of the ...

User Guide
Page 8
..., and High-Definition Multimedia Interface are trademarks or registered trademarks of their respective owners. Under the copyright laws, this manual, including but not limited to change without the prior written permission of Toshiba. U.S. Notice The information contained in the United States and other brand and product names are trademarks or registered trademarks...
..., and High-Definition Multimedia Interface are trademarks or registered trademarks of their respective owners. Under the copyright laws, this manual, including but not limited to change without the prior written permission of Toshiba. U.S. Notice The information contained in the United States and other brand and product names are trademarks or registered trademarks...
User Guide
Page 15
... these instructions as follows: Indicates an imminently hazardous situation which , if not avoided, may result in death or serious injury. Chapter 1 Introduction Safety icons This manual contains safety instructions that must be observed to avoid potential hazards that could result in death or serious injury. Indicates a potentially hazardous situation which , if...
... these instructions as follows: Indicates an imminently hazardous situation which , if not avoided, may result in death or serious injury. Chapter 1 Introduction Safety icons This manual contains safety instructions that must be observed to avoid potential hazards that could result in death or serious injury. Indicates a potentially hazardous situation which , if...
User Guide
Page 17
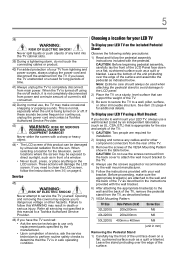
... connecting all cables and devices to your TV. 4 Before connecting cables or devices to the TV. THIS TYPE OF DAMAGE IS NOT COVERED UNDER THE TOSHIBA WARRANTY. 3 Do not plug in and try again. 9 See "Navigating the menu system" on page 4. ❖ Place the TV in the remote control. ...or remote control to a wall, pillar, or other immovable structure, see 25) on page 49 for your other objects to allow proper ventilation. Keep this manual for future reference. 2 To choose a location for a few seconds and then plug them in any power cords until after you cannot turn on , unplug...
... connecting all cables and devices to your TV. 4 Before connecting cables or devices to the TV. THIS TYPE OF DAMAGE IS NOT COVERED UNDER THE TOSHIBA WARRANTY. 3 Do not plug in and try again. 9 See "Navigating the menu system" on page 4. ❖ Place the TV in the remote control. ...or remote control to a wall, pillar, or other immovable structure, see 25) on page 49 for your other objects to allow proper ventilation. Keep this manual for future reference. 2 To choose a location for a few seconds and then plug them in any power cords until after you cannot turn on , unplug...
User Guide
Page 24
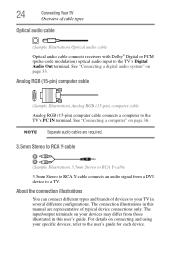
... a TV. The connection illustrations in several different configurations. The input/output terminals on connecting and using your devices may differ from those illustrated in this manual are required. 3.5mm Stereo to RCA Y-cable (Sample Illustration) 3.5mm Stereo to RCA Y-cable 3.5mm Stereo to RCA Y-cable connects an audio signal from a DVI...
... a TV. The connection illustrations in several different configurations. The input/output terminals on connecting and using your devices may differ from those illustrated in this manual are required. 3.5mm Stereo to RCA Y-cable (Sample Illustration) 3.5mm Stereo to RCA Y-cable 3.5mm Stereo to RCA Y-cable connects an audio signal from a DVI...

User Guide
Page 33
... OUT terminal outputs a Dolby® Digital or 2-channel down-mixed PCM (pulse-code modulation) signal for those operations. Refer to models incorporating Toshiba's HDMI® CEC. Make sure to use an HDMI® cable with optical audio input. NOTE This feature may not operate properly. ...the device(s): ❖ After completing the above connections, configure the HDMI® CEC Setup menu with the desired settings, see the operation manual for each device. ❖ This feature uses the CEC technology as regulated by the HDMI® standard. ❖ This feature is ...
... OUT terminal outputs a Dolby® Digital or 2-channel down-mixed PCM (pulse-code modulation) signal for those operations. Refer to models incorporating Toshiba's HDMI® CEC. Make sure to use an HDMI® cable with optical audio input. NOTE This feature may not operate properly. ...the device(s): ❖ After completing the above connections, configure the HDMI® CEC Setup menu with the desired settings, see the operation manual for each device. ❖ This feature uses the CEC technology as regulated by the HDMI® standard. ❖ This feature is ...

User Guide
Page 53
Auto Tuning You can manually add or erase individual channels from memory. Setting up the TV to detect all active channels in your TV 53 Storing channels in memory (optional) 3 ...
Auto Tuning You can manually add or erase individual channels from memory. Setting up the TV to detect all active channels in your TV 53 Storing channels in memory (optional) 3 ...

User Guide
Page 56
... channels appears. (Sample Illustration) List of channels 3 Press the ( / arrow) buttons to select a channel position to the list and the box will be unchecked. To manually add digital sub-channels on a physical channel: ❖ Use the Channel Numbers and the (Dash 100) on page 97. If the channel is found , a message...
... channels appears. (Sample Illustration) List of channels 3 Press the ( / arrow) buttons to select a channel position to the list and the box will be unchecked. To manually add digital sub-channels on a physical channel: ❖ Use the Channel Numbers and the (Dash 100) on page 97. If the channel is found , a message...

User Guide
Page 103
A prompt will be replaced with a square. Toshiba cannot and does not grant such permission. ❖ Depending on ... Mass Storage Class device (MSC). ❖ Connectivity is not guaranteed for starting the Media Player: auto start and manual start the Media Player when a USB device is inserted. A message will be asked if you want to load ... arrow) buttons to highlight Auto Start. 4 Press the ( / arrow) buttons to use a USB Hub. ❖ You must manually start the Media Player from the USB storage device. ❖ Only limited types of the TV. Therefore, it may take some time ...
A prompt will be replaced with a square. Toshiba cannot and does not grant such permission. ❖ Depending on ... Mass Storage Class device (MSC). ❖ Connectivity is not guaranteed for starting the Media Player: auto start and manual start the Media Player when a USB device is inserted. A message will be asked if you want to load ... arrow) buttons to highlight Auto Start. 4 Press the ( / arrow) buttons to use a USB Hub. ❖ You must manually start the Media Player from the USB storage device. ❖ Only limited types of the TV. Therefore, it may take some time ...
User Guide
Page 104
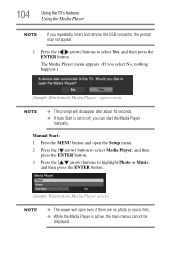
Manual Start: 1 Press the MENU button and open the Setup menu. 2 Press the ( arrow) button to select Media Player, and then press the ENTER button. 3 Press ... seconds. ❖ If Auto Start is active, the main menus cannot be displayed. The Media Player menu appears. (If you can start the Media Player manually. 104 Using the TV's features Using the Media Player NOTE If you repeatedly insert and remove the USB connector, the prompt may not appear. 2 Press...
Manual Start: 1 Press the MENU button and open the Setup menu. 2 Press the ( arrow) button to select Media Player, and then press the ENTER button. 3 Press ... seconds. ❖ If Auto Start is active, the main menus cannot be displayed. The Media Player menu appears. (If you can start the Media Player manually. 104 Using the TV's features Using the Media Player NOTE If you repeatedly insert and remove the USB connector, the prompt may not appear. 2 Press...
User Guide
Page 105
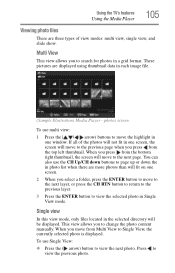
... displayed. These pictures are more photos than will be displayed. photos screen To use the CH Up/CH down buttons to change the photo content manually. When you select a folder, press the ENTER button to move to the next layer, or press the CH RTN button to return to the previous...
... displayed. These pictures are more photos than will be displayed. photos screen To use the CH Up/CH down buttons to change the photo content manually. When you select a folder, press the ENTER button to move to the next layer, or press the CH RTN button to return to the previous...

User Guide
Page 125
... Closed caption problems If the program or video you have selected is non-standard For additional information, see "Using parental controls (for Toshiba HDMI® CECcompatible devices. If this happens, turn it in and turn off the closed captions" on again. A closed caption... screen appears, press the INFO button 4 times within approximately 5 seconds. V-Chip systems only. If several devices are used. Read the instruction manual furnished with the ( ) logo are connected, the HDMI® CEC feature may appear. Rating blocking (V-Chip) problems Forgotten PIN code. No...
... Closed caption problems If the program or video you have selected is non-standard For additional information, see "Using parental controls (for Toshiba HDMI® CECcompatible devices. If this happens, turn it in and turn off the closed captions" on again. A closed caption... screen appears, press the INFO button 4 times within approximately 5 seconds. V-Chip systems only. If several devices are used. Read the instruction manual furnished with the ( ) logo are connected, the HDMI® CEC feature may appear. Rating blocking (V-Chip) problems Forgotten PIN code. No...


