Owners Manual
Page 5
...interference will disappear in a short period of time. 2) The LCD panel contained in this equipment does cause harmful interference to radio or ...Toshiba is not a sign of SRS Labs, Inc. Note: Interactive video games that does not operate properly (does not light, remains constantly lit, etc.). FCC Compliance Statement (Part 15): The Toshiba 26HLC56, 32HLC56, and 37HLC56 LCD...interference in accordance with the limits for a Class B device, pursuant to these rules is displayed for future reference. Please read all the safety and operating instructions carefully, and keep the ...
...interference will disappear in a short period of time. 2) The LCD panel contained in this equipment does cause harmful interference to radio or ...Toshiba is not a sign of SRS Labs, Inc. Note: Interactive video games that does not operate properly (does not light, remains constantly lit, etc.). FCC Compliance Statement (Part 15): The Toshiba 26HLC56, 32HLC56, and 37HLC56 LCD...interference in accordance with the limits for a Class B device, pursuant to these rules is displayed for future reference. Please read all the safety and operating instructions carefully, and keep the ...
Owners Manual
Page 6
...your new monitor 7 Front and side panel controls and connections 8 Back panel connections 9 Chapter 2: Connecting your Monitor ...Selecting the video input source to view 25 Labeling the video input sources... 25 Selecting the picture size 26 Adjusting the Picture Position 27 Using the auto aspect ratio feature 28 Using the blue screen function 28 Selecting the gray level for 4:3 mode side panels... Using the closed caption mode 32 Closed Caption Reception Adjustment 32 Adjusting the audio 33 Muting ...38 Setting the On timer 39 Displaying the monitor's settings on-screen ...
...your new monitor 7 Front and side panel controls and connections 8 Back panel connections 9 Chapter 2: Connecting your Monitor ...Selecting the video input source to view 25 Labeling the video input sources... 25 Selecting the picture size 26 Adjusting the Picture Position 27 Using the auto aspect ratio feature 28 Using the blue screen function 28 Selecting the gray level for 4:3 mode side panels... Using the closed caption mode 32 Closed Caption Reception Adjustment 32 Adjusting the audio 33 Muting ...38 Setting the On timer 39 Displaying the monitor's settings on-screen ...
Owners Manual
Page 7
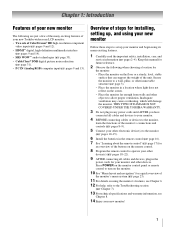
...technologies (- pages 18-22). 9 AFTER connecting all cables and devices to your new Toshiba widescreen LCD monitor: • Two sets of ColorStream® HD high-resolution component video inputs (- pages 9 and 12). • HDMI™ digital, high-definition multimedia ...interface (- pages 10-15). 6 Install the batteries in the power cords for your new monitor! 7 page 23). 11 For details on the monitor control panel...
...technologies (- pages 18-22). 9 AFTER connecting all cables and devices to your new Toshiba widescreen LCD monitor: • Two sets of ColorStream® HD high-resolution component video inputs (- pages 9 and 12). • HDMI™ digital, high-definition multimedia ...interface (- pages 10-15). 6 Install the batteries in the power cords for your new monitor! 7 page 23). 11 For details on the monitor control panel...
Owners Manual
Page 8
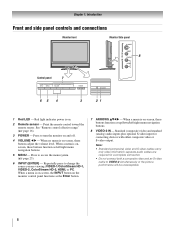
When a menu is on-screen, the INPUT button on the monitor control panel functions as the Enter button. 7 ARROWS BbC c - Note: • Standard (composite) video and S-video cables carry only video information; Chapter 1: Introduction Front and side panel controls and connections Monitor front Monitor Side panel 8 Control panel 7 65 4 3 21 1 Red LED - See "Remote control effective range" (- page...
When a menu is on-screen, the INPUT button on the monitor control panel functions as the Enter button. 7 ARROWS BbC c - Note: • Standard (composite) video and S-video cables carry only video information; Chapter 1: Introduction Front and side panel controls and connections Monitor front Monitor Side panel 8 Control panel 7 65 4 3 21 1 Red LED - See "Remote control effective range" (- page...

Owners Manual
Page 9
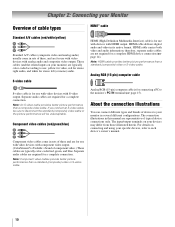
...terminals and ColorStream HD-1 is the current input mode, the VIDEO-1 input terminals will not carry any signals. 5 PC IN - page 15). 6 HDMI™ IN - also page 14). Chapter 1: Introduction Back panel connections For an explanation of shared analog audio inputs (shared between...the Set Up menu (- page 10). Note: VIDEO-1 input terminals are trademarks or registered trademarks of ColorStream® high-definition component video inputs (with analog audio inputs) for connecting devices with component video output, such as a Toshiba DVD player with ColorStream HD-1 input terminals. ...
...terminals and ColorStream HD-1 is the current input mode, the VIDEO-1 input terminals will not carry any signals. 5 PC IN - page 15). 6 HDMI™ IN - also page 14). Chapter 1: Introduction Back panel connections For an explanation of shared analog audio inputs (shared between...the Set Up menu (- page 10). Note: VIDEO-1 input terminals are trademarks or registered trademarks of ColorStream® high-definition component video inputs (with analog audio inputs) for connecting devices with component video output, such as a Toshiba DVD player with ColorStream HD-1 input terminals. ...
Owners Manual
Page 10
...stereo left (or mono) audio. HDMI cable carries both video and audio information; Component video cables (red/green/blue) Analog RGB (15-pin) computer cable is Toshiba's brand of component video.) These cables are for use : yellow for video, red for stereo right audio, and white for use with... devices with S-video output. The input/output terminals on connecting and using your specific devices...
...stereo left (or mono) audio. HDMI cable carries both video and audio information; Component video cables (red/green/blue) Analog RGB (15-pin) computer cable is Toshiba's brand of component video.) These cables are for use : yellow for video, red for stereo right audio, and white for use with... devices with S-video output. The input/output terminals on connecting and using your specific devices...
Owners Manual
Page 11
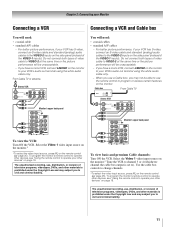
... programs, videotapes, DVDs, and other devices, see "Using the remote control to TV VIDEO AUDIO L R IN OUT L R Monitor's upper back panel To view the VCR: Turn ON the VCR. Select the Video 1 video input source on the side panel (instead of video cable to your VCR's audio out terminal using the white audio cable only. - Do...
... programs, videotapes, DVDs, and other devices, see "Using the remote control to TV VIDEO AUDIO L R IN OUT L R Monitor's upper back panel To view the VCR: Turn ON the VCR. Select the Video 1 video input source on the side panel (instead of video cable to your VCR's audio out terminal using the white audio cable only. - Do...
Owners Manual
Page 12
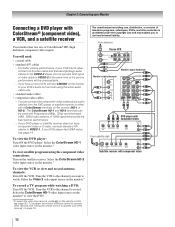
... AUDIO L R IN IN OUT L R Monitor's upper back panel Monitor's right side panel Y PB PR DVD player with component video AUDIO OUT L S-VIDEO COMPONENT VIDEO VIDEO R OUT OUT From satellite dish Y PB PR AUDIO OUT L Satellite S-VIDEO COMPONENT VIDEO VIDEO R IN OUT OUT Satellite receiver with component video 12 Select the ColorStream HD-2 video input source on the monitor.* To record a TV...
... AUDIO L R IN IN OUT L R Monitor's upper back panel Monitor's right side panel Y PB PR DVD player with component video AUDIO OUT L S-VIDEO COMPONENT VIDEO VIDEO R OUT OUT From satellite dish Y PB PR AUDIO OUT L Satellite S-VIDEO COMPONENT VIDEO VIDEO R IN OUT OUT Satellite receiver with component video 12 Select the ColorStream HD-2 video input source on the monitor.* To record a TV...
Owners Manual
Page 13
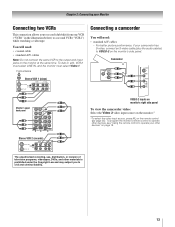
... VCR ("VCR2") while watching a videotape. Chapter 2: Connecting your Monitor Connecting two VCRs This connection allows you to VIDEO-2 on the monitor's side panel. page 25). For better picture performance, if your other materials is prohibited under the Copyright Law and may subject... output and input jacks on the remote control (- Camcorder VIDEO AUDIO OUT L R Monitor's upper back panel VIDEO-2 inputs on monitor's right side panel To view the camcorder video: Select the Video 2 video input source on the monitor.* *To select the video input source, press + on the monitor at the same...
... VCR ("VCR2") while watching a videotape. Chapter 2: Connecting your Monitor Connecting two VCRs This connection allows you to VIDEO-2 on the monitor's side panel. page 25). For better picture performance, if your other materials is prohibited under the Copyright Law and may subject... output and input jacks on the remote control (- Camcorder VIDEO AUDIO OUT L R Monitor's upper back panel VIDEO-2 inputs on monitor's right side panel To view the camcorder video: Select the Video 2 video input source on the monitor.* *To select the video input source, press + on the monitor at the same...

Owners Manual
Page 14
...video...video from an HDMI source device, or uncompressed digital video from a DVI (Digital Visual Interface) source device. HDMI device VIDEO AUDIO L R IN IN HDMI OUT OUT L R Monitor's lower back panel...VIDEO AUDIO L R IN IN DVI / HDCP OUT OUT L R Monitor's upper back panel Monitor's lower back panel... Note: To ensure that the HDMI or DVI device is reset properly, it is recommended that include a PC IN (VGA) port are trademarks or registered trademarks of an HDMI-to -DVI adapter cable transfers video...of highdefinition video signals. ...
...video...video from an HDMI source device, or uncompressed digital video from a DVI (Digital Visual Interface) source device. HDMI device VIDEO AUDIO L R IN IN HDMI OUT OUT L R Monitor's lower back panel...VIDEO AUDIO L R IN IN DVI / HDCP OUT OUT L R Monitor's upper back panel Monitor's lower back panel... Note: To ensure that the HDMI or DVI device is reset properly, it is recommended that include a PC IN (VGA) port are trademarks or registered trademarks of an HDMI-to -DVI adapter cable transfers video...of highdefinition video signals. ...
Owners Manual
Page 15
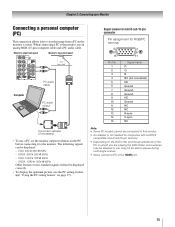
SVGA: 800 5 600 @ 60Hz - SXGA: 1280 5 1024 @ 60Hz Other formats or non-standard signals will not be displayed correctly. • To display the optimum picture, use an analog RGB (15-pin) computer cable and a PC audio cable. "Using the PC setting feature" on the PC...terminal. • Depending on the DVD's title and the specifications of the PC on which you are playing the DVD-Video, some scenes may be displayed: - Monitor's upper back panel Monitor's lower back panel Computer PC audio cable PC audio output Conversion adapter (if necessary) • To use a PC, set the monitor ...
SVGA: 800 5 600 @ 60Hz - SXGA: 1280 5 1024 @ 60Hz Other formats or non-standard signals will not be displayed correctly. • To display the optimum picture, use an analog RGB (15-pin) computer cable and a PC audio cable. "Using the PC setting feature" on the PC...terminal. • Depending on the DVD's title and the specifications of the PC on which you are playing the DVD-Video, some scenes may be displayed: - Monitor's upper back panel Monitor's lower back panel Computer PC audio cable PC audio output Conversion adapter (if necessary) • To use a PC, set the monitor ...
Owners Manual
Page 17
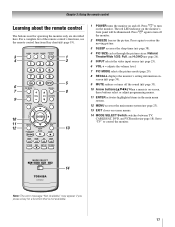
page 26). 5 INPUT selects the video input source (- The red LED indicator on -screen menus. 14 MODE SELECT... on and off the sound (- adjusts the volume level. 7 PIC MODE selects the picture mode (page 29). 8 RECALL displays the monitor's setting information onscreen (- Press p to restore the moving picture. 3 SLEEP accesses the sleep timer (- Set to... Press p again to control the monitor. page 23). 13 EXIT closes on the monitor's front panel will be illuminated. page 38). 4 PIC SIZE cycles through the pictures sizes: Natural, TheaterWide 1/2/3, Full, and 4:3 HD (- page ...
page 26). 5 INPUT selects the video input source (- The red LED indicator on -screen menus. 14 MODE SELECT... on and off the sound (- adjusts the volume level. 7 PIC MODE selects the picture mode (page 29). 8 RECALL displays the monitor's setting information onscreen (- Press p to restore the moving picture. 3 SLEEP accesses the sleep timer (- Set to... Press p again to control the monitor. page 23). 13 EXIT closes on the monitor's front panel will be illuminated. page 38). 4 PIC SIZE cycles through the pictures sizes: Natural, TheaterWide 1/2/3, Full, and 4:3 HD (- page ...
Owners Manual
Page 19
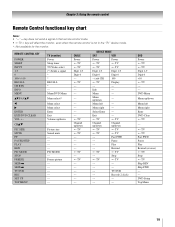
... MUTE FF PAUSE/STEP PLAY REW PIC MODE STOP FREEZE SKIP Z SKIP z TV/VCR REC SET UP TOP MENU TV (monitor) Power Sleep timer TV/Video select (*) Sends a signal * * RECALL * --Menu/DVD Menu Menu select/* Menu select Menu select Enter Exit Volume up/down * Picture size Sound mute --------PIC MODE --Freeze... Channel up /down s TV s TV --------s TV --s TV DEVICE MODE SAT VCR Power s TV s TV Power s TV s TV Digit 1-9 Digit 1-9 Digit 0 Digit 0 - (sub CH) s TV 100 Display --- --- Menu left Menu right Enter DVD Clear s TV ---
... MUTE FF PAUSE/STEP PLAY REW PIC MODE STOP FREEZE SKIP Z SKIP z TV/VCR REC SET UP TOP MENU TV (monitor) Power Sleep timer TV/Video select (*) Sends a signal * * RECALL * --Menu/DVD Menu Menu select/* Menu select Menu select Enter Exit Volume up/down * Picture size Sound mute --------PIC MODE --Freeze... Channel up /down s TV s TV --------s TV --s TV DEVICE MODE SAT VCR Power s TV s TV Power s TV s TV Digit 1-9 Digit 1-9 Digit 0 Digit 0 - (sub CH) s TV 100 Display --- --- Menu left Menu right Enter DVD Clear s TV ---
Owners Manual
Page 21
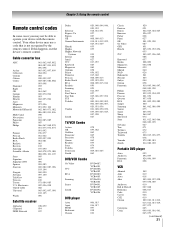
...JVC Kenwood Magnavox Optimus Pansat Primestar Proscan Radio Shack RCA Realistic Samsung Sony Star Choice Star Trak STS Toshiba Uniden Zenith 020, 040, 044, 046, 050, 053 018, 041, 051 057 027 008, ...Goldstar Panasonic Precision Quasar Realistic Sony Toshiba Totevision Zenith 078 059, 062 065 065 078 065 079 074 057 009, 010, 065 065 DVD/VCR Combo Go Video JVC RCA Samsung Sanyo Zenith DVD... Panasonic Philips Pioneer Proscan Qwestar RCA Sampo Samsung Sansui Sanyo Sharp Sherwood Sony Sylvania Teac Technics Techwood Toshiba Yamaha Zenith 020 021 022, 023, 024, 025 026, 027 028 027 001, 029, ...
...JVC Kenwood Magnavox Optimus Pansat Primestar Proscan Radio Shack RCA Realistic Samsung Sony Star Choice Star Trak STS Toshiba Uniden Zenith 020, 040, 044, 046, 050, 053 018, 041, 051 057 027 008, ...Goldstar Panasonic Precision Quasar Realistic Sony Toshiba Totevision Zenith 078 059, 062 065 065 078 065 079 074 057 009, 010, 065 065 DVD/VCR Combo Go Video JVC RCA Samsung Sanyo Zenith DVD... Panasonic Philips Pioneer Proscan Qwestar RCA Sampo Samsung Sansui Sanyo Sharp Sherwood Sony Sylvania Teac Technics Techwood Toshiba Yamaha Zenith 020 021 022, 023, 024, 025 026, 027 028 027 001, 029, ...
Owners Manual
Page 22
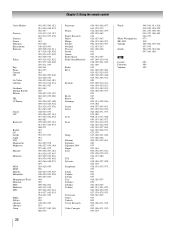
Chapter 3: Using the remote control Curtis Mathes Daewoo Daytron Denon Dimensia Electrohome Emerson Fisher Fuji Funai Garrard GE Go Video Goldstar Gradiente Harman Kardon Hitachi JBL JC Penney Jensen JVC Kenwood Kodak LG Lloyds Logik LXI Magnasonic Magnavox Marantz Memorex MGA MGN... Ricoh Runco Samsung Sansui Sanyo Scott Sears Sharp Shintom Signature Signature 2000 Singer Sony STS Sylvania Symphonic Tandy Tashiko Tatung Teac Technics Teknika Toshiba Totevision Unitec Unitech Vector Research Video Concepts 036, 045, 046, 057, 061, 072, 079 012, 024, 025, 035, 042, 053, 063 014 026, 027, 063 026...
Chapter 3: Using the remote control Curtis Mathes Daewoo Daytron Denon Dimensia Electrohome Emerson Fisher Fuji Funai Garrard GE Go Video Goldstar Gradiente Harman Kardon Hitachi JBL JC Penney Jensen JVC Kenwood Kodak LG Lloyds Logik LXI Magnasonic Magnavox Marantz Memorex MGA MGN... Ricoh Runco Samsung Sansui Sanyo Scott Sears Sharp Shintom Signature Signature 2000 Singer Sony STS Sylvania Symphonic Tandy Tashiko Tatung Teac Technics Teknika Toshiba Totevision Unitec Unitech Vector Research Video Concepts 036, 045, 046, 057, 061, 072, 079 012, 024, 025, 035, 042, 053, 063 014 026, 027, 063 026...
Owners Manual
Page 23
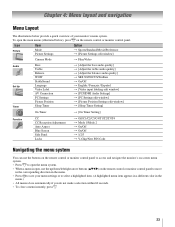
... or monitor control panel to save your monitor's menu system. Icon Picture Item Mode Picture Settings Option S Sports/Standard/Movie/Preference S [Picture Settings edit window] Cinema Mode S Film/Video Audio Set Up Timer Bass Treble Balance WOW StableSound Language Video Label AV Connection ...treble audio quality] S [Adjust the balance audio quality] S SRS 3D/FOCUS/TruBass S On/Off S English / Français / Español S [Video input labeling edit window] S [PC/HDMI Audio Settings] S [PC Settings edit window] S [Picture Position Settings edit window] S [Sleep Timer Setting] On ...
... or monitor control panel to save your monitor's menu system. Icon Picture Item Mode Picture Settings Option S Sports/Standard/Movie/Preference S [Picture Settings edit window] Cinema Mode S Film/Video Audio Set Up Timer Bass Treble Balance WOW StableSound Language Video Label AV Connection ...treble audio quality] S [Adjust the balance audio quality] S SRS 3D/FOCUS/TruBass S On/Off S English / Français / Español S [Video input labeling edit window] S [PC/HDMI Audio Settings] S [PC Settings edit window] S [Picture Position Settings edit window] S [Sleep Timer Setting] On ...

Owners Manual
Page 24
... HDMI or DVI device to Digital and will be grayed out. 24 page 14). Set Up Language Video Label AV Connection Picture Position English ENTER ENTER ENTER MENU Back EXIT Watch TV 3 Press C or c to display your Monitor Selecting the menu language You can choose from three different languages (English, French, and... Spanish) for the on-screen display of menus and messages. If PC/HDMI Audio is set to PC, the HDMI Audio setting is set the HDMI audio mode: 1 Press Y and open ...
... HDMI or DVI device to Digital and will be grayed out. 24 page 14). Set Up Language Video Label AV Connection Picture Position English ENTER ENTER ENTER MENU Back EXIT Watch TV 3 Press C or c to display your Monitor Selecting the menu language You can choose from three different languages (English, French, and... Spanish) for the on-screen display of menus and messages. If PC/HDMI Audio is set to PC, the HDMI Audio setting is set the HDMI audio mode: 1 Press Y and open ...
Owners Manual
Page 25
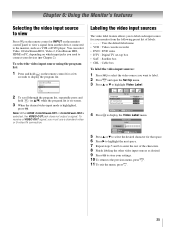
...INPUT on the monitor control panel to view a signal from the following preset list of the characters. 8 Finish labeling the other video input sources as a VCR or DVD player. Note: When HDMI, ColorStream HD1 or ColorStream HD2 is highlighted, press T. Video Label Label Video1 A ...jacks you must use a standard video or S-video IN connection. Labeling the video input sources The video label feature allows you want to label. 2 Press Y and open the Set Up menu. 3 Press B or b to display the Video Label menu. You can select Video 1/ColorStream HD1, Video 2, ColorStream HD2, HDMI or PC...
...INPUT on the monitor control panel to view a signal from the following preset list of the characters. 8 Finish labeling the other video input sources as a VCR or DVD player. Note: When HDMI, ColorStream HD1 or ColorStream HD2 is highlighted, press T. Video Label Label Video1 A ...jacks you must use a standard video or S-video IN connection. Labeling the video input sources The video label feature allows you want to label. 2 Press Y and open the Set Up menu. 3 Press B or b to display the Video Label menu. You can select Video 1/ColorStream HD1, Video 2, ColorStream HD2, HDMI or PC...
Owners Manual
Page 27
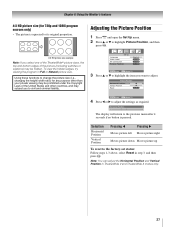
...174; picture sizes, the top and bottom edges of the United States and other countries, and may be hidden. Horizontal Position -2 - + The display will return to adjust. To view the hidden edges, try viewing the program in step 3, and then press T. Note: You can adjust the ...Horizontal Position and Vertical Position in TheaterWide 2 and TheaterWide 3 modes only. 27 Set Up Language Video Label AV Connection Picture Position English ENTER ENTER ENTER MENU Back EXIT Watch TV 3 Press B or b to highlight the item you want to ...
...174; picture sizes, the top and bottom edges of the United States and other countries, and may be hidden. Horizontal Position -2 - + The display will return to adjust. To view the hidden edges, try viewing the program in step 3, and then press T. Note: You can adjust the ...Horizontal Position and Vertical Position in TheaterWide 2 and TheaterWide 3 modes only. 27 Set Up Language Video Label AV Connection Picture Position English ENTER ENTER ENTER MENU Back EXIT Watch TV 3 Press B or b to highlight the item you want to ...
Owners Manual
Page 28
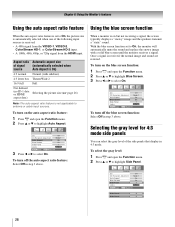
Once a signal is received: • A 480i signal from the VIDEO-1, VIDEO-2, ColorStream HD-1, or ColorStream HD-2 input. • A 1080i, 480i, 480p, or 720p signal from the HDMI input. To turn off the auto aspect ratio ... gray level: 1 Press Y and open the Function menu. 2 Press B or b to highlight Side Panel. Aspect ratio Automatic aspect size of the side panels that display in step 3 above . To turn on but not receiving a signal, the screen typically displays a "snowy" image and the speakers transmit a "static" sound. Function CC CC Reception Adjustment Auto...
Once a signal is received: • A 480i signal from the VIDEO-1, VIDEO-2, ColorStream HD-1, or ColorStream HD-2 input. • A 1080i, 480i, 480p, or 720p signal from the HDMI input. To turn off the auto aspect ratio ... gray level: 1 Press Y and open the Function menu. 2 Press B or b to highlight Side Panel. Aspect ratio Automatic aspect size of the side panels that display in step 3 above . To turn on but not receiving a signal, the screen typically displays a "snowy" image and the speakers transmit a "static" sound. Function CC CC Reception Adjustment Auto...


