Owners Manual
Page 1
...in the spaces below. Model number: Serial number: YC/M VX1A00011000 Refer to receive: (1) analog and/or digital broadcast signals from an antenna; LCD Monitor 26HLC56 32HLC56 37HLC56 NOTE: THIS MONITOR DOES NOT CONTAIN A TUNER A set-top box (i.e., cable box or analog/digital receiver) is required to these ... you communicate with your monitor. For an overview of steps for setting up your new monitor, see page 7. © 2006 TOSHIBA CORPORATION All Rights Reserved Owner's Record The model number and serial number are on the back of your Toshiba dealer about this owner's manual.
...in the spaces below. Model number: Serial number: YC/M VX1A00011000 Refer to receive: (1) analog and/or digital broadcast signals from an antenna; LCD Monitor 26HLC56 32HLC56 37HLC56 NOTE: THIS MONITOR DOES NOT CONTAIN A TUNER A set-top box (i.e., cable box or analog/digital receiver) is required to these ... you communicate with your monitor. For an overview of steps for setting up your new monitor, see page 7. © 2006 TOSHIBA CORPORATION All Rights Reserved Owner's Record The model number and serial number are on the back of your Toshiba dealer about this owner's manual.
Owners Manual
Page 2
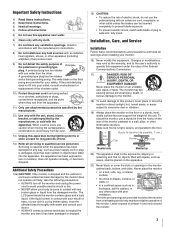
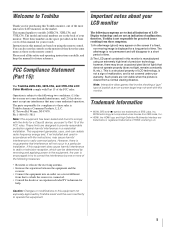
...the product's enclosure that may be securely attached to the wall (but never screw anything directly into the TV). See item 19 on your new LCD monitor. As you enjoy your TV (such as a VCR, remote control, or toy) that children can become excited while watching a program and...and educate consumers and their families about this owner's manual. As a result, TVs may reach for the size and weight of your purchase! Toshiba Cares! Use appropriate furniture large enough to persons. a Avoid placing any wall bracket other enclosed instructions for the size and weight of this apparatus ...
...the product's enclosure that may be securely attached to the wall (but never screw anything directly into the TV). See item 19 on your new LCD monitor. As you enjoy your TV (such as a VCR, remote control, or toy) that children can become excited while watching a program and...and educate consumers and their families about this owner's manual. As a result, TVs may reach for the size and weight of your purchase! Toshiba Cares! Use appropriate furniture large enough to persons. a Avoid placing any wall bracket other enclosed instructions for the size and weight of this apparatus ...
Owners Manual
Page 3
... floor or a sturdy, level, stable surface that no objects filled with any other immovable structure. The slots and openings are provided for your safety. The LCD panel inside the monitor contains glass and a toxic liquid. Make sure the tie is dropped and the cabinet or enclosure surface has been damaged or the...
... floor or a sturdy, level, stable surface that no objects filled with any other immovable structure. The slots and openings are provided for your safety. The LCD panel inside the monitor contains glass and a toxic liquid. Make sure the tie is dropped and the cabinet or enclosure surface has been damaged or the...
Owners Manual
Page 4
...such as insecticide on the cabinet. Service 36) WARNING: RISK OF ELECTRIC SHOCK! Gently wipe the display panel surface (the monitor screen) using a dry, soft cloth only (cotton, flannel, etc.). Failure to... other hazards. Avoid contact with a sharp or heavy object. 35) • The LCD screen of this page. Never spill liquids or push objects of any kind into the ...the connecting cables or apparatus. 32) For added protection of your TOSHIBA monitor, follow these sounds become frequent or continuous, unplug the power cord and contact a Toshiba Authorized Service Center. 34) ...
...such as insecticide on the cabinet. Service 36) WARNING: RISK OF ELECTRIC SHOCK! Gently wipe the display panel surface (the monitor screen) using a dry, soft cloth only (cotton, flannel, etc.). Failure to... other hazards. Avoid contact with a sharp or heavy object. 35) • The LCD screen of this page. Never spill liquids or push objects of any kind into the ...the connecting cables or apparatus. 32) For added protection of your TOSHIBA monitor, follow these sounds become frequent or continuous, unplug the power cord and contact a Toshiba Authorized Service Center. 34) ...
Owners Manual
Page 5
...your LCD monitor The following symptoms are technical limitations of LCD Display technology and are not an indication of the most innovative LCD monitors on -screen target may cause undesired operation. Instructions in a particular installation. FCC Compliance Statement (Part 15): The Toshiba 26HLC56, 32HLC56, and 37HLC56 LCD ... rules. Such pixels are on the front cover of light) that interference will disappear in a short period of time. 2) The LCD panel contained in accordance with the limits for a Class B device, pursuant to which can also use the controls on the monitor if...
...your LCD monitor The following symptoms are technical limitations of LCD Display technology and are not an indication of the most innovative LCD monitors on -screen target may cause undesired operation. Instructions in a particular installation. FCC Compliance Statement (Part 15): The Toshiba 26HLC56, 32HLC56, and 37HLC56 LCD ... rules. Such pixels are on the front cover of light) that interference will disappear in a short period of time. 2) The LCD panel contained in accordance with the limits for a Class B device, pursuant to which can also use the controls on the monitor if...
Owners Manual
Page 6
... setting up, and using your new monitor 7 Front and side panel controls and connections 8 Back panel connections 9 Chapter 2: Connecting your Monitor 10 Overview of cable types ...function 28 Selecting the gray level for 4:3 mode side panels 28 Selecting the cinema mode (480i signals only 29 ...Selecting the color temperature 31 Using the closed caption mode 32 Closed Caption Reception Adjustment 32 Adjusting the audio 33 Muting the sound 33 Adjusting the...38 Setting the sleep timer 38 Setting the On timer 39 Displaying the monitor's settings on-screen using RECALL 39 Understanding the...
... setting up, and using your new monitor 7 Front and side panel controls and connections 8 Back panel connections 9 Chapter 2: Connecting your Monitor 10 Overview of cable types ...function 28 Selecting the gray level for 4:3 mode side panels 28 Selecting the cinema mode (480i signals only 29 ...Selecting the color temperature 31 Using the closed caption mode 32 Closed Caption Reception Adjustment 32 Adjusting the audio 33 Muting the sound 33 Adjusting the...38 Setting the sleep timer 38 Setting the On timer 39 Displaying the monitor's settings on-screen using RECALL 39 Understanding the...
Owners Manual
Page 7
... page 3). • Place the monitor in a location where light does not reflect on using its many exciting features of your new Toshiba widescreen LCD monitor: • Two sets of ColorStream® HD high-resolution component video inputs (- THIS TYPE OF DAMAGE IS NOT COVERED UNDER THE...cords for your monitor and begin using the monitor's features, see Chapter 8. 14 Enjoy your new monitor! 7 Press POWER on the monitor control panel or remote control to a wall, pillar, or other immovable structure (- Chapter 1: Introduction Features of your new monitor The following when choosing a ...
... page 3). • Place the monitor in a location where light does not reflect on using its many exciting features of your new Toshiba widescreen LCD monitor: • Two sets of ColorStream® HD high-resolution component video inputs (- THIS TYPE OF DAMAGE IS NOT COVERED UNDER THE...cords for your monitor and begin using the monitor's features, see Chapter 8. 14 Enjoy your new monitor! 7 Press POWER on the monitor control panel or remote control to a wall, pillar, or other immovable structure (- Chapter 1: Introduction Features of your new monitor The following when choosing a ...
Owners Manual
Page 8
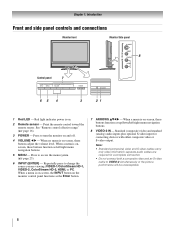
...). 3 POWER - Press to VIDEO-2 simultaneously or the picture performance will be unacceptable. 8 Chapter 1: Introduction Front and side panel controls and connections Monitor front Monitor Side panel 8 Control panel 7 65 4 3 21 1 Red LED - When no menu is on -screen, these buttons adjust the volume level. ..., these buttons function as the Enter button. 7 ARROWS BbC c - When a menu is on-screen, the INPUT button on the monitor control panel functions as left /right menu navigation buttons. 8 VIDEO-2 IN - When a menu is onscreen, these buttons function as up/down/left /right...
...). 3 POWER - Press to VIDEO-2 simultaneously or the picture performance will be unacceptable. 8 Chapter 1: Introduction Front and side panel controls and connections Monitor front Monitor Side panel 8 Control panel 7 65 4 3 21 1 Red LED - When no menu is on -screen, these buttons adjust the volume level. ..., these buttons function as the Enter button. 7 ARROWS BbC c - When a menu is on-screen, the INPUT button on the monitor control panel functions as left /right menu navigation buttons. 8 VIDEO-2 IN - When a menu is onscreen, these buttons function as up/down/left /right...

Owners Manual
Page 9
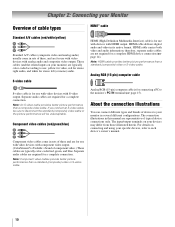
...56 1 A/V OUT - Composite video and analog audio outputs for connecting a VCR for connecting devices with component video output, such as a Toshiba DVD player with ColorStream®. also page 14). When component video cables are shared with analog audio inputs) for editing and dubbing. 2 ...connection. 3 PC/HDMI (AUDIO) IN - page 38). 4 VIDEO-1 IN - Their use when connecting a personal computer (- Chapter 1: Introduction Back panel connections For an explanation of shared analog audio inputs (shared between the PC IN and HDMI IN terminals). page 15). 6 HDMI™ IN -...
...56 1 A/V OUT - Composite video and analog audio outputs for connecting a VCR for connecting devices with component video output, such as a Toshiba DVD player with ColorStream®. also page 14). When component video cables are shared with analog audio inputs) for editing and dubbing. 2 ...connection. 3 PC/HDMI (AUDIO) IN - page 38). 4 VIDEO-1 IN - Their use when connecting a personal computer (- Chapter 1: Introduction Back panel connections For an explanation of shared analog audio inputs (shared between the PC IN and HDMI IN terminals). page 15). 6 HDMI™ IN -...
Owners Manual
Page 10
... (- Note: Component video cables provide better picture performance than a standard (composite) video or S-video cable. 10 Analog RGB (15-pin) computer cable S-video cable is Toshiba's brand of typical device connections only. page 15). HDMI cable delivers digital audio and video in this manual are representative of component video.) These cables...
... (- Note: Component video cables provide better picture performance than a standard (composite) video or S-video cable. 10 Analog RGB (15-pin) computer cable S-video cable is Toshiba's brand of typical device connections only. page 15). HDMI cable delivers digital audio and video in this manual are representative of component video.) These cables...
Owners Manual
Page 11
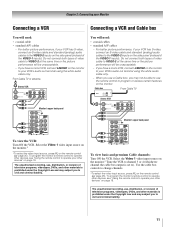
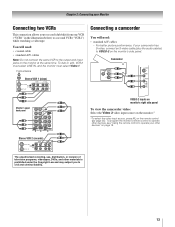
...picture performance, if your VCR has S-video, connect an S-video cable and standard (analog) audio cables to the VIDEO-2 inputs on the side panel (instead of video cable to VIDEO-2 at the same time or the picture performance will be able to operate your other devices" on the ... the VIDEO-1 inputs). The unauthorized recording, use, distribution, or revision of video cable to TV VIDEO AUDIO L R IN OUT L R Monitor's upper back panel You will be unacceptable. - page 25). Do not connect both types of the VIDEO-1 inputs). Cable box From Cable TV OUT CH 3 IN CH 4 Stereo...
...picture performance, if your VCR has S-video, connect an S-video cable and standard (analog) audio cables to the VIDEO-2 inputs on the side panel (instead of video cable to VIDEO-2 at the same time or the picture performance will be able to operate your other devices" on the ... the VIDEO-1 inputs). The unauthorized recording, use, distribution, or revision of video cable to TV VIDEO AUDIO L R IN OUT L R Monitor's upper back panel You will be unacceptable. - page 25). Do not connect both types of the VIDEO-1 inputs). Cable box From Cable TV OUT CH 3 IN CH 4 Stereo...
Owners Manual
Page 12
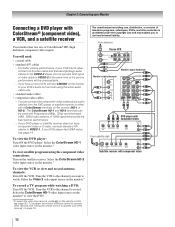
... can connect the component video cables (plus audio cables) from ANT CH 3 CH 4 OUT to TV AUDIO L R IN IN OUT L R Monitor's upper back panel Monitor's right side panel Y PB PR DVD player with component video AUDIO OUT L S-VIDEO COMPONENT VIDEO VIDEO R OUT OUT From satellite dish Y PB PR AUDIO OUT L Satellite S-VIDEO...
... can connect the component video cables (plus audio cables) from ANT CH 3 CH 4 OUT to TV AUDIO L R IN IN OUT L R Monitor's upper back panel Monitor's right side panel Y PB PR DVD player with component video AUDIO OUT L S-VIDEO COMPONENT VIDEO VIDEO R OUT OUT From satellite dish Y PB PR AUDIO OUT L Satellite S-VIDEO...
Owners Manual
Page 13
Camcorder VIDEO AUDIO OUT L R Monitor's upper back panel VIDEO-2 inputs on monitor's right side panel To view the camcorder video: Select the Video 2 video input source on the monitor.* *To select the video input source, press + on the remote control ... devices" on page 18. Chapter 2: Connecting your camcorder has S-video, connect an S-video cable (plus the audio cables) to VIDEO-2 on the monitor's side panel. For better picture performance, if your Monitor Connecting two VCRs This connection allows you to a second VCR ("VCR2") while watching a videotape. To dub or edit...
Camcorder VIDEO AUDIO OUT L R Monitor's upper back panel VIDEO-2 inputs on monitor's right side panel To view the camcorder video: Select the Video 2 video input source on the monitor.* *To select the video input source, press + on the remote control ... devices" on page 18. Chapter 2: Connecting your camcorder has S-video, connect an S-video cable (plus the audio cables) to VIDEO-2 on the monitor's side panel. For better picture performance, if your Monitor Connecting two VCRs This connection allows you to a second VCR ("VCR2") while watching a videotape. To dub or edit...

Owners Manual
Page 14
...transfers both video and audio. HDMI device VIDEO AUDIO L R IN IN HDMI OUT OUT L R Monitor's lower back panel Note: If the audio output mode of standard analog audio cables per DVI device - Separate analog audio cables are trademarks... page 24. DVI device VIDEO AUDIO L R IN IN DVI / HDCP OUT OUT L R Monitor's upper back panel Monitor's lower back panel Note: To ensure that the HDMI or DVI device is reset properly, it is possible that include a PC IN ...adapter cable should not encounter difficulty if you will also accept and display 480i, 480p and 720p signals.
...transfers both video and audio. HDMI device VIDEO AUDIO L R IN IN HDMI OUT OUT L R Monitor's lower back panel Note: If the audio output mode of standard analog audio cables per DVI device - Separate analog audio cables are trademarks... page 24. DVI device VIDEO AUDIO L R IN IN DVI / HDCP OUT OUT L R Monitor's upper back panel Monitor's lower back panel Note: To ensure that the HDMI or DVI device is reset properly, it is possible that include a PC IN ...adapter cable should not encounter difficulty if you will also accept and display 480i, 480p and 720p signals.
Owners Manual
Page 15
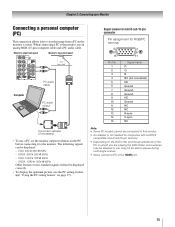
Monitor's upper back panel Monitor's lower back panel Computer PC audio cable PC audio output Conversion adapter...during multi-angle scenes. • Never connect a PC to the monitor. The following signals can be displayed correctly. • To display the optimum picture, use the PC setting feature (- VGA: 640 5 480 @ 60Hz - SXGA: 1280... 5 1024 @ 60Hz Other formats or non-standard signals will not be displayed: - Signal names for mini D-sub 15-pin connector Pin assignment for RGB/PC terminal 5 1 10 6 15 11 Pin No. 1 ...
Monitor's upper back panel Monitor's lower back panel Computer PC audio cable PC audio output Conversion adapter...during multi-angle scenes. • Never connect a PC to the monitor. The following signals can be displayed correctly. • To display the optimum picture, use the PC setting feature (- VGA: 640 5 480 @ 60Hz - SXGA: 1280... 5 1024 @ 60Hz Other formats or non-standard signals will not be displayed: - Signal names for mini D-sub 15-pin connector Pin assignment for RGB/PC terminal 5 1 10 6 15 11 Pin No. 1 ...

Owners Manual
Page 16
.... 16 Installing the remote control batteries 1 Remove the battery cover from the back of time. page 20). If you have a non-Toshiba device or a Toshiba device that the remote control is not to be disposed of batteries in a designated disposal area. • Batteries should always be used ... lift cover. Chapter 3: Using the remote control Preparing the remote control for an extended period of the remote control. If you have a Toshiba device: Your monitor's remote control is no obstruction between the remote control and the monitor. pages 18-22). Never mix battery types or use...
.... 16 Installing the remote control batteries 1 Remove the battery cover from the back of time. page 20). If you have a non-Toshiba device or a Toshiba device that the remote control is not to be disposed of batteries in a designated disposal area. • Batteries should always be used ... lift cover. Chapter 3: Using the remote control Preparing the remote control for an extended period of the remote control. If you have a Toshiba device: Your monitor's remote control is no obstruction between the remote control and the monitor. pages 18-22). Never mix battery types or use...
Owners Manual
Page 17
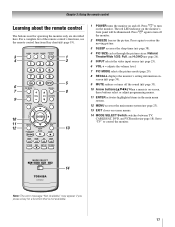
... the main menu system (- page 26). 5 INPUT selects the video input source (- adjusts the volume level. 7 PIC MODE selects the picture mode (page 29). 8 RECALL displays the monitor's setting information onscreen (- page 39). 9 MUTE reduces or turns off the monitor. 2 FREEZE freezes the picture. Set to "TV" to restore the moving... turn off the sound (- Chapter 3: Using the remote control Learning about the remote control The buttons used for a function that is on the monitor's front panel will be illuminated. page 18).
... the main menu system (- page 26). 5 INPUT selects the video input source (- adjusts the volume level. 7 PIC MODE selects the picture mode (page 29). 8 RECALL displays the monitor's setting information onscreen (- page 39). 9 MUTE reduces or turns off the monitor. 2 FREEZE freezes the picture. Set to "TV" to restore the moving... turn off the sound (- Chapter 3: Using the remote control Learning about the remote control The buttons used for a function that is on the monitor's front panel will be illuminated. page 18).
Owners Manual
Page 18
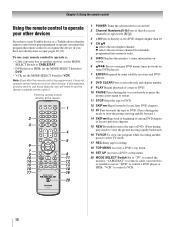
b selects the next lower channel (for channels programmed into memory only). 5 INFO Displays the monitor's status information onscreen. 6 BbC c Press to navigate DVD menus (may not operate certain features on your remote control to operate a: • Cable converter ... opposed to < ,). 3 +10 Press to control a cable converter box or satellite receiver; "DVD" to VCR. To use your other devices If you have a non-Toshiba device or a Toshiba device that the remote control is programmed, it may not work on some DVD players). 7 ENTER Required by some satellite receivers and DVD players...
b selects the next lower channel (for channels programmed into memory only). 5 INFO Displays the monitor's status information onscreen. 6 BbC c Press to navigate DVD menus (may not operate certain features on your remote control to operate a: • Cable converter ... opposed to < ,). 3 +10 Press to control a cable converter box or satellite receiver; "DVD" to VCR. To use your other devices If you have a non-Toshiba device or a Toshiba device that the remote control is programmed, it may not work on some DVD players). 7 ENTER Required by some satellite receivers and DVD players...
Owners Manual
Page 19
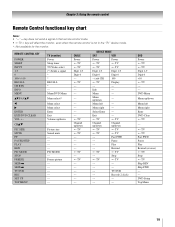
... Channel up /down s TV s TV --------s TV --s TV DEVICE MODE SAT VCR Power s TV s TV Power s TV s TV Digit 1-9 Digit 1-9 Digit 0 Digit 0 - (sub CH) s TV 100 Display --- --- Menu left Menu right Enter DVD Clear s TV --- Select Enter --- DVD Power s TV s TV Digit 1-9 Digit 0 +10 s TV ----DVD Menu Menu up /down Menu left...
... Channel up /down s TV s TV --------s TV --s TV DEVICE MODE SAT VCR Power s TV s TV Power s TV s TV Digit 1-9 Digit 1-9 Digit 0 Digit 0 - (sub CH) s TV 100 Display --- --- Menu left Menu right Enter DVD Clear s TV --- Select Enter --- DVD Power s TV s TV Digit 1-9 Digit 0 +10 s TV ----DVD Menu Menu up /down Menu left...
Owners Manual
Page 20
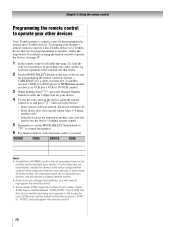
... E, press the Channel Number buttons to enter the 3-digit code for your device. To program your monitor's remote control to operate a non-Toshiba device (or a Toshiba device that all listed codes, the necessary keys do not operate your device, use the device's original remote control. • Every time you...write down the code(s) you will need to use the device's original remote control. 5 Remember to set the switch to the other devices Your Toshiba monitor's remote control is listed, try each one that works. 2 Set the MODE SELECT Switch to the type of device you will need to...
... E, press the Channel Number buttons to enter the 3-digit code for your device. To program your monitor's remote control to operate a non-Toshiba device (or a Toshiba device that all listed codes, the necessary keys do not operate your device, use the device's original remote control. • Every time you...write down the code(s) you will need to use the device's original remote control. 5 Remember to set the switch to the other devices Your Toshiba monitor's remote control is listed, try each one that works. 2 Set the MODE SELECT Switch to the type of device you will need to...