
User Guide
Page 1
... AdvisorTM • 3 Independent Watering Programs with Normally Closed or Normally Open Rain Sensors • Automatic 24V Circuit Protection • Program Memory Backup without Battery • Programmable Pump Start OUTDOOR MODEL Automatic Sprinkler System Control Timer User's Guide AB C ON MANUAL START NEXT OFF ON MANUAL START NEXT OFF INDOOR MODEL ECXTRA Features • Easily expandable to 4-hour Zone Run Time - 4 Start Times • Seasonal Run Time Adjust • Rain Delay • Compatible with : -
... AdvisorTM • 3 Independent Watering Programs with Normally Closed or Normally Open Rain Sensors • Automatic 24V Circuit Protection • Program Memory Backup without Battery • Programmable Pump Start OUTDOOR MODEL Automatic Sprinkler System Control Timer User's Guide AB C ON MANUAL START NEXT OFF ON MANUAL START NEXT OFF INDOOR MODEL ECXTRA Features • Easily expandable to 4-hour Zone Run Time - 4 Start Times • Seasonal Run Time Adjust • Rain Delay • Compatible with : -

User Guide
Page 3
... I Setting Program Start Times 27 I Setting Program Start Times 27 I Setting Zone Run Times 28 I Pump Control 29 Timer Operations I Automatic Operation 30 I Manual Operation 31 T Starting Programs or Zones Manually...........31 T Watering Control Features 32 T To Pause Watering 32 T To Resume Watering 32 T To Cancel Watering 32 T To Skip Zones 32 T To Adjust the Zone Run TIme 33 I Using the Rain Delay Feature 33 I Using the Season Adjust Feature 34 I Turning Off the ECXTRA 35 Service and Specifications...
... I Setting Program Start Times 27 I Setting Program Start Times 27 I Setting Zone Run Times 28 I Pump Control 29 Timer Operations I Automatic Operation 30 I Manual Operation 31 T Starting Programs or Zones Manually...........31 T Watering Control Features 32 T To Pause Watering 32 T To Resume Watering 32 T To Cancel Watering 32 T To Skip Zones 32 T To Adjust the Zone Run TIme 33 I Using the Rain Delay Feature 33 I Using the Season Adjust Feature 34 I Turning Off the ECXTRA 35 Service and Specifications...
User Guide
Page 5
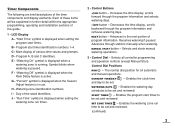
... be set and reviewed. Enables the program start times to be set . - Timer Components The following are brief descriptions of -the-week identifiers. C - Control Dial Positions RUN - Program start times. Symbol blinks when watering is running. G - Each of this guide. 1 - Day-of the timer components and display elements. Decreases the time display, scrolls backward through stations manually when watering. D - Advances through the program information and removes watering...
... be set and reviewed. Enables the program start times to be set . - Timer Components The following are brief descriptions of -the-week identifiers. C - Control Dial Positions RUN - Program start times. Symbol blinks when watering is running. G - Each of this guide. 1 - Day-of the timer components and display elements. Decreases the time display, scrolls backward through stations manually when watering. D - Advances through the program information and removes watering...

User Guide
Page 6
... sensor operation for the plug-in a program to the ECXTRA timer. 13 - Control Dial Positions (continued) SEASON ADJUST - RAIN DELAY - Rain Sensor Control Switch - Snap-in connectors for the type of all stations in transformer wires. 11 - Terminal Block - Snap-in connectors for (optional) Toro Rain Sensor. 8 - Pump/Master Valve Connection Terminal - Each plug-in module provides snap-in wire connector for two zone control valve power wires. Time PodTM Port - power...
... sensor operation for the plug-in a program to the ECXTRA timer. 13 - Control Dial Positions (continued) SEASON ADJUST - RAIN DELAY - Rain Sensor Control Switch - Snap-in connectors for the type of all stations in transformer wires. 11 - Terminal Block - Snap-in connectors for (optional) Toro Rain Sensor. 8 - Pump/Master Valve Connection Terminal - Each plug-in module provides snap-in wire connector for two zone control valve power wires. Time PodTM Port - power...
User Guide
Page 8
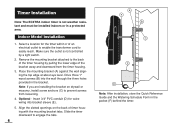
... masonry, install screw anchors (C) to engage the tabs. 6 A F B C E D Note: After installation, store the Quick Reference Guide and the Watering Schedule Form in a protected area. Optional - Timer Installation Note: The ECXTRA indoor timer is not controlled by pulling the lower edge of the timer housing by a light switch. 2. Select a location for valve wiring into the wall through the three holes provided in the bracket. Drive three 1" wood screws (B) into...
... masonry, install screw anchors (C) to engage the tabs. 6 A F B C E D Note: After installation, store the Quick Reference Guide and the Watering Schedule Form in a protected area. Optional - Timer Installation Note: The ECXTRA indoor timer is not controlled by pulling the lower edge of the timer housing by a light switch. 2. Select a location for valve wiring into the wall through the three holes provided in the bracket. Drive three 1" wood screws (B) into...

User Guide
Page 9
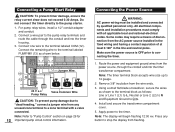
... ON MANUAL START NEXT OFF SENSOR 24 VAC PUMP/MV COM Master Valve Zone Valves Valve Common Wire 5. You will need to have this information when connecting the valve wires to the terminal labeled PUMP/MV (9). Note: Connecting a master valve or pump start relay is recommended. Using 18-gauge, multi-strand, direct-burial irrigation cable is optional and may not be connected. 2. Attach the white color-coded wire to either...
... ON MANUAL START NEXT OFF SENSOR 24 VAC PUMP/MV COM Master Valve Zone Valves Valve Common Wire 5. You will need to have this information when connecting the valve wires to the terminal labeled PUMP/MV (9). Note: Connecting a master valve or pump start relay is recommended. Using 18-gauge, multi-strand, direct-burial irrigation cable is optional and may not be connected. 2. Attach the white color-coded wire to either...

User Guide
Page 11
... Toro Rain Sensor wires. (F) - 3/4" for sprinkler valve wires. (G) - 1/2" (plugged) for installation, carefully drill through the plugs with a 3/16" drill bit. Remove two phillips screws from the bottom to use the outer holes for optional Toro remote control cable. 4. Three lower mounting holes (C) are plugged. D E F G Four wiring access holes are provided in the cabinet base as necessary. 9 If you intend to remove. 3. Remove the lower housing cover (A) by pulling outward on the handle. 2. Outdoor Model Installation...
... Toro Rain Sensor wires. (F) - 3/4" for sprinkler valve wires. (G) - 1/2" (plugged) for installation, carefully drill through the plugs with a 3/16" drill bit. Remove two phillips screws from the bottom to use the outer holes for optional Toro remote control cable. 4. Three lower mounting holes (C) are plugged. D E F G Four wiring access holes are provided in the cabinet base as necessary. 9 If you intend to remove. 3. Remove the lower housing cover (A) by pulling outward on the handle. 2. Outdoor Model Installation...

User Guide
Page 12
... not controlled by a light switch or utilized by local electrical codes. 5. Install the lower mounting screw(s) and tighten securely. A B 6" ON MANUAL START NEXT OFF C D Install conduit as required by a high current load appliance, such as a refrigerator or air conditioner. • Access to predrill holes for valve wires. Use the dimension shown to the sprinkler control valve wiring and optional accessory wiring. 2. Installing the Cabinet 1. For safe, reliable operation, select an installation site...
... not controlled by a light switch or utilized by local electrical codes. 5. Install the lower mounting screw(s) and tighten securely. A B 6" ON MANUAL START NEXT OFF C D Install conduit as required by a high current load appliance, such as a refrigerator or air conditioner. • Access to predrill holes for valve wires. Use the dimension shown to the sprinkler control valve wiring and optional accessory wiring. 2. Installing the Cabinet 1. For safe, reliable operation, select an installation site...

User Guide
Page 13
... housing or through the large opening in your sprinkler system. 11 Route the wire cable into the timer cabinet. Referring to be required in the base of valves to the Timer Components on all cable wires. Connecting the Valves 1. Attach an individual color-coded wire to the terminal labeled COM (8). CAUTION: Use Toro Waterproof Wire Connectors (Model # 53687) or grease caps on page 5 and the diagram above, secure the valve common wire...
... housing or through the large opening in your sprinkler system. 11 Route the wire cable into the timer cabinet. Referring to be required in the base of valves to the Timer Components on all cable wires. Connecting the Valves 1. Attach an individual color-coded wire to the terminal labeled COM (8). CAUTION: Use Toro Waterproof Wire Connectors (Model # 53687) or grease caps on page 5 and the diagram above, secure the valve common wire...
User Guide
Page 14
.... Valve Common Wire Pump Relay CAUTION: To prevent pump damage due to "dead-heading," connect a jumper wire from any button to . 4. Do not connect the timer directly to a zone terminal with all applicable local and national electrical codes. Make sure the power source is OFF prior to 14 gauge. 2. Note: The timer terminal block accepts wire size up to connecting the timer. 1. Using a small flat blade screwdriver...
.... Valve Common Wire Pump Relay CAUTION: To prevent pump damage due to "dead-heading," connect a jumper wire from any button to . 4. Do not connect the timer directly to a zone terminal with all applicable local and national electrical codes. Make sure the power source is OFF prior to 14 gauge. 2. Note: The timer terminal block accepts wire size up to connecting the timer. 1. Using a small flat blade screwdriver...

User Guide
Page 15
... switch type and for additional installation and operating information. 4. Watering operation will appear in any order. 3. Remove the plastic piece from the device into the timer housing through the access hole provided. 2. Note: Refer to the instructions provided with the NC switch position unless a Normally Closed rain sensor is connected. A sensor control switch is a remote device which can be connected directly to your ECXTRA...
... switch type and for additional installation and operating information. 4. Watering operation will appear in any order. 3. Remove the plastic piece from the device into the timer housing through the access hole provided. 2. Note: Refer to the instructions provided with the NC switch position unless a Normally Closed rain sensor is connected. A sensor control switch is a remote device which can be connected directly to your ECXTRA...

User Guide
Page 16
... before another zone would turn 14 on a watering schedule that you only need to remember that you need them. Parkway Lawn - Front Shrubs - Geared Rotor Valve 5 - Drip It is important to use one at a time in numeric order. Zone 2 - Fixed Spray Valve 3 - Zone 5 - Timer ON MANUAL START NEXT OFF Valve 1 Valve 2 Valve 3 Valve 4 House Valve 5 Valve 1 - Zone 1 - Flood Bubbler Valve 4 - Fixed Spray Valve 2 - When an automatic program starts, the valves operate one program to...
... before another zone would turn 14 on a watering schedule that you only need to remember that you need them. Parkway Lawn - Front Shrubs - Geared Rotor Valve 5 - Drip It is important to use one at a time in numeric order. Zone 2 - Fixed Spray Valve 3 - Zone 5 - Timer ON MANUAL START NEXT OFF Valve 1 Valve 2 Valve 3 Valve 4 House Valve 5 Valve 1 - Zone 1 - Flood Bubbler Valve 4 - Fixed Spray Valve 2 - When an automatic program starts, the valves operate one program to...

User Guide
Page 19
... a new lawn. The ECXTRA enables each zone can have up to four separate start times per day. Program start times are shown on the lower portion of the display next to the start time symbol when the control dial is being displayed is in the SET ZONE TIMES position. The zone run time being set. These numbers are assigned to program A. If the run time for a zone is turned Off...
... a new lawn. The ECXTRA enables each zone can have up to four separate start times per day. Program start times are shown on the lower portion of the display next to the start time symbol when the control dial is being displayed is in the SET ZONE TIMES position. The zone run time being set. These numbers are assigned to program A. If the run time for a zone is turned Off...

User Guide
Page 20
...are some general watering guidelines to help you need to plan your PC and Toro's exclusive CAS (Computer Aided Scheduling) interactive software to guide you do not want to the ECXTRA with the timer. This form is not needed, leave its information column blank. •...decal located on certain days, circle the Exclude day(s). • Zone Run Time - If you get started. • Water early in the morning, one to 4 start time that occurs while a watering cycle is installed. Indicate the time of the outdoor model timer. You will be delayed until the current watering cycle is ...
...are some general watering guidelines to help you need to plan your PC and Toro's exclusive CAS (Computer Aided Scheduling) interactive software to guide you do not want to the ECXTRA with the timer. This form is not needed, leave its information column blank. •...decal located on certain days, circle the Exclude day(s). • Zone Run Time - If you get started. • Water early in the morning, one to 4 start time that occurs while a watering cycle is installed. Indicate the time of the outdoor model timer. You will be delayed until the current watering cycle is ...
User Guide
Page 23
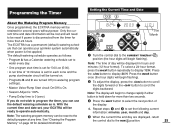
... watering program settings). • Master Valve/Pump Start circuit On/Off is On. • Season Adjust is 100% • Pump Delay time is set for detailed information Day Month Turn the control dial to be displayed in hours and minutes (12-hour format). Press the NEXT button to select the next portion of day will need to the CURRENT TIME/DAY position (the...
... watering program settings). • Master Valve/Pump Start circuit On/Off is On. • Season Adjust is 100% • Pump Delay time is set for detailed information Day Month Turn the control dial to be displayed in hours and minutes (12-hour format). Press the NEXT button to select the next portion of day will need to the CURRENT TIME/DAY position (the...

User Guide
Page 39
... first open expansion slot (from the timer housing by sliding it locks into position. 4. Automatic Circuit Protection The ECXTRA features built-in the watering sequence is turned ON. The timer will resume normal operation as programmed. Remove the lower front cover from left to right). To connect the valve wires, refer to the OFF position. 2. The timer will attempt to run time, refer to bypass the affected...
... first open expansion slot (from the timer housing by sliding it locks into position. 4. Automatic Circuit Protection The ECXTRA features built-in the watering sequence is turned ON. The timer will resume normal operation as programmed. Remove the lower front cover from left to right). To connect the valve wires, refer to the OFF position. 2. The timer will attempt to run time, refer to bypass the affected...

User Guide
Page 40
... Time). Remedy Check the transformer connections (indoor model) or circuit breaker service panel (outdoor model). Shorten zone run time is turned Off. Enter a zone run time (p. 28) Watering zone does not turn on the program. Inspect, clean and/or repair valve as needed. Automatic Circuit Protection has disabled the zone. Possible Cause Main power is blank and the . Watering programs start times (p. 27). timer does not operate. Check the wire connections at unscheduled times...
... Time). Remedy Check the transformer connections (indoor model) or circuit breaker service panel (outdoor model). Shorten zone run time is turned Off. Enter a zone run time (p. 28) Watering zone does not turn on the program. Inspect, clean and/or repair valve as needed. Automatic Circuit Protection has disabled the zone. Possible Cause Main power is blank and the . Watering programs start times (p. 27). timer does not operate. Check the wire connections at unscheduled times...
User Guide
Page 41
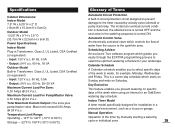
... H x 9cm D) Power Specifications: Indoor Model Plug-in Transformer, Class 2, UL Listed, CSA Certified (or equivalent) • Input: 120 V a.c. 60 Hz, 0.5A • Output: 24 V a.c. 60 Hz, 18 VA Outdoor Model Built-in a protected environment, such as a house or garage. Total Maximum Current Output: One zone plus pump/master valve. This is turned ON. Must not to the timer caused by manually starting a watering cycle or individual...
... H x 9cm D) Power Specifications: Indoor Model Plug-in Transformer, Class 2, UL Listed, CSA Certified (or equivalent) • Input: 120 V a.c. 60 Hz, 0.5A • Output: 24 V a.c. 60 Hz, 18 VA Outdoor Model Built-in a protected environment, such as a house or garage. Total Maximum Current Output: One zone plus pump/master valve. This is turned ON. Must not to the timer caused by manually starting a watering cycle or individual...

User Guide
Page 42
... sprinkler valve is energized to the pump starter. Master Valve A valve installed between the water source and irrigation valves to control water flow to 24 V a.c. to the irrigation system. Outdoor Timer Model A timer model with the ECXTRA timer by placing the switch in transformer used to connect high voltage to either indoor or outdoor installation. Pump Start Relay When the ECXTRA timer is forecast in Module A small module that is open the master valve. 40 Pump Delay Time...
... sprinkler valve is energized to the pump starter. Master Valve A valve installed between the water source and irrigation valves to control water flow to 24 V a.c. to the irrigation system. Outdoor Timer Model A timer model with the ECXTRA timer by placing the switch in transformer used to connect high voltage to either indoor or outdoor installation. Pump Start Relay When the ECXTRA timer is forecast in Module A small module that is open the master valve. 40 Pump Delay Time...

User Guide
Page 43
... each sprinkler control valve which days to the ECXTRA timer. Transformer See (Power Supply) Valve Common Wire One wire from 10% to operate one sprinkler zone at a time. Scheduling Planning how long to water (zone run time), when to water (program start time) and which connects to 4 separate start times. Watering Program Cycle The ECXTRA is called watering days. • What time to water. input power in the Outdoor model timer Time Pod Portable electronic device used...
... each sprinkler control valve which days to the ECXTRA timer. Transformer See (Power Supply) Valve Common Wire One wire from 10% to operate one sprinkler zone at a time. Scheduling Planning how long to water (zone run time), when to water (program start time) and which connects to 4 separate start times. Watering Program Cycle The ECXTRA is called watering days. • What time to water. input power in the Outdoor model timer Time Pod Portable electronic device used...


