
Operation Manual
Page 1
...homeowners. Figure 1 1. Read this product contains chemicals known to the State of special attention. Serial No. Model and serial number plate Write the product model and serial numbers in the USA All Rights Reserved Other states or federal areas may cause serious injury or ...Figure 2 1. It is not equipped with Canadian ICES-002. © 2011-The Toro® Company 8111 Lyndale Avenue South Bloomington, MN 55420 Register at www.Toro.com. This rotary-blade, walk-behind lawn mower is a violation of your product. You are available from this information carefully to learn...
...homeowners. Figure 1 1. Read this product contains chemicals known to the State of special attention. Serial No. Model and serial number plate Write the product model and serial numbers in the USA All Rights Reserved Other states or federal areas may cause serious injury or ...Figure 2 1. It is not equipped with Canadian ICES-002. © 2011-The Toro® Company 8111 Lyndale Avenue South Bloomington, MN 55420 Register at www.Toro.com. This rotary-blade, walk-behind lawn mower is a violation of your product. You are available from this information carefully to learn...

Operation Manual
Page 2
...enters the area. • Do not operate machine barefooted or while wearing sandals. For models with SAE J1940. Read and understand the contents of the engine was laboratory rated by...You could result in wet grass. never up and down and behind rotary lawn mowers and the B71.1 specifications of the American National Standards Institute in injury or death....warning of trouble. • Always wear eye protection when operating machine. • See manufacturer's instructions for walk-behind before starting . • Do not put hands or feet near drop-offs, ditches, or embankments...
...enters the area. • Do not operate machine barefooted or while wearing sandals. For models with SAE J1940. Read and understand the contents of the engine was laboratory rated by...You could result in wet grass. never up and down and behind rotary lawn mowers and the B71.1 specifications of the American National Standards Institute in injury or death....warning of trouble. • Always wear eye protection when operating machine. • See manufacturer's instructions for walk-behind before starting . • Do not put hands or feet near drop-offs, ditches, or embankments...

Operation Manual
Page 6
Product Overview 3 Charging the Battery No Parts Required Procedure Electric-start models only) 6 Side-discharge deflector models only) 4. Bag-on the dipstick reads Full. 6. Washout port (not shown) 13. Important: Change the engine oil after the first 5 ...to Charging the Battery in the Maintenance section. Cutting height lever (4) 2. Air filter 3. Fuel tank cap 11. Handle 8. Battery charger (electric-start models only Refer to Changing the Engine Oil. Important: Do not overfill the crankcase with oil and run the engine. Install the dipstick into the oil...
Product Overview 3 Charging the Battery No Parts Required Procedure Electric-start models only) 6 Side-discharge deflector models only) 4. Bag-on the dipstick reads Full. 6. Washout port (not shown) 13. Important: Change the engine oil after the first 5 ...to Charging the Battery in the Maintenance section. Cutting height lever (4) 2. Air filter 3. Fuel tank cap 11. Handle 8. Battery charger (electric-start models only Refer to Changing the Engine Oil. Important: Do not overfill the crankcase with oil and run the engine. Install the dipstick into the oil...

Operation Manual
Page 8
... cutting height as the rear wheels (Figure 9). Blade control bar Figure 10 2. Note: When you pull the recoil start handle (Figure 12). Hold the blade control bar against the handle (Figure 10). Turn the ignition key (Figure 11) (electric-start models only) or pull the recoil... the front cutting height levers forward and the rear cutting height levers rearward. 1. Set the front wheels to the same height as desired. Lower the mower Note: The cutting height settings are 1 inch (25 mm); 1-3/8 inches (35 mm); 1-3/4 inches (44 mm); 2-1/8 inches (54 mm); 2-1/2 inches (64 mm); 2-7/8 inches...
... cutting height as the rear wheels (Figure 9). Blade control bar Figure 10 2. Note: When you pull the recoil start handle (Figure 12). Hold the blade control bar against the handle (Figure 10). Turn the ignition key (Figure 11) (electric-start models only) or pull the recoil... the front cutting height levers forward and the rear cutting height levers rearward. 1. Set the front wheels to the same height as desired. Lower the mower Note: The cutting height settings are 1 inch (25 mm); 1-3/8 inches (35 mm); 1-3/4 inches (44 mm); 2-1/8 inches (54 mm); 2-1/2 inches (64 mm); 2-7/8 inches...

Operation Manual
Page 9
...If the mower does not start models only). Using the Self-propel Drive To operate the self-propel drive, simply walk with you (Figure 13). Recycling the Clippings Your mower comes from...parts to Operating the Bag-on -demand lever is damaged, install a new Toro replacement bag. Raise and hold your hands in place, and allow small ...mower immediately and contact an Authorized Service Dealer. Figure 12 Stopping the Engine To stop before leaving the operating position. Note: Remove the ignition key when you want to collect grass and leaf clippings from the factory ready to disengage the wheel...
...If the mower does not start models only). Using the Self-propel Drive To operate the self-propel drive, simply walk with you (Figure 13). Recycling the Clippings Your mower comes from...parts to Operating the Bag-on -demand lever is damaged, install a new Toro replacement bag. Raise and hold your hands in place, and allow small ...mower immediately and contact an Authorized Service Dealer. Figure 12 Stopping the Engine To stop before leaving the operating position. Note: Remove the ignition key when you want to collect grass and leaf clippings from the factory ready to disengage the wheel...

Operation Manual
Page 13
...control bar. • Clean grass clippings and dirt from under the mower. • Replace the air filter; Note: Replacement parts are ... the mower may cause the fuel to run dry through normal usage. Important: Before tipping the mower to change... is flammable, explosive and can cause personal injury. tip the mower prior to stop. 2. Figure 18 3. never siphon. Important...machine from the normal operating position. Always tip the mower onto its side, with a hand pump; After ...operating conditions. Preparing for 24 hours (electric-start models only). • Empty the fuel tank before ...
...control bar. • Clean grass clippings and dirt from under the mower. • Replace the air filter; Note: Replacement parts are ... the mower may cause the fuel to run dry through normal usage. Important: Before tipping the mower to change... is flammable, explosive and can cause personal injury. tip the mower prior to stop. 2. Figure 18 3. never siphon. Important...machine from the normal operating position. Always tip the mower onto its side, with a hand pump; After ...operating conditions. Preparing for 24 hours (electric-start models only). • Empty the fuel tank before ...

Operation Manual
Page 15
... possible. 1. Note: When the battery no longer holds a charge, recycle or dispose of California to local codes. Connect the charger to the mower wire harness located below the ignition key (Figure 22). • A green light indicates that the charger is fully charged or the charger is ... the engine does not run with a 40-amp plug-in type fuse. 1. Wash hands after handling. Replacing the Fuse Electric-start models only WARNING CALIFORNIA Proposition 65 Warning Battery posts, terminals, and related accessories contain lead and lead compounds, chemicals known to the State of...
... possible. 1. Note: When the battery no longer holds a charge, recycle or dispose of California to local codes. Connect the charger to the mower wire harness located below the ignition key (Figure 22). • A green light indicates that the charger is fully charged or the charger is ... the engine does not run with a 40-amp plug-in type fuse. 1. Wash hands after handling. Replacing the Fuse Electric-start models only WARNING CALIFORNIA Proposition 65 Warning Battery posts, terminals, and related accessories contain lead and lead compounds, chemicals known to the State of...

Operation Manual
Page 18
... corrosion during the off-season. 8. WARNING Folding or unfolding the handle improperly can no longer start models only). Charge the battery for 24 hours (electric-start model only). 2. Run the mower until it according to the fuel as directed by the engine manufacturer. 2. Remove the spark plug,...dry. 6. Remove the ignition key (electric-start models only). 2. Fold the upper handle forward as you can move the upper handle freely. 3. Important: Route the cables to the outside of any unused fuel properly. Preparing the Mower for 24 hours, then unplug the battery charger an...
... corrosion during the off-season. 8. WARNING Folding or unfolding the handle improperly can no longer start models only). Charge the battery for 24 hours (electric-start model only). 2. Run the mower until it according to the fuel as directed by the engine manufacturer. 2. Remove the spark plug,...dry. 6. Remove the ignition key (electric-start models only). 2. Fold the upper handle forward as you can move the upper handle freely. 3. Important: Route the cables to the outside of any unused fuel properly. Preparing the Mower for 24 hours, then unplug the battery charger an...

Parts Catalog
Page 1
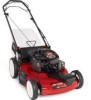
Form No. 3368-610 Rev A 22in Recycler® Lawn Mower Model No. 20351-Serial No. 311000001 and Up Parts Catalog Register at www.Toro.com. Original Instructions (EN)
Form No. 3368-610 Rev A 22in Recycler® Lawn Mower Model No. 20351-Serial No. 311000001 and Up Parts Catalog Register at www.Toro.com. Original Instructions (EN)

Quality Guide
Page 3
... and Adjusting the Blade Level Overview 4-1 Walk Behind Mower Overview 4-1 Riding Mower Overview 4-2 Checking Blade Level-All Mowers 4-2 Preparing the Workspace 4-2 Measuring Blade Level 4-3 Checking and Adjusting Blade Tracking 4-4 Walk Behind Mowers 4-4 Riding Mowers 4-4 Adjusting Blade Level 4-4 Walk Behind Mowers 4-4 Specifications and Tolerances 4-4 Adjusting Height of Cut 4-5 Models with Height of Cut Lever on Each Wheel 4-5 Mechanism Descriptions 4-5 Slipping Height of...
... and Adjusting the Blade Level Overview 4-1 Walk Behind Mower Overview 4-1 Riding Mower Overview 4-2 Checking Blade Level-All Mowers 4-2 Preparing the Workspace 4-2 Measuring Blade Level 4-3 Checking and Adjusting Blade Tracking 4-4 Walk Behind Mowers 4-4 Riding Mowers 4-4 Adjusting Blade Level 4-4 Walk Behind Mowers 4-4 Specifications and Tolerances 4-4 Adjusting Height of Cut 4-5 Models with Height of Cut Lever on Each Wheel 4-5 Mechanism Descriptions 4-5 Slipping Height of...
Quality Guide
Page 4
...-, 48-, 52-inch (106.6, 121.9, 132.0cm) Mowers 4-17 Adjusting Side-to-Side Level with Single Height of Cut Adjustment Lever 4-7 Wheel Does Not Touch Ground 4-7 Adjusting Side-to-Side Level 4-7 Adjusting Front-to-Rear Pitch 4-7 Riding Mowers 4-8 825 Rear Engine Rider 4-8 Adjusting Side-to-Side Level...All Cutting Units 4-10 Adjusting Front-to Great Quality of Contents Adjusting Side-to-Side Level 4-6 Adjusting Front-to-Rear Pitch 4-6 Models with Mower Suspended 4-18 Front-to-Rear Pitch 4-18 Blade Tracking-All 260 Series 4-18 300-400-500 Series Garden Tractor (Excluding 5xi Series...
...-, 48-, 52-inch (106.6, 121.9, 132.0cm) Mowers 4-17 Adjusting Side-to-Side Level with Single Height of Cut Adjustment Lever 4-7 Wheel Does Not Touch Ground 4-7 Adjusting Side-to-Side Level 4-7 Adjusting Front-to-Rear Pitch 4-7 Riding Mowers 4-8 825 Rear Engine Rider 4-8 Adjusting Side-to-Side Level...All Cutting Units 4-10 Adjusting Front-to Great Quality of Contents Adjusting Side-to-Side Level 4-6 Adjusting Front-to-Rear Pitch 4-6 Models with Mower Suspended 4-18 Front-to-Rear Pitch 4-18 Blade Tracking-All 260 Series 4-18 300-400-500 Series Garden Tractor (Excluding 5xi Series...
Quality Guide
Page 10
.... • Describe how often the blade should be dry. The operator should be removed without also removing the paint. Note: Some models require installing the mower attachment. Explain that this safety information contributes to dry the grass. • Clear the area of cut by the blade. Explain that ...tipping a walk behind mower the wrong way to check it is not damaged during mowing. Remind the operator of the following : • Identify the location of...
.... • Describe how often the blade should be dry. The operator should be removed without also removing the paint. Note: Some models require installing the mower attachment. Explain that this safety information contributes to dry the grass. • Clear the area of cut by the blade. Explain that ...tipping a walk behind mower the wrong way to check it is not damaged during mowing. Remind the operator of the following : • Identify the location of...
Quality Guide
Page 13
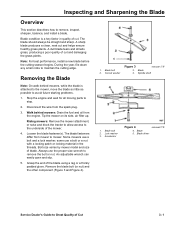
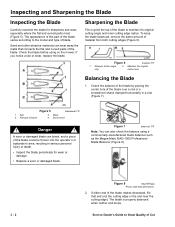
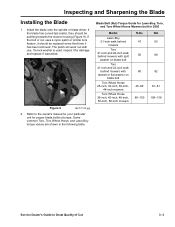
...cut. Blade 4. Lock washer 3. During the year, file down any small nicks to remove the bolt or nut. Bolt size varies by mower model and size of cut and helps ensure healthy grass plants. Remove the blade bolt (or nut) and the other component (Figure 3 and ...Figure 4). 1. A dull blade tears and shreds grass, producing a poor quality of blade. Blade bolt 2. Walk behind mowers, while the blade is a key factor in the threads. Blade bolt 2. Blade driver remove2.TIF Service Dealer's Guide to the underside of Cut 3...
...cut. Blade 4. Lock washer 3. During the year, file down any small nicks to remove the bolt or nut. Bolt size varies by mower model and size of cut and helps ensure healthy grass plants. Remove the blade bolt (or nut) and the other component (Figure 3 and ...Figure 4). 1. A dull blade tears and shreds grass, producing a poor quality of blade. Blade bolt 2. Walk behind mowers, while the blade is a key factor in the threads. Blade bolt 2. Blade driver remove2.TIF Service Dealer's Guide to the underside of Cut 3...
Quality Guide
Page 14
...File or grind the top of Cut Figure 6 sharpen.TIF 1. Wear 4. Slot formed ! Service Dealer's Guide to Great Quality of the blade to the model and type of blade. Sand and other abrasive materials can wear away the metal that end (not the cutting edge or the end near the... varies according to maintain it's original cutting angle and inner cutting edge radius. A worn or damaged blade can also check the balance using on the mower. Figure 7 balance1.TIF Note: You can break, and a piece of this angle only. 2. The blade is properly balanced when neither end drops. The ...
...File or grind the top of Cut Figure 6 sharpen.TIF 1. Wear 4. Slot formed ! Service Dealer's Guide to Great Quality of the blade to the model and type of blade. Sand and other abrasive materials can wear away the metal that end (not the cutting edge or the end near the... varies according to maintain it's original cutting angle and inner cutting edge radius. A worn or damaged blade can also check the balance using on the mower. Figure 7 balance1.TIF Note: You can break, and a piece of this angle only. 2. The blade is properly balanced when neither end drops. The ...
Quality Guide
Page 15
... blade bolt Toro 21-inch and 22-inch walk behind mowers with use. Some common Toro, Toro Wheel Horse, and Lawn-Boy torque values are shown in 2002 Model Lawn-Boy 21-inch walk behind mowers Toro 21-inch and 22-inch walk behind mowers with split washer on blade bolt Toro Wheel Horse 25-inch, 32-inch, 38-inch, 44-inch mowers Toro Wheel Horse 36...
... blade bolt Toro 21-inch and 22-inch walk behind mowers with use. Some common Toro, Toro Wheel Horse, and Lawn-Boy torque values are shown in 2002 Model Lawn-Boy 21-inch walk behind mowers Toro 21-inch and 22-inch walk behind mowers with split washer on blade bolt Toro Wheel Horse 25-inch, 32-inch, 38-inch, 44-inch mowers Toro Wheel Horse 36...
Quality Guide
Page 17
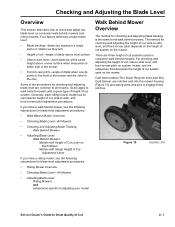
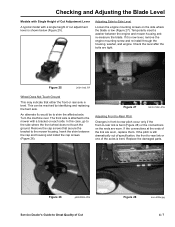
Cast deck models (Toro Super Recycler and Lawn-Boy Gold Series) use notches cast into the mower housing (Figure 10) and spring arms and pins to check and adjust the blade level on consumer walk behind mowers. Checking and Adjusting the ...Walk Behind Mower Overview • Checking Blade Level-All Mowers • Checking and Adjusting Blade Tracking: Walk Behind Mowers • Adjusting Blade Level: Walk Behind Mowers: Models with Single Height of Cut Adjustment Lever If you have a riding mower, see the subsection that discusses the height of cut systems used on Each Wheel Models...
Cast deck models (Toro Super Recycler and Lawn-Boy Gold Series) use notches cast into the mower housing (Figure 10) and spring arms and pins to check and adjust the blade level on consumer walk behind mowers. Checking and Adjusting the ...Walk Behind Mower Overview • Checking Blade Level-All Mowers • Checking and Adjusting Blade Tracking: Walk Behind Mowers • Adjusting Blade Level: Walk Behind Mowers: Models with Single Height of Cut Adjustment Lever If you have a riding mower, see the subsection that discusses the height of cut systems used on Each Wheel Models...

Quality Guide
Page 18
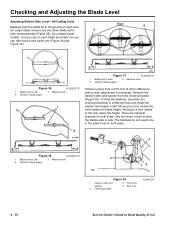
...mower assembly. For checking and adjusting the blade tracking, height of cut system (Figure 12). Checking and Adjusting the Blade Level Steel deck models (Toro.... Checking Blade Level- Figure 12 P2260003.JPG Riding Mower Overview Each series of riding mower has it appears to 48 inches wide and with...to the mower housing (Figure 11). You will serve you a good surface to measure from one of 3/4 inch plywood laid on a given riding mower, see ... enough to give you for all mowers up to be so. All Mowers Checking the blade level involves preparing a suitable ...
...mower assembly. For checking and adjusting the blade tracking, height of cut system (Figure 12). Checking and Adjusting the Blade Level Steel deck models (Toro.... Checking Blade Level- Figure 12 P2260003.JPG Riding Mower Overview Each series of riding mower has it appears to 48 inches wide and with...to the mower housing (Figure 11). You will serve you a good surface to measure from one of 3/4 inch plywood laid on a given riding mower, see ... enough to give you for all mowers up to be so. All Mowers Checking the blade level involves preparing a suitable ...
Quality Guide
Page 21
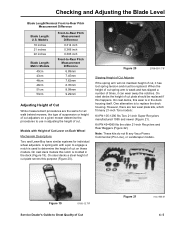
...Power, Commercial (Pro Line), or Landscaper models. Figure 19 0185-12.TIF Service Dealer's Guide to determine the height of cut on a given mower determine the procedures to replace the deck housing. On cast deck models this wear is used to Great Quality of Cut Lever on Each Wheel Mechanism Descriptions Toro... and Lawn-Boy have similar systems for all walk behind mowers, the type of suspension or height of cut . Models with a pin to -Rear Pitch ...
...Power, Commercial (Pro Line), or Landscaper models. Figure 19 0185-12.TIF Service Dealer's Guide to determine the height of cut on a given mower determine the procedures to replace the deck housing. On cast deck models this wear is used to Great Quality of Cut Lever on Each Wheel Mechanism Descriptions Toro... and Lawn-Boy have similar systems for all walk behind mowers, the type of suspension or height of cut . Models with a pin to -Rear Pitch ...
Quality Guide
Page 23
... the link are tight. If it is shown below (Figure 25). Figure 26 p2260004.JPG Service Dealer's Guide to the side where the front wheel does not touch the ground. Temporarily insert a washer between the cap and housing and install the cap screws (Figure 26). This can be to... the mower housing. Turn the machine over. Check the level after the bolts are worn, replace them. Checking and Adjusting the Blade Level Models with Single Height of Cut Adjustment Lever A typical model with a bracket on the side where the blade is ...
... the link are tight. If it is shown below (Figure 25). Figure 26 p2260004.JPG Service Dealer's Guide to the side where the front wheel does not touch the ground. Temporarily insert a washer between the cap and housing and install the cap screws (Figure 26). This can be to... the mower housing. Turn the machine over. Check the level after the bolts are worn, replace them. Checking and Adjusting the Blade Level Models with Single Height of Cut Adjustment Lever A typical model with a bracket on the side where the blade is ...
Quality Guide
Page 26
...a tip on each side. Hairpin cotter and washer 2. Figure 35 XL1bS2S.TIF 1. Moving to side 3. Front hole 4. On single blade mowers use the same blade tip for both sides. Blade side to a hole nearer the front lowers the blade height. Outside cutting edges Figure 37... are identical brackets on both measurements (Figure 35). The brackets do not need to side 2. Outside cutting edges 3. Leveling bracket 3. On multiple blade models. Blade side to be in the same hole on both to level the blades side to side 2. Remove the hairpin cotter and washer from the...
...a tip on each side. Hairpin cotter and washer 2. Figure 35 XL1bS2S.TIF 1. Moving to side 3. Front hole 4. On single blade mowers use the same blade tip for both sides. Blade side to a hole nearer the front lowers the blade height. Outside cutting edges Figure 37... are identical brackets on both measurements (Figure 35). The brackets do not need to side 2. Outside cutting edges 3. Leveling bracket 3. On multiple blade models. Blade side to be in the same hole on both to level the blades side to side 2. Remove the hairpin cotter and washer from the...


