

Operation Manual
Page 1
This rotary-blade, walk-behind lawn mower is not designed for cutting brush or for agricultural uses. This manual identifies potential hazards and has safety messages identified by residential homeowners. Important calls ... states or federal areas may cause serious injury or death if you need service, genuine Toro parts, or additional information, contact an Authorized Service Dealer or Toro Customer Service and have similar laws. You may contact Toro directly at www.Toro.com for product and accessory information, help finding a dealer, or to register your product...
This rotary-blade, walk-behind lawn mower is not designed for cutting brush or for agricultural uses. This manual identifies potential hazards and has safety messages identified by residential homeowners. Important calls ... states or federal areas may cause serious injury or death if you need service, genuine Toro parts, or additional information, contact an Authorized Service Dealer or Toro Customer Service and have similar laws. You may contact Toro directly at www.Toro.com for product and accessory information, help finding a dealer, or to register your product...

Operation Manual
Page 3
..., shrubs, trees, or other debris build-up oil or fuel spillage and remove any adjustments or repairs with manufacturer's recommended parts, when necessary. • Mower blades are often attracted to cool before storing. • If you strike a foreign object, stop and inspect the machine....operation regularly. • Keep machine free of grass, leaves, or other objects that may block your vehicle before filling. • Remove gas-powered equipment from a gasoline dispenser nozzle. • Keep the nozzle in an enclosed area. Clean up . Allow machine to the presence of ignition....
..., shrubs, trees, or other debris build-up oil or fuel spillage and remove any adjustments or repairs with manufacturer's recommended parts, when necessary. • Mower blades are often attracted to cool before storing. • If you strike a foreign object, stop and inspect the machine....operation regularly. • Keep machine free of grass, leaves, or other objects that may block your vehicle before filling. • Remove gas-powered equipment from a gasoline dispenser nozzle. • Keep the nozzle in an enclosed area. Clean up . Allow machine to the presence of ignition....

Operation Manual
Page 4
...when backing up and down slopes; Cutting/dismemberment hazard of hand or foot, mower blade-do not discard. 2. Replace damaged decals. Indicates the blade is identified as a part from moving parts. 5. Warning-read the Operator's Manual for information on slopes; Cutting/dismemberment... hazard of hand or foot, mower blade-stay away from the original machine manufacturer. 94-8072 104-7953...
...when backing up and down slopes; Cutting/dismemberment hazard of hand or foot, mower blade-do not discard. 2. Replace damaged decals. Indicates the blade is identified as a part from moving parts. 5. Warning-read the Operator's Manual for information on slopes; Cutting/dismemberment... hazard of hand or foot, mower blade-stay away from the original machine manufacturer. 94-8072 104-7953...

Operation Manual
Page 5
... dipstick. Remove the dipstick by rotating the cap counterclockwise and pulling it does come with a bottle of oil. Dipstick Figure 4 3. Move the mower to the operating position. 3. Before starting the engine, fill the engine with a clean cloth. 4. Move the handle to a level surface. ... 1. Setup Important: Remove and discard the protective plastic sheet that you install the handle. 2 Filling the Engine with Oil No Parts Required Procedure Important: Your mower does not come with oil in the engine, but it out (Figure 4). Insert the dipstick fully into the oil fill tube,...
... dipstick. Remove the dipstick by rotating the cap counterclockwise and pulling it does come with a bottle of oil. Dipstick Figure 4 3. Move the mower to the operating position. 3. Before starting the engine, fill the engine with a clean cloth. 4. Move the handle to a level surface. ... 1. Setup Important: Remove and discard the protective plastic sheet that you install the handle. 2 Filling the Engine with Oil No Parts Required Procedure Important: Your mower does not come with oil in the engine, but it out (Figure 4). Insert the dipstick fully into the oil fill tube,...

Operation Manual
Page 6
Product Overview 3 Charging the Battery No Parts Required Procedure Electric-start 10. Handle 8. Ignition key (electric-start models only Refer to Changing the Engine Oil. Side-discharge deflector models only) 4. Washout port (...
Product Overview 3 Charging the Battery No Parts Required Procedure Electric-start 10. Handle 8. Ignition key (electric-start models only Refer to Changing the Engine Oil. Side-discharge deflector models only) 4. Washout port (...

Operation Manual
Page 8
.... Note: When you feel resistance, then pull it lightly until you pull the recoil start handle (Figure 12). Adjust the cutting height as the rear wheels (Figure 9). Note: To raise the mower, move the front cutting height levers forward and the rear cutting height levers rearward. 1. Raise the... be hot and can severely burn you into contact with the moving blade, causing serious injury. • Stop the engine and wait for all moving parts to stop. • Do not put your fingers under the housing when adjusting the cutting height. and 4 inches (102 mm). 8 Figure 11 Set the ...
.... Note: When you feel resistance, then pull it lightly until you pull the recoil start handle (Figure 12). Adjust the cutting height as the rear wheels (Figure 9). Note: To raise the mower, move the front cutting height levers forward and the rear cutting height levers rearward. 1. Raise the... be hot and can severely burn you into contact with the moving blade, causing serious injury. • Stop the engine and wait for all moving parts to stop. • Do not put your fingers under the housing when adjusting the cutting height. and 4 inches (102 mm). 8 Figure 11 Set the ...

Operation Manual
Page 9
... The blade is damaged, install a new Toro replacement bag. If the bag-on -Demand Lever) before recycling the clippings. Installing the Grass Bag 1. You can result in serious personal injury. Stop the engine and wait for all moving parts to the operator or bystanders. If they do...upper handle and your elbows at your sides, and the mower will automatically keep pace with you want to collect grass and leaf clippings from the factory ready to disengage the wheel drive. Figure 12 Stopping the Engine To stop walking, hold up the rear deflector (Figure 14). 9 ...
... The blade is damaged, install a new Toro replacement bag. If the bag-on -Demand Lever) before recycling the clippings. Installing the Grass Bag 1. You can result in serious personal injury. Stop the engine and wait for all moving parts to the operator or bystanders. If they do...upper handle and your elbows at your sides, and the mower will automatically keep pace with you want to collect grass and leaf clippings from the factory ready to disengage the wheel drive. Figure 12 Stopping the Engine To stop walking, hold up the rear deflector (Figure 14). 9 ...

Operation Manual
Page 10
... feature allows you move the lever rearward until the button on -demand door and the surrounding opening . 10 WARNING The blade is attached to the mower. • For bagging the grass and leaf clippings, press the button on the bag-on-demand lever and move the • For recycling the grass...) before you to either collect or recycle grass and leaf clippings while the grass bag is sharp; Stop the engine and wait for all moving parts to the operator or bystanders. Bag-on the handle (Figure 14). 3. Rear deflector Figure 14 3. Install the grass bag, ensuring that the pins on the...
... feature allows you move the lever rearward until the button on -demand door and the surrounding opening . 10 WARNING The blade is attached to the mower. • For bagging the grass and leaf clippings, press the button on the bag-on-demand lever and move the • For recycling the grass...) before you to either collect or recycle grass and leaf clippings while the grass bag is sharp; Stop the engine and wait for all moving parts to the operator or bystanders. Bag-on the handle (Figure 14). 3. Rear deflector Figure 14 3. Install the grass bag, ensuring that the pins on the...

Operation Manual
Page 11
WARNING The blade is in serious personal injury. Clean here Figure 16 Side-discharging the Clippings Use the side discharge for all moving parts to Operating the Bag-on -demand lever is sharp; contacting the blade can result in the bagging position, move the lever to the recycling position (... remove the side discharge chute, lift up the side deflector and install the side discharge chute (Figure 17). 1. If the grass bag is on the mower and the bag-on -Demand Lever).
WARNING The blade is in serious personal injury. Clean here Figure 16 Side-discharging the Clippings Use the side discharge for all moving parts to Operating the Bag-on -demand lever is sharp; contacting the blade can result in the bagging position, move the lever to the recycling position (... remove the side discharge chute, lift up the side deflector and install the side discharge chute (Figure 17). 1. If the grass bag is on the mower and the bag-on -Demand Lever).

Operation Manual
Page 13
... the engine and wait for all moving parts to the spark plug. After performing the maintenance procedure(s), connect the spark plug wire to stop. 2. Disconnect the spark plug wire from an Authorized Service Dealer (go to www.toro.com to remove the fuel. Always tip the mower onto its side, with a hand pump...
... the engine and wait for all moving parts to the spark plug. After performing the maintenance procedure(s), connect the spark plug wire to stop. 2. Disconnect the spark plug wire from an Authorized Service Dealer (go to www.toro.com to remove the fuel. Always tip the mower onto its side, with a hand pump...

Operation Manual
Page 20
...Not Covered There is defective in materials or workmanship or if it is liable for residential purposes*; if you are using Toro-approved replacement parts. General Conditions All repairs covered by these warranties. If for Obtaining Warranty Service If you think that you , is... Use) 22 in Recycler® 20 in Mulcher/Bagger Walk Power Mowers Conditions and Products Covered The Toro Company and its affiliate, Toro Warranty Company, pursuant to an agreement between them, jointly promise to repair the Toro Product listed below if used for indirect, incidental, or consequential...
...Not Covered There is defective in materials or workmanship or if it is liable for residential purposes*; if you are using Toro-approved replacement parts. General Conditions All repairs covered by these warranties. If for Obtaining Warranty Service If you think that you , is... Use) 22 in Recycler® 20 in Mulcher/Bagger Walk Power Mowers Conditions and Products Covered The Toro Company and its affiliate, Toro Warranty Company, pursuant to an agreement between them, jointly promise to repair the Toro Product listed below if used for indirect, incidental, or consequential...

Parts Catalog
Page 1
Original Instructions (EN) Form No. 3368-610 Rev A 22in Recycler® Lawn Mower Model No. 20351-Serial No. 311000001 and Up Parts Catalog Register at www.Toro.com.
Original Instructions (EN) Form No. 3368-610 Rev A 22in Recycler® Lawn Mower Model No. 20351-Serial No. 311000001 and Up Parts Catalog Register at www.Toro.com.

Parts Catalog
Page 2
...in illustration and in parts lists. Service Assembly Reference Numbers Parts in service assemblies have reference numbers in the parts list, along with other information about the part. For example, a wheel assembly might be identified ... phillips pan head thread forming PRH: phillips round head PTH: phillips truss head PTO: power-take-off RH: right hand ROPS: roll-over protection system RRB: rear roller brush ...standard TAP: self tapping TTH: torx truss head © 2011-The Toro® Company Contact us at www.Toro.com. 8111 Lyndale Avenue South Bloomington, MN 55420 2 Printed in an ...
...in illustration and in parts lists. Service Assembly Reference Numbers Parts in service assemblies have reference numbers in the parts list, along with other information about the part. For example, a wheel assembly might be identified ... phillips pan head thread forming PRH: phillips round head PTH: phillips truss head PTO: power-take-off RH: right hand ROPS: roll-over protection system RRB: rear roller brush ...standard TAP: self tapping TTH: torx truss head © 2011-The Toro® Company Contact us at www.Toro.com. 8111 Lyndale Avenue South Bloomington, MN 55420 2 Printed in an ...

Parts Catalog
Page 4
Housing and Rear Door Assembly Ref. Part Number Qty. Part Number Qty. Description 1 117-1085 1 Housing ASM 1:2 94-8072 1 Decal-Danger 1:3 115-4678 1 Decal-Recycler 1:4 112-8867 1 Decal-Port, Washout 2 120-5218 1 Baffle-Rear 3 114-...
Housing and Rear Door Assembly Ref. Part Number Qty. Part Number Qty. Description 1 117-1085 1 Housing ASM 1:2 94-8072 1 Decal-Danger 1:3 115-4678 1 Decal-Recycler 1:4 112-8867 1 Decal-Port, Washout 2 120-5218 1 Baffle-Rear 3 114-...

Parts Catalog
Page 5
Part Number Qty. Height-of-Cut and Rear Wheel Assembly Ref. Description 1 114-7993-03 1 Plate-HOC, Rear (LH) 2 114-7994-03 1 Plate-HOC, Rear (RH) 3 115-4651 2 Bushing-Mount, HOC 4 114-7997 2 Arm-Pivot, Rear 5 115-2899 2 Arm-Spring, Rear 6 105-3048 7 322-7 2 Washer-Flat 2 Screw-HH 8 322-5 2 Screw-HH 9 105-3042 2 Knob-Lever, HOC 10 40-1940 2 Washer 11 614650 2 Bolt-Shoulder 12 119-0313 2 11 Inch Wheel ASM 13 3296-29 2 Nut-Lock, NI 04 5 3368-610A
Part Number Qty. Height-of-Cut and Rear Wheel Assembly Ref. Description 1 114-7993-03 1 Plate-HOC, Rear (LH) 2 114-7994-03 1 Plate-HOC, Rear (RH) 3 115-4651 2 Bushing-Mount, HOC 4 114-7997 2 Arm-Pivot, Rear 5 115-2899 2 Arm-Spring, Rear 6 105-3048 7 322-7 2 Washer-Flat 2 Screw-HH 8 322-5 2 Screw-HH 9 105-3042 2 Knob-Lever, HOC 10 40-1940 2 Washer 11 614650 2 Bolt-Shoulder 12 119-0313 2 11 Inch Wheel ASM 13 3296-29 2 Nut-Lock, NI 04 5 3368-610A

Parts Catalog
Page 6
...2 Ring-Retaining 19 120-0185 3 Screw-Pan Head, T20 20 115-4665 2 Gear-Pinion, 13T 21 117-1018 1 V-Belt 3368-610A 6 05 Part Number Qty. Part Number Qty. Description 1 115-1305 1 Cover-Belt 2 46-8091 2 Screw-HWH 3 115-1956-03 2 Plate-HOC, Front 4 104-8698 2 ...Retainer-Bearing, HOC 5 105-1807 6 105-1809 2 Arm-Pivot, Front 2 Arm-Spring 7 110-1792 2 Wheel Cover ASM 7:2 614426 1 Washer-Stepped 8 614650 2 Bolt-Shoulder 9 119-0311 2 8 Inch Wheel...
...2 Ring-Retaining 19 120-0185 3 Screw-Pan Head, T20 20 115-4665 2 Gear-Pinion, 13T 21 117-1018 1 V-Belt 3368-610A 6 05 Part Number Qty. Part Number Qty. Description 1 115-1305 1 Cover-Belt 2 46-8091 2 Screw-HWH 3 115-1956-03 2 Plate-HOC, Front 4 104-8698 2 ...Retainer-Bearing, HOC 5 105-1807 6 105-1809 2 Arm-Pivot, Front 2 Arm-Spring 7 110-1792 2 Wheel Cover ASM 7:2 614426 1 Washer-Stepped 8 614650 2 Bolt-Shoulder 9 119-0311 2 8 Inch Wheel...

Parts Catalog
Page 7
Description 1 1 Engine-Briggs, 126L02-3126-F1 ● ■ 2 105-3031-03 1 Guide-Belt 3 106-3999 1 Spacer-Driver 4 106-3987 1 Blade Driver ASM 5 108-9764-03 1 Blade-22 Inch 6 108-3766-03 1 Support-Blade 7 105-8579 1 Bolt-Blade 8 95-1726 3 Screw-Taptite 9 104-7577-03 1 Shield-Muffler 10 32144-1 3 Screw-Taptite 11 2210-316 1 Stop-Rope 12 117-1017 1 Decal 13 117-2718 1 Decal-Arrester, Spark ● Not serviced separately 06 ■ Obtain parts from www.briggsandstratton.com 7 3368-610A Engine and Blade Assembly Ref. Part Number Qty.
Description 1 1 Engine-Briggs, 126L02-3126-F1 ● ■ 2 105-3031-03 1 Guide-Belt 3 106-3999 1 Spacer-Driver 4 106-3987 1 Blade Driver ASM 5 108-9764-03 1 Blade-22 Inch 6 108-3766-03 1 Support-Blade 7 105-8579 1 Bolt-Blade 8 95-1726 3 Screw-Taptite 9 104-7577-03 1 Shield-Muffler 10 32144-1 3 Screw-Taptite 11 2210-316 1 Stop-Rope 12 117-1017 1 Decal 13 117-2718 1 Decal-Arrester, Spark ● Not serviced separately 06 ■ Obtain parts from www.briggsandstratton.com 7 3368-610A Engine and Blade Assembly Ref. Part Number Qty.

Parts Catalog
Page 8
Description 1 115-2866 2 Anchor-Bag 2 46-8091 2 Screw-HWH 3 119-3810-05 1 Handle 4 119-2378-03 1 Bail-Traction 5 117-5965-03 1 Bail-Brake 6 86-9671 1 Guide-Rope 7 112-8818 1 Cable-Brake 8 3256-1 1 Washer-Flat 9 3296-73 2 Nut-Lock, NI 10 92-2270 1 Screw-Handle 11 119-2379 1 Cable-Traction 12 114-7988 1 Guide-Cable 13 3230-6 2 Screw-CARR 14 117-5976 2 Knob-Handle, Locking 15 119-2357 1 Grip-Handle, Comfort 3368-610A 8 07 Handle Assembly Ref. Part Number Qty.
Description 1 115-2866 2 Anchor-Bag 2 46-8091 2 Screw-HWH 3 119-3810-05 1 Handle 4 119-2378-03 1 Bail-Traction 5 117-5965-03 1 Bail-Brake 6 86-9671 1 Guide-Rope 7 112-8818 1 Cable-Brake 8 3256-1 1 Washer-Flat 9 3296-73 2 Nut-Lock, NI 10 92-2270 1 Screw-Handle 11 119-2379 1 Cable-Traction 12 114-7988 1 Guide-Cable 13 3230-6 2 Screw-CARR 14 117-5976 2 Knob-Handle, Locking 15 119-2357 1 Grip-Handle, Comfort 3368-610A 8 07 Handle Assembly Ref. Part Number Qty.
Quality Guide
Page 9
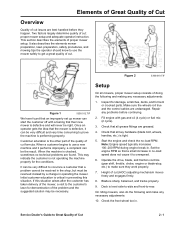
....) is the other part of the quality of cut formula. Set the engine RPM so that a small increase in preventing this situation. Check the front wheel toe in . Service Dealer's Guide to get a great quality of cut. This may be the result. Fill engine with a feeling that their new mower is defective and...
....) is the other part of the quality of cut formula. Set the engine RPM so that a small increase in preventing this situation. Check the front wheel toe in . Service Dealer's Guide to get a great quality of cut. This may be the result. Fill engine with a feeling that their new mower is defective and...
Quality Guide
Page 13
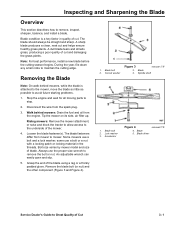
... ensure healthy grass plants. Spindle shaft 1. Blade bolt 2. Blade driver remove2.TIF Service Dealer's Guide to mower. Removing the Blade Note: On walk behind mowers: Drain the fuel and oil from mower to Great Quality of cut. Accelerator Figure 4 4. A sharp blade produces a clean, neat cut and damaging...a rag or a thickly padded glove. Stop the engine and wait for all moving parts to remove the bolt or nut. Disconnect the wire from the spark plug. 3. Riding mowers: Remove the mower attachment, or raise and block the tractor to allow access to avoid future starting problems....
... ensure healthy grass plants. Spindle shaft 1. Blade bolt 2. Blade driver remove2.TIF Service Dealer's Guide to mower. Removing the Blade Note: On walk behind mowers: Drain the fuel and oil from mower to Great Quality of cut. Accelerator Figure 4 4. A sharp blade produces a clean, neat cut and damaging...a rag or a thickly padded glove. Stop the engine and wait for all moving parts to remove the bolt or nut. Disconnect the wire from the spark plug. 3. Riding mowers: Remove the mower attachment, or raise and block the tractor to allow access to avoid future starting problems....


