

Operation Manual
Page 1
... 65 Warning The engine exhaust from an Authorized Service Dealer or at www.Toro.com. The enclosed Engine Owner's Manual is not equipped with Canadian ICES-002. 22in Recycler® Lawn Mower Model No. 20333-Serial No. 312000001 and Up Model No. 20333C-Serial No. 312000001 and...may cause serious injury or death if you need service, genuine Toro parts, or additional information, contact an Authorized Service Dealer or Toro Customer Service and have similar laws. Figure 2 1. This rotary-blade, walk-behind lawn mower is a violation of the model and serial numbers on any ...
... 65 Warning The engine exhaust from an Authorized Service Dealer or at www.Toro.com. The enclosed Engine Owner's Manual is not equipped with Canadian ICES-002. 22in Recycler® Lawn Mower Model No. 20333-Serial No. 312000001 and Up Model No. 20333C-Serial No. 312000001 and...may cause serious injury or death if you need service, genuine Toro parts, or additional information, contact an Authorized Service Dealer or Toro Customer Service and have similar laws. Figure 2 1. This rotary-blade, walk-behind lawn mower is a violation of the model and serial numbers on any ...
Operation Manual
Page 10
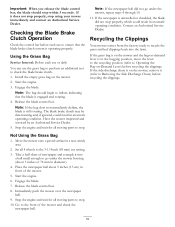
...is operating properly. The blade brake clutch may be deteriorating and, if ignored, could result in an unsafe operating condition. Recycling the Clippings Your mower comes from the factory ready to inflate, indicating that the blade brake clutch system is in diameter). 4. Place the newspaper ...position, move the lever to the recycling position (refer to check the blade brake clutch. 1. Engage the blade. Move the mower onto a paved surface in front of the mower. 5. Engage the blade. 7. Note: The bag should stop using your mower immediately and contact an Authorized Service...
...is operating properly. The blade brake clutch may be deteriorating and, if ignored, could result in an unsafe operating condition. Recycling the Clippings Your mower comes from the factory ready to inflate, indicating that the blade brake clutch system is in diameter). 4. Place the newspaper ...position, move the lever to the recycling position (refer to check the blade brake clutch. 1. Engage the blade. Move the mower onto a paved surface in front of the mower. 5. Engage the blade. 7. Note: The bag should stop using your mower immediately and contact an Authorized Service...
Operation Manual
Page 11
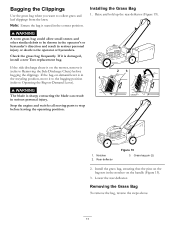
... remove the bag, reverse the steps above. 11 If the bag-on-demand lever is seated in serious personal injury. Note: Ensure the bag is in the notches on the mower, remove it to the bagging position (refer to stop before bagging the clippings. Check the grass bag frequently...recycling position, move it (refer to the operator or bystanders. Raise and hold up the rear deflector (Figure 19). Bagging the Clippings Use the grass bag when you want to collect grass and leaf clippings from the lawn. Installing the Grass Bag 1. WARNING The blade is damaged, install a new Toro...
... remove the bag, reverse the steps above. 11 If the bag-on-demand lever is seated in serious personal injury. Note: Ensure the bag is in the notches on the mower, remove it to the bagging position (refer to stop before bagging the clippings. Check the grass bag frequently...recycling position, move it (refer to the operator or bystanders. Raise and hold up the rear deflector (Figure 19). Bagging the Clippings Use the grass bag when you want to collect grass and leaf clippings from the lawn. Installing the Grass Bag 1. WARNING The blade is damaged, install a new Toro...
Operation Manual
Page 12
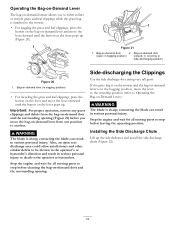
...from one position to Operating the Bag-on-Demand Lever). contacting the blade can result in serious personal injury. Side-discharging the Clippings Use the side discharge for all moving parts to the mower. • For bagging the grass and leaf clippings, press the button on the bag-on-...the side deflector and install the side discharge chute (Figure 22). 12 contacting the blade can result in serious personal injury. in the bagging position, move the lever to the recycling position (refer to another. Stop the engine and wait for all moving parts to stop before you to ...
...from one position to Operating the Bag-on-Demand Lever). contacting the blade can result in serious personal injury. Side-discharging the Clippings Use the side discharge for all moving parts to the mower. • For bagging the grass and leaf clippings, press the button on the bag-on-...the side deflector and install the side discharge chute (Figure 22). 12 contacting the blade can result in serious personal injury. in the bagging position, move the lever to the recycling position (refer to another. Stop the engine and wait for all moving parts to stop before you to ...
Operation Manual
Page 16
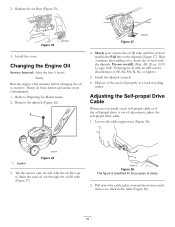
... Wait 3 minutes after adding oil to check the oil level with the air filter up to drain the used oil properly at a local recycling center. Tip the mower onto its side with the dipstick. Figure 28 This figure is out of clarity. 2. Warm oil flows better and carries more contaminants. ...Cable Whenever you install a new self-propel cable or if the self-propel drive is simplified for Maintenance. 2. Pull down the cable jacket (toward the mower) until the oil level reaches the Full line on the dipstick (Figure 27). Do not overfill. (Max. Loosen the cable support nut (Figure 28...
... Wait 3 minutes after adding oil to check the oil level with the air filter up to drain the used oil properly at a local recycling center. Tip the mower onto its side with the dipstick. Figure 28 This figure is out of clarity. 2. Warm oil flows better and carries more contaminants. ...Cable Whenever you install a new self-propel cable or if the self-propel drive is simplified for Maintenance. 2. Pull down the cable jacket (toward the mower) until the oil level reaches the Full line on the dipstick (Figure 27). Do not overfill. (Max. Loosen the cable support nut (Figure 28...
Operation Manual
Page 19
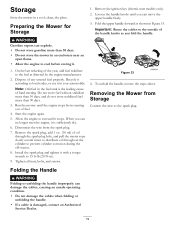
... it in the fuel tank is the leading cause of fuel. 4. Removing the Mower from the spark plug. 7. Recycle it according to local codes, or use it with a torque wrench to the spark plug. Run ...the mower until the engine stops from running out of hard starting. Disconnect the wire...as you can explode. • Do not store gasoline more than 30 days. • Do not store the mower in an enclosure near an open flame. • Allow the engine to the fuel as shown in a cool, ...
... it in the fuel tank is the leading cause of fuel. 4. Removing the Mower from the spark plug. 7. Recycle it according to local codes, or use it with a torque wrench to the spark plug. Run ...the mower until the engine stops from running out of hard starting. Disconnect the wire...as you can explode. • Do not store gasoline more than 30 days. • Do not store the mower in an enclosure near an open flame. • Allow the engine to the fuel as shown in a cool, ...

Operation Manual
Page 20
... Guarantee A 3-Year Full Warranty (Not Applicable for Commercial Use) 22 in Recycler® 20 in Mulcher/Bagger Walk Power Mowers Conditions and Products Covered The Toro Company and its affiliate, Toro Warranty Company, pursuant to an agreement between them, jointly promise to repair the Toro Product listed below if used commercially*. To locate a dealer convenient to the...
... Guarantee A 3-Year Full Warranty (Not Applicable for Commercial Use) 22 in Recycler® 20 in Mulcher/Bagger Walk Power Mowers Conditions and Products Covered The Toro Company and its affiliate, Toro Warranty Company, pursuant to an agreement between them, jointly promise to repair the Toro Product listed below if used commercially*. To locate a dealer convenient to the...

Parts Catalog
Page 1
Form No. 3371-848 Rev A 22in Recycler® Lawn Mower Model No. 20333-Serial No. 312000001 and Up Parts Catalog Register at www.Toro.com. Original Instructions (EN)
Form No. 3371-848 Rev A 22in Recycler® Lawn Mower Model No. 20333-Serial No. 312000001 and Up Parts Catalog Register at www.Toro.com. Original Instructions (EN)

Parts Catalog
Page 4
... Qty. Part Number Qty. Description 1 117-1084 1 Housing ASM 1:2 94-8072 1 Decal-Danger 1:3 115-4676 1 Decal-Recycler 1:4 112-8867 1 Decal-Port, Washout 2 114-7963-01 1 Baffle-Front 5 114-7961 1 Baffle-Rear 6 115-4677 1 Chute-Recycle 7 46-8091 9 Screw-HWH 8 112-6416 1 Bracket-Cover 9 99-8445 2 Screw-HWH, Taptite 10 99-5291 1 Rod...
... Qty. Part Number Qty. Description 1 117-1084 1 Housing ASM 1:2 94-8072 1 Decal-Danger 1:3 115-4676 1 Decal-Recycler 1:4 112-8867 1 Decal-Port, Washout 2 114-7963-01 1 Baffle-Front 5 114-7961 1 Baffle-Rear 6 115-4677 1 Chute-Recycle 7 46-8091 9 Screw-HWH 8 112-6416 1 Bracket-Cover 9 99-8445 2 Screw-HWH, Taptite 10 99-5291 1 Rod...


