
Toro 20332 Support Question
Toro 20332 Support Question
Find answers below for this question about Toro 20332 - Recycler 190CC Personal Pace Lawn Mower.Need a Toro 20332 manual? We have 2 online manuals for this item!
Question posted by Lovhossel on October 28th, 2013
How To Restring My Toro Recycler Lawn Mower
The person who posted this question about this Toro product did not include a detailed explanation. Please use the "Request More Information" button to the right if more details would help you to answer this question.
Current Answers
Answer #1: Posted by freginold on December 15th, 2013 8:21 AM
freginold

Member since:
December 20th, 2011 Points: 23,253,885

Member since:
December 20th, 2011 Points: 23,253,885
Hi, you can find instructions for doing that here:
http://askville.amazon.com/replace-starter-rope-toro-super-recycler-lawn-mower/AnswerViewer.do?requestId=82752215
http://askville.amazon.com/replace-starter-rope-toro-super-recycler-lawn-mower/AnswerViewer.do?requestId=82752215
Related Toro 20332 Manual Pages
Operation Manual - Page 1

... injury or death if you need service, genuine Toro parts, or additional information, contact an Authorized Service Dealer or Toro Customer Service and have similar laws. This manual ...
Figure 1 1. This spark ignition system complies with a spark arrester muffler.
22in Recycler® Lawn Mower
Model No. 20332-Serial No. 312000001 and Up Model No. 20334-Serial No. 312000001 and Up Model...
Operation Manual - Page 2

...the operator. Uneven terrain could result in severe injury.
To reduce this class of lawn mower will be ordered through the engine manufacturer. walk; Only use accessories approved by the ... slopes; Tall grass can amputate hands and feet and throw objects. As configured to potential personal injury hazards.
Failure to vibrate abnormally, stop before starting .
• Do not put hands...
Operation Manual - Page 3

Service
Safe Handling of Gasoline
To avoid personal injury or property damage, use extra caution when servicing them .
&#...8226; Never operate machine in safe working condition.
• Never tamper with manufacturer's recommended parts, when necessary.
• Mower blades are explosive.
• Extinguish all nuts and bolts tight to be sure the equipment is complete.
Allow engine to ...
Operation Manual - Page 4

... Decals
Important: Safety and instruction decals are located near areas of hand or foot, mower blade-remove the ignition key and read the instructions before leaving the operating position; contains...Operator's Manual for information on slopes; Cutting/dismemberment hazard of hand or foot, mower blade-stay away from the machine.
3.
Warning-read the Operator's Manual.
2. Read the Operator...
Operation Manual - Page 5

...through 5 until the oil level is at the Full mark on the dipstick. Max. Move the mower to the operating position. 3. Note: If the oil level is damaged, contact an Authorized
Service ... that you install the handle.
2
Filling the Engine with Oil
No Parts Required
Procedure
Important: Your mower does not come with oil in the crankcase, then do the following: 1.
Dipstick
Figure 4
3. ...
Operation Manual - Page 7

...with an API service classification of 87 or higher) from igniting the gasoline, place the container and/or mower directly on the dipstick, slowly pour a small amount of children. Do not mix oil with oil and... wait 3 minutes, and repeat steps 3 through 5 until the oil level on the dipstick. Move the mower to the fuel all season, mixing it with a clean cloth.
4.
Note: If the oil level is...
Operation Manual - Page 8

... the recoil start handle, pull it lightly until you feel resistance, then pull it sharply (Figure 12). Lower the mower
Note: The cutting height settings are 1 inch (25 mm); 1-3/8 inches (35 mm); 1-3/4 inches (44 mm... height. Adjust the cutting height as the rear wheels (Figure 9). To lower the mower, move the front cutting height levers rearward and the rear cutting height levers forward. ...
Operation Manual - Page 9

...Recycling the Clippings
Your mower comes from the lawn.
If the mower still does not roll backward easily, contact an Authorized Service Dealer. If the side discharge chute is on -demand lever is in serious personal injury. If the bag-on the mower, remove it is sharp; WARNING
The blade is damaged, install a new Toro...the personal pace handle to the metal handle and push the mower forward ...
Operation Manual - Page 10

... and other similar debris to be thrown in the operator's or bystander's direction and result in serious personal injury or death to the mower. • For bagging the grass and leaf clippings, press the
button on the bag-on-demand ...For proper operation, remove any grass clippings and debris from one position to either collect or recycle grass and leaf clippings while the grass bag is sharp;
Operation Manual - Page 11

... chute (Figure 17).
1.
WARNING
The blade is in serious personal injury. contacting the blade can result in the bagging position, move the lever to the recycling position (refer to stop before leaving the operating position. If the grass bag is on the mower and the bag-on -Demand Lever).
Installing the Side Discharge...
Operation Manual - Page 12

... begins.
• Replace the blade when necessary with a Toro replacement blade.
This helps disperse the clippings over any object.
• If the mower strikes an object or starts to Adjusting the Cutting Height.
...the blade. Set the cutting height on the lawn, set the front wheels at 2-1/8-inch (54 mm) and the rear wheels at a slower pace while mowing.
- Raise the cutting height on...
Operation Manual - Page 13

...Always tip the mower onto its side, with a hand pump; WARNING
Tipping the mower may cause the fuel to the spark plug. Gasoline is flammable, explosive and can cause personal injury. After...cooling system; Note: Replacement parts are available from an Authorized Service Dealer (go to www.toro.com to your engine operator's manual for Maintenance
1.
Maintenance
Note: Determine the left and ...
Operation Manual - Page 14

... the dipstick clean with oil and run the engine. Note: If the oil level is at a local recycling center.
14 Dipstick
Figure 20
4. Remove the dipstick (Figure 20). Replace the air filter (Figure 19)....filter cover
(Figure 19). 2. Warm oil flows better and carries more contaminants. 1.
Return the mower to the operating position. 6. Read the oil level on the dipstick reads Full. 11. ...
Operation Manual - Page 15

... hours initially, then monthly (every 25 starts) or as needed. Connect the charger to the mower wire harness
located below the ignition key (Figure 22).
• A green light indicates that ...Note: Your battery charger may be blown. Note: When the battery no longer holds a charge, recycle or dispose of the lead-acid battery according to cause cancer and reproductive harm. Battery 4. Always...
Operation Manual - Page 16

...is sharp; 1 2 3
1. Replace the fuse in serious personal injury.
Figure 26
Important: Position the curved ends of wood to point toward the mower housing. 6. Use a torque wrench to tighten the blade bolt ...cracked, replace it . contacting the blade can result in the fuse holder (Figure 24). Tip the mower onto its side with a spare fuse in step 3. 6. Use a block of the blade to ...
Operation Manual - Page 17

...the self-propel drive is very difficult to overtighten. Refer to its lowest cutting height setting. Move the mower onto a flat paved surface. 3. Attach a garden hose that come out from rusting.
10. Loosen ...is out of clarity.
1.
Turn the water on -demand in an enclosed area.
17 Lower the mower to Adjusting the Cutting Height. 2. Note: Wash out the area with the bag-on .
6. ...
Operation Manual - Page 18

... Run the mower until the engine stops from the spark plug.
7. Disconnect the wire from running out of hard starting. Charge the battery for 24 hours (electric-start model only). 2.
Recycle it according... the handle. • If a cable is sufficiently dry.
6. Figure 29
4. Removing the Mower from Storage
1. On the last refueling of oil through the spark plug hole, and pull the...
Operation Manual - Page 20

... the Yellow Pages of repairs under "Lawn Mowers") or access our web site at 866-214-9807 (U.S. improper starting procedures. This can no other rights which has been altered or misused and requires
replacement or repair due to accidents or lack of a component;
Use at their Toro Distributor (Dealer) to obtain guarantee policies...
Parts Catalog - Page 1

Original Instructions (EN) Form No. 3371-846 Rev A
22in Recycler® Lawn Mower
Model No. 20332-Serial No. 312000001 and Up
Parts Catalog
Register at www.Toro.com.
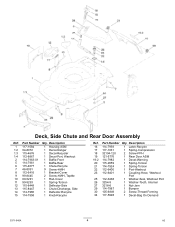
Parts Catalog - Page 4
...
2 114-7963-01 1 Baffle-Front
5 114-7961
1 Baffle-Rear
6 115-4677
1 Chute-Recycle
7 46-8091
9 Screw-HWH
8 112-6416
1 Bracket-Cover
9 99-8445
2 Screw-HWH,... Chute-Discharge, Side
14 114-7960
1 Deflector-Recycle
15 114-7958
1 Knob-Recycle
Ref. Deck, Side Chute and Rear Door Assembly
Ref. Description
16 114-7959
1 Latch-Recycle
17 117-1031
1 Spring-Compression
18 32104-120
...
Similar Questions

Toro 190cc Personal Pace Will Not Revers
(Posted by daddbp 10 years ago)

Toro 190cc Personal Pace Won't Start
(Posted by Soupokef 10 years ago)

How To Change Oil On A Toro Recycler (22 ) 190cc Personal Pace Lawn Mower
(Posted by tinaScamp1 10 years ago)

22 Personal Pace Recycler Lawn Mower Won't Start
(Posted by Jorsamuel 10 years ago)
Blade For Model 20037 Personal Pace Lawn Mower
where can i buy a replacement 21 inch bladefor my 2003 Toro model 20037 personal Pace lawn mower???
where can i buy a replacement 21 inch bladefor my 2003 Toro model 20037 personal Pace lawn mower???
(Posted by lynnegrede 12 years ago)