

Operation Manual
Page 1
..., contact an Authorized Service Dealer or Toro Customer Service and have similar laws. Read this product contains chemicals known to the State of special attention. Important calls attention to highlight information. 22in Recycler® Lawn Mower Model No. 20332-Serial No. 312000001 and Up Model No...1 1. Introduction Model No. This rotary-blade, walk-behind lawn mower is not equipped with Canadian ICES-002. © 2011-The Toro® Company 8111 Lyndale Avenue South Bloomington, MN 55420 Register at www.Toro.com for operating the product properly and safely. Serial No. ...
..., contact an Authorized Service Dealer or Toro Customer Service and have similar laws. Read this product contains chemicals known to the State of special attention. Important calls attention to highlight information. 22in Recycler® Lawn Mower Model No. 20332-Serial No. 312000001 and Up Model No...1 1. Introduction Model No. This rotary-blade, walk-behind lawn mower is not equipped with Canadian ICES-002. © 2011-The Toro® Company 8111 Lyndale Avenue South Bloomington, MN 55420 Register at www.Toro.com for operating the product properly and safely. Serial No. ...

Operation Manual
Page 9
...seconds. WARNING The blade is damaged, install a new Toro replacement bag. Raise and hold your mower immediately and contact an Authorized Service Dealer. Figure 12 Stopping the Engine To stop using your hands in serious personal injury or death to disengage the wheel drive. If they...blade can also try reaching just under the personal pace handle to the metal handle and push the mower forward a couple of inches (centimeters) forward to the operator or bystanders. Recycling the Clippings Your mower comes from the lawn. If the mower still does not roll backward easily, contact ...
...seconds. WARNING The blade is damaged, install a new Toro replacement bag. Raise and hold your mower immediately and contact an Authorized Service Dealer. Figure 12 Stopping the Engine To stop using your hands in serious personal injury or death to disengage the wheel drive. If they...blade can also try reaching just under the personal pace handle to the metal handle and push the mower forward a couple of inches (centimeters) forward to the operator or bystanders. Recycling the Clippings Your mower comes from the lawn. If the mower still does not roll backward easily, contact ...

Operation Manual
Page 10
...the bag, reverse the steps above. WARNING The blade is attached to the mower. • For bagging the grass and leaf clippings, press the button on the bag-on-demand lever and move the • For recycling the grass and leaf clippings, press the button on the lever and move the... up (Figure 15) Figure 15 1. Important: For proper operation, remove any grass clippings and debris from the bag-on -demand lever (in serious personal injury. Rear deflector Figure 14 3. Bag-on -demand door and the surrounding opening . 10 contacting the blade can result in bagging position) 1.
...the bag, reverse the steps above. WARNING The blade is attached to the mower. • For bagging the grass and leaf clippings, press the button on the bag-on-demand lever and move the • For recycling the grass and leaf clippings, press the button on the lever and move the... up (Figure 15) Figure 15 1. Important: For proper operation, remove any grass clippings and debris from the bag-on -demand lever (in serious personal injury. Rear deflector Figure 14 3. Bag-on -demand door and the surrounding opening . 10 contacting the blade can result in bagging position) 1.

Operation Manual
Page 11
... discharge for all moving parts to Operating the Bag-on -demand lever is in serious personal injury. Figure 17 Removing the Side Discharge Chute To remove the side discharge chute, lift ...Figure 17). 1. contacting the blade can result in the bagging position, move the lever to the recycling position (refer to stop before leaving the operating position. Stop the engine and wait for cutting ...very tall grass. If the grass bag is sharp; WARNING The blade is on the mower and the bag-on -Demand Lever). Installing the Side Discharge Chute Lift up the side deflector,...
... discharge for all moving parts to Operating the Bag-on -demand lever is in serious personal injury. Figure 17 Removing the Side Discharge Chute To remove the side discharge chute, lift ...Figure 17). 1. contacting the blade can result in the bagging position, move the lever to the recycling position (refer to stop before leaving the operating position. Stop the engine and wait for cutting ...very tall grass. If the grass bag is sharp; WARNING The blade is on the mower and the bag-on -Demand Lever). Installing the Side Discharge Chute Lift up the side deflector,...

Operation Manual
Page 14
Move the mower to warm it. Remove the dipstick (Figure 20). Wait 3 minutes for Maintenance. 3. Note: If the oil level is at a local recycling center. 14 Dipstick Figure 20 4. Pour about 3/4 of the crankcase capacity of oil into the oil fill tube and repeat steps 8 through the oil fill ... fill tube securely. 12. Read the oil level on the dipstick reads Full. 11. Important: Do not overfill the crankcase with a clean cloth. 9. Tip the mower onto its side with the air filter up to settle. 8. Refer to Preparing for the oil to drain the used oil properly at the Full...
Move the mower to warm it. Remove the dipstick (Figure 20). Wait 3 minutes for Maintenance. 3. Note: If the oil level is at a local recycling center. 14 Dipstick Figure 20 4. Pour about 3/4 of the crankcase capacity of oil into the oil fill tube and repeat steps 8 through the oil fill ... fill tube securely. 12. Read the oil level on the dipstick reads Full. 11. Important: Do not overfill the crankcase with a clean cloth. 9. Tip the mower onto its side with the air filter up to settle. 8. Refer to Preparing for the oil to drain the used oil properly at the Full...

Operation Manual
Page 15
...in the battery compartment area. 3. Rear deflector 2. Battery 4. Battery compartment Figure 22 2. Note: When the battery no longer holds a charge, recycle or dispose of the lead-acid battery according to cause cancer and reproductive harm. Replace it with the electric starter, the fuse may have a .... 2. Plug the charger into a wall outlet. Screw Figure 23 3. Note: Your battery charger may be blown. Connect the charger to the mower wire harness located below the ignition key (Figure 22). • A green light indicates that the charger is fully charged or the charger is ...
...in the battery compartment area. 3. Rear deflector 2. Battery 4. Battery compartment Figure 22 2. Note: When the battery no longer holds a charge, recycle or dispose of the lead-acid battery according to cause cancer and reproductive harm. Replace it with the electric starter, the fuse may have a .... 2. Plug the charger into a wall outlet. Screw Figure 23 3. Note: Your battery charger may be blown. Connect the charger to the mower wire harness located below the ignition key (Figure 22). • A green light indicates that the charger is fully charged or the charger is ...

Operation Manual
Page 18
...an enclosure near an open flame. • Allow the engine to local codes, or use it is damaged, contact an Authorized Service Dealer. 1. Recycle it according to cool before storing it stops. Disconnect the wire from running out of the handle knobs as shown in a cool, clean, dry... place. Loosely install the spark plug. 9. To unfold the handle, reverse the steps above. Preparing the Mower for Storage WARNING Gasoline vapors can move the upper handle freely. 3. On the last refueling of hard starting. Tighten all nuts, bolts, and screws. ...
...an enclosure near an open flame. • Allow the engine to local codes, or use it is damaged, contact an Authorized Service Dealer. 1. Recycle it according to cool before storing it stops. Disconnect the wire from running out of the handle knobs as shown in a cool, clean, dry... place. Loosely install the spark plug. 9. To unfold the handle, reverse the steps above. Preparing the Mower for Storage WARNING Gasoline vapors can move the upper handle freely. 3. On the last refueling of hard starting. Tighten all nuts, bolts, and screws. ...

Operation Manual
Page 20
... period of non-use of parts and labor, but you are dissatisfied with your telephone directory (look under "Lawn Mowers") or access our web site at their Toro Distributor (Dealer) to obtain guarantee policies for your product's engine in one location, or institutional or rental use... also call the numbers listed in item #3 to use , are using Toro-approved replacement parts. customers) Toll free at Toro Warranty Company. *Residential purposes means use pending completion of purchase: Products 22 in Recycler and 20 in Mulcher/Bagger and Attachments GTS (Guaranteed to Start) Engine ...
... period of non-use of parts and labor, but you are dissatisfied with your telephone directory (look under "Lawn Mowers") or access our web site at their Toro Distributor (Dealer) to obtain guarantee policies for your product's engine in one location, or institutional or rental use... also call the numbers listed in item #3 to use , are using Toro-approved replacement parts. customers) Toll free at Toro Warranty Company. *Residential purposes means use pending completion of purchase: Products 22 in Recycler and 20 in Mulcher/Bagger and Attachments GTS (Guaranteed to Start) Engine ...

Parts Catalog
Page 1
Original Instructions (EN) Form No. 3371-846 Rev A 22in Recycler® Lawn Mower Model No. 20332-Serial No. 312000001 and Up Parts Catalog Register at www.Toro.com.
Original Instructions (EN) Form No. 3371-846 Rev A 22in Recycler® Lawn Mower Model No. 20332-Serial No. 312000001 and Up Parts Catalog Register at www.Toro.com.
Parts Catalog
Page 4
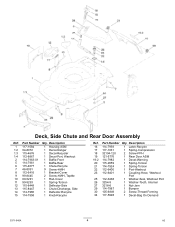
...3371-846A 4 A2 Description 1 117-1084 1 Housing ASM 1:2 94-8072 1 Decal-Danger 1:3 115-4676 1 Decal-Recycler 1:4 112-8867 1 Decal-Port, Washout 2 114-7963-01 1 Baffle-Front 5 114-7961 1 Baffle-Rear 6 115-4677 1 Chute-Recycle 7 46-8091 9 Screw-HWH 8 112-6416 1 Bracket-Cover 9 99-8445 2 Screw-HWH, Taptite 10 99-... Rod-Cover 11 99-5293 1 Spring-Torsion 12 115-8449 1 Deflector-Side 13 115-8447 1 Chute-Discharge, Side 14 114-7960 1 Deflector-Recycle 15 114-7958 1 Knob-Recycle Ref. Deck, Side Chute and Rear Door Assembly Ref. Part Number Qty. Part Number Qty.
...3371-846A 4 A2 Description 1 117-1084 1 Housing ASM 1:2 94-8072 1 Decal-Danger 1:3 115-4676 1 Decal-Recycler 1:4 112-8867 1 Decal-Port, Washout 2 114-7963-01 1 Baffle-Front 5 114-7961 1 Baffle-Rear 6 115-4677 1 Chute-Recycle 7 46-8091 9 Screw-HWH 8 112-6416 1 Bracket-Cover 9 99-8445 2 Screw-HWH, Taptite 10 99-... Rod-Cover 11 99-5293 1 Spring-Torsion 12 115-8449 1 Deflector-Side 13 115-8447 1 Chute-Discharge, Side 14 114-7960 1 Deflector-Recycle 15 114-7958 1 Knob-Recycle Ref. Deck, Side Chute and Rear Door Assembly Ref. Part Number Qty. Part Number Qty.


