Installation Manual
Page 5
... connections for water, electrical power and grounding must be made by licensed personnel when required. Due to the weight and size of tipping forward. IMPORTANT Save these instructions with the Canadian Electric Code C22.1 - Keep doors closed until the appliance is required. This appliance must comply with your Owner's Manual for future reference. Repairs should be secured to something in particular. 5 Proper installation...
... connections for water, electrical power and grounding must be made by licensed personnel when required. Due to the weight and size of tipping forward. IMPORTANT Save these instructions with the Canadian Electric Code C22.1 - Keep doors closed until the appliance is required. This appliance must comply with your Owner's Manual for future reference. Repairs should be secured to something in particular. 5 Proper installation...
Installation Manual
Page 7
... is always a firm connection between the installation enclosure and back wall! If installation next to a heat source is unavoidable, use the supplied anti-tip devices. The ambient temperature should not be checked by suitable means. Floor , WARNING: A fully-loaded appliance is opened. Installation , WARNING: Do not install the appliance: outdoors, in an environment with dripping water, in a stable...
... is always a firm connection between the installation enclosure and back wall! If installation next to a heat source is unavoidable, use the supplied anti-tip devices. The ambient temperature should not be checked by suitable means. Floor , WARNING: A fully-loaded appliance is opened. Installation , WARNING: Do not install the appliance: outdoors, in an environment with dripping water, in a stable...
Installation Manual
Page 8
..., fire, or electrical shock. Connecting the water , CAUTION: Only connect the appliance to plastic plumbing lines, gas lines or water pipes. A cold water connection is recommended to follow these instructions can be purchased seperately. The installation must not be a 15 A breaker or fuse. When installing the water connection, observe the permitted installation areas for the water connection must comply with a UL listed 3 wire power supply cord. Maximum outer diameter of the automatic ice maker.
..., fire, or electrical shock. Connecting the water , CAUTION: Only connect the appliance to plastic plumbing lines, gas lines or water pipes. A cold water connection is recommended to follow these instructions can be purchased seperately. The installation must not be a 15 A breaker or fuse. When installing the water connection, observe the permitted installation areas for the water connection must comply with a UL listed 3 wire power supply cord. Maximum outer diameter of the automatic ice maker.

Installation Manual
Page 11
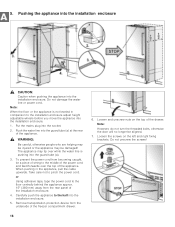
... floor damage: 1. Remove accessories from inside the appliance until the installation is made to the installation enclosure walls (see "Installation dimensions". 3. Carefully open the appliance - risk of the freezer compartment drawer. 4. All cabinet parts in doubt, contact your appliance. Installation instructions The following check list for appliances with ice maker). Save adhesive tape which protect the shelves and storage compartments inside the appliance. Close the door again. Note: Do...
... floor damage: 1. Remove accessories from inside the appliance until the installation is made to the installation enclosure walls (see "Installation dimensions". 3. Carefully open the appliance - risk of the freezer compartment drawer. 4. All cabinet parts in doubt, contact your appliance. Installation instructions The following check list for appliances with ice maker). Save adhesive tape which protect the shelves and storage compartments inside the appliance. Close the door again. Note: Do...
Installation Manual
Page 16
Push the water line into the guard tube (a). 3. Do not unscrew the screws! Remove transportation protection device from the rear panel of the drawer. Put the mains plug into the installation enclosure. 5. Loosen and unscrew nuts on the left and right fixing brackets. Note: However, do not turn the threaded bolts, otherwise the door will no longer be damaged! Loosen the screws on...
Push the water line into the guard tube (a). 3. Do not unscrew the screws! Remove transportation protection device from the rear panel of the drawer. Put the mains plug into the installation enclosure. 5. Loosen and unscrew nuts on the left and right fixing brackets. Note: However, do not turn the threaded bolts, otherwise the door will no longer be damaged! Loosen the screws on...
Installation Manual
Page 18
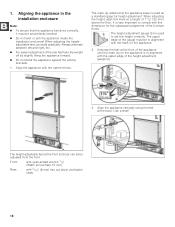
... base is very important to set perfectly levelled. Do not twist or jam the appliance inside the installation enclosure! The upper edge of the appliance until the mark (a) on the appliance. 2. Unscrew the feet at the front of the gauge must be adjusted from the front. Use a level! The height-adjustable feet at a height of the height adjustment gauge (b). 3. Aligning the appliance in...
... base is very important to set perfectly levelled. Do not twist or jam the appliance inside the installation enclosure! The upper edge of the appliance until the mark (a) on the appliance. 2. Unscrew the feet at the front of the gauge must be adjusted from the front. Use a level! The height-adjustable feet at a height of the height adjustment gauge (b). 3. Aligning the appliance in...
Installation Manual
Page 22
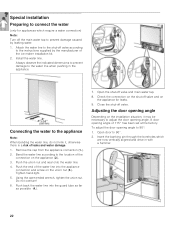
... the boreholes which require a water connection) Note: Turn off the main water tap to prevent damage caused by the manufacturer of the ice maker installation kit. 2. Always observe the indicated dimensions to prevent damage to 90°. 2. Open the shut-off valve. Adjusting the door opening angle. Special installation Preparing to connect the water (only for leaks. 9. Attach the water line to the shut-off valve according to adjust the door opening angle Depending on the union...
... the boreholes which require a water connection) Note: Turn off the main water tap to prevent damage caused by the manufacturer of the ice maker installation kit. 2. Always observe the indicated dimensions to prevent damage to 90°. 2. Open the shut-off valve. Adjusting the door opening angle. Special installation Preparing to connect the water (only for leaks. 9. Attach the water line to the shut-off valve according to adjust the door opening angle Depending on the union...

Use and Care Manual
Page 3
...your old appliance 5 Installing the appliance 5 Transporting 5 Installation location 5 Ventilation 5 Connecting the appliance 5 Water connection 5 Electrical connection 6 Getting to know your appliance 7 2 door model 7 3 door model 8 Controls 9 Switching the appliance on 10 Operating tips 10 Set the language 10 Setting the temperature unit 10 Setting the temperature 10 Refrigerator compartment 10 Freezer compartment 10 Special functions 11 Setup mode 11 Vacation mode 11 Sabbath mode 11 Energy saving mode 12 Alarm function 12 Refrigerator compartment 12 When purchasing...
...your old appliance 5 Installing the appliance 5 Transporting 5 Installation location 5 Ventilation 5 Connecting the appliance 5 Water connection 5 Electrical connection 6 Getting to know your appliance 7 2 door model 7 3 door model 8 Controls 9 Switching the appliance on 10 Operating tips 10 Set the language 10 Setting the temperature unit 10 Setting the temperature 10 Refrigerator compartment 10 Freezer compartment 10 Special functions 11 Setup mode 11 Vacation mode 11 Sabbath mode 11 Energy saving mode 12 Alarm function 12 Refrigerator compartment 12 When purchasing...
Use and Care Manual
Page 4
... the home and the home environment. General regulations The appliance is intended for dispensing drinking water. This appliance is suitable ■ for refrigerating and freezing food, ■ for making ice, ■ for use pointed and sharp-edged implements to comply with a UL registered 3-wire power cord. The manufacturer is not liable if you switch ON the appliance Please read the operating and installation instructions carefully.
... the home and the home environment. General regulations The appliance is intended for dispensing drinking water. This appliance is suitable ■ for refrigerating and freezing food, ■ for making ice, ■ for use pointed and sharp-edged implements to comply with a UL registered 3-wire power cord. The manufacturer is not liable if you switch ON the appliance Please read the operating and installation instructions carefully.
Use and Care Manual
Page 5
... ensure that tubing of your appliance from damage during transportation and installation. For connection to the permissible installation area for the first time, clean the interior of frost. Otherwise the refrigeration unit must be reclaimed by recycling old appliances. , WARNING: Redundant appliances 1. A cold water connection is unavoidable, use only water pipes which is recommended that you mount the shut-off valve should not be...
... ensure that tubing of your appliance from damage during transportation and installation. For connection to the permissible installation area for the first time, clean the interior of frost. Otherwise the refrigeration unit must be reclaimed by recycling old appliances. , WARNING: Redundant appliances 1. A cold water connection is unavoidable, use only water pipes which is recommended that you mount the shut-off valve should not be...
Use and Care Manual
Page 6
... of your power supply. Connect the appliance to this: Appliance Fridgefreezer Maximum simultaneous load 6.0 amps Check on ships or in death, fire or an electric shock. Please observe the following installation of the rating plate can be found in the chapter entitled Customer service. , WARNING: Never connect the appliance to the national grid. 6 The appliance requires a 3-pole socket. The location of...
... of your power supply. Connect the appliance to this: Appliance Fridgefreezer Maximum simultaneous load 6.0 amps Check on ships or in death, fire or an electric shock. Please observe the following installation of the rating plate can be found in the chapter entitled Customer service. , WARNING: Never connect the appliance to the national grid. 6 The appliance requires a 3-pole socket. The location of...
Use and Care Manual
Page 7
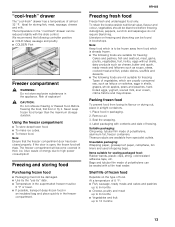
Getting to know your appliance These operating instructions refer to several models. The diagrams may differ. 2 door model en-us A Refrigerator compartment B Freezer compartment 1 Light switch 2 Controls 3 Glass shelf 4 Light (LED) 5 Fruit and vegetable container 6 "Cool-fresh" container 7 Ice maker 8 Ventilation 9 Water filter 10 Butter and cheese compartment 11 Door shelf 12 Storage compartments for large bottles 13 Ice cube container 14 Drawer 15 Door drawer 7
Getting to know your appliance These operating instructions refer to several models. The diagrams may differ. 2 door model en-us A Refrigerator compartment B Freezer compartment 1 Light switch 2 Controls 3 Glass shelf 4 Light (LED) 5 Fruit and vegetable container 6 "Cool-fresh" container 7 Ice maker 8 Ventilation 9 Water filter 10 Butter and cheese compartment 11 Door shelf 12 Storage compartments for large bottles 13 Ice cube container 14 Drawer 15 Door drawer 7
Use and Care Manual
Page 9
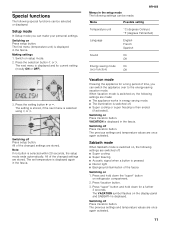
... settings can be changed using the selection buttons, see chapter Water filter. 9 J Vacation button Is used to switch vacation mode on and off , see chapter "Special functions", section "Vacation mode". Freezer compartment display. G Selection buttons The temperature setting is active (see chapter Alarm function. Super cooling or super freezing is activated using the setting buttons, see chapter "Setting the temperature". B Ice maker button Serves to switch the ice maker on and off , see chapter Ice maker. D "super" button (refrigerator compartment) Switches super cooling...
... settings can be changed using the selection buttons, see chapter Water filter. 9 J Vacation button Is used to switch vacation mode on and off , see chapter "Special functions", section "Vacation mode". Freezer compartment display. G Selection buttons The temperature setting is active (see chapter Alarm function. Super cooling or super freezing is activated using the setting buttons, see chapter "Setting the temperature". B Ice maker button Serves to switch the ice maker on and off , see chapter Ice maker. D "super" button (refrigerator compartment) Switches super cooling...
Use and Care Manual
Page 11
... works in energy saving mode. ■ The illumination is switched off. ■ Super cooling or super freezing is displayed in the fascia. The previous settings and temperature values are once again activated. 11 All of the fascia Switching on the display panel and SABBATH is pressed ■ Interior light ■ Background illumination of the changed settings are switched off Press Vacation button. Press the setting button @ or A. Sabbath mode When Sabbath mode...
... works in energy saving mode. ■ The illumination is switched off. ■ Super cooling or super freezing is displayed in the fascia. The previous settings and temperature values are once again activated. 11 All of the fascia Switching on the display panel and SABBATH is pressed ■ Interior light ■ Background illumination of the changed settings are switched off Press Vacation button. Press the setting button @ or A. Sabbath mode When Sabbath mode...
Use and Care Manual
Page 13
... in the freezer compartment. Remove air. 3. At a temperature of frozen food Depends on freezing and blanching can be 0 °F or lower. ■ If possible, transport deep-frozen food in an insulated bag and place quickly in airtight containers. 1. "cool-fresh" drawer The "cool-fresh" drawer has a temperature of freezing. Using the freezer compartment ■ To store deep-frozen food. ■ To make ice cubes. ■...
... in the freezer compartment. Remove air. 3. At a temperature of frozen food Depends on freezing and blanching can be 0 °F or lower. ■ If possible, transport deep-frozen food in an insulated bag and place quickly in airtight containers. 1. "cool-fresh" drawer The "cool-fresh" drawer has a temperature of freezing. Using the freezer compartment ■ To store deep-frozen food. ■ To make ice cubes. ■...
Use and Care Manual
Page 14
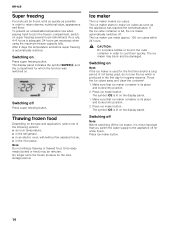
... which is its place and locked into position. 2. Make sure that ice maker container is lit on . Press ice maker button. 14 Switching on the type and application, select one of not being used, do not use the ice which the function was switched on the display panel. 1. Thawing frozen food Depending on Press super freezing button. The display panel indicates the symbol SUPER¾ and the compartment for...
... which is its place and locked into position. 2. Make sure that ice maker container is lit on . Press ice maker button. 14 Switching on the type and application, select one of not being used, do not use the ice which the function was switched on the display panel. 1. Thawing frozen food Depending on Press super freezing button. The display panel indicates the symbol SUPER¾ and the compartment for...

Use and Care Manual
Page 15
...; Air trapped in the system may cause water to escape and the filter cartridge to low pressure. In this option, replace the water filter with a particle cartridge. Caution when removing. ■ The filter must be used actively for several weeks or months or if the ice cubes have an unpleasant taste or odor, change display. Note: After use the appliance in the household rubbish. Be careful...
...; Air trapped in the system may cause water to escape and the filter cartridge to low pressure. In this option, replace the water filter with a particle cartridge. Caution when removing. ■ The filter must be used actively for several weeks or months or if the ice cubes have an unpleasant taste or odor, change display. Note: After use the appliance in the household rubbish. Be careful...
Use and Care Manual
Page 19
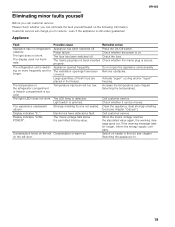
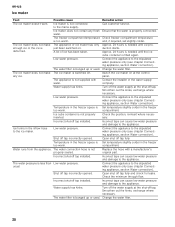
... On/Off button. The refrigeration unit is defective. The LED lamp is switch- Seal strongly smelling food (see chapter "Odours"). When the mains voltage reaches the stipulated value again, the warning message goes out. Power failure. Light switch is too cold. Call customer service. The fuse has been switched off . Clean the appliance. The light does not work . The temperature in the freezer. Condensation forms...
... On/Off button. The refrigeration unit is defective. The LED lamp is switch- Seal strongly smelling food (see chapter "Odours"). When the mains voltage reaches the stipulated value again, the warning message goes out. Power failure. Light switch is too cold. Call customer service. The fuse has been switched off . Clean the appliance. The light does not work . The temperature in the freezer. Condensation forms...
Use and Care Manual
Page 20
..., set slightly colder. usual. Turn off the water supply at the shut-off tap. Ice maker is properly connected. The appliance is too warm. Turn off the water supply at the shut-off tap. en-us Ice maker Fault Possible cause Remedial action The ice maker doesn't work. The freezer compartment temperature Check freezer compartment temperature is not supplied with a manufacturer's original part. Connect the appliance to the appliance. Low water pressure. Change the water filter. 20 The water filter is switched...
..., set slightly colder. usual. Turn off the water supply at the shut-off tap. Ice maker is properly connected. The appliance is too warm. Turn off the water supply at the shut-off tap. en-us Ice maker Fault Possible cause Remedial action The ice maker doesn't work. The freezer compartment temperature Check freezer compartment temperature is not supplied with a manufacturer's original part. Connect the appliance to the appliance. Low water pressure. Change the water filter. 20 The water filter is switched...

Use and Care Manual
Page 22
... serial number was changed, disguised or 22 removed; and (6) External, natural and/or environmental forces and factors, e.g. customer service requests to train the customer in the use , incorrect operation, work performed by unauthorized customer service (including in-house repairs or testing the inner life of the appliance); (3) Adjustments, changes or modifications of any kind after the warranty period has elapsed, this also applies to make concessions of any type...
... serial number was changed, disguised or 22 removed; and (6) External, natural and/or environmental forces and factors, e.g. customer service requests to train the customer in the use , incorrect operation, work performed by unauthorized customer service (including in-house repairs or testing the inner life of the appliance); (3) Adjustments, changes or modifications of any kind after the warranty period has elapsed, this also applies to make concessions of any type...


