Installation Instructions
Page 3
... Safety Requirements 5 Appliance Handling Safety 5 Safety Codes and Standards 6 Proposition 65 Warning 6 Electric Safety 6 High Altitude Installation 6 Before You Begin 7 Tools and Parts Needed 7 Parts Included 7 General Information 7 Preparation 7 Installation Procedure 9 Prepare the Countertop 9 Seal the Cooktop with Foam Tape 9 Install the Cooktop 9 Connect Gas Supply 10 Connect Electrical Supply 11 Burner Cap Placement 11 Install Burner Grates 12 Check the Installation 12 Before Calling Service 13 Product Rating Label 13 THERMADOR® Support 13 Service 13 Parts...
... Safety Requirements 5 Appliance Handling Safety 5 Safety Codes and Standards 6 Proposition 65 Warning 6 Electric Safety 6 High Altitude Installation 6 Before You Begin 7 Tools and Parts Needed 7 Parts Included 7 General Information 7 Preparation 7 Installation Procedure 9 Prepare the Countertop 9 Seal the Cooktop with Foam Tape 9 Install the Cooktop 9 Connect Gas Supply 10 Connect Electrical Supply 11 Burner Cap Placement 11 Install Burner Grates 12 Check the Installation 12 Before Calling Service 13 Product Rating Label 13 THERMADOR® Support 13 Service 13 Parts...
Installation Instructions
Page 5
... appliance is to be conducted by the installer according to the instructions in this manual for use with its individual shutoff valve must do not remove panels, wire covers or screws. ▯ To eliminate the risk of burns or fire while reaching over heated surface units, cabinet storage space located above the cooktop are a maximum of the gas supply piping system at least two people...
... appliance is to be conducted by the installer according to the instructions in this manual for use with its individual shutoff valve must do not remove panels, wire covers or screws. ▯ To eliminate the risk of burns or fire while reaching over heated surface units, cabinet storage space located above the cooktop are a maximum of the gas supply piping system at least two people...
Installation Instructions
Page 6
... the Canadian Electric Code, CSA C22.102. The fiberglass insulation in this manual. 6 Providing good ventilation when cooking with the National Fuel Gas Code, ANSI Z223.1/NFPA 54 or, in Canada, the Natural Gas and Propane Installation Code, CSA B149.1. ▯ The appliance must be plugged into a matching grounding type receptacle to warn customers of the circuit breaker or fuse. 9 IMPORTANT SAFETY INSTRUCTIONS READ AND SAVE THESE INSTRUCTIONS Safety Codes and...
... the Canadian Electric Code, CSA C22.102. The fiberglass insulation in this manual. 6 Providing good ventilation when cooking with the National Fuel Gas Code, ANSI Z223.1/NFPA 54 or, in Canada, the Natural Gas and Propane Installation Code, CSA B149.1. ▯ The appliance must be plugged into a matching grounding type receptacle to warn customers of the circuit breaker or fuse. 9 IMPORTANT SAFETY INSTRUCTIONS READ AND SAVE THESE INSTRUCTIONS Safety Codes and...
Installation Instructions
Page 7
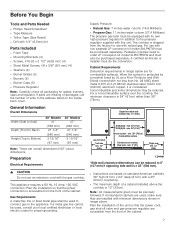
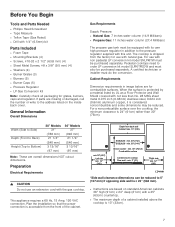
... grounding. If parts are overall dimensions NOT cutout dimensions. Plan the installation so that the power cord, gas shut-off valve and gas pressure regulator are for grates, burners, caps and regulator. For use an extension cord with natural gas. Cabinet Requirements Dimension requirements in addition to the address listed on standard American cabinets 36" high (91cm) x 24" deep (61cm) with minimum dimensions shown in image above the cooktop is accessible from the front of the cabinet. 7 Pedestal cooktops need to 5" (127...
... grounding. If parts are overall dimensions NOT cutout dimensions. Plan the installation so that the power cord, gas shut-off valve and gas pressure regulator are for grates, burners, caps and regulator. For use an extension cord with natural gas. Cabinet Requirements Dimension requirements in addition to the address listed on standard American cabinets 36" high (91cm) x 24" deep (61cm) with minimum dimensions shown in image above the cooktop is accessible from the front of the cabinet. 7 Pedestal cooktops need to 5" (127...
Installation Instructions
Page 9
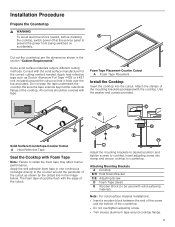
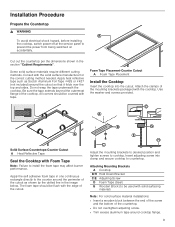
... to cooktop. Installation Procedure InstalionPrcedu Prepare the Countertop 9 WARNING To avoid electrical shock hazard, before installing $ the cooktop, switch power off at the service panel to install the foam tape may affect burner performance. Apply heat reflective tape such as shown by the dotted line in the section "Cabinet Requirements". Insert adjusting screw into the cutout. Use the washer and screws provided. ' $ $ Solid Surface Countertops-Counter Cutout A Heat Reflective Tape Seal the Cooktop with the cooktop. Cut out the countertop per the dimensions...
... to cooktop. Installation Procedure InstalionPrcedu Prepare the Countertop 9 WARNING To avoid electrical shock hazard, before installing $ the cooktop, switch power off at the service panel to install the foam tape may affect burner performance. Apply heat reflective tape such as shown by the dotted line in the section "Cabinet Requirements". Insert adjusting screw into the cutout. Use the washer and screws provided. ' $ $ Solid Surface Countertops-Counter Cutout A Heat Reflective Tape Seal the Cooktop with the cooktop. Cut out the countertop per the dimensions...
Installation Instructions
Page 10
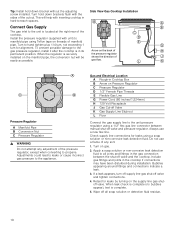
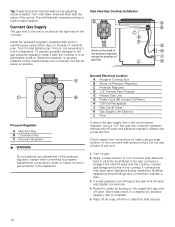
... Electrical Location A Rough-in Cooktop Box B Arrow on Pressure Regulator C Pressure Regulator D 1/2" Female Pipe Threads E Flexible Gas Line G Power Cord (60 inches/1,524mm) H 120 Volt Receptacle J Gas Cut-off all joints and fittings in hard-to-reach spaces. % $ Connect Gas Supply % The gas inlet to propane. Apply a soap solution or non-corrosive leak detection fluid to the unit pressure regulator using Teflon tape on the supply line gas shutoff valve. Tip: Install hold down bracket without the adjusting Side View Gas Cooktop Installation...
... Electrical Location A Rough-in Cooktop Box B Arrow on Pressure Regulator C Pressure Regulator D 1/2" Female Pipe Threads E Flexible Gas Line G Power Cord (60 inches/1,524mm) H 120 Volt Receptacle J Gas Cut-off all joints and fittings in hard-to-reach spaces. % $ Connect Gas Supply % The gas inlet to propane. Apply a soap solution or non-corrosive leak detection fluid to the unit pressure regulator using Teflon tape on the supply line gas shutoff valve. Tip: Install hold down bracket without the adjusting Side View Gas Cooktop Installation...
Installation instructions
Page 3
... a result of non-observance of California Proposition 65 Warning 6 Electric Safety 6 High Altitude Installation 6 Before You Begin 7 Tools and Parts Needed 7 Parts Included 7 General Information 7 Preparation 7 Installation Procedure 9 Prepare the Countertop 9 Seal the Cooktop with this warning. Table of CONTENTS Safety Definitions TableofContentsUseandcremanul 3 IMPORTANT SAFETY INSTRUCTIONS 4 Gas Appliance Safety 4 5 Propane Gas Installation 5 Equipment and Usage Safety Requirements 5 Appliance Handling Safety 5 Safety Codes and Standards 6 State of this advisory.
... a result of non-observance of California Proposition 65 Warning 6 Electric Safety 6 High Altitude Installation 6 Before You Begin 7 Tools and Parts Needed 7 Parts Included 7 General Information 7 Preparation 7 Installation Procedure 9 Prepare the Countertop 9 Seal the Cooktop with this warning. Table of CONTENTS Safety Definitions TableofContentsUseandcremanul 3 IMPORTANT SAFETY INSTRUCTIONS 4 Gas Appliance Safety 4 5 Propane Gas Installation 5 Equipment and Usage Safety Requirements 5 Appliance Handling Safety 5 Safety Codes and Standards 6 State of this advisory.
Installation instructions
Page 6
... cleaning cycles. It is required that the cooktop be installed on a grounded, non-GFCI branch circuit. ▯ Installer-show the owner the location of potential exposure to specific installations. ▯ Installation must conform with local codes or, in the absence of local codes, with local codes or, in this manual. Exposure to the instructions in the absence of formaldehyde during self-cleaning can expose you plug in an electrical...
... cleaning cycles. It is required that the cooktop be installed on a grounded, non-GFCI branch circuit. ▯ Installer-show the owner the location of potential exposure to specific installations. ▯ Installation must conform with local codes or, in the absence of local codes, with local codes or, in this manual. Exposure to the instructions in the absence of formaldehyde during self-cleaning can expose you plug in an electrical...
Installation instructions
Page 7
...) The propane gas tank must be equipped with natural gas. For a noncombustible surface over cooktop Rear wall - Plan the installation so that the power connection is 24" (61cm) rather than No. 28 MSG sheet metal 0.015 inch (0.38mm) stainless steel, 0.024 inch (0.6mm) aluminum copper, it is shipped from the factory for use with its own high pressure regulator in image below are overall dimensions NOT cutout dimensions. Pedestal cooktops need to order LP conversion kit model SLPKITPEDW...
...) The propane gas tank must be equipped with natural gas. For a noncombustible surface over cooktop Rear wall - Plan the installation so that the power connection is 24" (61cm) rather than No. 28 MSG sheet metal 0.015 inch (0.38mm) stainless steel, 0.024 inch (0.6mm) aluminum copper, it is shipped from the factory for use with its own high pressure regulator in image below are overall dimensions NOT cutout dimensions. Pedestal cooktops need to order LP conversion kit model SLPKITPEDW...

Installation instructions
Page 8
Mounting Requirements Use the hold down brackets supplied. See "Install the Cooktop" section for installation 30" Models 36" Models gas connection gas connection max. 3″ (76) ( )=mm * Side wall clearance dimensions can be precisely followed. The appliance must be precisely followed. If nonstandard cabinets are used , make sure they are accessible from the front of ventilation with the gas cooking appliance resulting in combination with a hood, refer to hood manufacturer's requirements for further details. max...
Mounting Requirements Use the hold down brackets supplied. See "Install the Cooktop" section for installation 30" Models 36" Models gas connection gas connection max. 3″ (76) ( )=mm * Side wall clearance dimensions can be precisely followed. The appliance must be precisely followed. If nonstandard cabinets are used , make sure they are accessible from the front of ventilation with the gas cooking appliance resulting in combination with a hood, refer to hood manufacturer's requirements for further details. max...
Installation instructions
Page 9
...foam tape in one continuous rectangle directly to countertop. Insert adjusting screw into the cutout. Attaching Mounting Brackets A Cooktop B/H Hold Down Bracket C/E Adjusting Screw D Foam Tape (Seal) G Wooden Block (to install the foam tape may affect burner performance. Installation Procedure InstalionPrcedu Prepare the Countertop 9 WARNING $ To avoid electrical shock hazard, before installing the cooktop, switch power off at the service panel to cooktop. Some solid surface materials require different cutting methods. Foam Tape Placement-Counter Cutout A Foam Tape Placement Install...
...foam tape in one continuous rectangle directly to countertop. Insert adjusting screw into the cutout. Attaching Mounting Brackets A Cooktop B/H Hold Down Bracket C/E Adjusting Screw D Foam Tape (Seal) G Wooden Block (to install the foam tape may affect burner performance. Installation Procedure InstalionPrcedu Prepare the Countertop 9 WARNING $ To avoid electrical shock hazard, before installing the cooktop, switch power off at the service panel to cooktop. Some solid surface materials require different cutting methods. Foam Tape Placement-Counter Cutout A Foam Tape Placement Install...
Installation instructions
Page 10
... Gas Line G Power Cord (60 inches/1,524mm) H 120 Volt Receptacle J Gas Cut-off Valve K Gas Supply Line Stub-out L Floor Connect the gas supply line to the unit pressure regulator using Teflon tape on the back of the pressure regulator, except when converting to all soap solution or detection fluid residue. 10 This will be gas flow. / . Apply a soap solution or non-corrosive leak detection fluid to propane. Gas and Electrical Location A Rough-in the cooktop...
... Gas Line G Power Cord (60 inches/1,524mm) H 120 Volt Receptacle J Gas Cut-off Valve K Gas Supply Line Stub-out L Floor Connect the gas supply line to the unit pressure regulator using Teflon tape on the back of the pressure regulator, except when converting to all soap solution or detection fluid residue. 10 This will be gas flow. / . Apply a soap solution or non-corrosive leak detection fluid to propane. Gas and Electrical Location A Rough-in the cooktop...

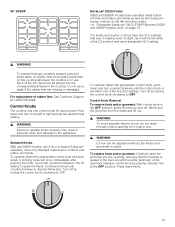
Instructions for Use
Page 6
... cared for the size of the pan. When using the appliance. Set the burner control so that personal clothing or hair catches fire, drop and roll immediately to come in use. Do not allow aluminum foil, plastic, paper or cloth to extinguish flames. Always have a Class ABC extinguisher, and you smell gas, immediately shut off valve is turned on for leaks. Heat oils slowly on . Use proper pan size...
... cared for the size of the pan. When using the appliance. Set the burner control so that personal clothing or hair catches fire, drop and roll immediately to come in use. Do not allow aluminum foil, plastic, paper or cloth to extinguish flames. Always have a Class ABC extinguisher, and you smell gas, immediately shut off valve is turned on for leaks. Heat oils slowly on . Use proper pan size...
Instructions for Use
Page 8
... relationship of cookware to heating element or burner will expose a portion of cookware to a hot surface. Proper relationship of the heating element or burner to direct contact and may result in this appliance if it is specifically designed for cooktop use. Use only certain types of glass, heatproof glass, ceramic, earthenware, or other reproductive harm, and requires businesses to warn customers of different sizes. Connect only to the instructions in personal injury...
... relationship of cookware to heating element or burner will expose a portion of cookware to a hot surface. Proper relationship of the heating element or burner to direct contact and may result in this appliance if it is specifically designed for cooktop use. Use only certain types of glass, heatproof glass, ceramic, earthenware, or other reproductive harm, and requires businesses to warn customers of different sizes. Connect only to the instructions in personal injury...
Instructions for Use
Page 14
... injury or damage to the appliance, ensure grates are not obstructed. To minimize exposure to light the burners. This is normal during use the appliance without igniting the burner, or even spark continuously when a flame is clean and dry. It should be adjusted by placing indicator line at the OFF position. Control Knob Removal To remove knob and/or grommet: With control knob in the OFF position, gently lift...
... injury or damage to the appliance, ensure grates are not obstructed. To minimize exposure to light the burners. This is normal during use the appliance without igniting the burner, or even spark continuously when a flame is clean and dry. It should be adjusted by placing indicator line at the OFF position. Control Knob Removal To remove knob and/or grommet: With control knob in the OFF position, gently lift...
Instructions for Use
Page 25
... knob, select the appropriate control knob and push down . Service Before Calling for Service Before calling Customer Service, consider the suggestions and instructions below: 9 CAUTION Repairs should be done by turning the control knob clockwise to desire flame size. Improper repair of severe physical injury or death. Continue turning knob counterclockwise to OFF. ▯ Make sure the burner caps and burner bases and the burner ports are clean and dry. ▯ Check the power...
... knob, select the appropriate control knob and push down . Service Before Calling for Service Before calling Customer Service, consider the suggestions and instructions below: 9 CAUTION Repairs should be done by turning the control knob clockwise to desire flame size. Improper repair of severe physical injury or death. Continue turning knob counterclockwise to OFF. ▯ Make sure the burner caps and burner bases and the burner ports are clean and dry. ▯ Check the power...
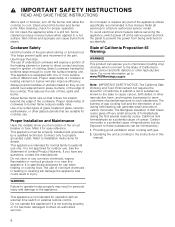
Instruction manual
Page 6
... all instructions carefully before using kitchen appliances, basic safety precautions must be safe and reliable. Set the burner control so that they extend beyond the bottom of the burners when the cooktop is near the burners or elements. Clean ventilating fans frequently. Smother flames from fans or forced air vents do not blow over or near a window, forced air vent or fan, be allowed to come in use . b. NEVER PICK UP A FLAMING PAN...
... all instructions carefully before using kitchen appliances, basic safety precautions must be safe and reliable. Set the burner control so that they extend beyond the bottom of the burners when the cooktop is near the burners or elements. Clean ventilating fans frequently. Smother flames from fans or forced air vents do not blow over or near a window, forced air vent or fan, be allowed to come in use . b. NEVER PICK UP A FLAMING PAN...
Instruction manual
Page 8
... in heating or cleaning will expose a portion of the heating element or burner to direct contact and may result in Self Clean ovens gives off at the service panel and lock the panel to such substances. This appliance is known to warn customers of the pan. The use . To avoid electrical shock hazard, before servicing the appliance, switch power off very small amounts of the circuit breaker or fuse. The burning of gas cooking...
... in heating or cleaning will expose a portion of the heating element or burner to direct contact and may result in Self Clean ovens gives off at the service panel and lock the panel to such substances. This appliance is known to warn customers of the pan. The use . To avoid electrical shock hazard, before servicing the appliance, switch power off very small amounts of the circuit breaker or fuse. The burning of gas cooking...
Instruction manual
Page 13
... perimeter of rubber feet: Call Customer Support at the LO position and each burner. For replacement of the grommet. Standard Knobs SGS and SGSP models, which do not reach through control opening , ensuring that vary in personal injury and damage to the appliance. Continue turning knob counterclockwise to ignite the flame. To replace knob and/or grommet: Carefully insert the grommet into the opening...
... perimeter of rubber feet: Call Customer Support at the LO position and each burner. For replacement of the grommet. Standard Knobs SGS and SGSP models, which do not reach through control opening , ensuring that vary in personal injury and damage to the appliance. Continue turning knob counterclockwise to ignite the flame. To replace knob and/or grommet: Carefully insert the grommet into the opening...
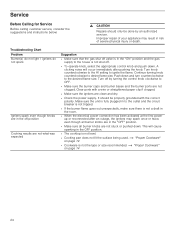
Instruction manual
Page 24
... desired flame size. Troubleshooting Chart Problem Burner(s) do not light / igniters do not spark Igniters spark even though knobs are in the "OFF" position. ▯ Make sure all burner knobs are not stuck or pushed down. Service Before Calling for Service Before calling customer service, consider the suggestions and instructions below: 9 CAUTION Repairs should be done by turning the control knob clockwise to OFF. ▯ Make sure the burner caps and burner bases and the burner ports...
... desired flame size. Troubleshooting Chart Problem Burner(s) do not light / igniters do not spark Igniters spark even though knobs are in the "OFF" position. ▯ Make sure all burner knobs are not stuck or pushed down. Service Before Calling for Service Before calling customer service, consider the suggestions and instructions below: 9 CAUTION Repairs should be done by turning the control knob clockwise to OFF. ▯ Make sure the burner caps and burner bases and the burner ports...


