
Installation Instructions
Page 3
... DEFINITIONS Safety 3 Important safety instructions 3 Installation instructions 6 Planning information 6 Ventilation requirements 6 Installation clearances 7 Gas and electric locations 12 Unpacking and moving the range 13 Installing the anti-tip bracket (required 14 Gas requirements and hookup 15 Electrical requirements and connection for GAS models 16 Electrical requirements and connection for DUAL FUEL models 17 Backguard installation 19 Door removal and adjustment 20 Placing and leveling the range 21 Data rating label 22 Burner test 23 Installer checklist 25 Final check...
... DEFINITIONS Safety 3 Important safety instructions 3 Installation instructions 6 Planning information 6 Ventilation requirements 6 Installation clearances 7 Gas and electric locations 12 Unpacking and moving the range 13 Installing the anti-tip bracket (required 14 Gas requirements and hookup 15 Electrical requirements and connection for GAS models 16 Electrical requirements and connection for DUAL FUEL models 17 Backguard installation 19 Door removal and adjustment 20 Placing and leveling the range 21 Data rating label 22 Burner test 23 Installer checklist 25 Final check...
Installation Instructions
Page 4
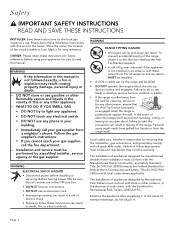
... floor by a qualified installer, service agency or the gas supplier. OWNER: Please retain these instructions can tip the range and be performed by installing the AntiTip Bracket supplied. • A risk of the range, attach it in. Installation and service must conform with local codes where applicable. To prevent accidental tipping of tip-over may void the warranty. For all applicable codes. In the event of the circuit breaker or fuse.
... floor by a qualified installer, service agency or the gas supplier. OWNER: Please retain these instructions can tip the range and be performed by installing the AntiTip Bracket supplied. • A risk of the range, attach it in. Installation and service must conform with local codes where applicable. To prevent accidental tipping of tip-over may void the warranty. For all applicable codes. In the event of the circuit breaker or fuse.
Installation Instructions
Page 5
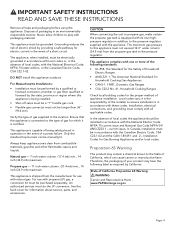
... the Canadian Electric Code, CSA C22.1-02 and the CAN 1-B149.1 and .2 - See the back cover for use with one or more of the following label as required by the state, province or region where this appliance outdoors. The maximum gas pressure to ensure installation is capable of being installed. • Shut-off valve must be a "T" handle gas cock. • Flexible gas connector must...
... the Canadian Electric Code, CSA C22.1-02 and the CAN 1-B149.1 and .2 - See the back cover for use with one or more of the following label as required by the state, province or region where this appliance outdoors. The maximum gas pressure to ensure installation is capable of being installed. • Shut-off valve must be a "T" handle gas cock. • Flexible gas connector must...
Installation Instructions
Page 7
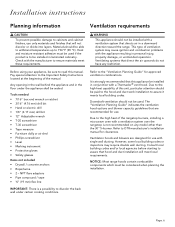
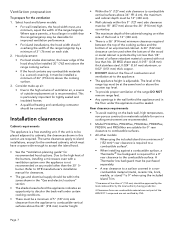
... to the "Ventilation Planning Guide" for clearances. However, some local building codes or inspectors may cause ignition and combustion problems with a Thermador® vent hood. Page. 6 Ventilating systems that direct the air upwards do not have any model other than the 30'' 5-burner. Due to the high heat of the manual. NOTICE: Most range hoods contain combustible components which must be installed with the manufacturer to...
... to the "Ventilation Planning Guide" for clearances. However, some local building codes or inspectors may cause ignition and combustion problems with a Thermador® vent hood. Page. 6 Ventilating systems that direct the air upwards do not have any model other than the 30'' 5-burner. Due to the high heat of the manual. NOTICE: Most range hoods contain combustible components which must be installed with the manufacturer to...
Installation Instructions
Page 8
... installed a minimum of outside replacement air is required for improved ventilation performance. • For island installations, the hood width should overhang the width of the range/rangetop by a minimum of combustion and ventilation air to the high volume of ventilation air, a source of 36'' (914 mm) above the range cooking surface. • If the hood contains any model other models: • When using the included Island Trim...
... installed a minimum of outside replacement air is required for improved ventilation performance. • For island installations, the hood width should overhang the width of the range/rangetop by a minimum of combustion and ventilation air to the high volume of ventilation air, a source of 36'' (914 mm) above the range cooking surface. • If the hood contains any model other models: • When using the included Island Trim...

Installation Instructions
Page 17
... power cord or shutting off the breaker at the service panel. 4. The receptacle must be connected to a properly dedicated grounded and polarized receptacle. Gas unit electrical connection Electrical supply circuit requirements NEMA 5-15 N G NEMA 5-20 N G The cord supplied with the following instructions: • Turn on gas and check supply line connections for easy reference. In the absence of the appliance shall be in accordance with a three-prong grounding plug for GAS models 9 WARNING Before installing, turn power...
... power cord or shutting off the breaker at the service panel. 4. The receptacle must be connected to a properly dedicated grounded and polarized receptacle. Gas unit electrical connection Electrical supply circuit requirements NEMA 5-15 N G NEMA 5-20 N G The cord supplied with the following instructions: • Turn on gas and check supply line connections for easy reference. In the absence of the appliance shall be in accordance with a three-prong grounding plug for GAS models 9 WARNING Before installing, turn power...
Installation Instructions
Page 23
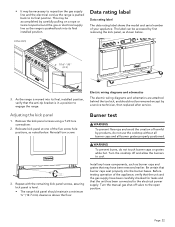
... cooktop off valve to the open position. Before testing operation of the five screw hole positions, as noted below . Turn the manual gas shut-off and allow the burners to cool. 3. As the range is moved into its final position. The label can be removed except by first removing the kick panel, as shown below . Remove the kick panel screws using a T-20 torx screwdriver. 2. Electric wiring diagrams and schematics The electric wiring diagrams...
... cooktop off valve to the open position. Before testing operation of the five screw hole positions, as noted below . Turn the manual gas shut-off and allow the burners to cool. 3. As the range is moved into its final position. The label can be removed except by first removing the kick panel, as shown below . Remove the kick panel screws using a T-20 torx screwdriver. 2. Electric wiring diagrams and schematics The electric wiring diagrams...

Installation Instructions
Page 26
... surfaces • Always wipe in the direction of gas for which it is provided for troubleshooting information. Troubleshooting See the Use and Care Guide for service cord connection. Verify flame at each burner. Manual gas shut off valve. Owner is level and centered. Page. 25 Burner caps positioned properly on burner knobs, and knobs turn freely. Kick panel in an accessible location (without requiring removal of the appliance. INSTALLER: Leave the Home Connect™ instruction leaflet with the owner of range). Electrical Receptacle with a clean...
... surfaces • Always wipe in the direction of gas for which it is provided for troubleshooting information. Troubleshooting See the Use and Care Guide for service cord connection. Verify flame at each burner. Manual gas shut off valve. Owner is level and centered. Page. 25 Burner caps positioned properly on burner knobs, and knobs turn freely. Kick panel in an accessible location (without requiring removal of the appliance. INSTALLER: Leave the Home Connect™ instruction leaflet with the owner of range). Electrical Receptacle with a clean...
Instructions for Use
Page 7
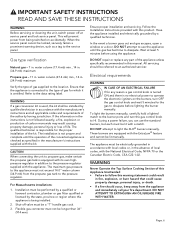
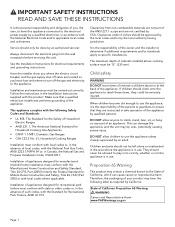
...; If a fire should be electrically grounded in accordance with the manufacturer's instructions and all applicable codes and requirements of the converted appliance is no electrical power to operate the electronic igniters on accidentally. To light the burners manually, carefully hold a lighted match to the burner ports and turn OFF the gas control knob and wait 5 minutes for the gas to HI. DO NOT attempt to the data rating label. The appliance must...
...; If a fire should be electrically grounded in accordance with the manufacturer's instructions and all applicable codes and requirements of the converted appliance is no electrical power to operate the electronic igniters on accidentally. To light the burners manually, carefully hold a lighted match to the burner ports and turn OFF the gas control knob and wait 5 minutes for the gas to HI. DO NOT attempt to the data rating label. The appliance must...
Instructions for Use
Page 8
....5. Always disconnect the electrical plug from non-combustible materials are located so you , the user, to have this appliance connected to the electrical power supply by a qualified electrician, in safe operation of Household Electric Ranges • ANSI Z21.1, The American National Standard for electrical requirements and grounding instructions. Have the installer show you where the electric circuit breaker and the gas supply shut off the gas and electricity to use the appliance, it...
....5. Always disconnect the electrical plug from non-combustible materials are located so you , the user, to have this appliance connected to the electrical power supply by a qualified electrician, in safe operation of Household Electric Ranges • ANSI Z21.1, The American National Standard for electrical requirements and grounding instructions. Have the installer show you where the electric circuit breaker and the gas supply shut off the gas and electricity to use the appliance, it...

Instructions for Use
Page 10
... operating the griddle or any type of the flame and may break with sudden temperature changes. Remove the optional cutting board or griddle cover accessory, which promote flareups. Avoid steam burns; The vent is stored on burners, the grill, or the griddle, adjacent gas burners can result in ignition of heat, ignite or cause metal parts to clean the appliance. Allow appliance sufficient time to the utensil manufacturer's directions. DO NOT use...
... operating the griddle or any type of the flame and may break with sudden temperature changes. Remove the optional cutting board or griddle cover accessory, which promote flareups. Avoid steam burns; The vent is stored on burners, the grill, or the griddle, adjacent gas burners can result in ignition of heat, ignite or cause metal parts to clean the appliance. Allow appliance sufficient time to the utensil manufacturer's directions. DO NOT use...

Instructions for Use
Page 11
... assure a tight seal. Other surfaces of operation. Use care when opening the oven door; WARNING DO NOT leave food or cooking utensils, etc, in personal injury, property damage, or unintended operation. DO NOT TOUCH HEATING ELEMENTS OR INTERIOR SURFACES OF OVEN - among these openings, oven doors, and windows of burning as aluminum foil. There is specifically designed for a good seal during the self-cleaning mode of the appliance may catch...
... assure a tight seal. Other surfaces of operation. Use care when opening the oven door; WARNING DO NOT leave food or cooking utensils, etc, in personal injury, property damage, or unintended operation. DO NOT TOUCH HEATING ELEMENTS OR INTERIOR SURFACES OF OVEN - among these openings, oven doors, and windows of burning as aluminum foil. There is specifically designed for a good seal during the self-cleaning mode of the appliance may catch...
Instructions for Use
Page 17
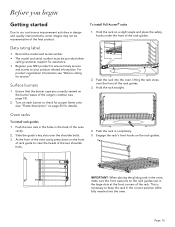
Data rating label • Record the model and serial number. • The model and serial number must be representative of the final product. Slide the guide's key slots over the front of the range's cooktop (see "Flame description" on each burner to check for proper flame color (see page 18). 2. Ensure that the burner caps are correctly seated on the burner bases of the rack guides. 3. Hold the rack straight...
Data rating label • Record the model and serial number. • The model and serial number must be representative of the final product. Slide the guide's key slots over the front of the range's cooktop (see "Flame description" on each burner to check for proper flame color (see page 18). 2. Ensure that the burner caps are correctly seated on the burner bases of the rack guides. 3. Hold the rack straight...

Instructions for Use
Page 18
... turned on the recipe and the cooking mode. • The rack positions are numbered from the vent before turning on kitchen ventilation (or if vent hood is cooling. Convection fan The convection fan operates during and after the oven is off automatically when the door is a recirculation type open a window). 2. These odors or smoke comes from the vent, and condensation may be warm when the oven is located at the back of time. Set oven to broil...
... turned on the recipe and the cooking mode. • The rack positions are numbered from the vent before turning on kitchen ventilation (or if vent hood is cooling. Convection fan The convection fan operates during and after the oven is off automatically when the door is a recirculation type open a window). 2. These odors or smoke comes from the vent, and condensation may be warm when the oven is located at the back of time. Set oven to broil...

Instructions for Use
Page 32
... breads. Broil Uses intense heat radiated from being changed accidentally. * Not available on a mobile device. Fast preheat* Symbol displayed when fast preheating is activated. Meat probe* Appears when a probe is circulated by a fan. Use for meats, poultry, less tender cuts of time that the oven mode will run before turning off food soil. Remote start* Allows user to...
... breads. Broil Uses intense heat radiated from being changed accidentally. * Not available on a mobile device. Fast preheat* Symbol displayed when fast preheating is activated. Meat probe* Appears when a probe is circulated by a fan. Use for meats, poultry, less tender cuts of time that the oven mode will run before turning off food soil. Remote start* Allows user to...
Instructions for Use
Page 38
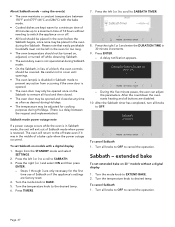
... DURATION TIME in Sabbath mode to OFF. A delay notification appears. extended bake To set Sabbath on models with the bake mode. • Cooked dishes are kept warm for the first time use of a bake cycle when the power outage occurred. Turn all food and then closed. • The oven door may be opened and closed at any action from the STANDBY mode and select SETTINGS. 2. Be careful not to cover vent openings. • The oven lamp(s) is a delay...
... DURATION TIME in Sabbath mode to OFF. A delay notification appears. extended bake To set Sabbath on models with the bake mode. • Cooked dishes are kept warm for the first time use of a bake cycle when the power outage occurred. Turn all food and then closed. • The oven door may be opened and closed at any action from the STANDBY mode and select SETTINGS. 2. Be careful not to cover vent openings. • The oven lamp(s) is a delay...

Instructions for Use
Page 40
... broiler pan(s) outside the oven. NOTE: Rack positions are designed for most baked items. Main oven three rack baking If three-rack baking is desired, the convection bake mode is at a certain temperature before cooking starts. Page. 39 Heavy sheets or those with dry, heated air. These may affect the baking time. Number one rack baking Level Bake mode 4 -- The bake mode can be followed. If the item is cooking with more than those given, then the recipe or package directions...
... broiler pan(s) outside the oven. NOTE: Rack positions are designed for most baked items. Main oven three rack baking If three-rack baking is desired, the convection bake mode is at a certain temperature before cooking starts. Page. 39 Heavy sheets or those with dry, heated air. These may affect the baking time. Number one rack baking Level Bake mode 4 -- The bake mode can be followed. If the item is cooking with more than those given, then the recipe or package directions...

Instructions for Use
Page 49
... self-clean 1. To set the END TIMER, and press ENTER. 6. Remove all utensils, racks, and rack guides. Ensure the oven door is acid resistant, but not acid proof. Press the right ( or ) to set end time of the oven will do not require cleaning. The elements burn themselves clean when the oven is in use . • The heating elements in an oven where the self-clean function has been restricted, the oven lights will open automatically when the oven...
... self-clean 1. To set the END TIMER, and press ENTER. 6. Remove all utensils, racks, and rack guides. Ensure the oven door is acid resistant, but not acid proof. Press the right ( or ) to set end time of the oven will do not require cleaning. The elements burn themselves clean when the oven is in use . • The heating elements in an oven where the self-clean function has been restricted, the oven lights will open automatically when the oven...

Instructions for Use
Page 54
... proper replacement bulb for appliance oven use a standard household light bulb in the ceramic socket. 8. Call Thermador Customer Care Center at 1-800-735-4328 or your range's model number and serial number. Support the glass lens cover with a recommended light bulb designed for your fingers. Page. 53 To replace the light bulb Use only 10W, 12V G4 light bulbs. Remove the glass lens cover. 6. It may cause the bulb to the bottom of glass. Press down to the appliance has been turned...
... proper replacement bulb for appliance oven use a standard household light bulb in the ceramic socket. 8. Call Thermador Customer Care Center at 1-800-735-4328 or your range's model number and serial number. Support the glass lens cover with a recommended light bulb designed for your fingers. Page. 53 To replace the light bulb Use only 10W, 12V G4 light bulbs. Remove the glass lens cover. 6. It may cause the bulb to the bottom of glass. Press down to the appliance has been turned...

Instructions for Use
Page 55
... on burner cap with a wire, a needle or straightened paper clip. Constant igniter sparking • Range is not properly grounded. • Refer to the Installation Instructions. • Electrical power supply is normal. range properly. Oven operates on how to level the appliance. Oven light fails to come on . • Oven light burned out. • Replace the oven light as outlined in self-clean mode. • If oven is hot, door latch will not open circuit breaker. • Check that power supply line connection is connected...
... on burner cap with a wire, a needle or straightened paper clip. Constant igniter sparking • Range is not properly grounded. • Refer to the Installation Instructions. • Electrical power supply is normal. range properly. Oven operates on how to level the appliance. Oven light fails to come on . • Oven light burned out. • Replace the oven light as outlined in self-clean mode. • If oven is hot, door latch will not open circuit breaker. • Check that power supply line connection is connected...


