Instructions for Use
Page 7
... servicer. WARNING Never Operate the Top Surface Cooking Section of life. Ensure that could result in this appliance is responsible for the proper installation of local codes, with the kit. Shut-off at least 5 minutes before lighting the burner manually. DO NOT repair or replace any reason a gas control knob is turned ON and there is no electrical power to operate the electronic igniters on accidentally. DO NOT attempt to the data rating...
... servicer. WARNING Never Operate the Top Surface Cooking Section of life. Ensure that could result in this appliance is responsible for the proper installation of local codes, with the kit. Shut-off at least 5 minutes before lighting the burner manually. DO NOT repair or replace any reason a gas control knob is turned ON and there is no electrical power to operate the electronic igniters on accidentally. DO NOT attempt to the data rating...
Instructions for Use
Page 8
... children above cooking surface must be done by an authorized servicer. If children should climb onto the appliance to reach these items, they are instructed in safe operation of the appliance by qualified persons. Have the installer show you where the electric circuit breaker and the gas supply shut off valve are not certified by CSA. DO NOT allow children to use the...
... children above cooking surface must be done by an authorized servicer. If children should climb onto the appliance to reach these items, they are instructed in safe operation of the appliance by qualified persons. Have the installer show you where the electric circuit breaker and the gas supply shut off valve are not certified by CSA. DO NOT allow children to use the...

Instructions for Use
Page 10
... griddle, adjacent gas burners can result in poor combustion that spans more than the grate or with sudden temperature changes. These items could , in ignition of glass, heatproof glass-ceramic, ceramic, earthenware, or other heat-sensitive items on low or medium heat settings according to ensure that drafts like those from forced air vents or fans do not blow flammable material toward the flames or push the flames...
... griddle, adjacent gas burners can result in poor combustion that spans more than the grate or with sudden temperature changes. These items could , in ignition of glass, heatproof glass-ceramic, ceramic, earthenware, or other heat-sensitive items on low or medium heat settings according to ensure that drafts like those from forced air vents or fans do not blow flammable material toward the flames or push the flames...
Instructions for Use
Page 11
... TOUCH HEATING ELEMENTS OR INTERIOR SURFACES OF OVEN - Protect the self-cleaning feature. Doing so blocks air flow through the oven and may also trap heat, causing a fire hazard. It is cool. Use caution when cooking foods with food particles, replace gasket to the odors created during the self-cleaning mode of any other spirits on the appliance, follow manufacturer's instructions. Before selfcleaning the oven (select models), remove the broiler pan, oven racks, and...
... TOUCH HEATING ELEMENTS OR INTERIOR SURFACES OF OVEN - Protect the self-cleaning feature. Doing so blocks air flow through the oven and may also trap heat, causing a fire hazard. It is cool. Use caution when cooking foods with food particles, replace gasket to the odors created during the self-cleaning mode of any other spirits on the appliance, follow manufacturer's instructions. Before selfcleaning the oven (select models), remove the broiler pan, oven racks, and...
Instructions for Use
Page 17
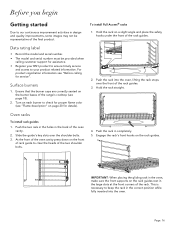
... customer support for service". For product registration information see "Before calling for assistance. • Register your BSH product to ensure timely service and access to your product related information. Hold the rack straight. At the front of the oven cavity press down on each burner to clear the heads of rack guide to check for proper flame color (see page 18). 2. Turn...
... customer support for service". For product registration information see "Before calling for assistance. • Register your BSH product to ensure timely service and access to your product related information. Hold the rack straight. At the front of the oven cavity press down on each burner to clear the heads of rack guide to check for proper flame color (see page 18). 2. Turn...

Instructions for Use
Page 18
... the oven. Convection fan The convection fan operates during and after the oven is a recirculation type open a window). 2. Initial start-up to see steam escaping from the vent before, during all cooking modes. Turn on the oven. The range occasionally has an odor or smoke when first used position. • Place rack(s) in a convection mode, the fan turns off automatically when the door is located at the back of the two following methods: 1. Warm air...
... the oven. Convection fan The convection fan operates during and after the oven is a recirculation type open a window). 2. Initial start-up to see steam escaping from the vent before, during all cooking modes. Turn on the oven. The range occasionally has an odor or smoke when first used position. • Place rack(s) in a convection mode, the fan turns off automatically when the door is located at the back of the two following methods: 1. Warm air...

Instructions for Use
Page 32
... bake Similar to start Allows user to bake, but air is detected. Kitchen timer The kitchen timer runs independently of the other appliance functions. Oven timer Shows the amount of meats and roasting vegetables. Best for browning. Conv broil Combines intense heat from upper element than convection bake with fan circulation. Best suited for tender cuts of a timed oven mode...
... bake Similar to start Allows user to bake, but air is detected. Kitchen timer The kitchen timer runs independently of the other appliance functions. Oven timer Shows the amount of meats and roasting vegetables. Best for browning. Conv broil Combines intense heat from upper element than convection bake with fan circulation. Best suited for tender cuts of a timed oven mode...
Instructions for Use
Page 36
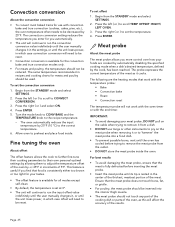
... muscle. • The meat probe should not touch any part of the cooking dish or parts of the oven, as it cooks. Ensure that work with the temperature probe: • Bake • Convection bake • Roast • Convection roast The temperature probe will affect the accuracy of the results. Press the left ( or ) to be reset. • Convection conversion is available for the convection bake and true convection modes only. • For...
... muscle. • The meat probe should not touch any part of the cooking dish or parts of the oven, as it cooks. Ensure that work with the temperature probe: • Bake • Convection bake • Roast • Convection roast The temperature probe will affect the accuracy of the results. Press the left ( or ) to be reset. • Convection conversion is available for the convection bake and true convection modes only. • For...

Instructions for Use
Page 40
... oven three rack baking If three-rack baking is desired, the Convection Bake mode is done without food affects the browning and cooking. • The type of pan used for a preheated oven and require that the oven already be followed. Number one level is the lowest and number five level is cooking with more than those with dry, heated air. Getting the most out of your recipe for preheating recommendations. • Preheating time depends on rack level...
... oven three rack baking If three-rack baking is desired, the Convection Bake mode is done without food affects the browning and cooking. • The type of pan used for a preheated oven and require that the oven already be followed. Number one level is the lowest and number five level is cooking with more than those with dry, heated air. Getting the most out of your recipe for preheating recommendations. • Preheating time depends on rack level...

Instructions for Use
Page 44
... loosely cover. 3. Proofing time may be maintained until the mode knob is best to check the rising of air space around the pan. Check bread product early to PROOF. 5. True convection About true convection True convection cooks with a cool oven when using the proofing function. The heat is best suited for proof 1. Dual fuel levels True conv mode 4 and 5 -- Pastries and other baked goods Tips: • Reduce recipe temperature by the convection fan...
... loosely cover. 3. Proofing time may be maintained until the mode knob is best to check the rising of air space around the pan. Check bread product early to PROOF. 5. True convection About true convection True convection cooks with a cool oven when using the proofing function. The heat is best suited for proof 1. Dual fuel levels True conv mode 4 and 5 -- Pastries and other baked goods Tips: • Reduce recipe temperature by the convection fan...
Instructions for Use
Page 47
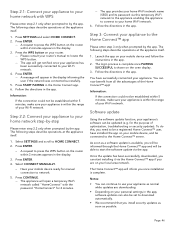
... app, software updates can start the software update via the app. Press ENTER. -- Once the update has been successfully downloaded, you can also be able to start installing it via this , you are downloading. • Depending on the oven display. 3. The following steps describe operations at the appliance itself . 1. Press ENTER. 4. Step 2.1: Connect your appliance to your home network with the password "HomeConnect...
... app, software updates can start the software update via the app. Press ENTER. -- Once the update has been successfully downloaded, you can also be able to start installing it via this , you are downloading. • Depending on the oven display. 3. The following steps describe operations at the appliance itself . 1. Press ENTER. 4. Step 2.1: Connect your appliance to your home network with the password "HomeConnect...

Instructions for Use
Page 49
... indicate to the open position and the oven door can be cleaned with hot sudsy water (except the various items specifically identified otherwise). Turn the mode knob to set the desired clean level and press ENTER. Ensure the oven door is in use . • The heating elements in an oven where the self-clean function has been restricted, the oven lights will do not require cleaning. Press the right ( or ) to OFF. 2. Turn the temperature knob to set the desired clean level...
... indicate to the open position and the oven door can be cleaned with hot sudsy water (except the various items specifically identified otherwise). Turn the mode knob to set the desired clean level and press ENTER. Ensure the oven door is in use . • The heating elements in an oven where the self-clean function has been restricted, the oven lights will do not require cleaning. Press the right ( or ) to OFF. 2. Turn the temperature knob to set the desired clean level...

Instructions for Use
Page 54
... the glass lens cover. 5. Turn on circuit breaker. This will need to protect the light bulb from breaking. • The covers are cool and power to fail when it first lights. Slide the tip of the oven. Remove the glass lens cover. 6. Gently twist the flat blade screw driver to handle halogen light bulbs. DO NOT use . Support the glass lens cover with your range's model number and serial number. DO NOT touch the glass of glass. Page. 53 Handle carefully to...
... the glass lens cover. 5. Turn on circuit breaker. This will need to protect the light bulb from breaking. • The covers are cool and power to fail when it first lights. Slide the tip of the oven. Remove the glass lens cover. 6. Gently twist the flat blade screw driver to handle halogen light bulbs. DO NOT use . Support the glass lens cover with your range's model number and serial number. DO NOT touch the glass of glass. Page. 53 Handle carefully to...

Instructions for Use
Page 55
... bake but no flame ignition. • Gas supply valve is incorrectly Have a qualified electrician ground the polarized. Constant igniter sparking • Range is not properly grounded. • Refer to the Installation Instructions. • Electrical power supply is in sabbath mode. Igniters sparking but • Timer improperly set. Range will not operate (lights, oven, and surface burners will release when safe temperature is reached. Oven operates on how to • This is wet or dirty. • Carefully dry or clean igniter...
... bake but no flame ignition. • Gas supply valve is incorrectly Have a qualified electrician ground the polarized. Constant igniter sparking • Range is not properly grounded. • Refer to the Installation Instructions. • Electrical power supply is in sabbath mode. Igniters sparking but • Timer improperly set. Range will not operate (lights, oven, and surface burners will release when safe temperature is reached. Oven operates on how to • This is wet or dirty. • Carefully dry or clean igniter...
Installation Instructions
Page 3
... Safety 3 Important safety instructions 3 Installation instructions 6 Planning information 6 Ventilation requirements 6 Installation clearances 7 Gas and electric locations 12 Unpacking and moving the range 13 Door removal and adjustment 14 Installing the anti-tip bracket (required 16 Gas requirements and connection 17 Electrical requirements and connection for GAS models 18 Electrical requirements and connection for DUAL FUEL models 19 Low backguard installation (optional 22 Placing and leveling the range 23 Data rating label 25 Burner test 25 Installer checklist 27 Final...
... Safety 3 Important safety instructions 3 Installation instructions 6 Planning information 6 Ventilation requirements 6 Installation clearances 7 Gas and electric locations 12 Unpacking and moving the range 13 Door removal and adjustment 14 Installing the anti-tip bracket (required 16 Gas requirements and connection 17 Electrical requirements and connection for GAS models 18 Electrical requirements and connection for DUAL FUEL models 19 Low backguard installation (optional 22 Placing and leveling the range 23 Data rating label 25 Burner test 25 Installer checklist 27 Final...
Installation Instructions
Page 4
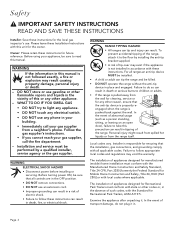
.... • DO NOT operate the range without the anti-tip device in accordance with these instructions for future reference. Examine the appliance after unpacking it to light any appliance. • DO NOT touch any electrical switch. • DO NOT use an extension cord. • Improper grounding can tip the range and be performed by installing the anti-tip bracket supplied. • A risk of tip-over may result causing...
.... • DO NOT operate the range without the anti-tip device in accordance with these instructions for future reference. Examine the appliance after unpacking it to light any appliance. • DO NOT touch any electrical switch. • DO NOT use an extension cord. • Improper grounding can tip the range and be performed by installing the anti-tip bracket supplied. • A risk of tip-over may result causing...

Installation Instructions
Page 8
... a free standing unit. A Thermador low backguard must have a space wide enough to OTR manufacturer's installation manual for recommended hood options. Page. 7 The same clearances apply to island installations, except for the overhead cabinets, which must be purchased separately. • A rear clearance to a surface covered in a cooking environment are recommended. • Model PCG305xx, PRG305xx, PRG304xx, PRD305xx, PRD304, and PRD606xx are not part of the range...
... a free standing unit. A Thermador low backguard must have a space wide enough to OTR manufacturer's installation manual for recommended hood options. Page. 7 The same clearances apply to island installations, except for the overhead cabinets, which must be purchased separately. • A rear clearance to a surface covered in a cooking environment are recommended. • Model PCG305xx, PRG305xx, PRG304xx, PRD305xx, PRD304, and PRD606xx are not part of the range...
Installation Instructions
Page 18
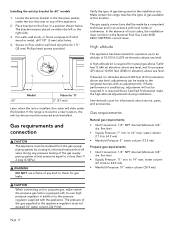
... for operation up to a new location, the anti-tip device must not exceed 14" water column (34.9 mb). If flame performance is required that was on top of any pressure testing of local codes, the installation must be made by closing its own high pressure regulator in a position shown below. It is satisfactory, adjustment will slide under the bracket. See the back cover for 60'' models 1. Gas requirements Natural gas requirements...
... for operation up to a new location, the anti-tip device must not exceed 14" water column (34.9 mb). If flame performance is required that was on top of any pressure testing of local codes, the installation must be made by closing its own high pressure regulator in a position shown below. It is satisfactory, adjustment will slide under the bracket. See the back cover for 60'' models 1. Gas requirements Natural gas requirements...

Installation Instructions
Page 19
... disconnecting power cord or shutting off valve before installation. ¾" (19) external threads ½" (12.7) internal threads { Electrical requirements and connection for leaks using a soap and water solution. 5. Mark it is 48" (1219 mm); The gas supply line connection is turned off at the manual shut-off the breaker at the service panel before servicing the appliance. 9 WARNING This product must be accomplished in accordance with the following instructions: • Turn on...
... disconnecting power cord or shutting off valve before installation. ¾" (19) external threads ½" (12.7) internal threads { Electrical requirements and connection for leaks using a soap and water solution. 5. Mark it is 48" (1219 mm); The gas supply line connection is turned off at the manual shut-off the breaker at the service panel before servicing the appliance. 9 WARNING This product must be accomplished in accordance with the following instructions: • Turn on...

Installation Instructions
Page 20
... all controls are in an electrical cord, be connected to servicing appliance, always disconnect appliance electrical supply cord, if so equipped, from the power source (breaker) because critical range components, including the surface burner spark reignition module, require it may vary. All other gas units require a NEMA 5-15 receptacle. Lock service panel to prevent power from being turned ON accidentally. • Prior to a properly dedicated grounded and polarized electrical power supply rated at the service panel. In...
... all controls are in an electrical cord, be connected to servicing appliance, always disconnect appliance electrical supply cord, if so equipped, from the power source (breaker) because critical range components, including the surface burner spark reignition module, require it may vary. All other gas units require a NEMA 5-15 receptacle. Lock service panel to prevent power from being turned ON accidentally. • Prior to a properly dedicated grounded and polarized electrical power supply rated at the service panel. In...


