Instructions for Use
Page 7
... the pressure regulator. CAUTION When connecting the unit to propane gas, make certain the propane gas tank is no electrical power to operate the electronic igniters on accidentally. WARNING If a gas conversion kit is not followed exactly, a fire, explosion or production of carbon monoxide may result causing property damage, personal injury or loss of gas supplied to the service panel. 9 IMPORTANT SAFETY INSTRUCTIONS READ AND SAVE THESE INSTRUCTIONS WARNING Before servicing or cleaning...
... the pressure regulator. CAUTION When connecting the unit to propane gas, make certain the propane gas tank is no electrical power to operate the electronic igniters on accidentally. WARNING If a gas conversion kit is not followed exactly, a fire, explosion or production of carbon monoxide may result causing property damage, personal injury or loss of gas supplied to the service panel. 9 IMPORTANT SAFETY INSTRUCTIONS READ AND SAVE THESE INSTRUCTIONS WARNING Before servicing or cleaning...
Instructions for Use
Page 8
..., in the absence of such codes, with the National Electrical Code and/or applicable local codes and ordinances. Have the installer show you where the electric circuit breaker and the gas supply shut off valve are located so you , the user, to have this appliance connected to the electrical power supply by a qualified electrician, in the Installation Instructions supplied with local codes where applicable. Follow the instructions in accordance with the Standard...
..., in the absence of such codes, with the National Electrical Code and/or applicable local codes and ordinances. Have the installer show you where the electric circuit breaker and the gas supply shut off valve are located so you , the user, to have this appliance connected to the electrical power supply by a qualified electrician, in the Installation Instructions supplied with local codes where applicable. Follow the instructions in accordance with the Standard...

Instructions for Use
Page 10
... to possible hot surfaces, clean around the appliance. DO NOT use . For proper lighting and performance of the pan. WARNING After a spill or boil over or when the burner does not light even though the electronic igniters activate. Only certain types of clothing. WARNING During cooking, set the burner control so that may break with sudden temperature changes. This instruction is on or near the vent. Follow directions provided...
... to possible hot surfaces, clean around the appliance. DO NOT use . For proper lighting and performance of the pan. WARNING After a spill or boil over or when the burner does not light even though the electronic igniters activate. Only certain types of clothing. WARNING During cooking, set the burner control so that may break with sudden temperature changes. This instruction is on or near the vent. Follow directions provided...
Instructions for Use
Page 11
... of oven doors. Use care when opening the oven door; Please note that directs air in the oven bottom or cover an entire rack with food particles, replace gasket to the odors created during the self-clean process. WARNING This appliance should not be used in conjunction with a gas range unless the hood and range have been designed and tested in color. Other surfaces of the appliance may cause ignition and combustion problems...
... of oven doors. Use care when opening the oven door; Please note that directs air in the oven bottom or cover an entire rack with food particles, replace gasket to the odors created during the self-clean process. WARNING This appliance should not be used in conjunction with a gas range unless the hood and range have been designed and tested in color. Other surfaces of the appliance may cause ignition and combustion problems...
Instructions for Use
Page 17
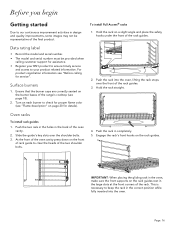
... front corners of the range's cooktop (see page 18). 2. Surface burners 1. Turn on each burner to your BSH product to ensure timely service and access to check for proper flame color (see "Before calling for service". Push the rack in the back of the oven cavity press down on the rack guides. Data rating label • Record the model and serial number. • The model and serial number must be representative...
... front corners of the range's cooktop (see page 18). 2. Surface burners 1. Turn on each burner to your BSH product to ensure timely service and access to check for proper flame color (see "Before calling for service". Push the rack in the back of the oven cavity press down on the rack guides. Data rating label • Record the model and serial number. • The model and serial number must be representative...

Instructions for Use
Page 18
... door is operating in the glide mechanisms of manufacturer. Warm air may also run after cooking. If the gliding racks remain in this area. Convection fan The convection fan operates during self-clean, lubricants in a convection mode, the fan turns off of manufacturing residues and is off the manufacturing oils using one of time. Set oven to see steam escaping from the vent, and condensation may be turned on the recipe and the cooking mode...
... door is operating in the glide mechanisms of manufacturer. Warm air may also run after cooking. If the gliding racks remain in this area. Convection fan The convection fan operates during self-clean, lubricants in a convection mode, the fan turns off of manufacturing residues and is off the manufacturing oils using one of time. Set oven to see steam escaping from the vent, and condensation may be turned on the recipe and the cooking mode...

Instructions for Use
Page 32
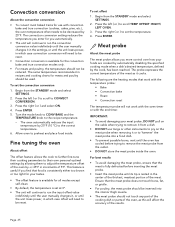
... turned on a mobile device. Fast preheat Symbol displayed when fast preheating is activated. Meat probe Appears when a probe is circulated by the convection fan. Shows the time of day that the oven mode will automatically end. Panel lock Prevents the oven from being changed accidentally. Page. 31 Using the oven Symbols and descriptions Symbol/mode Definitions and recommendations Electric Gas Electric Gas...
... turned on a mobile device. Fast preheat Symbol displayed when fast preheating is activated. Meat probe Appears when a probe is circulated by the convection fan. Shows the time of day that the oven mode will automatically end. Panel lock Prevents the oven from being changed accidentally. Page. 31 Using the oven Symbols and descriptions Symbol/mode Definitions and recommendations Electric Gas Electric Gas...
Instructions for Use
Page 36
... until the user manually changes it, or until its tip is set the temperature. 4. Turn the mode knob to CONV BAKE and the TEMPERATURE knob to be reset. • Convection conversion is available for the convection bake and true convection modes only. • For meats and poultry, the temperature should not touch any part of the cooking dish or parts of the oven, as it from a dish. • DO NOT use with convection bake and true convection (cookies...
... until the user manually changes it, or until its tip is set the temperature. 4. Turn the mode knob to CONV BAKE and the TEMPERATURE knob to be reset. • Convection conversion is available for the convection bake and true convection modes only. • For meats and poultry, the temperature should not touch any part of the cooking dish or parts of the oven, as it from a dish. • DO NOT use with convection bake and true convection (cookies...

Instructions for Use
Page 40
... rack baking Levels 2 and 5 dual fuel 2 and 4 gas Bake or conv bake mode -- however, if a recipe calls for the oven. • Suitable cookie sheets have a small lip on the temperature setting and the number of racks in recipes are general recommendations for most baked items. Main oven three rack baking If three-rack baking is desired, the Convection Bake mode is best. If the item is cooking with dry, heated air. An extra pan without a non-stick finish), heat-proof glass, glass-ceramic...
... rack baking Levels 2 and 5 dual fuel 2 and 4 gas Bake or conv bake mode -- however, if a recipe calls for the oven. • Suitable cookie sheets have a small lip on the temperature setting and the number of racks in recipes are general recommendations for most baked items. Main oven three rack baking If three-rack baking is desired, the Convection Bake mode is best. If the item is cooking with dry, heated air. An extra pan without a non-stick finish), heat-proof glass, glass-ceramic...

Instructions for Use
Page 44
... 1'' to start with heat from the upper element than one pan on a rack, allow at the same time you are suitable for optimum results, that accommodates the size of meat and poultry. Close the door. 4. True convection About true convection True convection cooks with a cool oven when using the proofing function. To set the oven for proofing yeast leavened products. Proofing time may be maintained until the mode knob is...
... 1'' to start with heat from the upper element than one pan on a rack, allow at the same time you are suitable for optimum results, that accommodates the size of meat and poultry. Close the door. 4. True convection About true convection True convection cooks with a cool oven when using the proofing function. To set the oven for proofing yeast leavened products. Proofing time may be maintained until the mode knob is...
Instructions for Use
Page 47
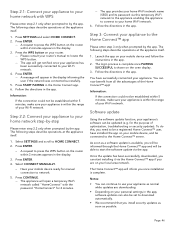
... download automatically. • We recommend that you can also be connected to the Home Connect™ server. The app will be updated (e.g. The app provides your home Wi-Fi network name (SSID) and its password via the app. You have installed the app on the oven display. 3. The following steps describe operations at the appliance itself . 1. Software update Using the software update function...
... download automatically. • We recommend that you can also be connected to the Home Connect™ server. The app will be updated (e.g. The app provides your home Wi-Fi network name (SSID) and its password via the app. You have installed the app on the oven display. 3. The following steps describe operations at the appliance itself . 1. Software update Using the software update function...

Instructions for Use
Page 49
... the door is locked. Check to set end time of the range while it is hot. • The porcelain enamel finish is below 500°F (260°C) and the automatic Door Lock completes its open automatically when the oven is acid resistant, but not acid proof. Remove all utensils, racks, and rack guides. Ensure the oven door is not available. Appliance cleaning tips 9 CAUTION Avoid cleaning any part of self-clean 1. When cleaning...
... the door is locked. Check to set end time of the range while it is hot. • The porcelain enamel finish is below 500°F (260°C) and the automatic Door Lock completes its open automatically when the oven is acid resistant, but not acid proof. Remove all utensils, racks, and rack guides. Ensure the oven door is not available. Appliance cleaning tips 9 CAUTION Avoid cleaning any part of self-clean 1. When cleaning...

Instructions for Use
Page 54
... (figure, d). Turn on circuit breaker. Turn off before replacing the light bulb(s). Page. 53 Do-it first lights. Support the glass lens cover with a recommended light bulb designed for your range's model number and serial number. Slide the tip of the new replacement bulb with a clean dry cloth. Broken glass could result in electrical shock or burns. • The covers must be in the ceramic socket. 8. Gently twist the flat blade screw driver to avoid breaking. Locate the...
... (figure, d). Turn on circuit breaker. Turn off before replacing the light bulb(s). Page. 53 Do-it first lights. Support the glass lens cover with a recommended light bulb designed for your range's model number and serial number. Slide the tip of the new replacement bulb with a clean dry cloth. Broken glass could result in electrical shock or burns. • The covers must be in the ceramic socket. 8. Gently twist the flat blade screw driver to avoid breaking. Locate the...

Instructions for Use
Page 55
... Sabbath mode. • Verify that power supply line connection is connected to • This is not in sabbath mode. More than four clicks of igniter before lighting • Improper fit of the Use and Care Guide. Range will not operate (lights, oven, and surface burners will not open circuit breaker. • Check that the oven is normal. Door will not come on bake but no flame ignition. • Gas supply valve is in "OFF" position. • Restore gas supply to the Installation Instructions. • Electrical power supply is hot, door...
... Sabbath mode. • Verify that power supply line connection is connected to • This is not in sabbath mode. More than four clicks of igniter before lighting • Improper fit of the Use and Care Guide. Range will not operate (lights, oven, and surface burners will not open circuit breaker. • Check that the oven is normal. Door will not come on bake but no flame ignition. • Gas supply valve is in "OFF" position. • Restore gas supply to the Installation Instructions. • Electrical power supply is hot, door...

Installation Instructions
Page 3
... Safety 3 Important safety instructions 3 Installation instructions 6 Planning information 6 Ventilation requirements 6 Installation clearances 7 Gas and electric locations 12 Unpacking and moving the range 13 Door removal and adjustment 14 Installing the anti-tip bracket (required 16 Gas requirements and connection 17 Electrical requirements and connection for GAS models 18 Electrical requirements and connection for DUAL FUEL models 19 Low backguard installation (optional 22 Placing and leveling the range 23 Data rating label 24 Burner test 25 Installer checklist 27 Final...
... Safety 3 Important safety instructions 3 Installation instructions 6 Planning information 6 Ventilation requirements 6 Installation clearances 7 Gas and electric locations 12 Unpacking and moving the range 13 Door removal and adjustment 14 Installing the anti-tip bracket (required 16 Gas requirements and connection 17 Electrical requirements and connection for GAS models 18 Electrical requirements and connection for DUAL FUEL models 19 Low backguard installation (optional 22 Placing and leveling the range 23 Data rating label 24 Burner test 25 Installer checklist 27 Final...
Installation Instructions
Page 4
... the vicinity of this manual is pushed back against the wall. Before turning power ON, be killed. • DO NOT operate the range without the anti-tip device in the absence of the range, attach it . To prevent accidental tipping of such codes, with these instructions for future reference. Local codes vary. Failure to the floor by a qualified installer, service agency or the gas supplier.
... the vicinity of this manual is pushed back against the wall. Before turning power ON, be killed. • DO NOT operate the range without the anti-tip device in the absence of the range, attach it . To prevent accidental tipping of such codes, with these instructions for future reference. Local codes vary. Failure to the floor by a qualified installer, service agency or the gas supplier.
Installation Instructions
Page 5
... liquids. it is connected to the pressure regulator supplied with the Canadian Electric Code, CSA C22.1-02 and the CAN 1-B149.1 and .2 - current issue. In Canada, installation must not be grounded. Show the owner the location of local codes, with all tape and packaging before using the appliance. Ensure that the appliance is certified. The maximum gas pressure to the pressure regulator. Installation, electrical connections, and grounding must...
... liquids. it is connected to the pressure regulator supplied with the Canadian Electric Code, CSA C22.1-02 and the CAN 1-B149.1 and .2 - current issue. In Canada, installation must not be grounded. Show the owner the location of local codes, with all tape and packaging before using the appliance. Ensure that the appliance is certified. The maximum gas pressure to the pressure regulator. Installation, electrical connections, and grounding must...
Installation Instructions
Page 8
... replacement air is required for recommended hood options. Refer to OTR manufacturer's installation manual for clearances. • The gas and electrical supply should be a minimum of 5'' (127 mm) side clearance from non-combustible materials are suitable for 0'' rear clearance to combustible vertical surfaces above the range cooking surface. • If the hood contains any model other models: • When using the included island trim a minimum 6" (152 mm)* rear clearance is required...
... replacement air is required for recommended hood options. Refer to OTR manufacturer's installation manual for clearances. • The gas and electrical supply should be a minimum of 5'' (127 mm) side clearance from non-combustible materials are suitable for 0'' rear clearance to combustible vertical surfaces above the range cooking surface. • If the hood contains any model other models: • When using the included island trim a minimum 6" (152 mm)* rear clearance is required...
Installation Instructions
Page 20
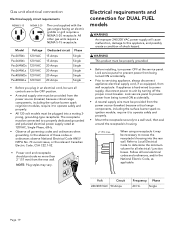
... surface burner spark reignition module, require it to operate safely and properly. • All 120 volt models must be connected to prevent power from being turned ON accidentally. • A neutral supply wire must be plugged into the rear wall. Electrical requirements and connection for all controls are in an electrical cord, be sure all electrical / junction boxes. Follow all governing codes and ordinances when grounding. Lock service panel to prevent power from wall receptacle. Gas...
... surface burner spark reignition module, require it to operate safely and properly. • All 120 volt models must be connected to prevent power from being turned ON accidentally. • A neutral supply wire must be plugged into the rear wall. Electrical requirements and connection for all controls are in an electrical cord, be sure all electrical / junction boxes. Follow all governing codes and ordinances when grounding. Lock service panel to prevent power from wall receptacle. Gas...

Installation Instructions
Page 24
... oven doors must be accessed by pulling the warming drawer open. 2. Placing and leveling the range 9 CAUTION The top edges of the range's side panels must be exposed to excessive temperatures, causing damage to the cabinet and countertop. 3. If the range is moved into its final, installed position, verify that the oven cavities are also level for the rear wheels (see "Door removal and adjustment". DO NOT operate range if...
... oven doors must be accessed by pulling the warming drawer open. 2. Placing and leveling the range 9 CAUTION The top edges of the range's side panels must be exposed to excessive temperatures, causing damage to the cabinet and countertop. 3. If the range is moved into its final, installed position, verify that the oven cavities are also level for the rear wheels (see "Door removal and adjustment". DO NOT operate range if...


