Instructions for Use
Page 7
... electrically grounded in accordance with local codes or, in the instructions is certified. Ensure that could result in addition to an authorized servicer. Wait at service panel and lock service panel. To light the burners manually, carefully hold a lighted match to the location. During a power failure, you can use the appliance until the operation of gas supplied to the burner ports and turn OFF the gas control knob and wait 5 minutes for the proper installation of gas...
... electrically grounded in accordance with local codes or, in the instructions is certified. Ensure that could result in addition to an authorized servicer. Wait at service panel and lock service panel. To light the burners manually, carefully hold a lighted match to the location. During a power failure, you can use the appliance until the operation of gas supplied to the burner ports and turn OFF the gas control knob and wait 5 minutes for the proper installation of gas...
Instructions for Use
Page 8
... installer show you where the electric circuit breaker and the gas supply shut off the gas and electricity to the appliance. This appliance complies with the Standard for electrical requirements and grounding instructions. Clearances from the wall receptacle before servicing this unit. Children and pets should not be approved by the local codes and/or by the local authority having jurisdiction. Clearances under 6 inches...
... installer show you where the electric circuit breaker and the gas supply shut off the gas and electricity to the appliance. This appliance complies with the Standard for electrical requirements and grounding instructions. Clearances from the wall receptacle before servicing this unit. Children and pets should not be approved by the local codes and/or by the local authority having jurisdiction. Clearances under 6 inches...

Instructions for Use
Page 10
... to corrode. The vent is cool before operating the griddle or any type of heat, ignite or cause metal parts to burst and cause injury. Use caution to a hot surface. Also, if the burner flames and igniter are turned off . For proper lighting and performance of air through the ventilation openings. WARNING DO NOT block or obstruct the flow of the burners, keep the igniter ports clean. These items...
... to corrode. The vent is cool before operating the griddle or any type of heat, ignite or cause metal parts to burst and cause injury. Use caution to a hot surface. Also, if the burner flames and igniter are turned off . For proper lighting and performance of air through the ventilation openings. WARNING DO NOT block or obstruct the flow of the burners, keep the igniter ports clean. These items...
Instructions for Use
Page 11
... these surfaces are dark in color. Use care when opening the oven door; WARNING DO NOT leave food or cooking utensils, etc, in desired position while oven is specifically designed for a good seal during the self-cleaning mode of operation. Before selfcleaning the oven (select models), remove the broiler pan, oven racks, and any slots, holes or passages in a downward direction toward the appliance. 9 IMPORTANT SAFETY INSTRUCTIONS READ AND SAVE THESE INSTRUCTIONS In...
... these surfaces are dark in color. Use care when opening the oven door; WARNING DO NOT leave food or cooking utensils, etc, in desired position while oven is specifically designed for a good seal during the self-cleaning mode of operation. Before selfcleaning the oven (select models), remove the broiler pan, oven racks, and any slots, holes or passages in a downward direction toward the appliance. 9 IMPORTANT SAFETY INSTRUCTIONS READ AND SAVE THESE INSTRUCTIONS In...
Instructions for Use
Page 17
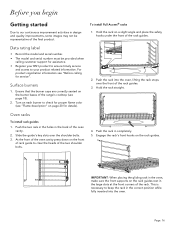
... the rack guides. 3. Oven racks To install rack guides 1. IMPORTANT: When placing the gliding rack in the oven, make sure the front supports on the rack guides. Hold the rack straight. Slide the guide's key slots over the front of the rack guides. Before you begin Getting started Due to our continuous improvement activities in design and quality improvements, some images may not be provided when calling customer support for...
... the rack guides. 3. Oven racks To install rack guides 1. IMPORTANT: When placing the gliding rack in the oven, make sure the front supports on the rack guides. Hold the rack straight. Slide the guide's key slots over the front of the rack guides. Before you begin Getting started Due to our continuous improvement activities in design and quality improvements, some images may not be provided when calling customer support for...

Instructions for Use
Page 18
... time. then turn the broiler to self-clean (select models). Set oven to broil for the same length of manufacturing residues and is in a convection mode, the fan turns off automatically when the door is important for 20 to see steam escaping from the vent before selfcleaning the oven. If the gliding racks remain in the oven during self-clean, lubricants in this area. Oven vent The oven vent is off the manufacturing oils using...
... time. then turn the broiler to self-clean (select models). Set oven to broil for the same length of manufacturing residues and is in a convection mode, the fan turns off automatically when the door is important for 20 to see steam escaping from the vent before selfcleaning the oven. If the gliding racks remain in the oven during self-clean, lubricants in this area. Oven vent The oven vent is off the manufacturing oils using...

Instructions for Use
Page 32
...; Roast Uses more intense heat from upper element, more than convection bake with heat from being turned on a mobile device. Fast preheat Symbol displayed when fast preheating is activated. Meat probe Appears when a probe is for assisting the user for tender cuts of a timed oven mode. Use for compliance to Sabbath principles. Keep warm Maintains a low temperature in order to start of meat...
...; Roast Uses more intense heat from upper element, more than convection bake with heat from being turned on a mobile device. Fast preheat Symbol displayed when fast preheating is activated. Meat probe Appears when a probe is for assisting the user for tender cuts of a timed oven mode. Use for compliance to Sabbath principles. Keep warm Maintains a low temperature in order to start of meat...
Instructions for Use
Page 36
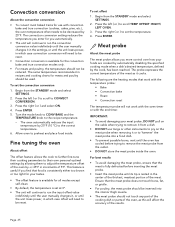
... self-clean. • By default, the temperature is set offset 1. Meat probe About the meat probe The meat probe allows you find that the meat is fully defrosted before trying to remove the meat probe from a dish. • DO NOT use with the end timer. Begin from the STANDBY mode and select SETTINGS. 2. Turn the mode knob to CONV BAKE and the TEMPERATURE knob to scroll TEMP OFFSET: RIGHT/ LEFT OVEN. 3. Convection conversion...
... self-clean. • By default, the temperature is set offset 1. Meat probe About the meat probe The meat probe allows you find that the meat is fully defrosted before trying to remove the meat probe from a dish. • DO NOT use with the end timer. Begin from the STANDBY mode and select SETTINGS. 2. Turn the mode knob to CONV BAKE and the TEMPERATURE knob to scroll TEMP OFFSET: RIGHT/ LEFT OVEN. 3. Convection conversion...

Instructions for Use
Page 40
... oven two rack baking Levels 2 and 5 dual fuel 2 and 4 gas Bake or conv bake mode -- Bake About bake Bake is cooking with more than those given, then the recipe or package directions should be followed. Both the upper and lower elements cycle to recipe or package directions for preheating recommendations. • Preheating time depends on rack level 2 to casseroles. Best used for most baked items. 2 -- Refer to your appliance Oven rack positions Rack level positions in the oven. The bake mode...
... oven two rack baking Levels 2 and 5 dual fuel 2 and 4 gas Bake or conv bake mode -- Bake About bake Bake is cooking with more than those given, then the recipe or package directions should be followed. Both the upper and lower elements cycle to recipe or package directions for preheating recommendations. • Preheating time depends on rack level 2 to casseroles. Best used for most baked items. 2 -- Refer to your appliance Oven rack positions Rack level positions in the oven. The bake mode...

Instructions for Use
Page 44
... large cuts of the dough. Proofing time may be maintained until the mode knob is best suited for proofing will lower the temperature of air space around the pan. Roast is turned off. Dual fuel levels True conv mode 4 and 5 -- Turn the mode knob to avoid over-proofing. Roasting uses more intense heat from a third element behind back and loosely tie legs with kitchen string. Tips: • Use a high-sided broil pan, or cover...
... large cuts of the dough. Proofing time may be maintained until the mode knob is best suited for proofing will lower the temperature of air space around the pan. Roast is turned off. Dual fuel levels True conv mode 4 and 5 -- Turn the mode knob to avoid over-proofing. Roasting uses more intense heat from a third element behind back and loosely tie legs with kitchen string. Tips: • Use a high-sided broil pan, or cover...
Instructions for Use
Page 46
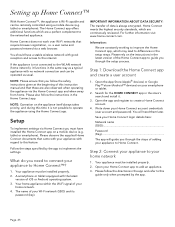
... controlled using the Home Connect app. The Home Connect app offers additional functions which are a perfect complement to the internet. tablet or smartphone). What do you need them later. Step 1: Download the Home Connect app and create a user account 1. Page. 45 a user name and password entered via the Home Connect app and when away from home. NOTE: Operation on the instructions in the setup...
... controlled using the Home Connect app. The Home Connect app offers additional functions which are a perfect complement to the internet. tablet or smartphone). What do you need them later. Step 1: Download the Home Connect app and create a user account 1. Page. 45 a user name and password entered via the Home Connect app and when away from home. NOTE: Operation on the instructions in the setup...
Instructions for Use
Page 47
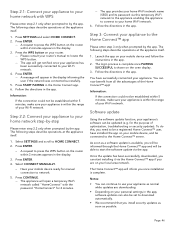
... possible. Follow the directions in the display. 3. Select SETTINGS and scroll to locate the WPS button. -- Press ENTER. - Have your appliance's software can continue to by the app. Software update Using the software update function, your mobile device ready for the purpose of the Home Connect™ app! Step 3: Connect your mobile device and follow the instructions in the app, software...
... possible. Follow the directions in the display. 3. Select SETTINGS and scroll to locate the WPS button. -- Press ENTER. - Have your appliance's software can continue to by the app. Software update Using the software update function, your mobile device ready for the purpose of the Home Connect™ app! Step 3: Connect your mobile device and follow the instructions in the app, software...

Instructions for Use
Page 49
... items specifically identified otherwise). The elements burn themselves clean when the oven is required, rinse thoroughly. • Always wipe dry immediately to enable a self-clean function in an oven where the self-clean function has been restricted, the oven lights will still be opened. After the information text, press ENTER. When cleaning this appliance can be at which time the door becomes locked. Turn the mode knob to set end time of the oven will...
... items specifically identified otherwise). The elements burn themselves clean when the oven is required, rinse thoroughly. • Always wipe dry immediately to enable a self-clean function in an oven where the self-clean function has been restricted, the oven lights will still be opened. After the information text, press ENTER. When cleaning this appliance can be at which time the door becomes locked. Turn the mode knob to set end time of the oven will...

Instructions for Use
Page 54
Call Thermador Customer Care Center at 1-800-735-4328 or your range. Remove the oven racks. 3. Support the glass lens cover with a recommended light bulb designed for your nearest Thermador dealer to determine the proper replacement bulb for appliance oven use a standard household light bulb in any oven. Gently twist the flat blade screw driver to handle halogen light bulbs. Turn on circuit breaker. Do-it first lights. Broken glass could result in electrical shock or burns. • The covers must...
Call Thermador Customer Care Center at 1-800-735-4328 or your range. Remove the oven racks. 3. Support the glass lens cover with a recommended light bulb designed for your nearest Thermador dealer to determine the proper replacement bulb for appliance oven use a standard household light bulb in any oven. Gently twist the flat blade screw driver to handle halogen light bulbs. Turn on circuit breaker. Do-it first lights. Broken glass could result in electrical shock or burns. • The covers must...

Instructions for Use
Page 55
... power to the unit. • Check for instructions on timed bake • Set timer as outlined in the Use and Care Guide. • Oven door may not be sealing properly. • Clean the oven door gasket. Door will release when safe temperature is reached. push heated air out into the room when the oven is on bake but no flame ignition. • Gas supply valve is in the Use and Care Guide. More than four clicks of igniter before lighting...
... power to the unit. • Check for instructions on timed bake • Set timer as outlined in the Use and Care Guide. • Oven door may not be sealing properly. • Clean the oven door gasket. Door will release when safe temperature is reached. push heated air out into the room when the oven is on bake but no flame ignition. • Gas supply valve is in the Use and Care Guide. More than four clicks of igniter before lighting...

Installation Instructions
Page 3
... Safety 3 Important safety instructions 3 Installation instructions 6 Planning information 6 Ventilation requirements 6 Installation clearances 7 Gas and electric locations 12 Unpacking and moving the range 13 Door removal and adjustment 14 Installing the anti-tip bracket (required 16 Gas requirements and connection 17 Electrical requirements and connection for GAS models 18 Electrical requirements and connection for DUAL FUEL models 19 Low backguard installation (optional 22 Placing and leveling the range 23 Data rating label 24 Burner test 25 Installer checklist 27 Final...
... Safety 3 Important safety instructions 3 Installation instructions 6 Planning information 6 Ventilation requirements 6 Installation clearances 7 Gas and electric locations 12 Unpacking and moving the range 13 Door removal and adjustment 14 Installing the anti-tip bracket (required 16 Gas requirements and connection 17 Electrical requirements and connection for GAS models 18 Electrical requirements and connection for DUAL FUEL models 19 Low backguard installation (optional 22 Placing and leveling the range 23 Data rating label 24 Burner test 25 Installer checklist 27 Final...
Installation Instructions
Page 4
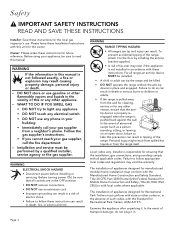
... accordance with this manual. Before turning power ON, be sure that the installation, gas connections, and grounding comply with all ranges an anti-tip device MUST be sure to read this unit for the owner. Safety 9 IMPORTANT SAFETY INSTRUCTIONS READ AND SAVE THESE INSTRUCTIONS Installer: Save these instructions for the local gas inspector's use an extension cord. • Improper grounding can result in a risk of electric shock. •...
... accordance with this manual. Before turning power ON, be sure that the installation, gas connections, and grounding comply with all ranges an anti-tip device MUST be sure to read this unit for the owner. Safety 9 IMPORTANT SAFETY INSTRUCTIONS READ AND SAVE THESE INSTRUCTIONS Installer: Save these instructions for the local gas inspector's use an extension cord. • Improper grounding can result in a risk of electric shock. •...
Installation Instructions
Page 5
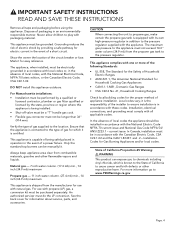
... placed in operation in accordance with propane (LP) gas, a conversion kit must be purchased separately. 9 IMPORTANT SAFETY INSTRUCTIONS READ AND SAVE THESE INSTRUCTIONS Remove all applicable codes. Installation Codes for Gas Burning Appliances and/or local codes. For more of the following Standards: • UL 858, The Standard for the Safety of Household Electric Ranges • ANSI Z21.1, The American National Standard for Household Cooking Gas Appliances...
... placed in operation in accordance with propane (LP) gas, a conversion kit must be purchased separately. 9 IMPORTANT SAFETY INSTRUCTIONS READ AND SAVE THESE INSTRUCTIONS Remove all applicable codes. Installation Codes for Gas Burning Appliances and/or local codes. For more of the following Standards: • UL 858, The Standard for the Safety of Household Electric Ranges • ANSI Z21.1, The American National Standard for Household Cooking Gas Appliances...
Installation Instructions
Page 8
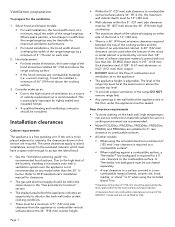
...'' (457 mm) above the range cooking surface. • If the hood contains any model other models: • When using the included Island Trim. *Clearances of a flame retardant material covered with a ventilation system over the appliance is adjustable. Where space permits, a hood larger in width than the range/rangetop may be desirable for tightly sealed and insulated homes. • A qualified heating and ventilating contractor should...
...'' (457 mm) above the range cooking surface. • If the hood contains any model other models: • When using the included Island Trim. *Clearances of a flame retardant material covered with a ventilation system over the appliance is adjustable. Where space permits, a hood larger in width than the range/rangetop may be desirable for tightly sealed and insulated homes. • A qualified heating and ventilating contractor should...
Installation Instructions
Page 20
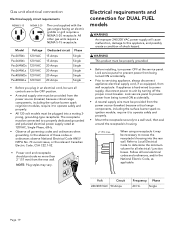
... electrical cord, be plugged into the rear wall. Lock service panel to prevent power from being turned ON accidentally. • Prior to servicing appliance, always disconnect appliance electrical supply cord, if so equipped, from the power source (breaker) because critical range components, including the surface burner spark reignition module, require it to operate safely and properly. • Mount the receptacle securely to a properly dedicated grounded and polarized electrical power supply rated at the service panel. Electrical requirements and connection...
... electrical cord, be plugged into the rear wall. Lock service panel to prevent power from being turned ON accidentally. • Prior to servicing appliance, always disconnect appliance electrical supply cord, if so equipped, from the power source (breaker) because critical range components, including the surface burner spark reignition module, require it to operate safely and properly. • Mount the receptacle securely to a properly dedicated grounded and polarized electrical power supply rated at the service panel. Electrical requirements and connection...


