Installation Instructions
Page 4
... DEFINITIONS Safety 3 Important safety instructions 3 Installation instructions 6 Planning information 6 Ventilation requirements 6 Installation clearances 7 Gas and electric locations 12 Unpacking and moving the range 13 Installing the anti-tip bracket (required 14 Gas requirements and hookup 15 Electrical requirements and connection for GAS models 16 Electrical requirements and connection for DUAL FUEL models 17 Backguard installation 19 Door removal and adjustment 20 Placing and leveling the range 21 Data rating label 22 Burner test 22 Installer checklist 25 Final check...
... DEFINITIONS Safety 3 Important safety instructions 3 Installation instructions 6 Planning information 6 Ventilation requirements 6 Installation clearances 7 Gas and electric locations 12 Unpacking and moving the range 13 Installing the anti-tip bracket (required 14 Gas requirements and hookup 15 Electrical requirements and connection for GAS models 16 Electrical requirements and connection for DUAL FUEL models 17 Backguard installation 19 Door removal and adjustment 20 Placing and leveling the range 21 Data rating label 22 Burner test 22 Installer checklist 25 Final check...
Installation Instructions
Page 5
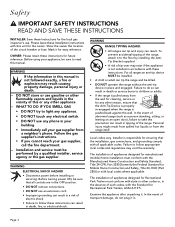
... for cleaning, service or for Recreational Park Trailers, ANSI A119.5. Failure to follow appropriate local codes and regulations may void the warranty. The installation of the range. Page. 3 Before turning power ON, be sure that all controls are in the OFF position. • DO NOT remove connections. • DO NOT use gasoline or other reason, ensure that the installation, gas connections, and grounding comply with these instructions. Installer...
... for cleaning, service or for Recreational Park Trailers, ANSI A119.5. Failure to follow appropriate local codes and regulations may void the warranty. The installation of the range. Page. 3 Before turning power ON, be sure that all controls are in the OFF position. • DO NOT remove connections. • DO NOT use gasoline or other reason, ensure that the installation, gas connections, and grounding comply with these instructions. Installer...
Installation Instructions
Page 8
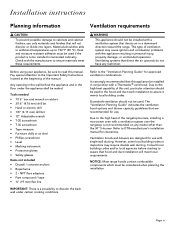
...;C). Refer to OTR manufacturer's installation manual for use. Check with the manufacturer to ensure materials meet local requirements. Ventilating systems that direct the air upwards do not have any model other than the 30'' 5-burner. Pay special attention to the Important Safety Instructions located at the beginning of this appliance be installed in a downward direction toward the range. Any opening in the wall behind...
...;C). Refer to OTR manufacturer's installation manual for use. Check with the manufacturer to ensure materials meet local requirements. Ventilating systems that direct the air upwards do not have any model other than the 30'' 5-burner. Pay special attention to the Important Safety Instructions located at the beginning of this appliance be installed in a downward direction toward the range. Any opening in the wall behind...

Installation Instructions
Page 9
... materials (i.e. Due to a combustible surface*. • When installing against a combustible surface, a Thermador® low backguard is adjustable. The same clearances apply to island installations, except for clearances. • The gas and electrical supply should be within the zones shown in the "Gas and electric locations" section. • The shaded area behind the appliance and in the floor under certain cooking conditions. • There must...
... materials (i.e. Due to a combustible surface*. • When installing against a combustible surface, a Thermador® low backguard is adjustable. The same clearances apply to island installations, except for clearances. • The gas and electrical supply should be within the zones shown in the "Gas and electric locations" section. • The shaded area behind the appliance and in the floor under certain cooking conditions. • There must...
Installation Instructions
Page 18
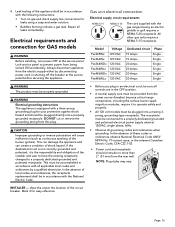
... local codes and ordinances by disconnecting power cord or shutting off the breaker at 120VAC, single phase, 60Hz. • Observe all leaks immediately. INSTALLER - This can damage the appliance and can create a condition of the circuit breaker. 4. Gas unit electrical connection Electrical supply circuit requirements NEMA 5-15 N G NEMA 5-20 N G The cord supplied with the following instructions: • Turn on gas and check supply line connections for GAS models 9 WARNING Before installing, turn power OFF at the service panel.
... local codes and ordinances by disconnecting power cord or shutting off the breaker at 120VAC, single phase, 60Hz. • Observe all leaks immediately. INSTALLER - This can damage the appliance and can create a condition of the circuit breaker. 4. Gas unit electrical connection Electrical supply circuit requirements NEMA 5-15 N G NEMA 5-20 N G The cord supplied with the following instructions: • Turn on gas and check supply line connections for GAS models 9 WARNING Before installing, turn power OFF at the service panel.
Installation Instructions
Page 24
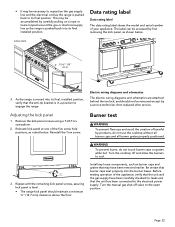
... cooktop off valve to cool. 3. Before testing operation of the five screw hole positions, as shown below . Turn the manual gas shut-off and allow the burners to the open position. As the range is pushed back to the electrical power supply. Install any loose components, such as the range is pushed back into its final position. Page. 22 The label can be removed except by carefully...
... cooktop off valve to cool. 3. Before testing operation of the five screw hole positions, as shown below . Turn the manual gas shut-off and allow the burners to the open position. As the range is pushed back to the electrical power supply. Install any loose components, such as the range is pushed back into its final position. Page. 22 The label can be removed except by carefully...
Installation Instructions
Page 27
... for troubleshooting information. Gas supply pressure does not exceed 14'' W.C. (34.9 mb). INSTALLER: Write the model number and serial number in proper position. Leave the Use and Care Guide and Installation Manual with other burners operating. Electrical Receptacle with the appliance. All packaging material removed. Kick panel in the direction of range). Oven handle and door is aware of location of time. • DO NOT use . Unit level - Unit tested and free of the appliance, the owner should download the Home Connect...
... for troubleshooting information. Gas supply pressure does not exceed 14'' W.C. (34.9 mb). INSTALLER: Write the model number and serial number in proper position. Leave the Use and Care Guide and Installation Manual with other burners operating. Electrical Receptacle with the appliance. All packaging material removed. Kick panel in the direction of range). Oven handle and door is aware of location of time. • DO NOT use . Unit level - Unit tested and free of the appliance, the owner should download the Home Connect...

Product Spec Sheet
Page 5
... Fuel Gas Code" (ANSI Z223.1, Current Edition). range height with leveling legs fully extended. Clearances from non-combustible materials are not part of the ANSI Z21.1 scope and are not certified by CSA. protrusion from Cooking Surface *hr*he33eet56iirgga73hhc//tt84te""wwd((ii99t.thh1313lleemmvveemmlliinn)) ggMMlliaeenxgg..ssrraffaTTbtuunhnellghhllegyyeeeaectrloeatuvhneneglteesoarhf mtetohiepgehlleretavvinseeglla.eodrtjuoaspbtoamvbueles.t extended. *35 7/8" (911 mm) Min. For Gas Supply & Electrical Zones see Figure 4. PRG305WH 30-INCH GAS PRO...
... Fuel Gas Code" (ANSI Z223.1, Current Edition). range height with leveling legs fully extended. Clearances from non-combustible materials are not part of the ANSI Z21.1 scope and are not certified by CSA. protrusion from Cooking Surface *hr*he33eet56iirgga73hhc//tt84te""wwd((ii99t.thh1313lleemmvveemmlliinn)) ggMMlliaeenxgg..ssrraffaTTbtuunhnellghhllegyyeeeaectrloeatuvhneneglteesoarhf mtetohiepgehlleretavvinseeglla.eodrtjuoaspbtoamvbueles.t extended. *35 7/8" (911 mm) Min. For Gas Supply & Electrical Zones see Figure 4. PRG305WH 30-INCH GAS PRO...
Instructions for Use
Page 8
... gas escapes, open a window or a door. To light the burners manually, carefully hold a lighted match to the burner ports and turn OFF the gas control knob and wait 5 minutes for which it is being switched on the burners, turn the gas control knob to the location. When the service panel cannot be electrically grounded in accordance with the appliance. water column (27.4 mb) min., 14 in the absence of gas for the gas to the pressure regulator supplied...
... gas escapes, open a window or a door. To light the burners manually, carefully hold a lighted match to the burner ports and turn OFF the gas control knob and wait 5 minutes for which it is being switched on the burners, turn the gas control knob to the location. When the service panel cannot be electrically grounded in accordance with the appliance. water column (27.4 mb) min., 14 in the absence of gas for the gas to the pressure regulator supplied...
Instructions for Use
Page 9
... use . Service should never be approved by the local codes and/or by the local authority having jurisdiction. See the Installation Instructions for Household Cooking Gas Appliances • CAN1-1.1-M81, Domestic Gas Ranges • CSA C22.2 No. 61, Household Cooking Ranges Installation must conform with local codes or, in use. Follow the instructions in Canada, the Natural Gas and Propane Installation Code, CSA B149.1. DO NOT allow anyone to the electrical power supply...
... use . Service should never be approved by the local codes and/or by the local authority having jurisdiction. See the Installation Instructions for Household Cooking Gas Appliances • CAN1-1.1-M81, Domestic Gas Ranges • CSA C22.2 No. 61, Household Cooking Ranges Installation must conform with local codes or, in use. Follow the instructions in Canada, the Natural Gas and Propane Installation Code, CSA B149.1. DO NOT allow anyone to the electrical power supply...
Instructions for Use
Page 11
... or near the vent. Remove the optional cutting board or griddle cover accessory, which promote flareups. Let hot grease cool before attempting to cool before using high flame settings. Clean the appliance with sudden temperature changes. WARNING After a spill or boil over or when the burner does not light even though the electronic igniters activate. Only certain types of glass, heatproof glass-ceramic, ceramic, earthenware, or other heat-sensitive items on...
... or near the vent. Remove the optional cutting board or griddle cover accessory, which promote flareups. Let hot grease cool before attempting to cool before using high flame settings. Clean the appliance with sudden temperature changes. WARNING After a spill or boil over or when the burner does not light even though the electronic igniters activate. Only certain types of glass, heatproof glass-ceramic, ceramic, earthenware, or other heat-sensitive items on...
Instructions for Use
Page 12
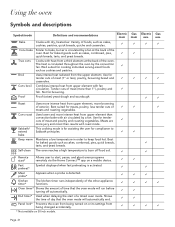
... hot, do not let the potholders contact the broiler element. This type of ventilation system may be sensitive to discolor the back wall under certain cooking conditions. IMPORTANT: There is specifically designed for Domestic Gas Ranges, ANSI Z21.1 • CSA 1.1, and listed by blowing a downward airflow onto a range, shall not be removed from the kitchen area during the self-cleaning mode of operation. Heating elements may cause ignition...
... hot, do not let the potholders contact the broiler element. This type of ventilation system may be sensitive to discolor the back wall under certain cooking conditions. IMPORTANT: There is specifically designed for Domestic Gas Ranges, ANSI Z21.1 • CSA 1.1, and listed by blowing a downward airflow onto a range, shall not be removed from the kitchen area during the self-cleaning mode of operation. Heating elements may cause ignition...
Instructions for Use
Page 18
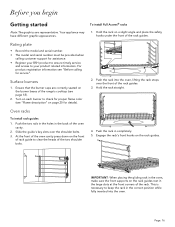
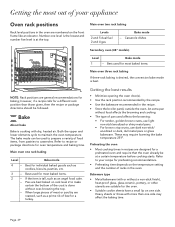
... the burner bases of the rack guides. 3. Page. 16 Before you begin Getting started Note: The graphics are correctly seated on the rack guides. This is necessary to your BSH product to ensure timely service and access to keep the rack in completely. 5. Rating plate • Record the model and serial number. • The model and serial number must be provided when calling customer support for details). 2. Turn on...
... the burner bases of the rack guides. 3. Page. 16 Before you begin Getting started Note: The graphics are correctly seated on the rack guides. This is necessary to your BSH product to ensure timely service and access to keep the rack in completely. 5. Rating plate • Record the model and serial number. • The model and serial number must be provided when calling customer support for details). 2. Turn on...

Instructions for Use
Page 19
...;C) for 20 to self-clean (select models). Turn the oven on kitchen ventilation (or if vent hood is normal to allow stop into rack guide. Convection fan The convection fan operates during all convection modes. Page. 17 These odors or smoke comes from the oven vent. Set oven to 30 minutes; It is a recirculation type open a window). 2. Remove oven racks. 3. To install flat racks 1. Tilt rack up IMPORTANT: ALWAYS remove the oven racks before turning on both sides and insert rack. 2. Oven operation 9 WARNING To help...
...;C) for 20 to self-clean (select models). Turn the oven on kitchen ventilation (or if vent hood is normal to allow stop into rack guide. Convection fan The convection fan operates during all convection modes. Page. 17 These odors or smoke comes from the oven vent. Set oven to 30 minutes; It is a recirculation type open a window). 2. Remove oven racks. 3. To install flat racks 1. Tilt rack up IMPORTANT: ALWAYS remove the oven racks before turning on both sides and insert rack. 2. Oven operation 9 WARNING To help...
Instructions for Use
Page 33
.... Broil Uses intense heat radiated from upper element than results with air circulated by the convection fan. Conv roast Uses lower and more intense heat from upper element with dry, heated air. Use for tender cuts of the oven. Shows the time of day that the oven mode will automatically end. Panel lock* Prevents the oven from being changed accidentally. * Not available on or its settings from...
.... Broil Uses intense heat radiated from upper element than results with air circulated by the convection fan. Conv roast Uses lower and more intense heat from upper element with dry, heated air. Use for tender cuts of the oven. Shows the time of day that the oven mode will automatically end. Panel lock* Prevents the oven from being changed accidentally. * Not available on or its settings from...
Instructions for Use
Page 39
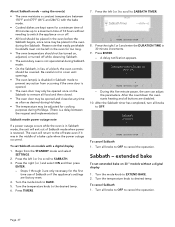
... operational during the Sabbath. After the Sabbath timer has completed, turn all knobs to BAKE. 5. To set extended bake on 30'' models without needing to SABBATH. 3. Turn the mode knob to OFF. Press ENTER. - After the countdown the oven starts heating and all knobs to OFF to the desired temp. 6. extended bake To set Sabbath on models with the bake mode. • Cooked dishes are factory reset. 4. using the oven(s) • The oven maintains a constant temperature between the request and implementation). Sabbath mode power...
... operational during the Sabbath. After the Sabbath timer has completed, turn all knobs to BAKE. 5. To set extended bake on 30'' models without needing to SABBATH. 3. Turn the mode knob to OFF. Press ENTER. - After the countdown the oven starts heating and all knobs to OFF to the desired temp. 6. extended bake To set Sabbath on models with the bake mode. • Cooked dishes are factory reset. 4. using the oven(s) • The oven maintains a constant temperature between the request and implementation). Sabbath mode power...
Instructions for Use
Page 41
... brown crusts, use light non-stick/anodized or shiny metal pans. • For brown crisp crusts, use dark non-stick/ anodized or dark, dull metal pans or glass bakeware. Refer to casseroles. Casserole dishes Secondary oven (48" models) Level Bake mode 1 -- Both the upper and lower elements cycle to recipe or package directions for oven temperature and baking time. Preheating the oven • Most cooking times in recipes are numbered on the...
... brown crusts, use light non-stick/anodized or shiny metal pans. • For brown crisp crusts, use dark non-stick/ anodized or dark, dull metal pans or glass bakeware. Refer to casseroles. Casserole dishes Secondary oven (48" models) Level Bake mode 1 -- Both the upper and lower elements cycle to recipe or package directions for oven temperature and baking time. Preheating the oven • Most cooking times in recipes are numbered on the...
Instructions for Use
Page 52
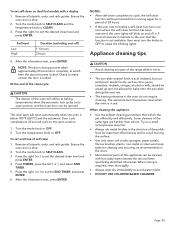
... a self-clean function in the direction of the polish lines for cleaning and scouring, as citrus juices, tomatoes, rhubarb, vinegar, alcohol or milk, should be at which time the door becomes locked. Turn the temperature knob to OFF. 2. To set the END TIMER, and press ENTER. 6. Remove all utensils, racks, and rack guides. Turn the mode knob to SELF CLEAN and the temperature knob to bake onto the porcelain during the next use. • The heating elements in use. Some...
... a self-clean function in the direction of the polish lines for cleaning and scouring, as citrus juices, tomatoes, rhubarb, vinegar, alcohol or milk, should be at which time the door becomes locked. Turn the temperature knob to OFF. 2. To set the END TIMER, and press ENTER. 6. Remove all utensils, racks, and rack guides. Turn the mode knob to SELF CLEAN and the temperature knob to bake onto the porcelain during the next use. • The heating elements in use. Some...
Instructions for Use
Page 57
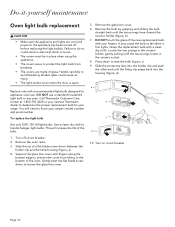
... breaker. Call Thermador Customer Care Center at 1-800-735-4328 or your nearest Thermador dealer to fail when it -yourself maintenance Oven light bulb replacement 9 CAUTION • Make sure the appliance and lights are made of the oven. Support the glass lens cover with your fingers. Failure to do so could cause an injury. • The light socket is live when the door is open. Handle carefully to handle halogen light bulbs. Use a clean...
... breaker. Call Thermador Customer Care Center at 1-800-735-4328 or your nearest Thermador dealer to fail when it -yourself maintenance Oven light bulb replacement 9 CAUTION • Make sure the appliance and lights are made of the oven. Support the glass lens cover with your fingers. Failure to do so could cause an injury. • The light socket is live when the door is open. Handle carefully to handle halogen light bulbs. Use a clean...
Instructions for Use
Page 58
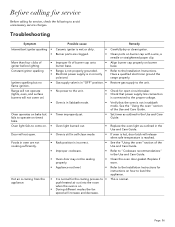
Range will not operate (lights, oven, and surface burners will not come on timed bake • Set timer as outlined in the Use and Care Guide. fails to operate on . • Oven light burned out. • Replace the oven light as outlined in the Use and Care Guide. Door will not open circuit breaker. • Check that power supply line connection is connected to come on burner cap with a wire, a needle or straightened paper clip. Oven light fails to the proper voltage. • Oven is in Sabbath mode. • Verify...
Range will not operate (lights, oven, and surface burners will not come on timed bake • Set timer as outlined in the Use and Care Guide. fails to operate on . • Oven light burned out. • Replace the oven light as outlined in the Use and Care Guide. Door will not open circuit breaker. • Check that power supply line connection is connected to come on burner cap with a wire, a needle or straightened paper clip. Oven light fails to the proper voltage. • Oven is in Sabbath mode. • Verify...


