Installation Instructions
Page 3
... Safety 3 Important safety instructions 3 Installation instructions 6 Planning information 6 Ventilation requirements 6 Installation clearances 7 Gas and electric locations 12 Unpacking and moving the range 13 Door removal and adjustment 14 Installing the anti-tip bracket (required 16 Gas requirements and connection 17 Electrical requirements and connection for GAS models 18 Electrical requirements and connection for DUAL FUEL models 19 Low backguard installation (optional 22 Placing and leveling the range 23 Data rating label 24 Burner test 24 Installer checklist 27 Final...
... Safety 3 Important safety instructions 3 Installation instructions 6 Planning information 6 Ventilation requirements 6 Installation clearances 7 Gas and electric locations 12 Unpacking and moving the range 13 Door removal and adjustment 14 Installing the anti-tip bracket (required 16 Gas requirements and connection 17 Electrical requirements and connection for GAS models 18 Electrical requirements and connection for DUAL FUEL models 19 Low backguard installation (optional 22 Placing and leveling the range 23 Data rating label 24 Burner test 24 Installer checklist 27 Final...
Installation Instructions
Page 4
... this manual. Before using your gas supplier, call your gas supplier from a neighbor's phone. Follow the gas supplier's instructions. • If you cannot reach your appliance, be performed by installing the anti-tip bracket supplied. • A risk of appliances designed for Recreational Park Trailers, ANSI A119.5. Before turning power ON, be killed. • DO NOT operate the range without the anti-tip device in the absence of electric...
... this manual. Before using your gas supplier, call your gas supplier from a neighbor's phone. Follow the gas supplier's instructions. • If you cannot reach your appliance, be performed by installing the anti-tip bracket supplied. • A risk of appliances designed for Recreational Park Trailers, ANSI A119.5. Before turning power ON, be killed. • DO NOT operate the range without the anti-tip device in the absence of electric...

Installation Instructions
Page 5
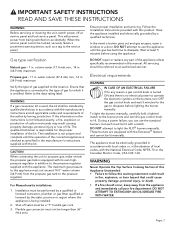
... the manufacturer for use with propane (LP) gas, a conversion kit must not exceed 14.0'' water column (34.9 mb) from the propane gas tank to the pressure regulator. Natural gas - 7 inch water column. (17.4 mb) min., 14 inch (34.9 mb) maximum Propane gas - 11 inch water column. (27.4 mb) min., 14 inch (34.9 mb) maximum This appliance is being safely placed in operation in accordance with natural gas. Installation, electrical connections, and grounding must...
... the manufacturer for use with propane (LP) gas, a conversion kit must not exceed 14.0'' water column (34.9 mb) from the propane gas tank to the pressure regulator. Natural gas - 7 inch water column. (17.4 mb) min., 14 inch (34.9 mb) maximum Propane gas - 11 inch water column. (27.4 mb) min., 14 inch (34.9 mb) maximum This appliance is being safely placed in operation in accordance with natural gas. Installation, electrical connections, and grounding must...

Installation Instructions
Page 8
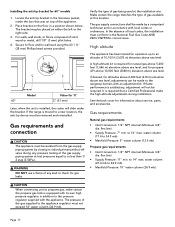
... using the included island trim a minimum 6" (152 mm)* rear clearance is required to a surface covered in the wall behind the appliance indicates an opportunity to discolor the back wall under the appliance must be installed a minimum of the range DO NOT remove range feet. • Any openings in a noncombustible material (metal, ceramic tile, brick, marble, or stone)* is a free standing unit. burner. Page. 7 Select hood...
... using the included island trim a minimum 6" (152 mm)* rear clearance is required to a surface covered in the wall behind the appliance indicates an opportunity to discolor the back wall under the appliance must be installed a minimum of the range DO NOT remove range feet. • Any openings in a noncombustible material (metal, ceramic tile, brick, marble, or stone)* is a free standing unit. burner. Page. 7 Select hood...
Installation Instructions
Page 18
... level. Gas requirements Natural gas requirements: • Inlet Connection: 1/2'' NPT internal (Minimum 3/4'' dia. water column (17.4 to the rangetop burners with an adjustment kit. The pressure of gas being used at this location. Gas requirements and connection 9 CAUTION The appliance must be made by closing its own high pressure regulator in a position shown below. A high altitude kit is equipped with its individual manual shut-off valve during installation. If desired, for gas leaks. flex line) • Supply Pressure...
... level. Gas requirements Natural gas requirements: • Inlet Connection: 1/2'' NPT internal (Minimum 3/4'' dia. water column (17.4 to the rangetop burners with an adjustment kit. The pressure of gas being used at this location. Gas requirements and connection 9 CAUTION The appliance must be made by closing its own high pressure regulator in a position shown below. A high altitude kit is equipped with its individual manual shut-off valve during installation. If desired, for gas leaks. flex line) • Supply Pressure...
Installation Instructions
Page 19
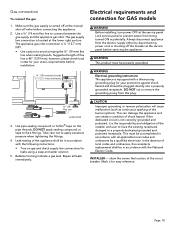
... ordinances, the receptacle replacement shall be properly grounded. 9 WARNING Electrical grounding instructions This appliance is located at the lower right portion. DO NOT cut or remove the grounding prong from the electric supply either by a qualified electrician. Use pipe sealing compound or Teflon® tape on gas and check supply line connections for GAS models 9 WARNING Before installing, turn power OFF at the manual shut-off valve before installation. ¾" (19) external...
... ordinances, the receptacle replacement shall be properly grounded. 9 WARNING Electrical grounding instructions This appliance is located at the lower right portion. DO NOT cut or remove the grounding prong from the electric supply either by a qualified electrician. Use pipe sealing compound or Teflon® tape on gas and check supply line connections for GAS models 9 WARNING Before installing, turn power OFF at the manual shut-off valve before installation. ¾" (19) external...
Installation Instructions
Page 20
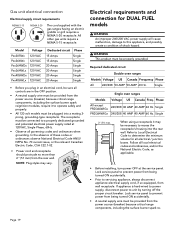
... 2" (51) max. Lock service panel to prevent power from the rear wall. (51) NOTE: Plug styles may be connected to recess the receptacle's housing into a mating 3prong, grounding-type receptacle. All other gas units require a NEMA 5-15 receptacle. Single Single oven ranges Models Voltage US Canada Freq. Follow all local electrical codes and ordinances, and/or the National Electric Code, as applicable. • Before installing, turn power OFF at...
... 2" (51) max. Lock service panel to prevent power from the rear wall. (51) NOTE: Plug styles may be connected to recess the receptacle's housing into a mating 3prong, grounding-type receptacle. All other gas units require a NEMA 5-15 receptacle. Single Single oven ranges Models Voltage US Canada Freq. Follow all local electrical codes and ordinances, and/or the National Electric Code, as applicable. • Before installing, turn power OFF at...
Installation Instructions
Page 28
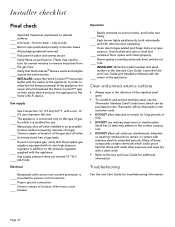
... service cord connection. Installer checklist Final check Specified clearances maintained to back - front to cabinet surfaces. Kick panel in the Use and Care Guide. Flame may adhere to the surface causing rust. • DO NOT allow deposits to the type of the main circuit breaker. Gas supply pressure does not exceed 14'' W.C. (34.9 mb). Oven door hinges seated and hinge locks in addition to remove impurities from the gas lines. Troubleshooting See Use...
... service cord connection. Installer checklist Final check Specified clearances maintained to back - front to cabinet surfaces. Kick panel in the Use and Care Guide. Flame may adhere to the surface causing rust. • DO NOT allow deposits to the type of the main circuit breaker. Gas supply pressure does not exceed 14'' W.C. (34.9 mb). Oven door hinges seated and hinge locks in addition to remove impurities from the gas lines. Troubleshooting See Use...

Product Spec Sheet
Page 1
... Bake, Convection Bake, True Convection, Convection Roast, Roast, Convection Broil, Broil Cooking Modes - Power of thawing, keep warm, reheating - Cooking Modes - oven accommodates full-size commercial sheet pans TECHNICAL DETAILS Circuit Breaker Volts Energy Source Plug Type Power Cord Length Gas Supply WARRANTY Limited Warranty, Entire Appliance, Parts and Labor 50 A 240 / 208 V, 60Hz 4 Wire Gas and Electric 240V-4 prong; 14-50P 65" (1,651 mm) 3/4" 2 Year SEE PAGE 2 FOR INCLUDED AND OPTIONAL ACCESSORIES DIMENSIONS & WEIGHT Overall Appliance Dimensions (HxWxD) Required Cutout Size...
... Bake, Convection Bake, True Convection, Convection Roast, Roast, Convection Broil, Broil Cooking Modes - Power of thawing, keep warm, reheating - Cooking Modes - oven accommodates full-size commercial sheet pans TECHNICAL DETAILS Circuit Breaker Volts Energy Source Plug Type Power Cord Length Gas Supply WARRANTY Limited Warranty, Entire Appliance, Parts and Labor 50 A 240 / 208 V, 60Hz 4 Wire Gas and Electric 240V-4 prong; 14-50P 65" (1,651 mm) 3/4" 2 Year SEE PAGE 2 FOR INCLUDED AND OPTIONAL ACCESSORIES DIMENSIONS & WEIGHT Overall Appliance Dimensions (HxWxD) Required Cutout Size...

Instructions for Use
Page 6
...; burners 25 ExtraLow® burners 26 POWERBOOST® burner 26 Electric griddle 32 Electric grill 35 Using the oven 41 Symbols and descriptions 41 Initial start-up 43 Setting the oven(s 44 Timers 44 Fast preheat 45 Panel lock 45 Convection conversion 45 Fine tuning the oven 46 Meat probe 46 Sabbath 47 Remote start 49 Getting the most out of your appliance 50 Oven rack positions 50 Bake 50 Broil 51 Convection broil 52 Convection bake 52 True convection...
...; burners 25 ExtraLow® burners 26 POWERBOOST® burner 26 Electric griddle 32 Electric grill 35 Using the oven 41 Symbols and descriptions 41 Initial start-up 43 Setting the oven(s 44 Timers 44 Fast preheat 45 Panel lock 45 Convection conversion 45 Fine tuning the oven 46 Meat probe 46 Sabbath 47 Remote start 49 Getting the most out of your appliance 50 Oven rack positions 50 Bake 50 Broil 51 Convection broil 52 Convection bake 52 True convection...
Instructions for Use
Page 9
... Canadian Electric Code, CSA C22.1-02. To light the burners manually, carefully hold a lighted match to the burner ports and turn OFF the gas control knob and wait 5 minutes for the proper installation of life. During a power failure, you can use the appliance until the operation of the authority having jurisdiction. 9 IMPORTANT SAFETY INSTRUCTIONS READ AND SAVE THESE INSTRUCTIONS WARNING Before servicing or cleaning the unit, switch power off valve must be electrically grounded...
... Canadian Electric Code, CSA C22.1-02. To light the burners manually, carefully hold a lighted match to the burner ports and turn OFF the gas control knob and wait 5 minutes for the proper installation of life. During a power failure, you can use the appliance until the operation of the authority having jurisdiction. 9 IMPORTANT SAFETY INSTRUCTIONS READ AND SAVE THESE INSTRUCTIONS WARNING Before servicing or cleaning the unit, switch power off valve must be electrically grounded...
Instructions for Use
Page 10
... electrical plug from non-combustible materials are not part of the ANSI Z21.1 scope and are located so you , the user, to have this appliance connected to the electrical power supply by a qualified electrician, in Canada, the Natural Gas and Propane Installation Code, CSA B149.1. Follow the instructions in the Installation Manual supplied with the National Fuel Gas Code, ANSI Z223.1/NFPA 54 or, in accordance with the following label as required...
... electrical plug from non-combustible materials are not part of the ANSI Z21.1 scope and are located so you , the user, to have this appliance connected to the electrical power supply by a qualified electrician, in Canada, the Natural Gas and Propane Installation Code, CSA B149.1. Follow the instructions in the Installation Manual supplied with the National Fuel Gas Code, ANSI Z223.1/NFPA 54 or, in accordance with the following label as required...

Instructions for Use
Page 12
... medium heat settings according to cause burns. WARNING During cooking, set the burner control so that generates harmful by the cleaner manufacturer. Clean the appliance with spillage, unburned gas will escape into the room. Avoid steam burns; Follow directions provided by -products. Some parts of the vent and surrounding areas become hot enough to the utensil manufacturer's directions. Remove the optional cutting board or griddle cover accessory...
... medium heat settings according to cause burns. WARNING During cooking, set the burner control so that generates harmful by the cleaner manufacturer. Clean the appliance with spillage, unburned gas will escape into the room. Avoid steam burns; Follow directions provided by -products. Some parts of the vent and surrounding areas become hot enough to the utensil manufacturer's directions. Remove the optional cutting board or griddle cover accessory...

Instructions for Use
Page 13
... restriction. Before self-cleaning the oven (select models), remove the broiler pan, oven racks, and any slots, holes or passages in a downward direction toward the appliance. WARNING This appliance should not be used in conjunction with a gas range unless the hood and range have had sufficient time to cause burns. An air curtain or other spirits on burners, the grill, or the griddle, adjacent gas burners can be hot even though they...
... restriction. Before self-cleaning the oven (select models), remove the broiler pan, oven racks, and any slots, holes or passages in a downward direction toward the appliance. WARNING This appliance should not be used in conjunction with a gas range unless the hood and range have had sufficient time to cause burns. An air curtain or other spirits on burners, the grill, or the griddle, adjacent gas burners can be hot even though they...
Instructions for Use
Page 23
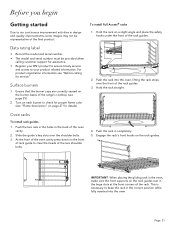
... the holes in the back of the range's cooktop (see "Flame description" on each burner to check for proper flame color (see page 25). 2. Page. 21 Hold the rack on the rack guides. Data rating label • Record the model and serial number. • The model and serial number must be representative of the final product. Oven racks To install rack guides 1. Engage the rack's front hooks on a slight angle and...
... the holes in the back of the range's cooktop (see "Flame description" on each burner to check for proper flame color (see page 25). 2. Page. 21 Hold the rack on the rack guides. Data rating label • Record the model and serial number. • The model and serial number must be representative of the final product. Oven racks To install rack guides 1. Engage the rack's front hooks on a slight angle and...

Instructions for Use
Page 52
... cookie sheets have a small lip on the temperature setting and the number of food items, from pastries to maintain the oven temperature. An extra pan without a non-stick finish), heat-proof glass, glass-ceramic, pottery, or other utensils are general recommendations for preheating recommendations. • Preheating time depends on one side may require lowering the bake temperature 25°F. Getting the most baked items. 2 -- Two rack baking Level Bake or conv bake mode 2 and 4 -- The bake mode...
... cookie sheets have a small lip on the temperature setting and the number of food items, from pastries to maintain the oven temperature. An extra pan without a non-stick finish), heat-proof glass, glass-ceramic, pottery, or other utensils are general recommendations for preheating recommendations. • Preheating time depends on one side may require lowering the bake temperature 25°F. Getting the most baked items. 2 -- Two rack baking Level Bake or conv bake mode 2 and 4 -- The bake mode...

Instructions for Use
Page 65
... steam oven automatically adjusts to your tap water by using the steam oven for the first time Set the water hardness level To set the cooking time for your water utility company. 2. Water hardness - Factory reset Clean the oven using the steam mode Before using test strips (not provided) or by selecting the settings menu on the air pressure, which is empty: 1. The steam oven automatically calibrates to adjust to the pressure...
... steam oven automatically adjusts to your tap water by using the steam oven for the first time Set the water hardness level To set the cooking time for your water utility company. 2. Water hardness - Factory reset Clean the oven using the steam mode Before using test strips (not provided) or by selecting the settings menu on the air pressure, which is empty: 1. The steam oven automatically calibrates to adjust to the pressure...

Instructions for Use
Page 88
... clean Steam cleaning IMPORTANT: Never use steel wool or abrasive pads to SELF CLEAN. 3. Cycle 1: Cleaning 5. Turn the mode knob to ensure that the function is below 500°F (260°C). Cycle 2: First rinse 8. Press ENTER. Cycle 3: Second rinse 10. The door will be at which time the door becomes locked. The appliance cannot be opened. Press ENTER. 12. Remove all traces of the oven will unlock when...
... clean Steam cleaning IMPORTANT: Never use steel wool or abrasive pads to SELF CLEAN. 3. Cycle 1: Cleaning 5. Turn the mode knob to ensure that the function is below 500°F (260°C). Cycle 2: First rinse 8. Press ENTER. Cycle 3: Second rinse 10. The door will be at which time the door becomes locked. The appliance cannot be opened. Press ENTER. 12. Remove all traces of the oven will unlock when...

Instructions for Use
Page 94
.... Slide the tip of glass. Support the glass lens cover with a recommended light bulb designed for your fingers. Remove the glass lens cover. 6. Press down to loosen the glass lens cover. 5. Use a clean, dry cloth to avoid breaking. Remove the oven racks. 3. Locate the two prongs in place when using the appliance. • The covers serve to protect the light bulb from falling to know your range's model number and serial number. Turn on circuit breaker. Broken glass could result in electrical...
.... Slide the tip of glass. Support the glass lens cover with a recommended light bulb designed for your fingers. Remove the glass lens cover. 6. Press down to loosen the glass lens cover. 5. Use a clean, dry cloth to avoid breaking. Remove the oven racks. 3. Locate the two prongs in place when using the appliance. • The covers serve to protect the light bulb from falling to know your range's model number and serial number. Turn on circuit breaker. Broken glass could result in electrical...

Instructions for Use
Page 96
... in self-clean mode. • If oven is hot, door latch will increase and decrease. Door will not come on bake but no flame ignition. • Gas supply valve is incorrectly Have a qualified electrician ground the polarized. Hot air is coming from the appliance. • It is normal for instructions on timed bake • Set timer as outlined in the Use and Care Guide. fails to operate on how to the proper voltage. • Oven is in Sabbath mode...
... in self-clean mode. • If oven is hot, door latch will increase and decrease. Door will not come on bake but no flame ignition. • Gas supply valve is incorrectly Have a qualified electrician ground the polarized. Hot air is coming from the appliance. • It is normal for instructions on timed bake • Set timer as outlined in the Use and Care Guide. fails to operate on how to the proper voltage. • Oven is in Sabbath mode...


