Installation Manual
Page 4
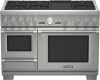
..., a backguard designed specifically for the Safety of gas provided at installation location. Before proceeding with natural gas. Field conversion of the owner and the installer to determine if additional requirements and/or standards apply to the pressure regulator. • This unit is the responsibility of the appliance for use it is used. Installation, electrical connections and grounding must not exceed 14.0 inches water column (34.9 mb) from the propane gas tank...
..., a backguard designed specifically for the Safety of gas provided at installation location. Before proceeding with natural gas. Field conversion of the owner and the installer to determine if additional requirements and/or standards apply to the pressure regulator. • This unit is the responsibility of the appliance for use it is used. Installation, electrical connections and grounding must not exceed 14.0 inches water column (34.9 mb) from the propane gas tank...
Installation Manual
Page 5
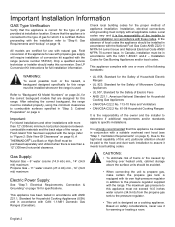
... install a microwave oven/ventilator combination above the cooking surface. 3. Where space permits, a hood larger in width than the range may be used with griddle 1200 (cfm) 48" or 54" Pro Wall Hood 48" Custom Insert w/ optional blower Important Notes: It is recommended that a THERMADOR PROFESSIONAL® wall or island hood or custom insert is particularly important for improved ventilation performance. • For island installations...
... install a microwave oven/ventilator combination above the cooking surface. 3. Where space permits, a hood larger in width than the range may be used with griddle 1200 (cfm) 48" or 54" Pro Wall Hood 48" Custom Insert w/ optional blower Important Notes: It is recommended that a THERMADOR PROFESSIONAL® wall or island hood or custom insert is particularly important for improved ventilation performance. • For island installations...
Installation Manual
Page 6
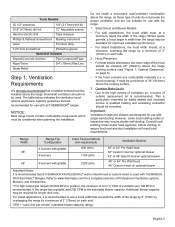
..., the clearances shown in the "National Fuel Gas Code" (ANSI Z223.1, Current Edition). Note: The maximum depth of overhead cabinets installed on page 7. • Any openings in the wall behind the range and in accordance with "O" flame spread ratings are shown as also indicated in Figure on page 5. • The gas and electrical supply should be used when the bottom of the wood...
..., the clearances shown in the "National Fuel Gas Code" (ANSI Z223.1, Current Edition). Note: The maximum depth of overhead cabinets installed on page 7. • Any openings in the wall behind the range and in accordance with "O" flame spread ratings are shown as also indicated in Figure on page 5. • The gas and electrical supply should be used when the bottom of the wood...
Installation Manual
Page 14
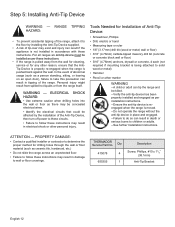
.... THERMADOR Service Part No. For all ranges an anti-tip device must be affected by the installation of Anti-Tip Device: • Screwdriver, Phillips • Drill, electric or hand • Measuring tape or ruler • 1/8" (3.17mm) drill bit (wood or metal; Personal injury might result from spilled hot liquids or from the wall for cleaning, service or for Installation of the Anti-Tip Device, then turn off power...
.... THERMADOR Service Part No. For all ranges an anti-tip device must be affected by the installation of Anti-Tip Device: • Screwdriver, Phillips • Drill, electric or hand • Measuring tape or ruler • 1/8" (3.17mm) drill bit (wood or metal; Personal injury might result from spilled hot liquids or from the wall for cleaning, service or for Installation of the Anti-Tip Device, then turn off power...
Installation Manual
Page 16
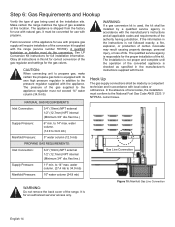
... installation is used at this kit for correct conversion of the gas regulator and settings for use with natural gas. to 34.9 mb) Manifold Pressure: 5" water column (12.5 mb) PROPANE GAS REQUIREMENTS: Inlet Connection: 3/4" (19mm) NPT external 1/2" (12.7mm) NPT internal (Minimum 3/4" dia. It must not exceed 14" water column (34.9 mb). NATURAL GAS REQUIREMENTS: WARNING: If a gas conversion kit is not proper and complete until the operation of the conversion kit supplied with the range (service number...
... installation is used at this kit for correct conversion of the gas regulator and settings for use with natural gas. to 34.9 mb) Manifold Pressure: 5" water column (12.5 mb) PROPANE GAS REQUIREMENTS: Inlet Connection: 3/4" (19mm) NPT external 1/2" (12.7mm) NPT internal (Minimum 3/4" dia. It must not exceed 14" water column (34.9 mb). NATURAL GAS REQUIREMENTS: WARNING: If a gas conversion kit is not proper and complete until the operation of the conversion kit supplied with the range (service number...
Installation Manual
Page 27
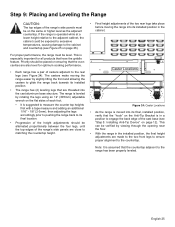
... be exposed to excessive temperatures, causing damage to matching the countertop height. • Final height adjustments of the two rear legs take place before moving the range into its final, installed position, verify that have the griddle feature. English 25 This can be verified by viewing through the opening near the floor. • With the range in the cabinet. The...
... be exposed to excessive temperatures, causing damage to matching the countertop height. • Final height adjustments of the two rear legs take place before moving the range into its final, installed position, verify that have the griddle feature. English 25 This can be verified by viewing through the opening near the floor. • With the range in the cabinet. The...
Installation Manual
Page 31
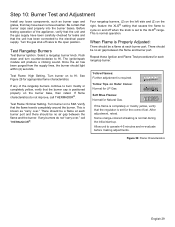
Turn the gas shut-off when the knob is set to the XLO® range. Test Flame: Simmer Setting. When Flame is normal during the initial start-up. Yellow Tips on and off valve to cycle on Outer Cones: Normal for Natural Gas. If the flame is completely or mostly yellow, verify that causes the flame to the open position. Four rangetop burners, (2) on the left side and (2) on...
Turn the gas shut-off when the knob is set to the XLO® range. Test Flame: Simmer Setting. When Flame is normal during the initial start-up. Yellow Tips on and off valve to cycle on Outer Cones: Normal for Natural Gas. If the flame is completely or mostly yellow, verify that causes the flame to the open position. Four rangetop burners, (2) on the left side and (2) on...
Installation Manual
Page 32
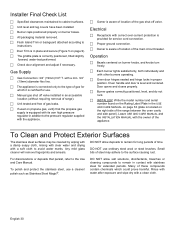
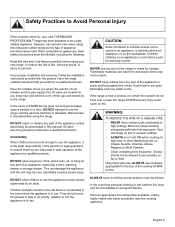
... the pressure regulator supplied with correct over-current protection is provided for use. Manual gas shut off valve installed in an accessible location (without requiring removal of range). Unit tested and free of gas leaks. If used on burner knobs, and knobs turn freely. Each burner lights satisfactorily, both individually and with other burners operating. Oven door hinges seated and hinge locks in addition to the Use and Care Manual. To Clean and Protect Exterior Surfaces The...
... the pressure regulator supplied with correct over-current protection is provided for use. Manual gas shut off valve installed in an accessible location (without requiring removal of range). Unit tested and free of gas leaks. If used on burner knobs, and knobs turn freely. Each burner lights satisfactorily, both individually and with other burners operating. Oven door hinges seated and hinge locks in addition to the Use and Care Manual. To Clean and Protect Exterior Surfaces The...
Use and Care Manual
Page 7
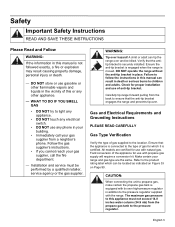
... installation and use of the appliance for use with natural gas. Refer to children and adults. Follow the gas supplier's instructions. • If you cannot reach your range and gas type are certified for use with propane gas supply will require a conversion kit. DO NOT operate the range without the anti-tip bracket in death or serious burns to the product rating label which it is moved. Gas and Electrical Requirements and Grounding Instructions PLEASE READ CAREFULLY Gas...
... installation and use of the appliance for use with natural gas. Refer to children and adults. Follow the gas supplier's instructions. • If you cannot reach your range and gas type are certified for use with propane gas supply will require a conversion kit. DO NOT operate the range without the anti-tip bracket in death or serious burns to the product rating label which it is moved. Gas and Electrical Requirements and Grounding Instructions PLEASE READ CAREFULLY Gas...
Use and Care Manual
Page 8
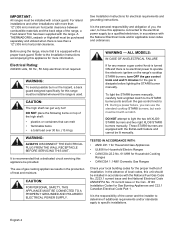
... range's cooktop STAR® burners, turn the gas control knob to the STAR® burner ports and turn OFF the gas control knob and wait 5 minutes for more than a 12" (305 mm) horizontal clearance. CAUTION: FOR PERSONAL SAFETY, THIS APPLIANCE MUST BE CONNECTED TO A PROPERLY GROUNDED AND POLARIZED ELECTRICAL POWER SUPPLY. DO NOT attempt to dissipate before lighting the STAR® burner manually. B149 Installation Codes for electrical requirements and grounding instructions. It is used...
... range's cooktop STAR® burners, turn the gas control knob to the STAR® burner ports and turn OFF the gas control knob and wait 5 minutes for more than a 12" (305 mm) horizontal clearance. CAUTION: FOR PERSONAL SAFETY, THIS APPLIANCE MUST BE CONNECTED TO A PROPERLY GROUNDED AND POLARIZED ELECTRICAL POWER SUPPLY. DO NOT attempt to dissipate before lighting the STAR® burner manually. B149 Installation Codes for electrical requirements and grounding instructions. It is used...
Use and Care Manual
Page 9
... ignite. they are located so you where the electric circuit breaker and the gas supply shut off the gas and electricity to accumulate on fire. DO NOT attempt to use the appliance, it is in safe operation of the appliance by a qualified technician. DO NOT repair or replace any part of the appliance unless specifically recommended in use extreme care when using this restaurant caliber range as this Use and Care Manual carefully...
... ignite. they are located so you where the electric circuit breaker and the gas supply shut off the gas and electricity to accumulate on fire. DO NOT attempt to use the appliance, it is in safe operation of the appliance by a qualified technician. DO NOT repair or replace any part of the appliance unless specifically recommended in use extreme care when using this restaurant caliber range as this Use and Care Manual carefully...

Use and Care Manual
Page 11
... directions provided by -products. The heat deflector, which deflects heat away from forced air vents or fans do not extend over adjacent work areas, cooking areas, or the edge of the range's cooktop. DO NOT clean, rub, damage, move, or remove the door gasket. If the gasket becomes worn or excessively soiled with sudden temperature changes. Build-up of pressure may result in or around the self-cleaning oven...
... directions provided by -products. The heat deflector, which deflects heat away from forced air vents or fans do not extend over adjacent work areas, cooking areas, or the edge of the range's cooktop. DO NOT clean, rub, damage, move, or remove the door gasket. If the gasket becomes worn or excessively soiled with sudden temperature changes. Build-up of pressure may result in or around the self-cleaning oven...
Use and Care Manual
Page 12
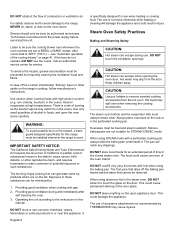
...'s instructions. The fruit juice that drips off the baking pan leaves behind stains that cannot be heat and steam resistant. Listen to remove inserted cooking accessories from the door. DO NOT place anything on page 41. see "Automatic operation of time in foods, and open appliance door. rum, brandy, bourbon) in this range must be installed whenever the range is specifically designed for STEAM/CONVEC mode. Steam Oven...
...'s instructions. The fruit juice that drips off the baking pan leaves behind stains that cannot be heat and steam resistant. Listen to remove inserted cooking accessories from the door. DO NOT place anything on page 41. see "Automatic operation of time in foods, and open appliance door. rum, brandy, bourbon) in this range must be installed whenever the range is specifically designed for STEAM/CONVEC mode. Steam Oven...
Use and Care Manual
Page 17
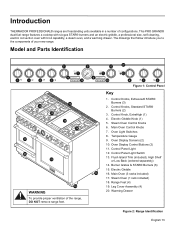
... (1 rack included) 18. Temperature Gauge 9. Range Feet (4) 19. Steam Oven Control Knobs 6. Key 1. Oven Light Switches 8. Electric Griddle 18 16. Control Knob, ExtraHigh (1) 4. Control Panel Light 12. Main Oven (3 racks included) 17. This PRO GRAND® dual-fuel range features a cooktop with six gas STAR® burners and an electric griddle, a professional size, self-cleaning, electric convection oven with broil capability, a steam oven, and a warming drawer. Electric Griddle Knob (1) 5. Oven Display Screens (2) 10. Control Panel Light Switch 13. Flush Island Trim...
... (1 rack included) 18. Temperature Gauge 9. Range Feet (4) 19. Steam Oven Control Knobs 6. Key 1. Oven Light Switches 8. Electric Griddle 18 16. Control Knob, ExtraHigh (1) 4. Control Panel Light 12. Main Oven (3 racks included) 17. This PRO GRAND® dual-fuel range features a cooktop with six gas STAR® burners and an electric griddle, a professional size, self-cleaning, electric convection oven with broil capability, a steam oven, and a warming drawer. Electric Griddle Knob (1) 5. Oven Display Screens (2) 10. Control Panel Light Switch 13. Flush Island Trim...
Use and Care Manual
Page 19
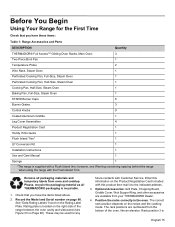
... Quantity THERMADOR® Full Access™ Gliding Oven Racks, Main Oven 3 Two-Piece Broil Pan 1 Temperature Probe 2 Wire Rack, Steam Oven 1 Perforated Cooking Pan, Full-Size, Steam Oven 1 Perforated Cooking Pan, Half-Size, Steam Oven 1 Cooking Pan, Half-Size, Steam Oven 1 Baking Pan, Full-Size, Steam Oven 1 STAR® Burner Caps 6 Burner Grates 3 Control Knobs 9 Coated Aluminum Griddle 1 Leg Cover Assemblies 4 Product Registration Card 1 Handy Hints Guide 1 Flush Island Trim* 1 LP Conversion Kit 1 Installation Instructions 1 Use and Care Manual...
... Quantity THERMADOR® Full Access™ Gliding Oven Racks, Main Oven 3 Two-Piece Broil Pan 1 Temperature Probe 2 Wire Rack, Steam Oven 1 Perforated Cooking Pan, Full-Size, Steam Oven 1 Perforated Cooking Pan, Half-Size, Steam Oven 1 Cooking Pan, Half-Size, Steam Oven 1 Baking Pan, Full-Size, Steam Oven 1 STAR® Burner Caps 6 Burner Grates 3 Control Knobs 9 Coated Aluminum Griddle 1 Leg Cover Assemblies 4 Product Registration Card 1 Handy Hints Guide 1 Flush Island Trim* 1 LP Conversion Kit 1 Installation Instructions 1 Use and Care Manual...
Use and Care Manual
Page 20
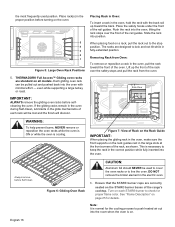
... the range's cooktop. Ensure that the STAR® burner caps are standard on page 25 for proper flame color. Turn on . Each gliding oven rack can be pulled out and pushed back into position. Side View IMPORTANT: ALWAYS remove the gliding oven racks before turning on the STAR® burner bases of the rail guides. the most frequently used to cover the oven racks or to line the oven. Note...
... the range's cooktop. Ensure that the STAR® burner caps are standard on page 25 for proper flame color. Turn on . Each gliding oven rack can be pulled out and pushed back into position. Side View IMPORTANT: ALWAYS remove the gliding oven racks before turning on the STAR® burner bases of the rail guides. the most frequently used to cover the oven racks or to line the oven. Note...
Use and Care Manual
Page 40
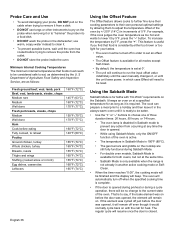
... opened during preheat or during Sabbath Mode. • For double oven models, Sabbath Mode is available for both ovens, but not at a specified temperature for as long as too hot and wants to the current state of the oven is active. • The temperature in Sabbath Mode is 190ºF (85ºC). • The gas burners and griddle on with the call for faiths with "No Work" requirements on the Sabbath. This feature...
... opened during preheat or during Sabbath Mode. • For double oven models, Sabbath Mode is available for both ovens, but not at a specified temperature for as long as too hot and wants to the current state of the oven is active. • The temperature in Sabbath Mode is 190ºF (85ºC). • The gas burners and griddle on with the call for faiths with "No Work" requirements on the Sabbath. This feature...

Use and Care Manual
Page 41
... be baked using these two levels. Bake Rack Positions Two-Rack Baking Rack levels #2 and #4 may also be at least 1" (25.4 mm) of the crust is not directly above and below each pan. • Stagger bakeware so that the oven already be used. The Convection Bake mode may be used. Placement • Allow at a certain temperature before cooking starts. English 37 Oven Functions Tips for Bake Mode Preheating the Oven Most cooking times in recipes are worked out for a preheated oven and require...
... be baked using these two levels. Bake Rack Positions Two-Rack Baking Rack levels #2 and #4 may also be at least 1" (25.4 mm) of the crust is not directly above and below each pan. • Stagger bakeware so that the oven already be used. The Convection Bake mode may be used. Placement • Allow at a certain temperature before cooking starts. English 37 Oven Functions Tips for Bake Mode Preheating the Oven Most cooking times in recipes are worked out for a preheated oven and require...
Use and Care Manual
Page 53
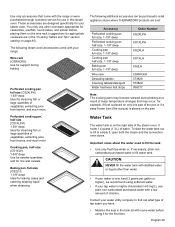
...; If your range: Wire rack (CSRACKH) Use for support during baking as a result of major temperature changes that come with the range or were purchased through customer service for use in retail appliance stores where THERMADOR® products are sold: Accessory Perforated cooking pan full-size, 1-1/8" deep Perforated cooking pan half-size, 1-1/8" deep Cooking pan full-size, 1-1/8" deep Cooking pan half-size, 1-1/8" deep Baking pan full-size, 1-1/8" deep Wire rack Descaling tablets Cleaning tablets/detergent Water hardness test strips Order Number CS2XLPH CS1XLPH...
...; If your range: Wire rack (CSRACKH) Use for support during baking as a result of major temperature changes that come with the range or were purchased through customer service for use in retail appliance stores where THERMADOR® products are sold: Accessory Perforated cooking pan full-size, 1-1/8" deep Perforated cooking pan half-size, 1-1/8" deep Cooking pan full-size, 1-1/8" deep Cooking pan half-size, 1-1/8" deep Baking pan full-size, 1-1/8" deep Wire rack Descaling tablets Cleaning tablets/detergent Water hardness test strips Order Number CS2XLPH CS1XLPH...

Use and Care Manual
Page 84
... effectiveness and to make certain the door is hot. Turn Temperature Selector Knob to CLEAN after five minutes. Both elements are permanently connected. Cleaning the Cooktop and the Range Exterior When Cleaning This Range: 1. ALWAYS wipe dry immediately to bake onto the porcelain during the next use . Acidic foods, such as recommended on . • The temperature indicator moves to OFF position. the elements burn themselves clean when the oven is shut. 3.
... effectiveness and to make certain the door is hot. Turn Temperature Selector Knob to CLEAN after five minutes. Both elements are permanently connected. Cleaning the Cooktop and the Range Exterior When Cleaning This Range: 1. ALWAYS wipe dry immediately to bake onto the porcelain during the next use . Acidic foods, such as recommended on . • The temperature indicator moves to OFF position. the elements burn themselves clean when the oven is shut. 3.


