Use and Care Manual
Page 5
... 1 Safety 2 Important Safety Instructions 2 Before You Begin 7 Using Your Range for the First Time 7 Range Description 10 Parts Identification - 48" Range 10 Parts Identification - 36" Range 11 Using The Cooktop 12 Cookware Recommendations 17 Specialty Cookware 18 Surface Burner Cooking Recommendations ....... 19 Electric...Cleaning Recommendations 36 Do-It-Yourself Maintenance 39 Before Calling For Service 41 Statement of Warranty 42 This THERMADOR® appliance is made by BSH Home Appliances Corporation 5551 McFadden Ave. Huntington Beach, CA 92649 Questions? 1-800-735-...
... 1 Safety 2 Important Safety Instructions 2 Before You Begin 7 Using Your Range for the First Time 7 Range Description 10 Parts Identification - 48" Range 10 Parts Identification - 36" Range 11 Using The Cooktop 12 Cookware Recommendations 17 Specialty Cookware 18 Surface Burner Cooking Recommendations ....... 19 Electric...Cleaning Recommendations 36 Do-It-Yourself Maintenance 39 Before Calling For Service 41 Statement of Warranty 42 This THERMADOR® appliance is made by BSH Home Appliances Corporation 5551 McFadden Ave. Huntington Beach, CA 92649 Questions? 1-800-735-...

Use and Care Manual
Page 8
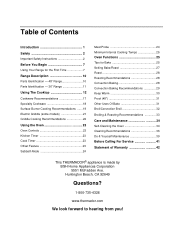
... specifically recommended in use extreme care when using the range. It is no electrical power to operate the electronic igniters on any part of the appliance. Have the range installed and electrically grounded by qualified persons. ALL MODELS: IN CASE OF AN ELECTRICAL FAILURE If ...for , your new range, to children above or at least 5 minutes before lighting the burner manually. However, use . When using your new THERMADOR PROFESSIONAL® range has been designed to be followed, including the following: Read this manual. Have the installer show you know how and where to...
... specifically recommended in use extreme care when using the range. It is no electrical power to operate the electronic igniters on any part of the appliance. Have the range installed and electrically grounded by qualified persons. ALL MODELS: IN CASE OF AN ELECTRICAL FAILURE If ...for , your new range, to children above or at least 5 minutes before lighting the burner manually. However, use . When using your new THERMADOR PROFESSIONAL® range has been designed to be followed, including the following: Read this manual. Have the installer show you know how and where to...
Use and Care Manual
Page 9
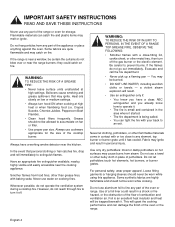
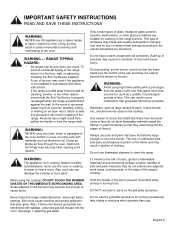
... appliance or place anything against the oven. Do not use aluminum foil to an exit. Flammable materials can fight the fire with a close to any part of combustion and ventilation air. WARNING: TO REDUCE THE RISK OF A GREASE FIRE: • Never leave surface units unattended at high heat or when ... OF INJURY TO PERSONS, IN THE EVENT OF A RANGE TOP GREASE FIRE, OBSERVE THE FOLLOWING: • Smother flames with your back to line any part of the oven or the range. If the flames do not operate the ventilation system during a cooktop fire. Use only dry potholders: moist or damp...
... appliance or place anything against the oven. Do not use aluminum foil to an exit. Flammable materials can fight the fire with a close to any part of combustion and ventilation air. WARNING: TO REDUCE THE RISK OF A GREASE FIRE: • Never leave surface units unattended at high heat or when ... OF INJURY TO PERSONS, IN THE EVENT OF A RANGE TOP GREASE FIRE, OBSERVE THE FOLLOWING: • Smother flames with your back to line any part of the oven or the range. If the flames do not operate the ventilation system during a cooktop fire. Use only dry potholders: moist or damp...
Use and Care Manual
Page 10
... carbon monoxide poisoning and overheating of pressure may ignite. RANGE TIPPING HAZARD: • All ranges can tip and injury can damage the cooktop or oven parts. Never leave the range unattended when using high flame settings. DO NOT use pots or pans on an open door), failure to cover the burner...
... carbon monoxide poisoning and overheating of pressure may ignite. RANGE TIPPING HAZARD: • All ranges can tip and injury can damage the cooktop or oven parts. Never leave the range unattended when using high flame settings. DO NOT use pots or pans on an open door), failure to cover the burner...
Use and Care Manual
Page 11
..., clean around the burner and burner ports. Use care when opening the oven door; It is cool. Clean only those parts indicated in the presence of heat, ignite or cause metal parts to cause burns. Clean after oven heats to clean the range while it . WARNING: After a spill or boil over or...
..., clean around the burner and burner ports. Use care when opening the oven door; It is cool. Clean only those parts indicated in the presence of heat, ignite or cause metal parts to cause burns. Clean after oven heats to clean the range while it . WARNING: After a spill or boil over or...
Use and Care Manual
Page 12
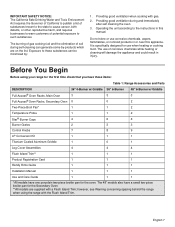
.... 3. Operating the unit according to the instructions in this appliance. Do not store or use of potential exposure to these items: Table 1: Range Accessories and Parts DESCRIPTION Full Access® Oven Racks, Main Oven Full Access® Oven Racks, Secondary Oven Two-Piece Broil Pan* 36" 4-Burner w/ Griddle 3 0 1 36" 6-Burner 3 0 1 48...
.... 3. Operating the unit according to the instructions in this appliance. Do not store or use of potential exposure to these items: Table 1: Range Accessories and Parts DESCRIPTION Full Access® Oven Racks, Main Oven Full Access® Oven Racks, Secondary Oven Two-Piece Broil Pan* 36" 4-Burner w/ Griddle 3 0 1 36" 6-Burner 3 0 1 48...

Use and Care Manual
Page 15
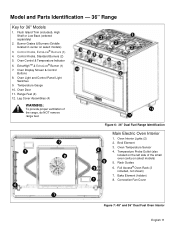
... included) 17. Key for 48" Models 1. Secondary Oven Control Knobs 6. Oven Display Screens 10. Oven Light Switches 8. Secondary Oven (2 racks included) 18. Description Model and Parts Identification - 48" Range 11 11 22 22 55 8 66 7 7 78 7 9 9 1100 9 9 1100 1111 12 12 44 33 11 Figure 4: 48" Dual Fuel Control Panel 13...
... included) 17. Key for 48" Models 1. Secondary Oven Control Knobs 6. Oven Display Screens 10. Oven Light Switches 8. Secondary Oven (2 racks included) 18. Description Model and Parts Identification - 48" Range 11 11 22 22 55 8 66 7 7 78 7 9 9 1100 9 9 1100 1111 12 12 44 33 11 Figure 4: 48" Dual Fuel Control Panel 13...
Use and Care Manual
Page 16
... Trim (included), High Shelf or Low Back (ordered separately) 2. Oven Temperature Sensor 4. Full Access® Oven Rack (3 included, not shown) 7. Range Feet (4) 12. Model and Parts Identification - 36" Range Key for 36" Models 1. Broil Element 3. Convection Fan Cover 7 Figure 7: 48" and 36" Dual Fuel Oven Interior English 11
... Trim (included), High Shelf or Low Back (ordered separately) 2. Oven Temperature Sensor 4. Full Access® Oven Rack (3 included, not shown) 7. Range Feet (4) 12. Model and Parts Identification - 36" Range Key for 36" Models 1. Broil Element 3. Convection Fan Cover 7 Figure 7: 48" and 36" Dual Fuel Oven Interior English 11

Use and Care Manual
Page 29
..., ensure that the meat is fully defrosted before the door was opened . • The temperature in Sabbath Mode can be varied at any part of the cooking dish or parts of the meat. Press the (-) to decrease or (+) to increase to the desired internal temperatures to prevent any action from 0-99Hrs. When...
..., ensure that the meat is fully defrosted before the door was opened . • The temperature in Sabbath Mode can be varied at any part of the cooking dish or parts of the meat. Press the (-) to decrease or (+) to increase to the desired internal temperatures to prevent any action from 0-99Hrs. When...
Use and Care Manual
Page 39
.... During self-clean, fumes are in use . The amount of smoke stain is directly related to birds. Wipe this area clean. You can be used . Parts of the appliance may become hotter than usual. Keep these substances, provide good ventilation with Formula 409® or Fantastik® cleaners. Clean the oven...
.... During self-clean, fumes are in use . The amount of smoke stain is directly related to birds. Wipe this area clean. You can be used . Parts of the appliance may become hotter than usual. Keep these substances, provide good ventilation with Formula 409® or Fantastik® cleaners. Clean the oven...
Use and Care Manual
Page 40
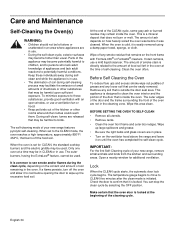
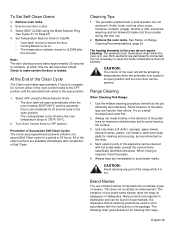
...others. The elements burn themselves clean when the oven is imperative that will still be at which time the door becomes locked. Most exterior parts of cleaner. This does not constitute an endorsement. Cleaning Tips 1. The heating elements in use of brand names is shut. 3. The omission of... any part of the Clean Cycle The Clean cycle takes approximately 2 hours to complete, at baking temperatures when the automatic lock cycles to bake onto the ...
...others. The elements burn themselves clean when the oven is imperative that will still be at which time the door becomes locked. Most exterior parts of cleaner. This does not constitute an endorsement. Cleaning Tips 1. The heating elements in use of brand names is shut. 3. The omission of... any part of the Clean Cycle The Clean cycle takes approximately 2 hours to complete, at baking temperatures when the automatic lock cycles to bake onto the ...
Use and Care Manual
Page 41
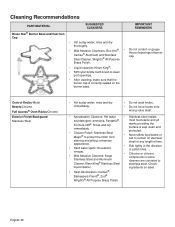
...;, most food stains and pit Formula 409®. Rinse and dry immediately. Check liquid cleaner. English 36 ingredients on stainless staining and pitting; Cleaning Recommendations PART/MATERIAL SUGGESTED CLEANERS IMPORTANT REMINDERS Brass Star® Burner Base and Cast Iron Cap • Hot sudsy water; Steel Cleaner, Wright's® All Purpose Brass...
...;, most food stains and pit Formula 409®. Rinse and dry immediately. Check liquid cleaner. English 36 ingredients on stainless staining and pitting; Cleaning Recommendations PART/MATERIAL SUGGESTED CLEANERS IMPORTANT REMINDERS Brass Star® Burner Base and Cast Iron Cap • Hot sudsy water; Steel Cleaner, Wright's® All Purpose Brass...
Use and Care Manual
Page 42
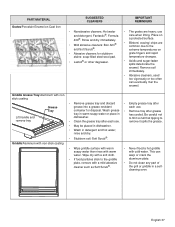
..., used too vigorously or too often can warp or crack the aluminum plate. • Do not clean any part of the grill or griddle in detergent and hot water; Be careful not dishwasher. PART/MATERIAL Grates/Porcelain Enamel on grate fingers and rapid temperature changes. • Acidic and sugar-laden spills deteriorate...
..., used too vigorously or too often can warp or crack the aluminum plate. • Do not clean any part of the grill or griddle in detergent and hot water; Be careful not dishwasher. PART/MATERIAL Grates/Porcelain Enamel on grate fingers and rapid temperature changes. • Acidic and sugar-laden spills deteriorate...
Use and Care Manual
Page 43
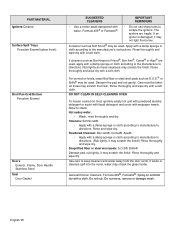
... not move, remove or damage mesh. Cleaners: Soft Scrub®. • Apply with a soft cloth. Soap-filled fiber or steel wool pads: S.O.S®, Brillo®. PART/MATERIAL Igniters/Ceramic Surface Spill Trays Porcelain Enamel (gloss finish) Broil Pan Grid/Bottom Porcelain Enamel Doors Exterior, Frame, Door Handle Stainless Steel Seal Door...
... not move, remove or damage mesh. Cleaners: Soft Scrub®. • Apply with a soft cloth. Soap-filled fiber or steel wool pads: S.O.S®, Brillo®. PART/MATERIAL Igniters/Ceramic Surface Spill Trays Porcelain Enamel (gloss finish) Broil Pan Grid/Bottom Porcelain Enamel Doors Exterior, Frame, Door Handle Stainless Steel Seal Door...
Use and Care Manual
Page 47
... and has at its authorized service providers will repair your Product without success, then THERMADOR® will have been manufactured with respect to such parts. For safety and property damage concerns, THERMADOR® highly recommends that you do not attempt to have been made without charge to...for the Product if it is under no responsibility or liability for any such event, if you request, THERMADOR® would still pay for labor and parts and ship the parts to the nearest authorized service provider, but you would still be extended with a defect in materials or ...
... and has at its authorized service providers will repair your Product without success, then THERMADOR® will have been manufactured with respect to such parts. For safety and property damage concerns, THERMADOR® highly recommends that you do not attempt to have been made without charge to...for the Product if it is under no responsibility or liability for any such event, if you request, THERMADOR® would still pay for labor and parts and ship the parts to the nearest authorized service provider, but you would still be extended with a defect in materials or ...
Use and Care Manual
Page 48
... including without limitation cabinetry, walls, floors, shelving, etc.); Also excluded from this warranty shall be effective unless authorized in the completed THERMADOR® Product Registration card. 2. service visits to teach you are scratches, nicks, minor dents, and cosmetic damages on which the ... outdoors, use the Product, or visits where there is nothing wrong with the Product; Products on external surfaces and exposed parts; Register your THERMADOR® product to ensure timely service and access to your product through one or more of the following ways: 1. We...
... including without limitation cabinetry, walls, floors, shelving, etc.); Also excluded from this warranty shall be effective unless authorized in the completed THERMADOR® Product Registration card. 2. service visits to teach you are scratches, nicks, minor dents, and cosmetic damages on which the ... outdoors, use the Product, or visits where there is nothing wrong with the Product; Products on external surfaces and exposed parts; Register your THERMADOR® product to ensure timely service and access to your product through one or more of the following ways: 1. We...
Installation Manual
Page 14
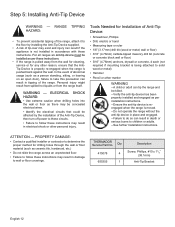
... block wall or floor) • 3/16" (4.76mm) anchors, drywall or concrete, 4 each (not required if mounting bracket is pulled away from the range itself. THERMADOR Service Part No. In the event of abnormal usage (such as ceramic tile, hardwood, etc.) • Do not slide the range across an unprotected floor. • Failure...
... block wall or floor) • 3/16" (4.76mm) anchors, drywall or concrete, 4 each (not required if mounting bracket is pulled away from the range itself. THERMADOR Service Part No. In the event of abnormal usage (such as ceramic tile, hardwood, etc.) • Do not slide the range across an unprotected floor. • Failure...
Installation Manual
Page 21
... forward to gain access to disconnect gas and power supplies. Locate and lightly mark wall studs. The backsplash should be found at the mounting location. 4. Parts Included Tools Needed (10) 1" (25.4mm) Phillips screwdriver or screws drill 30", 36", 48" (760mm, 913mm, 1218mm) (1) Backsplash Tape measure 42" (1070mm) (1) Installation Guide Pencil...
... forward to gain access to disconnect gas and power supplies. Locate and lightly mark wall studs. The backsplash should be found at the mounting location. 4. Parts Included Tools Needed (10) 1" (25.4mm) Phillips screwdriver or screws drill 30", 36", 48" (760mm, 913mm, 1218mm) (1) Backsplash Tape measure 42" (1070mm) (1) Installation Guide Pencil...
Installation Manual
Page 25
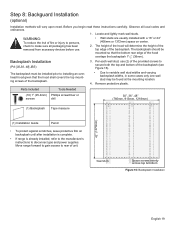
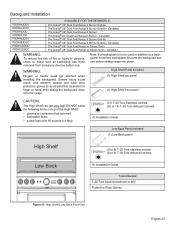
Backguard Installation PRD364JDGU PRD364JDGC PRD366JGU PRD366JGC PRD486JDGU PRD486JDGC PRD48JDSGU PRD48JDSGC AVAILABLE FOR THESE MODELS: Pro Grand® 36...Range w/ Steam Oven Pro Grand® 48" Dual Fuel Range w/ Steam Oven - WARNING: High Shelf Parts Included Fingers or hands could result. DO NOT place the following items on top of fire or injury to ....6kg) (13) T-20 Torx Stainless screws (16 or 14) T-20 Torx drill point screws (1) Installation Guide Low Back Parts Included (1) Low Back panel High Shelf (9 or 8) T-20 Torx stainless screws (8 or 6) T-20 Torx drill point screws...
Backguard Installation PRD364JDGU PRD364JDGC PRD366JGU PRD366JGC PRD486JDGU PRD486JDGC PRD48JDSGU PRD48JDSGC AVAILABLE FOR THESE MODELS: Pro Grand® 36...Range w/ Steam Oven Pro Grand® 48" Dual Fuel Range w/ Steam Oven - WARNING: High Shelf Parts Included Fingers or hands could result. DO NOT place the following items on top of fire or injury to ....6kg) (13) T-20 Torx Stainless screws (16 or 14) T-20 Torx drill point screws (1) Installation Guide Low Back Parts Included (1) Low Back panel High Shelf (9 or 8) T-20 Torx stainless screws (8 or 6) T-20 Torx drill point screws...
Installation Manual
Page 29
... 10 for which the holes of the range's cooktop. Place the smaller 'sleeve', with one -quarter turn counter-clockwise of the griddle plate. The mating part has dimples (that you know that the burner caps are correctly seated on the burner bases of the larger sleeve should feel a definitive click, letting...
... 10 for which the holes of the range's cooktop. Place the smaller 'sleeve', with one -quarter turn counter-clockwise of the griddle plate. The mating part has dimples (that you know that the burner caps are correctly seated on the burner bases of the larger sleeve should feel a definitive click, letting...
