Use and Care Manual
Page 6
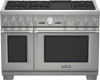
... Instructions located at the beginning of configurations. Range should not move more than 1 inch (2.5cm). WARNING: Tip Over Hazard! The THERMADOR PROFESSIONAL® ranges are freestanding units available in this manual can tip the range over . This manual contains important Use and Care... reach your gas supplier, call your gas supplier from the back to each range. Introduction Before using this manual, it is securely installed. All models feature a gas cooking surface with a professional size, electric convection, self-cleaning oven with broil capability. Do not operate...
... Instructions located at the beginning of configurations. Range should not move more than 1 inch (2.5cm). WARNING: Tip Over Hazard! The THERMADOR PROFESSIONAL® ranges are freestanding units available in this manual can tip the range over . This manual contains important Use and Care... reach your gas supplier, call your gas supplier from the back to each range. Introduction Before using this manual, it is securely installed. All models feature a gas cooking surface with a professional size, electric convection, self-cleaning oven with broil capability. Do not operate...
Use and Care Manual
Page 7
... equipped with its own high-pressure regulator in addition to the pressure regulator supplied with a proper backguard. Refer to the Installation Manual accompanying this appliance for this appliance connected to the product rating label which it is certified. It is recommended that...can be installed with propane gas supply will require a conversion kit (included). It is connected to the pressure regulator. IMPORTANT: All ranges must be provided. Ensure that can get very hot! The use with a backguard. The maximum gas pressure to the location. A THERMADOR®...
... equipped with its own high-pressure regulator in addition to the pressure regulator supplied with a proper backguard. Refer to the Installation Manual accompanying this appliance for this appliance connected to the product rating label which it is certified. It is recommended that...can be installed with propane gas supply will require a conversion kit (included). It is connected to the pressure regulator. IMPORTANT: All ranges must be provided. Ensure that can get very hot! The use with a backguard. The maximum gas pressure to the location. A THERMADOR®...

Use and Care Manual
Page 8
... be lit with the National Fuel Gas Code No. All other servicing should be lit manually. They should climb onto the appliance to specific installations. If children should never be seriously injured. TESTED IN ACCORDANCE WITH: • ANSI Z21.1 for Household Gas Appliances • UL858 for ...ALL MODELS: IN CASE OF AN ELECTRICAL FAILURE If for Household Cooking Ranges • CAN/CGA 1.1-M81 Domestic Gas Ranges Check your new THERMADOR PROFESSIONAL® range has been designed to HI. DO NOT attempt to dissipate before using this restaurant caliber range as this unit should ...
... be lit with the National Fuel Gas Code No. All other servicing should be lit manually. They should climb onto the appliance to specific installations. If children should never be seriously injured. TESTED IN ACCORDANCE WITH: • ANSI Z21.1 for Household Gas Appliances • UL858 for ...ALL MODELS: IN CASE OF AN ELECTRICAL FAILURE If for Household Cooking Ranges • CAN/CGA 1.1-M81 Domestic Gas Ranges Check your new THERMADOR PROFESSIONAL® range has been designed to HI. DO NOT attempt to dissipate before using this restaurant caliber range as this unit should ...
Use and Care Manual
Page 10
... not heat or warm unopened food containers. Always use flammable cleaners to cover the burner. Do not use pots and pans that generates harmful by installing the Anti-Tip Device supplied. • A risk of tip-over adjacent work areas, cooking areas, or the edge of the pan. English 5... INSTRUCTIONS WARNING: NEVER use this precaution can result in tipping of the range. This type of pressure may exist if the appliance is not installed in ignition of abnormal usage (such as a space heater to burst and cause injury. This can result. Personal injury might result from spilled...
... not heat or warm unopened food containers. Always use flammable cleaners to cover the burner. Do not use pots and pans that generates harmful by installing the Anti-Tip Device supplied. • A risk of tip-over adjacent work areas, cooking areas, or the edge of the pan. English 5... INSTRUCTIONS WARNING: NEVER use this precaution can result in tipping of the range. This type of pressure may exist if the appliance is not installed in ignition of abnormal usage (such as a space heater to burst and cause injury. This can result. Personal injury might result from spilled...
Use and Care Manual
Page 11
... the oven door. The heat deflector, which is in this range must disconnect the power supply before removing or replacing foods. If a rack must be installed whenever the range is a risk of burning as the alcohol vapors may catch fire in the oven. Clean only those parts indicated in use . For...
... the oven door. The heat deflector, which is in this range must disconnect the power supply before removing or replacing foods. If a rack must be installed whenever the range is a risk of burning as the alcohol vapors may catch fire in the oven. Clean only those parts indicated in use . For...
Use and Care Manual
Page 12
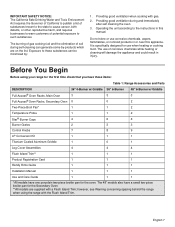
...; Burner Caps Burner Grates Control Knobs LP Conversion Kit 1 1 2 4 6 6 2 3 3 7 8 9 1 1 1 Titanium Coated Aluminum Griddle 1 0 1 Leg Cover Assemblies 4 4 4 Flush Island Trim** 1 1 1 Product Registration Card 1 1 1 Handy Hints Guide 1 1 1 Installation Manual 1 1 1 Use and Care Guide 1 1 1 *All models have a small two-piece broiler pan for the Secondary Oven. **All models are on the list. The 48...
...; Burner Caps Burner Grates Control Knobs LP Conversion Kit 1 1 2 4 6 6 2 3 3 7 8 9 1 1 1 Titanium Coated Aluminum Griddle 1 0 1 Leg Cover Assemblies 4 4 4 Flush Island Trim** 1 1 1 Product Registration Card 1 1 1 Handy Hints Guide 1 1 1 Installation Manual 1 1 1 Use and Care Guide 1 1 1 *All models have a small two-piece broiler pan for the Secondary Oven. **All models are on the list. The 48...

Use and Care Manual
Page 21
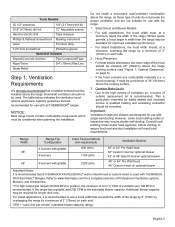
... excessive noise or fluttering. It is positioned correctly on the base and that the ports are normal. • The flame should be adjusted by a certified installer or agency to ensure proper combustion. 2) Ensure proper ventilation with an open window or use a ventilation fan or hood when cooking with gas. 3) Always operate...
... excessive noise or fluttering. It is positioned correctly on the base and that the ports are normal. • The flame should be adjusted by a certified installer or agency to ensure proper combustion. 2) Ensure proper ventilation with an open window or use a ventilation fan or hood when cooking with gas. 3) Always operate...
Use and Care Manual
Page 26
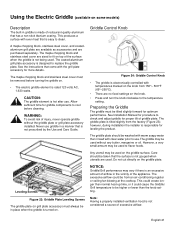
...tilt of injury, never operate griddle without any butter, margarine or oil. English 21 See Installation Manual for procedure to be used on the griddle plate. however, during installation the installer is rated 120 volts AC, 1,630 watts. The excessive airflow could cause the Griddle/ ... amount may be tilted slightly forward for leveling the product. Do not cut directly on the griddle surface. Note: Having a properly installed ventilation hood is made of restaurant-quality aluminum that is an excessive amount of airflow in the vicinity of the appliance. The griddle ...
...tilt of injury, never operate griddle without any butter, margarine or oil. English 21 See Installation Manual for procedure to be used on the griddle plate. however, during installation the installer is rated 120 volts AC, 1,630 watts. The excessive airflow could cause the Griddle/ ... amount may be tilted slightly forward for leveling the product. Do not cut directly on the griddle surface. Note: Having a properly installed ventilation hood is made of restaurant-quality aluminum that is an excessive amount of airflow in the vicinity of the appliance. The griddle ...
Use and Care Manual
Page 45
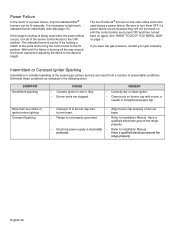
... OFF if a power failure occurs because they will not turn all the way around the burner cap before adjusting the flame to Installation Manual. polarized. English 40 Be sure to Installation Manual. If you have low gas pressure, contact your gas company. REMEDY • Carefully dry or clean igniter. • Clean ports...
... OFF if a power failure occurs because they will not turn all the way around the burner cap before adjusting the flame to Installation Manual. polarized. English 40 Be sure to Installation Manual. If you have low gas pressure, contact your gas company. REMEDY • Carefully dry or clean igniter. • Clean ports...
Use and Care Manual
Page 48
..., HOTELS AND/OR RESTAURANT MEALS, REMODELLING EXPENSES IN EXCESS OF DIRECT DAMAGES WHICH ARE DEFINITIVELY CAUSED EXCLUSIVELY BY THERMADOR®, OR OTHERWISE. correction of installation problems (you how to use of the Product in conjunction with air or water-going vessels). • ...online at 1-800-735-4328. Also excluded from this manual without limitation cabinetry, walls, floors, shelving, etc.); In no event shall THERMADOR® have been altered, defaced, or removed; Mail in anything other than its normal, customary and intended manner (including without limitation...
..., HOTELS AND/OR RESTAURANT MEALS, REMODELLING EXPENSES IN EXCESS OF DIRECT DAMAGES WHICH ARE DEFINITIVELY CAUSED EXCLUSIVELY BY THERMADOR®, OR OTHERWISE. correction of installation problems (you how to use of the Product in conjunction with air or water-going vessels). • ...online at 1-800-735-4328. Also excluded from this manual without limitation cabinetry, walls, floors, shelving, etc.); In no event shall THERMADOR® have been altered, defaced, or removed; Mail in anything other than its normal, customary and intended manner (including without limitation...
Installation Manual
Page 2
... and Hookup 14 Step 7: Electrical Requirements, Connection & Grounding . . . 16 Step 8: Backguard Installation (optional 19 Step 9: Placing and Leveling the Range 25 Step 10: Burner Test and Adjustment 29 Installer Final Check List 30 To Clean and Protect Exterior Surfaces 30 This THERMADOR® appliance is made by BSH Home Appliances Corporation 5551 McFadden...
... and Hookup 14 Step 7: Electrical Requirements, Connection & Grounding . . . 16 Step 8: Backguard Installation (optional 19 Step 9: Placing and Leveling the Range 25 Step 10: Burner Test and Adjustment 29 Installer Final Check List 30 To Clean and Protect Exterior Surfaces 30 This THERMADOR® appliance is made by BSH Home Appliances Corporation 5551 McFadden...
Installation Manual
Page 3
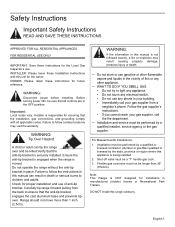
...not move more than 36" (914mm). WHAT TO DO IF YOU SMELL GAS • Do not try to ensure that all applicable codes. Installation must not be a "T" handle gas cock. 3. Safety Instructions Important Safety Instructions READ AND SAVE THESE INSTRUCTIONS APPROVED FOR ALL RESIDENTIAL APPLIANCES FOR ...use any electrical switch. • Do not use gasoline or other flammable vapors and liquids in place. For Massachusetts Installations: 1. INSTALLER: Please leave these instructions for ensuring that the anti-tip bracket is not followed exactly, a fire or explosion may void the warranty...
...not move more than 36" (914mm). WHAT TO DO IF YOU SMELL GAS • Do not try to ensure that all applicable codes. Installation must not be a "T" handle gas cock. 3. Safety Instructions Important Safety Instructions READ AND SAVE THESE INSTRUCTIONS APPROVED FOR ALL RESIDENTIAL APPLIANCES FOR ...use any electrical switch. • Do not use gasoline or other flammable vapors and liquids in place. For Massachusetts Installations: 1. INSTALLER: Please leave these instructions for ensuring that the anti-tip bracket is not followed exactly, a fire or explosion may void the warranty...
Installation Manual
Page 4
...Kit Model Numbers" on page 16 for which it is used. A THERMADOR® Low Back or High Shelf must not exceed 14.0 inches water column (34.9 mb) from the propane gas tank to specific installations. CAUTIONS: • To eliminate risk of this appliance be purchased ...Field conversion of the appliance for the proper method of conversion kit supplied with propane gas supply will require installation of appliance installation. Important: For island installations and other installations with natural gas. It is connected to the type of the range, a Flush Island Trim has been...
...Kit Model Numbers" on page 16 for which it is used. A THERMADOR® Low Back or High Shelf must not exceed 14.0 inches water column (34.9 mb) from the propane gas tank to specific installations. CAUTIONS: • To eliminate risk of this appliance be purchased ...Field conversion of the appliance for the proper method of conversion kit supplied with propane gas supply will require installation of appliance installation. Important: For island installations and other installations with natural gas. It is connected to the type of the range, a Flush Island Trim has been...
Installation Manual
Page 5
...the range may be desirable for improved ventilation performance. • For island installations, the hood width should be a minimum of 3" (76mm) on each end. Refer to www.thermador.com for use with THERMADOR PROFESSIONAL® Ranges. If the range has a griddle, add 200 CFM... cooking surface. 3. Select Hood and Blower Models: • For wall installations, the hood width must be consulted. Important: Ventilation hoods and blowers are not suitable for use a hood width that a THERMADOR PROFESSIONAL® wall or island hood or custom insert is recommended. Consider...
...the range may be desirable for improved ventilation performance. • For island installations, the hood width should be a minimum of 3" (76mm) on each end. Refer to www.thermador.com for use with THERMADOR PROFESSIONAL® Ranges. If the range has a griddle, add 200 CFM... cooking surface. 3. Select Hood and Blower Models: • For wall installations, the hood width must be consulted. Important: Ventilation hoods and blowers are not suitable for use a hood width that a THERMADOR PROFESSIONAL® wall or island hood or custom insert is recommended. Consider...
Installation Manual
Page 6
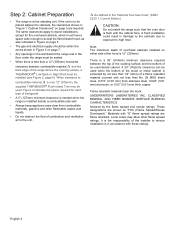
... to combustible material is over 12" (305mm), the supplied THERMADOR® Flush Island Trim may allow other flammable vapors and liquids. • Do not obstruct the flow of combustion and ventilation air to ensure installation is less than a 12" (305mm) horizontal clearance between the top ...hood is a 36" (914mm) minimum clearance required between combustible material and the back edge of the range above the cooking surface, a THERMADOR® Low Back or High Shelf must have a space wide enough to high heat. Step 2: Cabinet Preparation • The range is the ...
... to combustible material is over 12" (305mm), the supplied THERMADOR® Flush Island Trim may allow other flammable vapors and liquids. • Do not obstruct the flow of combustion and ventilation air to ensure installation is less than a 12" (305mm) horizontal clearance between the top ...hood is a 36" (914mm) minimum clearance required between combustible material and the back edge of the range above the cooking surface, a THERMADOR® Low Back or High Shelf must have a space wide enough to high heat. Step 2: Cabinet Preparation • The range is the ...
Installation Manual
Page 8
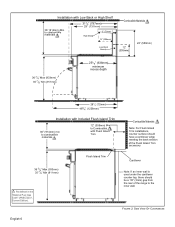
... edge meeting the back section of the range to the inner wall. FIGURE 2: SIDE VIEW OF CLEARANCES Installation with Flush Island Trim Combustible Materials Note: For Flush Island Trim installations, counter surface should be a 1/8" (3mm) gap from the rear of the Flush Island Trim accessory.... (305mm) 22" (559mm) 36 3/4" Max (933mm) 35 7/8" Min (911mm) 251/8" (638mm) minimum recess depth 281/2" (723mm) 483/4" (1238mm) Installation with Included Flush Island Trim 36" (914mm) min to combustible materials 12" (305mm) Min to Combustible with Low Back or High Shelf 36" (914mm) Min....
... edge meeting the back section of the range to the inner wall. FIGURE 2: SIDE VIEW OF CLEARANCES Installation with Flush Island Trim Combustible Materials Note: For Flush Island Trim installations, counter surface should be a 1/8" (3mm) gap from the rear of the Flush Island Trim accessory.... (305mm) 22" (559mm) 36 3/4" Max (933mm) 35 7/8" Min (911mm) 251/8" (638mm) minimum recess depth 281/2" (723mm) 483/4" (1238mm) Installation with Included Flush Island Trim 36" (914mm) min to combustible materials 12" (305mm) Min to Combustible with Low Back or High Shelf 36" (914mm) Min....
Installation Manual
Page 9
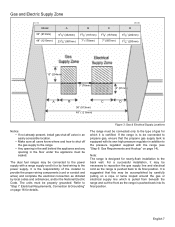
...and ordinances, and/or the National Electric Code. The units must be sealed. Note: The range is equipped with its final position. For a successful installation, it is pushed back to its final position. Gas and Electric Supply Zone Model 36" (913mm) 48" (1219mm) A 91/8" (232mm) 231...C 73/8" (187mm) 7" (587mm) D 91/8" (232mm) 77/8" (200mm) 10" (254mm) 3" (76mm) 2" (51mm) A B C D 36" (913mm) 48" (1219mm) Notice: • If not already present, install gas shut-off valve in an easily accessible location. • Make sure all users know where and how to shut off the gas supply to...
...and ordinances, and/or the National Electric Code. The units must be sealed. Note: The range is equipped with its final position. For a successful installation, it is pushed back to its final position. Gas and Electric Supply Zone Model 36" (913mm) 48" (1219mm) A 91/8" (232mm) 231...C 73/8" (187mm) 7" (587mm) D 91/8" (232mm) 77/8" (200mm) 10" (254mm) 3" (76mm) 2" (51mm) A B C D 36" (913mm) 48" (1219mm) Notice: • If not already present, install gas shut-off valve in an easily accessible location. • Make sure all users know where and how to shut off the gas supply to...
Installation Manual
Page 10
Electrical Supply Installation of the range must be planned so that may damage the door hinges and cause the door to fit incorrectly. Rings, watches, and any other ... may have sharp edges. The grates, griddle plate, burner caps, and oven racks must be handled accordingly. When the power supply cord or conduit is installed in moving the range to avoid injury and to avoid damage to the mating receptacle or terminal block cover, the combined connection should be used...
Electrical Supply Installation of the range must be planned so that may damage the door hinges and cause the door to fit incorrectly. Rings, watches, and any other ... may have sharp edges. The grates, griddle plate, burner caps, and oven racks must be handled accordingly. When the power supply cord or conduit is installed in moving the range to avoid injury and to avoid damage to the mating receptacle or terminal block cover, the combined connection should be used...

Installation Manual
Page 11
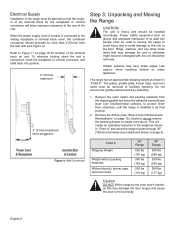
... the rear casters while the dolly is carefully removed. • "Step 5: Installing Anti-Tip Device", "Step 6: Gas Requirements and Hookup", "Step 7: Electrical Requirements, Connection & Grounding", and "Step 8: Backguard Installation (optional)" must be uniformly supported by loosening the 2 screws attaching it to ...see Figure 5). Use additional help as all tape and packaging before the range is placed in its final location. Remove all THERMADOR® appliance packaging material is recyclable. Please, recycle the packaging material, as required to its final position. • Use ...
... the rear casters while the dolly is carefully removed. • "Step 5: Installing Anti-Tip Device", "Step 6: Gas Requirements and Hookup", "Step 7: Electrical Requirements, Connection & Grounding", and "Step 8: Backguard Installation (optional)" must be uniformly supported by loosening the 2 screws attaching it to ...see Figure 5). Use additional help as all tape and packaging before the range is placed in its final location. Remove all THERMADOR® appliance packaging material is recyclable. Please, recycle the packaging material, as required to its final position. • Use ...
Installation Manual
Page 13
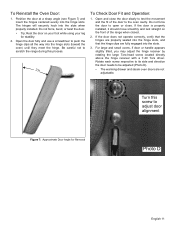
... adjust door alignment Figure 7: Approximate Door Angle for stability. 2. Turn this process. 23° To Check Door Fit and Operation: 1. If the door is properly installed, it should move smoothly and rest straight on your foot while using your leg for Removal Photo D English 11 For large and small ovens, if... fit of the range when closed. 2. Position the door at a sharp angle (see Figure 7) and insert the hinges centered evenly into the slots when properly installed.
... adjust door alignment Figure 7: Approximate Door Angle for stability. 2. Turn this process. 23° To Check Door Fit and Operation: 1. If the door is properly installed, it should move smoothly and rest straight on your foot while using your leg for Removal Photo D English 11 For large and small ovens, if... fit of the range when closed. 2. Position the door at a sharp angle (see Figure 7) and insert the hinges centered evenly into the slots when properly installed.
