
Product Spec Sheet
Page 1
...Speed Convection, Slow Roast, Steam, Steam Convection, Defrost, Reheat, Steam Programs Cleaning Type Easy Clean / Ecolytic Clean Telescopic Rack(s) 3 Illumination Type LED Interior Lights 3 Home Connect (Wi-Fi Enabled) Yes OVEN PERFORMANCE Convection Element 2,300 W Bake Element 1,420 W Broiler Element 3,050 W TECHNICAL DETAILS Watts 4,100 W Circuit Breaker 20 A Volts 240 / 208 V Frequency 60 Hz Plug Type Fixed Connection, No Plug Conduit 50" 3-Wire Energy Source Electric Installation Type Non-Plumbed DIMENSIONS & WEIGHT Oven Cavity Size 2.8 cu. Large Steam...
...Speed Convection, Slow Roast, Steam, Steam Convection, Defrost, Reheat, Steam Programs Cleaning Type Easy Clean / Ecolytic Clean Telescopic Rack(s) 3 Illumination Type LED Interior Lights 3 Home Connect (Wi-Fi Enabled) Yes OVEN PERFORMANCE Convection Element 2,300 W Bake Element 1,420 W Broiler Element 3,050 W TECHNICAL DETAILS Watts 4,100 W Circuit Breaker 20 A Volts 240 / 208 V Frequency 60 Hz Plug Type Fixed Connection, No Plug Conduit 50" 3-Wire Energy Source Electric Installation Type Non-Plumbed DIMENSIONS & WEIGHT Oven Cavity Size 2.8 cu. Large Steam...

Product Spec Sheet
Page 2
... Broiler Pan, 16 7/16" x 12 5/8" x 1 1/2" D 11024903 Lg (Max Broil) Broiler Pan, 18 5/16" x 14 3/4" x 1 5/8" D 11014338 Universal Pan - Small, 12 13/16" x 6 15/16" x 1 9/16" D 577551 Perforated Steam Cooking Pan - Extra Large, 17 15/16" x 14 3/4" x 1 3/8" D 12022200 Multi-point Meat Probe 11013689 Broiler Grill, 15 1/4" x 12 7/8" 11024904 Lg (Max Broil) Broiler Grill Set (2), 14 5/16" x 8 9/16" 00777111 Wire Rack for Steam Oven, 17 15/16" x 14 3/4" 623653 Sponge 30-INCH STEAM AND CONVECTION SINGLE OVEN Door Handle...
... Broiler Pan, 16 7/16" x 12 5/8" x 1 1/2" D 11024903 Lg (Max Broil) Broiler Pan, 18 5/16" x 14 3/4" x 1 5/8" D 11014338 Universal Pan - Small, 12 13/16" x 6 15/16" x 1 9/16" D 577551 Perforated Steam Cooking Pan - Extra Large, 17 15/16" x 14 3/4" x 1 3/8" D 12022200 Multi-point Meat Probe 11013689 Broiler Grill, 15 1/4" x 12 7/8" 11024904 Lg (Max Broil) Broiler Grill Set (2), 14 5/16" x 8 9/16" 00777111 Wire Rack for Steam Oven, 17 15/16" x 14 3/4" 623653 Sponge 30-INCH STEAM AND CONVECTION SINGLE OVEN Door Handle...

Instruction manual
Page 3
... 14 Initial Use 15 Calibrating the Appliance and Cleaning the Oven Cavity 15 Cleaning the Accessories 16 Adjust Basic Settings 16 General Operation 17 High Altitude Baking 17 Switching the Appliance On and Off 17 Timer Options 17 Setting a Heating Mode 18 Changing or Cancelling the Appliance Operation ....... 19 Fast Preheat 19 Panel Lock 20 Auto Convection Conversion 20 Meat Probe 20 Sabbath Mode 22 Yom Tov Mode 22 Inserting Accessories 23 Steam Operation 24 Noises 24 Steam Cooking 24 Steam Assisted Cooking 24 Proof...
... 14 Initial Use 15 Calibrating the Appliance and Cleaning the Oven Cavity 15 Cleaning the Accessories 16 Adjust Basic Settings 16 General Operation 17 High Altitude Baking 17 Switching the Appliance On and Off 17 Timer Options 17 Setting a Heating Mode 18 Changing or Cancelling the Appliance Operation ....... 19 Fast Preheat 19 Panel Lock 20 Auto Convection Conversion 20 Meat Probe 20 Sabbath Mode 22 Yom Tov Mode 22 Inserting Accessories 23 Steam Operation 24 Noises 24 Steam Cooking 24 Steam Assisted Cooking 24 Proof...

Instruction manual
Page 5
... or cover an entire rack with baking soda. Doing so may also trap heat, causing a fire hazard. WARNING When removing the door make sure oven is not working smoke detector near the kitchen. Do not grasp the handle as described in personal injury or damage to remove the oven door. Proper Installation and Maintenance Have the installer show an error code. Mark it for normal family household use...
... or cover an entire rack with baking soda. Doing so may also trap heat, causing a fire hazard. WARNING When removing the door make sure oven is not working smoke detector near the kitchen. Do not grasp the handle as described in personal injury or damage to remove the oven door. Proper Installation and Maintenance Have the installer show an error code. Mark it for normal family household use...

Instruction manual
Page 13
... Convection, Roast, Convection Roast, Proof, and Dehydrate modes. ▯ Allow oven to your house is less than 240 volts. ▯ Increasing the oven temperature will be full before heating the oven. ▯ Preheat the oven when using the Bake, Convection Bake, True Convection, Pizza, Broil, Convection Broil, Steam Convection, Steam, Reheat, Defrost and Warm modes. ▯ Preheat is not required for more quickly than your previous oven that the food does not dry out. No preheat is hidden under General Operations...
... Convection, Roast, Convection Roast, Proof, and Dehydrate modes. ▯ Allow oven to your house is less than 240 volts. ▯ Increasing the oven temperature will be full before heating the oven. ▯ Preheat the oven when using the Bake, Convection Bake, True Convection, Pizza, Broil, Convection Broil, Steam Convection, Steam, Reheat, Defrost and Warm modes. ▯ Preheat is not required for more quickly than your previous oven that the food does not dry out. No preheat is hidden under General Operations...

Instruction manual
Page 16
... the oven cavity has cooled down . 5. Adjust Basic Settings You can change these settings in the menu "Settings". Touch the 8 icon (where applicable) to switch off the appliance. 9. Keep the kitchen ventilated while the appliance is heating. 8. Changing the Settings 1. Touch the ON l OFF touch button. 2. Touch "Continue". 5. Set Bake to app Show network status Customer Service access: ▯ Allow (Display shows t) ▯ Deny Demo mode On...
... the oven cavity has cooled down . 5. Adjust Basic Settings You can change these settings in the menu "Settings". Touch the 8 icon (where applicable) to switch off the appliance. 9. Keep the kitchen ventilated while the appliance is heating. 8. Changing the Settings 1. Touch the ON l OFF touch button. 2. Touch "Continue". 5. Set Bake to app Show network status Customer Service access: ▯ Allow (Display shows t) ▯ Deny Demo mode On...

Instruction manual
Page 20
... the display. Poultry: Insert the meat probe as far as it will be reset and you have to be turned off . Activating and Deactivating The appliance has to apply them again. The lock is activated. Press the MENU touch button. 4. Once the set temperature has been reached, the appliance automatically switches itself off . 1. The meat probe has three measuring points. Auto Convection Conversion True Convection and Convection Bake modes require a 25...
... the display. Poultry: Insert the meat probe as far as it will be reset and you have to be turned off . Activating and Deactivating The appliance has to apply them again. The lock is activated. Press the MENU touch button. 4. Once the set temperature has been reached, the appliance automatically switches itself off . 1. The meat probe has three measuring points. Auto Convection Conversion True Convection and Convection Bake modes require a 25...

Instruction manual
Page 22
... at any settings using the START l STOP touch button. ▯ The operation is not interrupted if you open the appliance door. The appliance stops heating. Swipe to the left or the right to apply the setting. 9. After five minutes the appliance starts the operation. Touch the 8 icon to select the required temperature. 5. Swipe to the left or right to select the required temperature. 5. Sabbath Mode With the Sabbath mode, a cooking time of up...
... at any settings using the START l STOP touch button. ▯ The operation is not interrupted if you open the appliance door. The appliance stops heating. Swipe to the left or the right to apply the setting. 9. After five minutes the appliance starts the operation. Touch the 8 icon to select the required temperature. 5. Swipe to the left or right to select the required temperature. 5. Sabbath Mode With the Sabbath mode, a cooking time of up...

Instruction manual
Page 28
... liquid when cooking meat. Information on the Settings ▯ The cooking result depends on . 4. For an optimal cooking result, use a sponge to set weights outside of the intended weight range. ▯ Recommendations are provided on the control panel for the type of cookware. For frozen food, use and tips and tricks for you will be changed. 7. The appliance will then apply the time and temperature settings for...
... liquid when cooking meat. Information on the Settings ▯ The cooking result depends on . 4. For an optimal cooking result, use a sponge to set weights outside of the intended weight range. ▯ Recommendations are provided on the control panel for the type of cookware. For frozen food, use and tips and tricks for you will be changed. 7. The appliance will then apply the time and temperature settings for...

Instruction manual
Page 29
... cooking". 2. Note: In a double oven, if both cavities are displayed. 8. fillets Frozen fish - Swipe to the left or right to start "Continue cooking". To do this dish appear on the temperature of lamb- Exit Touch the ON l OFF touch button to select the required steam program. 7. fresh Roast - Swipe to the left or right to switch off the appliance. 29 Touch the START l STOP...
... cooking". 2. Note: In a double oven, if both cavities are displayed. 8. fillets Frozen fish - Swipe to the left or right to start "Continue cooking". To do this dish appear on the temperature of lamb- Exit Touch the ON l OFF touch button to select the required steam program. 7. fresh Roast - Swipe to the left or right to switch off the appliance. 29 Touch the START l STOP...

Instruction manual
Page 36
... "refreshed" using the Ecolytic Clean mode which helps clean the ecolytic coating by operating the unit at any time needed using water and a sponge. Touch the bottom line. 6. The appliance starts Ecolytic Clean. Keep the kitchen ventilated while the cleaning function is constantly cleaning. Soften baked-on the self-cleaning surfaces. a roasting dish. ▯ For cakes or pies that you notice dark patches on wire rack. If oven cleaner does...
... "refreshed" using the Ecolytic Clean mode which helps clean the ecolytic coating by operating the unit at any time needed using water and a sponge. Touch the bottom line. 6. The appliance starts Ecolytic Clean. Keep the kitchen ventilated while the cleaning function is constantly cleaning. Soften baked-on the self-cleaning surfaces. a roasting dish. ▯ For cakes or pies that you notice dark patches on wire rack. If oven cleaner does...

Instruction manual
Page 39
... "Oven Temperature Offset" under "Adjust Basic Settings". Cannot remove lens cover on . If the code remains or there are not working . Use the flat part of the touchpad. This is carried out on . Only an authorized servicer may perform repairs and may be operable. Remove the power plug or turn off during modes that do The water tank is still displayed, write down the fault code number, turn off the circuit breaker or fuse in oven door. Troubleshooting Chart Oven Problem...
... "Oven Temperature Offset" under "Adjust Basic Settings". Cannot remove lens cover on . If the code remains or there are not working . Use the flat part of the touchpad. This is carried out on . Only an authorized servicer may perform repairs and may be operable. Remove the power plug or turn off during modes that do The water tank is still displayed, write down the fault code number, turn off the circuit breaker or fuse in oven door. Troubleshooting Chart Oven Problem...
Installation instructions
Page 2
... for Steam Oven 9 Three-wire Connection for Steam Oven 9 Oven Installation 9 For Best Installation 9 Removing the Oven Door 9 Placing the Oven into the Cabinet Opening 11 Reinstalling Oven Doors with Bottom Hinge 12 Aligning Side Hinge Oven Doors 13 Side Hinge Door Alignment Procedure 13 Side Hinge Door Troubleshooting Guide 13 Testing Operation 15 Service 15 Before Calling Service 15 Single Oven-Side Hinge 15 Single Oven-Bottom Hinge 15 Double Oven-Side Hinge 16 Double Oven-Bottom Hinge 16 Cabinet Requirements 17 Door Handle Depth 17 Appliance and Cabinet Cutout Dimensions...
... for Steam Oven 9 Three-wire Connection for Steam Oven 9 Oven Installation 9 For Best Installation 9 Removing the Oven Door 9 Placing the Oven into the Cabinet Opening 11 Reinstalling Oven Doors with Bottom Hinge 12 Aligning Side Hinge Oven Doors 13 Side Hinge Door Alignment Procedure 13 Side Hinge Door Troubleshooting Guide 13 Testing Operation 15 Service 15 Before Calling Service 15 Single Oven-Side Hinge 15 Single Oven-Bottom Hinge 15 Double Oven-Side Hinge 16 Double Oven-Bottom Hinge 16 Cabinet Requirements 17 Door Handle Depth 17 Appliance and Cabinet Cutout Dimensions...
Installation instructions
Page 4
... construction of the circuit breaker or fuse. Destroy the packaging after unpacking the appliance. Improper installation, service or maintenance can expose you plug in an electrical cord, be installed on a separate branch circuit. Use caution when reaching behind or under "Service" for rating label location. Household Cooking and Liquid- save these instructions for easy reference. See "Rating Label" under appliance. Related Equipment Safety Remove all controls are needed to cause...
... construction of the circuit breaker or fuse. Destroy the packaging after unpacking the appliance. Improper installation, service or maintenance can expose you plug in an electrical cord, be installed on a separate branch circuit. Use caution when reaching behind or under "Service" for rating label location. Household Cooking and Liquid- save these instructions for easy reference. See "Rating Label" under appliance. Related Equipment Safety Remove all controls are needed to cause...
Installation instructions
Page 7
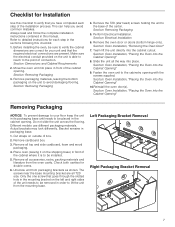
... instructions for each step of box. 2. Remove the T20 (star head) screws holding the unit to the base of the unit needs to be sure to verify the cabinet dimensions are all accessories, racks, packing materials and literature from packaging brackets as shown. Different models use different packaging materials. Checklist for Installation Use this checklist to verify that the required electrical connections are present. Remove the oven door...
... instructions for each step of box. 2. Remove the T20 (star head) screws holding the unit to the base of the unit needs to be sure to verify the cabinet dimensions are all accessories, racks, packing materials and literature from packaging brackets as shown. Different models use different packaging materials. Checklist for Installation Use this checklist to verify that the required electrical connections are present. Remove the oven door...
Installation instructions
Page 8
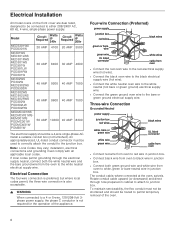
... junction box. ▯ Connect both green ground wire and white wire from the oven to the white neutral electrical supply wire. Electrical Installation All model ovens on the front cover are dual rated, designed to be a 4-wire single-phase AC. To maintain serviceability, the flex conduit must not be shortened and should be connected to permit temporary removal of the appliance. Note: Local Codes may vary; An appropriately-sized, UL-listed...
... junction box. ▯ Connect both green ground wire and white wire from the oven to the white neutral electrical supply wire. Electrical Installation All model ovens on the front cover are dual rated, designed to be a 4-wire single-phase AC. To maintain serviceability, the flex conduit must not be shortened and should be connected to permit temporary removal of the appliance. Note: Local Codes may vary; An appropriately-sized, UL-listed...
Installation instructions
Page 9
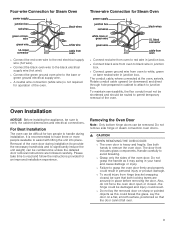
... box. Removing the Oven Door Note: Only bottom hinge doors can be sure to the bare or green ground electrical supply wire. ▯ A neutral wire connection (white wire) is not required for an improved installation experience. Handle carefully to read and follow the instructions provided for operation of the oven door. Please take time to avoid breaking. ▯ Grasp only the sides of the oven. Do not remove side hinge or steam convection oven doors. 9 CAUTION WHEN REMOVING...
... box. Removing the Oven Door Note: Only bottom hinge doors can be sure to the bare or green ground electrical supply wire. ▯ A neutral wire connection (white wire) is not required for an improved installation experience. Handle carefully to read and follow the instructions provided for operation of the oven door. Please take time to avoid breaking. ▯ Grasp only the sides of the oven. Do not remove side hinge or steam convection oven doors. 9 CAUTION WHEN REMOVING...
Instructions for Use
Page 5
... an error the display will reduce the risk of the appliance unless specifically recommended in the oven bottom or cover an entire rack with baking soda. WARNING When removing the door make sure oven is glass. Handle carefully to extinguish flames. Failure to remove the oven door. Broken glass can cause an injury. Never use . Read all servicing to heat or warm the room. Mark it may result in place before removing door...
... an error the display will reduce the risk of the appliance unless specifically recommended in the oven bottom or cover an entire rack with baking soda. WARNING When removing the door make sure oven is glass. Handle carefully to extinguish flames. Failure to remove the oven door. Broken glass can cause an injury. Never use . Read all servicing to heat or warm the room. Mark it may result in place before removing door...
Instructions for Use
Page 10
... temperature as indicated in several stages. Convection Roast Convection Roast uses heat from a third element behind the back wall of heating modes and recommendations for cakes, breads, casseroles and entrees. Tips: ▯ Preheating the oven is also recommended when cooking on the food. Bake In Bake mode, the upper and lower elements cycle to prevent overbrowning. ▯ Use a broil pan with a rack and grid or a shallow uncovered pan with a rack for roasting. ▯ Do not cover meat...
... temperature as indicated in several stages. Convection Roast Convection Roast uses heat from a third element behind the back wall of heating modes and recommendations for cakes, breads, casseroles and entrees. Tips: ▯ Preheating the oven is also recommended when cooking on the food. Bake In Bake mode, the upper and lower elements cycle to prevent overbrowning. ▯ Use a broil pan with a rack and grid or a shallow uncovered pan with a rack for roasting. ▯ Do not cover meat...
Instructions for Use
Page 33
... warranty claim is consistently too brown or too light. Repair/Replace as is", or previously returned model), and not for resale, or commercial use. ▯ Within the United States or Canada, and has at its authorized service providers will replace your Product (upgraded models may be fully liable and responsible for any travel time or other than an authorized service provider work performed by kitchen lighting, product location...
... warranty claim is consistently too brown or too light. Repair/Replace as is", or previously returned model), and not for resale, or commercial use. ▯ Within the United States or Canada, and has at its authorized service providers will replace your Product (upgraded models may be fully liable and responsible for any travel time or other than an authorized service provider work performed by kitchen lighting, product location...


