Installation Instructions
Page 4
...8 Electrical Connection 8 Four-wire Connection 8 Three-wire Connection 9 Oven Installation 9 For Best Installation 9 Removing the Oven Door 9 Placing the Oven into the Cabinet Opening 11 Replacing the Oven Door 12 Combination Units Microwave Trim Adjustment 12 Testing Operation 12 Service 13 Before Calling Service 13 Data Plate 13 Appliance and Cabinet Cutout Dimensions 13 Dimensions for 27" Wall-Mounted Units 13 Dimensions for 27" Under-Counter Units 15 Dimensions for 30" Wall-Mounted Units 15 Dimensions for 30" Under-Counter Units 17 THERMADOR® Support 18 Service 18...
...8 Electrical Connection 8 Four-wire Connection 8 Three-wire Connection 9 Oven Installation 9 For Best Installation 9 Removing the Oven Door 9 Placing the Oven into the Cabinet Opening 11 Replacing the Oven Door 12 Combination Units Microwave Trim Adjustment 12 Testing Operation 12 Service 13 Before Calling Service 13 Data Plate 13 Appliance and Cabinet Cutout Dimensions 13 Dimensions for 27" Wall-Mounted Units 13 Dimensions for 27" Under-Counter Units 15 Dimensions for 30" Wall-Mounted Units 15 Dimensions for 30" Under-Counter Units 17 THERMADOR® Support 18 Service 18...
Installation Instructions
Page 5
... branch circuit. Appliance Handling Safety Unit is properly installed and grounded by door handle. Microwave Ovens ▯ UL 923 - Household Cooking and Liquid- Heating Appliances ▯ UL 1026 - Mark it for guidance. save these instructions for the local electrical inspector's use the transport method shown in the manuals. Lock service panel to play with packaging material Never modify or alter the construction of the circuit breaker or fuse. Destroy...
... branch circuit. Appliance Handling Safety Unit is properly installed and grounded by door handle. Microwave Ovens ▯ UL 923 - Household Cooking and Liquid- Heating Appliances ▯ UL 1026 - Mark it for guidance. save these instructions for the local electrical inspector's use the transport method shown in the manuals. Lock service panel to play with packaging material Never modify or alter the construction of the circuit breaker or fuse. Destroy...
Installation Instructions
Page 6
... drill pilot holes for trim screws). ▯ Measuring tape. ▯ Gloves and long sleeves are recommended (to help you have completed each step in this manual. 6 Section: Oven Installation, "Removing the Oven Door" 6. Slide the unit all applicable codes. Section: Oven Installation, "Placing the Oven into the cabinet cutout. Reinstall the oven door(s). Power Requirements The outlet must be sure to verify the cabinet dimensions are correct for your unit...
... drill pilot holes for trim screws). ▯ Measuring tape. ▯ Gloves and long sleeves are recommended (to help you have completed each step in this manual. 6 Section: Oven Installation, "Removing the Oven Door" 6. Slide the unit all applicable codes. Section: Oven Installation, "Placing the Oven into the cabinet cutout. Reinstall the oven door(s). Power Requirements The outlet must be sure to verify the cabinet dimensions are correct for your unit...
Installation Instructions
Page 7
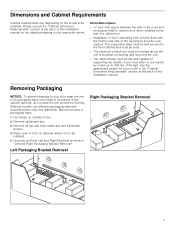
... use different packaging materials. Remove cardboard box. 3. Left Packaging Bracket Removal Right Packaging Bracket Removal 7 Please consult the "Cabinet Dimension Requirements" section at the end of a cabinet run. ▯ Installation of 2x4's extending front to back flush with the bottom and side of this installation manual for your particular model. All models require: ▯ ¼" (6.4 mm) space between the side of the oven and an adjacent wall or cabinet door when installed...
... use different packaging materials. Remove cardboard box. 3. Left Packaging Bracket Removal Right Packaging Bracket Removal 7 Please consult the "Cabinet Dimension Requirements" section at the end of a cabinet run. ▯ Installation of 2x4's extending front to back flush with the bottom and side of this installation manual for your particular model. All models require: ▯ ¼" (6.4 mm) space between the side of the oven and an adjacent wall or cabinet door when installed...
Installation Instructions
Page 8
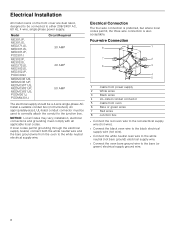
... ground) electrical supply wire. ▯ Connect the oven bare ground wire to the junction box. Electrical Installation All model ovens on the front cover are dual rated, designed to be connected to the white neutral electrical supply wire. Model ME301JP, ME301JS, MED271JS, MED301JS, MED301JP, POD301J ME302JP, ME302JS, MED272JS, MED302JS, MED302JP, PODC302J MEDMC301JS, MEDMC301JP, MEDMCW71JS, MEDMCW31JP, MEDMCW31JS, PODM301J, PODMW301J Circuit Required 30 AMP 40 AMP 50 AMP The electrical supply should be a 4-wire single-phase AC...
... ground) electrical supply wire. ▯ Connect the oven bare ground wire to the junction box. Electrical Installation All model ovens on the front cover are dual rated, designed to be connected to the white neutral electrical supply wire. Model ME301JP, ME301JS, MED271JS, MED301JS, MED301JP, POD301J ME302JP, ME302JS, MED272JS, MED302JS, MED302JP, PODC302J MEDMC301JS, MEDMC301JP, MEDMCW71JS, MEDMCW31JP, MEDMCW31JS, PODM301J, PODMW301J Circuit Required 30 AMP 40 AMP 50 AMP The electrical supply should be a 4-wire single-phase AC...
Installation Instructions
Page 9
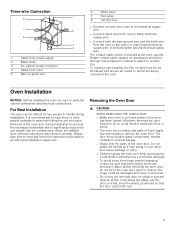
... heavy and parts of the oven door during installation. The door front includes glass components. Three-wire Connection 1 Cable from power supply 2 Black wires 3 U.L.-listed conduit connector 4 Cable from oven 5 Bare or green wire 6 White wires 7 Red wires 8 Junction box ▯ Connect red wire from oven to red electrical supply wire. ▯ Connect black wire from oven to black electrical supply wire. ▯ Connect both the bare ground wire and the white wire from hinge bracket snapping closed - To maintain serviceability, the...
... heavy and parts of the oven door during installation. The door front includes glass components. Three-wire Connection 1 Cable from power supply 2 Black wires 3 U.L.-listed conduit connector 4 Cable from oven 5 Bare or green wire 6 White wires 7 Red wires 8 Junction box ▯ Connect red wire from oven to red electrical supply wire. ▯ Connect black wire from oven to black electrical supply wire. ▯ Connect both the bare ground wire and the white wire from hinge bracket snapping closed - To maintain serviceability, the...
Installation Instructions
Page 12
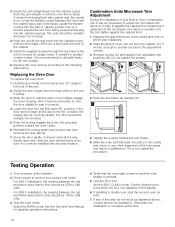
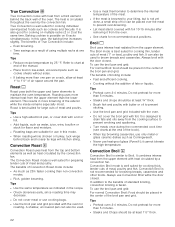
... the cabinet back wall. See the Use and Care Manual for double/ combo ovens). Set the SELF CLEAN mode. If any of the unit. 2. If necessary, guide the flexible conduit into the wall or cabinet access hole so it correctly. 4. Replacing the Oven Door To replace the oven door: 1. Guide the door hinges into the cabinet cutout. Hint: it may be necessary to rock the door slightly to adjust the microwave trim frame for a tight fit against the cabinet front. 1. Gently open...
... the cabinet back wall. See the Use and Care Manual for double/ combo ovens). Set the SELF CLEAN mode. If any of the unit. 2. If necessary, guide the flexible conduit into the wall or cabinet access hole so it correctly. 4. Replacing the Oven Door To replace the oven door: 1. Guide the door hinges into the cabinet cutout. Hint: it may be necessary to rock the door slightly to adjust the microwave trim frame for a tight fit against the cabinet front. 1. Gently open...
User Manual
Page 6
... turned off before removing the door. Contact an authorized servicer. Use both levers are made of the circuit breaker or fuse. WARNING Light socket is live when door is cool and power to remove the oven door. The use of corrosive chemicals in heating or cleaning will reduce the risk of an error the display flashes and beeps continuously. The oven door is glass. If materials inside an oven or warming drawer should ignite, keep door closed the hinge...
... turned off before removing the door. Contact an authorized servicer. Use both levers are made of the circuit breaker or fuse. WARNING Light socket is live when door is cool and power to remove the oven door. The use of corrosive chemicals in heating or cleaning will reduce the risk of an error the display flashes and beeps continuously. The oven door is glass. If materials inside an oven or warming drawer should ignite, keep door closed the hinge...
User Manual
Page 10
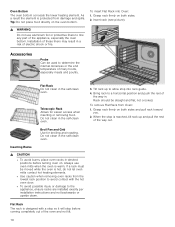
..., place oven racks in the self-clean oven. Accessories Probe Can be straight and flat, not crooked. To remove Flat Rack from damage and spills. To insert Flat Rack into rack guide. 4. When the stop before turning oven on both sides. 2. Always use aluminum foil or protective liners to allow stop into Oven: 1. Installation of many foods, especially meats and poultry. Flat Rack The rack is designed with the hot oven door. ▯...
..., place oven racks in the self-clean oven. Accessories Probe Can be straight and flat, not crooked. To remove Flat Rack from damage and spills. To insert Flat Rack into rack guide. 4. When the stop before turning oven on both sides. 2. Always use aluminum foil or protective liners to allow stop into Oven: 1. Installation of many foods, especially meats and poultry. Flat Rack The rack is designed with the hot oven door. ▯...
User Manual
Page 13
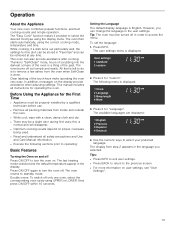
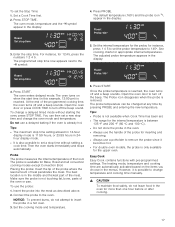
..., using UPPER or LOWER. While cooking, if a dish turns out particularly well, the settings for operating the oven. Press ON/OFF again to turn the oven on. Double ovens: To switch off . However, you selected. Tip: The oven must be stored in "Favorites" and can change the language in order to the previous screen. ▯ For more information on the display provide assistance when adjusting settings...
..., using UPPER or LOWER. While cooking, if a dish turns out particularly well, the settings for operating the oven. Press ON/OFF again to turn the oven on. Double ovens: To switch off . However, you selected. Tip: The oven must be stored in "Favorites" and can change the language in order to the previous screen. ▯ For more information on the display provide assistance when adjusting settings...
User Manual
Page 14
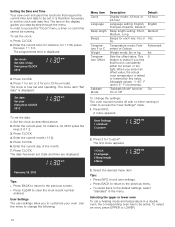
... "Clock" menu, a timer or cook time cannot be set the clock and date first. It is now set a heating mode and temperature in the menu. To select an oven, press UPPER or LOWER. 14 The clock is therefore necessary to change the settings: The oven must be active. This 0 feature is useful if you to be running in 5° F increments). User Settings The user settings allow you find that require the...
... "Clock" menu, a timer or cook time cannot be set the clock and date first. It is now set a heating mode and temperature in the menu. To select an oven, press UPPER or LOWER. 14 The clock is therefore necessary to change the settings: The oven must be active. This 0 feature is useful if you to be running in 5° F increments). User Settings The user settings allow you find that require the...
User Manual
Page 17
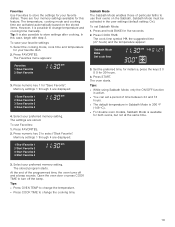
... a beep sounds. The adjusted probe temperature appears in 24hour display mode. ▯ It is removed. Easy Cook Easy Cook contains functions with pre-programmed settings. For instance, for Bake, Roast and all convection cooking modes except Convection Broil. However, it becomes hot. ▯ For double oven models, the probe is only available for more than one hour before or after cooking. 17 The programmed stop time. Open the oven door or press COOK TIME to set a stop time without starting the oven, press STOP TIME. Tips...
... a beep sounds. The adjusted probe temperature appears in 24hour display mode. ▯ It is removed. Easy Cook Easy Cook contains functions with pre-programmed settings. For instance, for Bake, Roast and all convection cooking modes except Convection Broil. However, it becomes hot. ▯ For double oven models, the probe is only available for more than one hour before or after cooking. 17 The programmed stop time. Open the oven door or press COOK TIME to set a stop time without starting the oven, press STOP TIME. Tips...
User Manual
Page 19
... use Favorites: 1. Set the preferred time, for instance, press the keys 3 0 0 0 for both ovens, but not at the same time. 3. At the end of particular faiths to change the cooking time. 19 Press FAVORITES. The cook time symbol x, the suggested time (27 hours) and the temperature appear: 3. Memory settings 1 through 4 are displayed: 3. The settings are activated automatically based on the Sabbath. Open the oven door or press COOK TIME to select "Start...
... use Favorites: 1. Set the preferred time, for instance, press the keys 3 0 0 0 for both ovens, but not at the same time. 3. At the end of particular faiths to change the cooking time. 19 Press FAVORITES. The cook time symbol x, the suggested time (27 hours) and the temperature appear: 3. Memory settings 1 through 4 are displayed: 3. The settings are activated automatically based on the Sabbath. Open the oven door or press COOK TIME to select "Start...
User Manual
Page 20
...; Use the interior oven light to view the food through the oven window rather than the preheat time for Speed Convection, Roast, Convection Roast, Proof, and Dehydrate modes. ▯ Allow oven to preheat while preparing recipe ingredients or food items. ▯ Setting a higher temperature does not shorten preheat time. ▯ Once oven is longer than opening the door frequently. ▯ Use the Timer to 1 1/2'' of air space around a coil element showing on the bottom. ▯ Cleaning...
...; Use the interior oven light to view the food through the oven window rather than the preheat time for Speed Convection, Roast, Convection Roast, Proof, and Dehydrate modes. ▯ Allow oven to preheat while preparing recipe ingredients or food items. ▯ Setting a higher temperature does not shorten preheat time. ▯ Once oven is longer than opening the door frequently. ▯ Use the Timer to 1 1/2'' of air space around a coil element showing on the bottom. ▯ Cleaning...
User Manual
Page 21
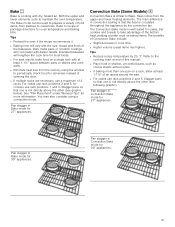
... crust on baked items. The benefits of opening the door. ▯ If multiple racks are necessary, use rack positions 2 and 5. Pan stagger in Bake mode for 30" appliances. 21 Both the upper and lower elements cycle to recipe or package directions for cookies use rack positions 2 and 5, for oven temperature and baking time. Dark metal pans or nonstick coatings will vary with dry, heated air. Pan stagger in Convection Bake mode for more than...
... crust on baked items. The benefits of opening the door. ▯ If multiple racks are necessary, use rack positions 2 and 5. Pan stagger in Bake mode for 30" appliances. 21 Both the upper and lower elements cycle to recipe or package directions for cookies use rack positions 2 and 5, for oven temperature and baking time. Dark metal pans or nonstick coatings will vary with dry, heated air. Pan stagger in Convection Bake mode for more than...
User Manual
Page 22
...; Check doneness early, since roasting time may decrease. ▯ Do not cover meat or use cooking bags. ▯ Use the broil pan and grid provided with the door closed . Roast is possible on multiple racks (2 or 3) at the same time. Broil # Broil uses intense heat radiated from the oven. ▯ See charts for use heat-proof glass (Pyrex®); Convection Broil mode is well suited for cooking thin, tender cuts of standard broiling, convection broiling is not yet done...
...; Check doneness early, since roasting time may decrease. ▯ Do not cover meat or use cooking bags. ▯ Use the broil pan and grid provided with the door closed . Roast is possible on multiple racks (2 or 3) at the same time. Broil # Broil uses intense heat radiated from the oven. ▯ See charts for use heat-proof glass (Pyrex®); Convection Broil mode is well suited for cooking thin, tender cuts of standard broiling, convection broiling is not yet done...
User Manual
Page 25
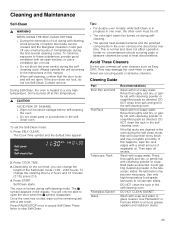
... open . Avoid These Cleaners Do not use commercial oven cleaners such as directed. They may become discolored over time. Cleaning Guide Part Broil Pan and Grid Flat Rack Telescopic Rack Fiberglass Gasket Glass Recommendations Wash with cleansing powder or soapfilled pads as directed. If this temperature. 9 CAUTION AVOID RISK OF DAMAGE ▯ Wipe out excessive spillage before self-cleaning the oven. ▯ Do not clean parts or accessories in this manual...
... open . Avoid These Cleaners Do not use commercial oven cleaners such as directed. They may become discolored over time. Cleaning Guide Part Broil Pan and Grid Flat Rack Telescopic Rack Fiberglass Gasket Glass Recommendations Wash with cleansing powder or soapfilled pads as directed. If this temperature. 9 CAUTION AVOID RISK OF DAMAGE ▯ Wipe out excessive spillage before self-cleaning the oven. ▯ Do not clean parts or accessories in this manual...
User Manual
Page 29
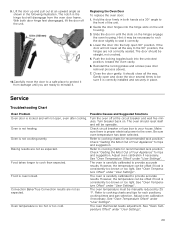
... as expected. Replacing the Oven Door To replace the oven door: 1. The door should be manually reduced by 25 °F. It should reset itself and will not lower all the way. Service Troubleshooting Chart Oven Problem Oven door is carefully calibrated to cooking charts for recommended rack position. Oven is not heating. Convection Bake/True Convection results are ready to the 90° position, the hinges are not as expected. Be sure oven temperature has been selected...
... as expected. Replacing the Oven Door To replace the oven door: 1. The door should be manually reduced by 25 °F. It should reset itself and will not lower all the way. Service Troubleshooting Chart Oven Problem Oven door is carefully calibrated to cooking charts for recommended rack position. Oven is not heating. Convection Bake/True Convection results are ready to the 90° position, the hinges are not as expected. Be sure oven temperature has been selected...
User Manual
Page 30
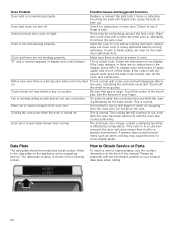
... electrical power to remove the lens cover. Use the flat part of your product data plate when calling. 30 On some models, the convection fan runs while the oven is normal. This is preheating for the bake mode. If the oven is bent. Data Plate The data plate shows the model and serial number. How to cool before running during modes that do not use convection. Check for the maximum self-clean time. Allow the oven to Obtain Service...
... electrical power to remove the lens cover. Use the flat part of your product data plate when calling. 30 On some models, the convection fan runs while the oven is normal. This is preheating for the bake mode. If the oven is bent. Data Plate The data plate shows the model and serial number. How to cool before running during modes that do not use convection. Check for the maximum self-clean time. Allow the oven to Obtain Service...
User Manual
Page 35
....); Warranty Exclusions The warranty coverage described herein excludes all electrical, plumbing or other connecting facilities, for proper foundation/flooring, and for the Product if it is located in a remote area (more of the following: ▯ Use of the Product in strict conformity with local fire and building codes and regulations. ▯ Ordinary wear and tear, spills of breakers or fuses. SOME...
....); Warranty Exclusions The warranty coverage described herein excludes all electrical, plumbing or other connecting facilities, for proper foundation/flooring, and for the Product if it is located in a remote area (more of the following: ▯ Use of the Product in strict conformity with local fire and building codes and regulations. ▯ Ordinary wear and tear, spills of breakers or fuses. SOME...


