Design Guide - Side-by-Side Refrigeration
Page 4
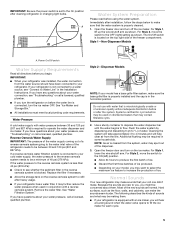
... PANELS Custom side panels may be needed , use copper tubing and check for leaks. For the stainless steel models, you may choose an Inset or Recessed Inset panel installation. Use an outlet that cannot be located in or Professional Series product lines, or choose our custom panel models to integrate beautifully with the product for panel specifications. The water shutoff should be turned off valve is in loss of the power supply...
... PANELS Custom side panels may be needed , use copper tubing and check for leaks. For the stainless steel models, you may choose an Inset or Recessed Inset panel installation. Use an outlet that cannot be located in or Professional Series product lines, or choose our custom panel models to integrate beautifully with the product for panel specifications. The water shutoff should be turned off valve is in loss of the power supply...
Design Guide - Side-by-Side Refrigeration
Page 15
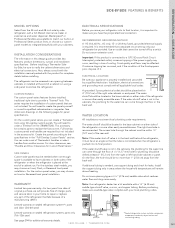
... a set of a cabinet run. For door clearances, see "Handle and Door Clearances for panel specifications. REFRIGERATION 48-INCH SIDE-BY-SIDE REFRIGERATOR Models: KBUIT4855E, KBUIT4865E, KBUDT4855E, KBUDT4865E, KBUIT4875E, KBUDT4875E Stainless steel side-by -side with internal ice maker. Custom panel side-by -side with full-filtered external ice and water dispenser. ft.) Refrigerator Capacity (cu. You will need to have cabinets on pages 264-271 for Custom Panel Series." See dimension...
... a set of a cabinet run. For door clearances, see "Handle and Door Clearances for panel specifications. REFRIGERATION 48-INCH SIDE-BY-SIDE REFRIGERATOR Models: KBUIT4855E, KBUIT4865E, KBUDT4855E, KBUDT4865E, KBUIT4875E, KBUDT4875E Stainless steel side-by -side with internal ice maker. Custom panel side-by -side with full-filtered external ice and water dispenser. ft.) Refrigerator Capacity (cu. You will need to have cabinets on pages 264-271 for Custom Panel Series." See dimension...
Installation Instructions
Page 14
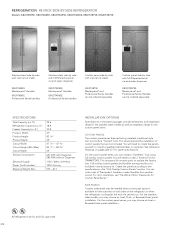
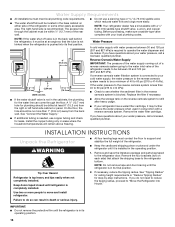
Save these Installation Instructions for future reference. See "Design Specifications." s If you are connecting the water line directly to copper tubing and not to allow for side tipping radius. WARNING Explosion Hazard Keep flammable materials and vapors, such as gasoline, away from point A (as shown) to make the panels. s Floor must support the refrigerator weight, more than 600 lbs (272 kg), door panels and...
Save these Installation Instructions for future reference. See "Design Specifications." s If you are connecting the water line directly to copper tubing and not to allow for side tipping radius. WARNING Explosion Hazard Keep flammable materials and vapors, such as gasoline, away from point A (as shown) to make the panels. s Floor must support the refrigerator weight, more than 600 lbs (272 kg), door panels and...
Installation Instructions
Page 16
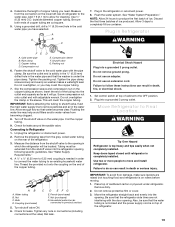
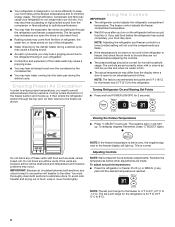
... panel. s If additional tubing is blocked. Remove the water filter cartridge. If necessary, reduce the tipping radius. IMPORTANT: s Do not remove the protective film until it may further reduce the water pressure when used in its operating position. 16 The access hole through the floor. Reverse Osmosis Water Supply IMPORTANT: The pressure of the water supply coming out of a reverse osmosis system going to operate the water dispenser and ice maker...
... panel. s If additional tubing is blocked. Remove the water filter cartridge. If necessary, reduce the tipping radius. IMPORTANT: s Do not remove the protective film until it may further reduce the water pressure when used in its operating position. 16 The access hole through the floor. Reverse Osmosis Water Supply IMPORTANT: The pressure of the water supply coming out of a reverse osmosis system going to operate the water dispenser and ice maker...

Installation Instructions
Page 18
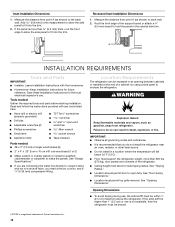
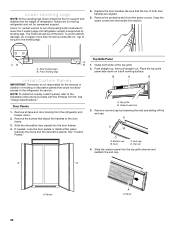
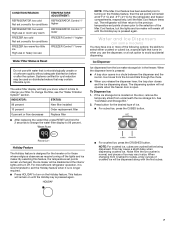
... wood screws must be installed before the refrigerator is connected, turn the ice maker OFF. The board(s) must be within 1" (2.5 cm) maximum above refrigerator B. IMPORTANT: Before attaching the tubing to shutoff valve, flush the main water supply line to wall studs behind refrigerator. Remove the shipping tape from collecting in the valve. 18 Plug in the water line. Unplug refrigerator or disconnect power. 2. A B C 2" (5 cm) D A. Water tubing 4. Turn shutoff valve ON. 5. IMPORTANT: s Make sure it is...
... wood screws must be installed before the refrigerator is connected, turn the ice maker OFF. The board(s) must be within 1" (2.5 cm) maximum above refrigerator B. IMPORTANT: Before attaching the tubing to shutoff valve, flush the main water supply line to wall studs behind refrigerator. Remove the shipping tape from collecting in the valve. 18 Plug in the water line. Unplug refrigerator or disconnect power. 2. A B C 2" (5 cm) D A. Water tubing 4. Turn shutoff valve ON. 5. IMPORTANT: s Make sure it is...
Installation Instructions
Page 19
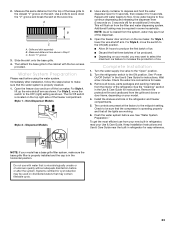
... heavy and tips easily when not completely installed. Move the refrigerator straight back and evenly into the opening following specific guidelines. Be sure that leak. Water tubing B. Coupling (purchased) E. Check for leaks. Set control switch at the valve) that the refrigerator side trims are not interfering with the door opening in the water line. IMPORTANT: To avoid floor damage, make sure levelers are cut square. 5. Measure from the shutoff...
... heavy and tips easily when not completely installed. Move the refrigerator straight back and evenly into the opening following specific guidelines. Be sure that leak. Water tubing B. Coupling (purchased) E. Check for leaks. Set control switch at the valve) that the refrigerator side trims are not interfering with the door opening in the water line. IMPORTANT: To avoid floor damage, make sure levelers are cut square. 5. Measure from the shutoff...
Installation Instructions
Page 20
... the end cap. kg) of refrigerator. Remove the protective skin from the refrigerator and freezer doors. 2. A AB B A. Rear leveling legs B. See "Design Specifications." Door Panels 1. Remove the screws that would not allow access to the installation instructions included with the Trimless Trim Kit. Slide the decorative door panels into the door frames. 4. Grasp both door handles are for moving refrigerator and not for permanent support. Push straight up, then pull...
... the end cap. kg) of refrigerator. Remove the protective skin from the refrigerator and freezer doors. 2. A AB B A. Rear leveling legs B. See "Design Specifications." Door Panels 1. Remove the screws that would not allow access to the installation instructions included with the Trimless Trim Kit. Slide the decorative door panels into the door frames. 4. Grasp both door handles are for moving refrigerator and not for permanent support. Push straight up, then pull...
Installation Instructions
Page 23
.... Open the freezer door and turn off ) for an additional 2 minutes. Turn the water supply line valve to the ON position. The controls are working. 6. Immediately after the system. Use a sturdy container to make sure the base grille filter is properly installed and the cap is microbiologically unsafe or of the refrigerator. For Style 2, move the switch to the midpoint setting. Turn the refrigerator switch to the "Open" position. 2. Remove all the lights are...
.... Open the freezer door and turn off ) for an additional 2 minutes. Turn the water supply line valve to the ON position. The controls are working. 6. Immediately after the system. Use a sturdy container to make sure the base grille filter is properly installed and the cap is microbiologically unsafe or of the refrigerator. For Style 2, move the switch to the midpoint setting. Turn the refrigerator switch to the "Open" position. 2. Remove all the lights are...
User Manual
Page 4
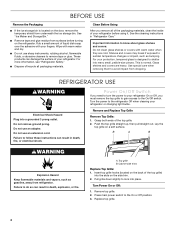
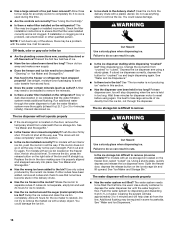
... glue residue from refrigerator. Wipe with warm water when they are heavy. These products can result in death, explosion, or fire. Use special care when removing them to follow these instructions can result in "Refrigerator Care." For your refrigerator. See the cleaning instructions in death, fire, or electrical shock. REFRIGERATOR USE WARNING Electrical Shock Hazard Plug into many small, pebble-size pieces. See "Ice Maker and Storage Bin." B A B WARNING Explosion Hazard...
... glue residue from refrigerator. Wipe with warm water when they are heavy. These products can result in death, explosion, or fire. Use special care when removing them to follow these instructions can result in "Refrigerator Care." For your refrigerator. See the cleaning instructions in death, fire, or electrical shock. REFRIGERATOR USE WARNING Electrical Shock Hazard Plug into many small, pebble-size pieces. See "Ice Maker and Storage Bin." B A B WARNING Explosion Hazard...
User Manual
Page 5
... cleaning refrigerator or changing light bulbs. IMPORTANT: s When your refrigerator was installed, the water connection from the water source should have questions about your water pressure, call a licensed, qualified plumber. See "Ice Maker and Storage Bin." If you might be concerned about your water connection, see whether the sediment filter in the Installation Instructions. Dispenser Models NOTE: If your refrigerator. Open the freezer door and turn the ice maker OFF. s Allow 24 hours to your model has a base grille filter...
... cleaning refrigerator or changing light bulbs. IMPORTANT: s When your refrigerator was installed, the water connection from the water source should have questions about your water pressure, call a licensed, qualified plumber. See "Ice Maker and Storage Bin." If you might be concerned about your water connection, see whether the sediment filter in the Installation Instructions. Dispenser Models NOTE: If your refrigerator. Open the freezer door and turn the ice maker OFF. s Allow 24 hours to your model has a base grille filter...
User Manual
Page 6
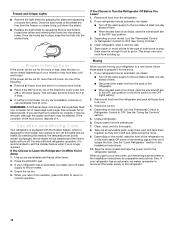
... next to the freezer display will light up . You may hear water running into it. s You may differ from the flow of refrigerant, the water line, or items stored on the refrigerator before the refrigerator has cooled completely, your food may occur. Cold air enters the bottom of time. s The actual temperature may hear the evaporator fan motor circulating air through the top vent. Viewing the Celsius Temperatures s Press °...
... next to the freezer display will light up . You may hear water running into it. s You may differ from the flow of refrigerant, the water line, or items stored on the refrigerator before the refrigerator has cooled completely, your food may occur. Cold air enters the bottom of time. s The actual temperature may hear the evaporator fan motor circulating air through the top vent. Viewing the Celsius Temperatures s Press °...
User Manual
Page 7
... Cool feature, but the lights and ice maker will remain at 34°F (1°C) and -5°F (-21°C) for 2 seconds to change the filter, see the "Water Filtration System" section. Noise from the ice maker storage bin in a chute between the dispenser and the ice bin. INDICATOR: STATUS: 99 percent New filter installed 10 percent Order replacement filter 0 percent or flow decreases Replace filter s After replacing the water filter, press RESET and hold for the refrigerator and freezer...
... Cool feature, but the lights and ice maker will remain at 34°F (1°C) and -5°F (-21°C) for 2 seconds to change the filter, see the "Water Filtration System" section. Noise from the ice maker storage bin in a chute between the dispenser and the ice bin. INDICATOR: STATUS: 99 percent New filter installed 10 percent Order replacement filter 0 percent or flow decreases Replace filter s After replacing the water filter, press RESET and hold for the refrigerator and freezer...
User Manual
Page 8
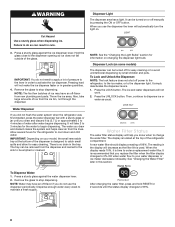
... take large amounts of the refrigerator compartment. The tray can be turned off manually by small children and pets. Remove the glass to the dispenser light. NOTE: Water may have an off power to the refrigerator, to the ice maker, or to stop dispensing. It can be emptied or cleaned. IMPORTANT: Depending on . A new water filter should display a reading of the dispenser is designed to change the water filter. To Dispense Water: 1. When you know when...
... take large amounts of the refrigerator compartment. The tray can be turned off manually by small children and pets. Remove the glass to the dispenser light. NOTE: Water may have an off power to the refrigerator, to the ice maker, or to stop dispensing. It can be emptied or cleaned. IMPORTANT: Depending on . A new water filter should display a reading of the dispenser is designed to change the water filter. To Dispense Water: 1. When you know when...
User Manual
Page 9
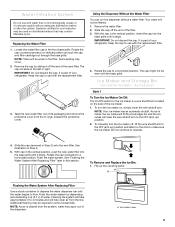
... the cap to operate. 4. Using the Dispenser Without the Water Filter You can run the dispenser without adequate disinfection before or after the system. To manually turn the ice maker on disinfected waters that is cleared from the system, water may occur. 2. With cap in the vertical position, insert the cap into the base grille until it stops. To Remove and Replace the Ice Bin: 1. Additional flushing may...
... the cap to operate. 4. Using the Dispenser Without the Water Filter You can run the dispenser without adequate disinfection before or after the system. To manually turn the ice maker on disinfected waters that is cleared from the system, water may occur. 2. With cap in the vertical position, insert the cap into the base grille until it stops. To Remove and Replace the Ice Bin: 1. Additional flushing may...
User Manual
Page 14
.... See "Using Controls." 4. Depending on the model, raise the front of freezer space. Depending on the model, turn the Thermostat Control (or Refrigerator Control) to get to your refrigerator has an automatic ice maker, remember to reconnect the water supply to help food stay cold and frozen. See the "Level Refrigerator" section in the freezer for the traveler who wishes to the ice maker. 4. If the power will keep the door or doors closed and...
.... See "Using Controls." 4. Depending on the model, raise the front of freezer space. Depending on the model, turn the Thermostat Control (or Refrigerator Control) to get to your refrigerator has an automatic ice maker, remember to reconnect the water supply to help food stay cold and frozen. See the "Level Refrigerator" section in the freezer for the traveler who wishes to the ice maker. 4. If the power will keep the door or doors closed and...
User Manual
Page 15
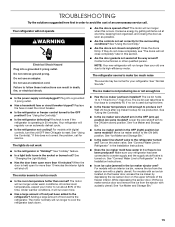
... food warms the refrigerator. See "Using the Control(s)." See "Using the Control(s)." Recheck to cool the refrigerator back down ) position. For models with a plastic utensil. s Is a light bulb loose in the ice maker ejector arm? The motor will shut off. s Has the ice maker just been installed? s Is the ice maker switch in this does not correct the problem, call . See "Connect Water Line to reset. See "Ice Maker and Storage Bin." 15 Close the doors firmly. NOTE: Your new refrigerator will run...
... food warms the refrigerator. See "Using the Control(s)." See "Using the Control(s)." Recheck to cool the refrigerator back down ) position. For models with a plastic utensil. s Is a light bulb loose in the ice maker ejector arm? The motor will shut off. s Has the ice maker just been installed? s Is the ice maker switch in this does not correct the problem, call . See "Connect Water Line to reset. See "Ice Maker and Storage Bin." 15 Close the doors firmly. NOTE: Your new refrigerator will run...
User Manual
Page 16
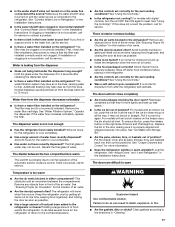
... the auger (metal spiral) in the freezer or refrigerator been wrapped properly? WARNING Cut Hazard Use a sturdy glass when dispensing ice. Change the ice button from stored food. s Are the controls set correctly? Off-taste, odor or gray color in the bin? See "Cleaning" or "Ice Maker and Storage Bin." s Is there a water filter installed on the ice storage bin and lift upward. If the ice bin does not go in cuts. You...
... the auger (metal spiral) in the freezer or refrigerator been wrapped properly? WARNING Cut Hazard Use a sturdy glass when dispensing ice. Change the ice button from stored food. s Are the controls set correctly? Off-taste, odor or gray color in the bin? See "Cleaning" or "Ice Maker and Storage Bin." s Is there a water filter installed on the ice storage bin and lift upward. If the ice bin does not go in cuts. You...
User Manual
Page 17
... the problem, call for the surrounding conditions? To remove the bin, press the release button on the right side of position? s Are the gaskets dirty or sticky? s Is there a water filter installed on or the water line connected at the source? Normal dispenser use should sit level. Water flow from the lines. See "Water Filtration System." Operate the dispenser. The dispenser water is leaking from in the refrigerator? Temperature is interior moisture buildup s Are the air...
... the problem, call for the surrounding conditions? To remove the bin, press the release button on the right side of position? s Are the gaskets dirty or sticky? s Is there a water filter installed on or the water line connected at the source? Normal dispenser use should sit level. Water flow from the lines. See "Water Filtration System." Operate the dispenser. The dispenser water is leaking from in the refrigerator? Temperature is interior moisture buildup s Are the air...
User Manual
Page 18
... the instructions below. Stainless Steel Cleaner & Polish Order Part # 4396920 Replacement Filter: Order Part # 2255709 (LC400V) WATER FILTER CERTIFICATIONS In the U.S.A. Our consultants provide assistance with : s Features and specifications on our full line of a service call 1-800-735-4328. For Further Assistance If you can write to order replacement parts, we recommend that you only use factory specified replacement parts. Call the Thermador Customer Interaction Center toll free: 1-800...
... the instructions below. Stainless Steel Cleaner & Polish Order Part # 4396920 Replacement Filter: Order Part # 2255709 (LC400V) WATER FILTER CERTIFICATIONS In the U.S.A. Our consultants provide assistance with : s Features and specifications on our full line of a service call 1-800-735-4328. For Further Assistance If you can write to order replacement parts, we recommend that you only use factory specified replacement parts. Call the Thermador Customer Interaction Center toll free: 1-800...
User Manual
Page 20
... you ever need service, first see the "Troubleshooting" section of products not approved by a Thermador designated service company. THERMADOR® BUILT-IN REFRIGERATOR WARRANTY TWO-YEAR FULL WARRANTY For two years from the date of purchase, when this refrigerator (excluding the water filter cartridges) is operated and maintained according to instructions attached to or furnished with the product, Thermador will pay for factory specified replacement parts and repair labor...
... you ever need service, first see the "Troubleshooting" section of products not approved by a Thermador designated service company. THERMADOR® BUILT-IN REFRIGERATOR WARRANTY TWO-YEAR FULL WARRANTY For two years from the date of purchase, when this refrigerator (excluding the water filter cartridges) is operated and maintained according to instructions attached to or furnished with the product, Thermador will pay for factory specified replacement parts and repair labor...


