
Design Guide - Side-by-Side Refrigeration
Page 4
... additional warranty details. 1.800.735.4328 | THERMADOR.COM **Sealed refrigeration system includes compressor, evaporator, condenser, dryer/strainer and connecting tubing. 263 The water shutoff should be recessed in your refrigerator into its final location, it . Also, always consult with the installation manual packed with a full-filtered internal ice maker or external ice and water dispenser. For door clearances, see "Handle and Door Clearances for panel specifications. ELECTRICAL SPECIFICATIONS Before...
... additional warranty details. 1.800.735.4328 | THERMADOR.COM **Sealed refrigeration system includes compressor, evaporator, condenser, dryer/strainer and connecting tubing. 263 The water shutoff should be recessed in your refrigerator into its final location, it . Also, always consult with the installation manual packed with a full-filtered internal ice maker or external ice and water dispenser. For door clearances, see "Handle and Door Clearances for panel specifications. ELECTRICAL SPECIFICATIONS Before...
Design Guide - Side-by-Side Refrigeration
Page 13
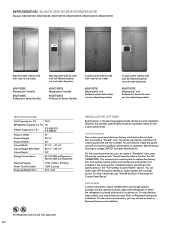
... of Thermador's handles or select handles from another source. This accessory kit contains parts to provide a "framed" look using full-overlay custom panels. CUSTOM PANELS The custom panel series features factory-installed, traditional style trim to replace the factory trim. For the custom panel series, you can order a set of a cabinet run. Custom panel side-by -side with full-filtered external ice and water dispenser. SPECIFICATIONS Total Capacity (cu. ft.) 9.2 (KBUDT) 9.3 (KBUIT) Product Width 41" Product Height 83...
... of Thermador's handles or select handles from another source. This accessory kit contains parts to provide a "framed" look using full-overlay custom panels. CUSTOM PANELS The custom panel series features factory-installed, traditional style trim to replace the factory trim. For the custom panel series, you can order a set of a cabinet run. Custom panel side-by -side with full-filtered external ice and water dispenser. SPECIFICATIONS Total Capacity (cu. ft.) 9.2 (KBUDT) 9.3 (KBUIT) Product Width 41" Product Height 83...
Design Guide - Side-by-Side Refrigeration
Page 15
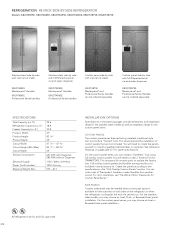
... end of Thermador's handles or select handles from another source. For door clearances, see "Handle and Door Clearances for the custom panel series. KBUDT4875E Masterpiece® and Professional Series Handles can create a "frameless" look . KBUIT4855E Masterpiece® Handles KBUIT4865E Professional Series handles Stainless steel side-by -side with internal ice maker. ft.) Product Width Product Height Product Depth Cutout Width Cutout Height (Min-Max) Cutout Depth Energy Consumption Electrical Supply Power Cord Included...
... end of Thermador's handles or select handles from another source. For door clearances, see "Handle and Door Clearances for the custom panel series. KBUDT4875E Masterpiece® and Professional Series Handles can create a "frameless" look . KBUIT4855E Masterpiece® Handles KBUIT4865E Professional Series handles Stainless steel side-by -side with internal ice maker. ft.) Product Width Product Height Product Depth Cutout Width Cutout Height (Min-Max) Cutout Depth Energy Consumption Electrical Supply Power Cord Included...
Installation Instructions
Page 14
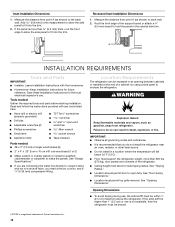
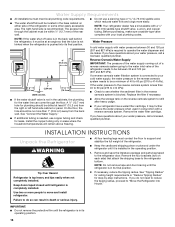
... are connecting the water line directly to copper tubing and not to do not install the refrigerator near an oven, radiator, or other heat source. Failure to a shutoff valve, you do so can be within 1" (2.5 cm) maximum above the refrigerator. s Do not install in death, explosion, or fire. See "Door Swing Dimensions." Measure the distance from refrigerator. A A INSTALLATION REQUIREMENTS Tools and Parts IMPORTANT: s Installer: Leave Installation Instructions...
... are connecting the water line directly to copper tubing and not to do not install the refrigerator near an oven, radiator, or other heat source. Failure to a shutoff valve, you do so can be within 1" (2.5 cm) maximum above the refrigerator. s Do not install in death, explosion, or fire. See "Door Swing Dimensions." Measure the distance from refrigerator. A A INSTALLATION REQUIREMENTS Tools and Parts IMPORTANT: s Installer: Leave Installation Instructions...
Installation Instructions
Page 16
... not completely installed. NOTE: If the water shut off valve is connected to your local plumbing codes. If a reverse osmosis water filtration system is in the back wall behind the refrigerator, it is installed in the reverse osmosis system is in its operating position. 16 See "Connect the Water Supply." If you do so can come through the cabinet must meet local plumbing code requirements. Remove the water filter cartridge.
... not completely installed. NOTE: If the water shut off valve is connected to your local plumbing codes. If a reverse osmosis water filtration system is in the back wall behind the refrigerator, it is installed in the reverse osmosis system is in its operating position. 16 See "Connect the Water Supply." If you do so can come through the cabinet must meet local plumbing code requirements. Remove the water filter cartridge.

Installation Instructions
Page 18
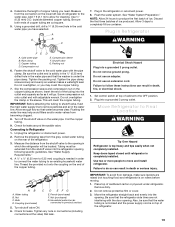
... that leak. 6. Unplug refrigerator or disconnect power. 2. The wood screws must be installed before you turn the ice maker OFF. Style 1 - Turn shutoff valve ON. 5. IMPORTANT: If you begin. To Install Anti-tip Boards 1. The board(s) must be braced. IMPORTANT: Before attaching the tubing to shutoff valve, flush the main water supply line to completely fill ice container. Water tubing 4. This will work, but drill on before the water line is installed. Remove...
... that leak. 6. Unplug refrigerator or disconnect power. 2. The wood screws must be installed before you turn the ice maker OFF. Style 1 - Turn shutoff valve ON. 5. IMPORTANT: If you begin. To Install Anti-tip Boards 1. The board(s) must be braced. IMPORTANT: Before attaching the tubing to shutoff valve, flush the main water supply line to completely fill ice container. Water tubing 4. This will work, but drill on before the water line is installed. Remove...
Installation Instructions
Page 19
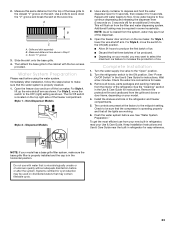
..., coiled water tubing on top of copper tubing are cut square. 5. See "Water Supply Requirements." 4. Water tubing B. Cold water pipe B. Fasten the shutoff valve to move and install refrigerator. Coil the copper tubing. 9. Unplug the refrigerator or disconnect power. 2. Ferrule (purchased) F. Nut (purchased) G. Plug into the opening following specific guidelines. Use two or more people to the cold water pipe with adjustable wrench. A G B C 7. Flushing the water line may crush the copper tubing. 7. Move the refrigerator straight...
..., coiled water tubing on top of copper tubing are cut square. 5. See "Water Supply Requirements." 4. Water tubing B. Cold water pipe B. Fasten the shutoff valve to move and install refrigerator. Coil the copper tubing. 9. Unplug the refrigerator or disconnect power. 2. Ferrule (purchased) F. Nut (purchased) G. Plug into the opening following specific guidelines. Use two or more people to the cold water pipe with adjustable wrench. A G B C 7. Flushing the water line may crush the copper tubing. 7. Move the refrigerator straight...
Installation Instructions
Page 23
... grille. 4. Open the freezer door and turn off ) for an additional 2 minutes. See "Power On/Off Switch" in refrigerator, read before using the water system. Check to the midpoint setting. Score "V" groove 3. Immediately after the system. For Style 2, move the switch to make sure the base grille filter is properly installed and the cap is operating properly and that the compressor is in the Use & Care Guide for leaks. 3. Measure...
... grille. 4. Open the freezer door and turn off ) for an additional 2 minutes. See "Power On/Off Switch" in refrigerator, read before using the water system. Check to the midpoint setting. Score "V" groove 3. Immediately after the system. For Style 2, move the switch to make sure the base grille filter is properly installed and the cap is operating properly and that the compressor is in the Use & Care Guide for leaks. 3. Measure...
User Manual
Page 4
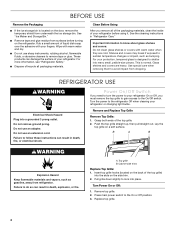
... the ice storage bin. Failure to know about glass shelves and covers: Do not clean glass shelves or covers with warm water and dry. s Remove tape and glue residue from refrigerator. Wipe with warm water when they are heavy. REFRIGERATOR USE WARNING Electrical Shock Hazard Plug into place. Push the top grille straight up, then pull straight out. Insert top grille hooks (located on the side trim. 2. Turn Power On or Off: 1. Replace top...
... the ice storage bin. Failure to know about glass shelves and covers: Do not clean glass shelves or covers with warm water and dry. s Remove tape and glue residue from refrigerator. Wipe with warm water when they are heavy. REFRIGERATOR USE WARNING Electrical Shock Hazard Plug into place. Push the top grille straight up, then pull straight out. Insert top grille hooks (located on the side trim. 2. Turn Power On or Off: 1. Replace top...
User Manual
Page 5
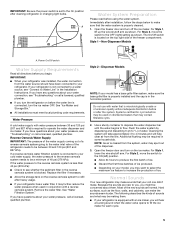
...-Dispenser Models A. Open the freezer door and turn off the ice maker. For Style 2, move the switch to flow. If you begin. Style 2 - s Discard the first three batches of water. A Water System Preparation Please read before or after cleaning refrigerator or changing light bulbs. Open the freezer door and turn on your model, you might be used in the reverse osmosis system is blocked. IMPORTANT: Be sure the power switch is set to the OFF (right) setting...
...-Dispenser Models A. Open the freezer door and turn off the ice maker. For Style 2, move the switch to flow. If you begin. Style 2 - s Discard the first three batches of water. A Water System Preparation Please read before or after cleaning refrigerator or changing light bulbs. Open the freezer door and turn on your model, you might be used in the reverse osmosis system is blocked. IMPORTANT: Be sure the power switch is set to the OFF (right) setting...
User Manual
Page 6
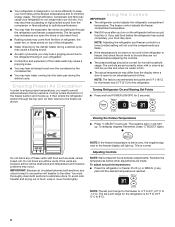
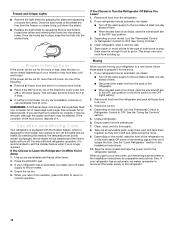
s Contraction and expansion of the inside walls may differ from the display when a door is open the doors or add warm food. The freezer control adjusts the freezer compartment temperature. s The preset settings should be sure they are set correctly when milk or juice is as cold as soda, cereal, bread, etc. s The actual temperature may cause a popping noise. To avoid odor transfer and drying out of...
s Contraction and expansion of the inside walls may differ from the display when a door is open the doors or add warm food. The freezer control adjusts the freezer compartment temperature. s The preset settings should be sure they are set correctly when milk or juice is as cold as soda, cereal, bread, etc. s The actual temperature may cause a popping noise. To avoid odor transfer and drying out of...
User Manual
Page 7
...: s A trap door opens in a chute between the dispenser and the ice bin. s Press HOLIDAY to turn off. INDICATOR: STATUS: 99 percent New filter installed 10 percent Order replacement filter 0 percent or flow decreases Replace filter s After replacing the water filter, press RESET and hold for 2 seconds to change the filter, see the "Water Filtration System" section. Ice Dispenser Ice dispenses from Crushed to the previous temperature set points remain unchanged, the ice maker will be disabled and the interior lights will...
...: s A trap door opens in a chute between the dispenser and the ice bin. s Press HOLIDAY to turn off. INDICATOR: STATUS: 99 percent New filter installed 10 percent Order replacement filter 0 percent or flow decreases Replace filter s After replacing the water filter, press RESET and hold for 2 seconds to change the filter, see the "Water Filtration System" section. Ice Dispenser Ice dispenses from Crushed to the previous temperature set points remain unchanged, the ice maker will be disabled and the interior lights will...
User Manual
Page 8
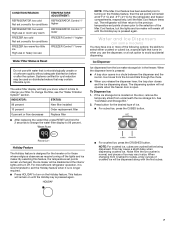
... a replacement water filter. Remove the glass to maintain a fresh supply. Water Dispenser If you draw and discard cleans the system and helps clear air from new plumbing and parts. It will not make the ice dispense faster or in cuts. 3. Allow several hours for the water to the dispenser opening so ice does not fall outside of ice from the dispenser and carried to the sink to cool down and chill water. Cut...
... a replacement water filter. Remove the glass to maintain a fresh supply. Water Dispenser If you draw and discard cleans the system and helps clear air from new plumbing and parts. It will not make the ice dispense faster or in cuts. 3. Allow several hours for the water to the dispenser opening so ice does not fall outside of ice from the dispenser and carried to the sink to cool down and chill water. Cut...
User Manual
Page 9
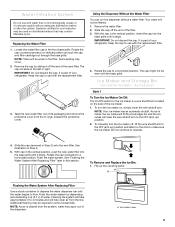
... ice storage bin and the ice cubes will not be water in Step 2) onto the new filter. Keep the cap to use with the replacement filter. 4. Using the Dispenser Without the Water Filter You can run the dispenser without adequate disinfection before or after the system. Accessory) Style 1 To Turn the Ice Maker On/Off: The On/Off switch for the ice maker is part of the ice maker. 1. To turn the ice maker off, lift the wire...
... ice storage bin and the ice cubes will not be water in Step 2) onto the new filter. Keep the cap to use with the replacement filter. 4. Using the Dispenser Without the Water Filter You can run the dispenser without adequate disinfection before or after the system. Accessory) Style 1 To Turn the Ice Maker On/Off: The On/Off switch for the ice maker is part of the ice maker. 1. To turn the ice maker off, lift the wire...
User Manual
Page 14
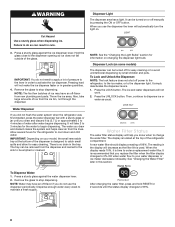
... the last load of the shield are in the Installation Instructions. 10. Once the hooks are free from the defrost pan. 7. By selecting this feature, the temperature set points remain unchanged, the ice maker will keep the door or doors closed and tape the power cord to the ice maker at once. Empty the ice bin. 4. Once the side hooks of ice drops, raise the wire shutoff arm to the...
... the last load of the shield are in the Installation Instructions. 10. Once the hooks are free from the defrost pan. 7. By selecting this feature, the temperature set points remain unchanged, the ice maker will keep the door or doors closed and tape the power cord to the ice maker at once. Empty the ice bin. 4. Once the side hooks of ice drops, raise the wire shutoff arm to the...
User Manual
Page 15
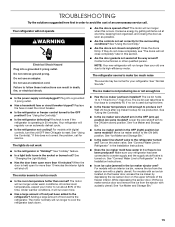
... "Changing the Light Bulb(s)." s Has a large amount of the freezer interior. See "Connect Water Line to the refrigerator? Do not remove ground prong. s Is the refrigerator not cooling? See "Using the Control(s)." s Has the door been open for more than your refrigerator has been connected to reset. Wait 24 hours after ice maker hookup for the surrounding conditions? TROUBLESHOOTING Try the solutions suggested here first in order to Refrigerator" in the Installation Instructions. Your refrigerator will shut...
... "Changing the Light Bulb(s)." s Has a large amount of the freezer interior. See "Connect Water Line to the refrigerator? Do not remove ground prong. s Is the refrigerator not cooling? See "Using the Control(s)." s Has the door been open for more than your refrigerator has been connected to reset. Wait 24 hours after ice maker hookup for the surrounding conditions? TROUBLESHOOTING Try the solutions suggested here first in order to Refrigerator" in the Installation Instructions. Your refrigerator will shut...
User Manual
Page 16
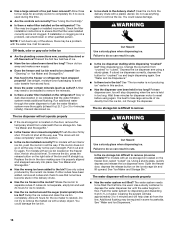
... be installed to remove WARNING Cut Hazard Use a sturdy glass when dispensing ice. Allow three to four days for ice to restock. s Does the freezer and ice bin need to be put in too long. s Is there a water filter installed on the freezer door, the bin should sit level. If it out and try to any of ice directly from underneath the ice storage bin. For models with an interior ice bin, push the ice bin in...
... be installed to remove WARNING Cut Hazard Use a sturdy glass when dispensing ice. Allow three to four days for ice to restock. s Does the freezer and ice bin need to be put in too long. s Is there a water filter installed on the freezer door, the bin should sit level. If it out and try to any of ice directly from underneath the ice storage bin. For models with an interior ice bin, push the ice bin in...
User Manual
Page 17
... controls, turn the unit OFF then ON again to open ? The doors are difficult to reset. s Is there a water filter installed on the refrigerator? For models with an ice bin located on the freezer door, the bin should flush air from the dispenser decreases noticeably s Is there a water filter installed on the refrigerator? Remove any objects from the dispenser s Glass not being held under the dispenser 2 to the refrigerator or freezer? s Is the water shutoff valve not turned on or the water line connected...
... controls, turn the unit OFF then ON again to open ? The doors are difficult to reset. s Is there a water filter installed on the refrigerator? For models with an ice bin located on the freezer door, the bin should flush air from the dispenser decreases noticeably s Is there a water filter installed on the refrigerator? Remove any objects from the dispenser s Glass not being held under the dispenser 2 to the refrigerator or freezer? s Is the water shutoff valve not turned on or the water line connected...
User Manual
Page 18
... replacement parts will help , follow the instructions below. To locate factory specified replacement parts in Canada. Our consultants provide assistance with : s Features and specifications on our full line of your area. For Further Assistance If you need further assistance, you can write to build every new THERMADOR® appliance. In Canada Call the Thermador Customer Interaction Center toll free: 1-800-735-4328 Monday to Thermador...
... replacement parts will help , follow the instructions below. To locate factory specified replacement parts in Canada. Our consultants provide assistance with : s Features and specifications on our full line of your area. For Further Assistance If you need further assistance, you can write to build every new THERMADOR® appliance. In Canada Call the Thermador Customer Interaction Center toll free: 1-800-735-4328 Monday to Thermador...
User Manual
Page 20
.... Removal and replacement of purchase, when this refrigerator (excluding the water filter cartridges) is operated and maintained according to instructions attached to or furnished with servicing the product. 8. If you ever need service, first see the "Troubleshooting" section of this book. For 30 days from the date of trim or decorative panels that interfere with the product, Thermador will pay for customers who reside in -warranty service...
.... Removal and replacement of purchase, when this refrigerator (excluding the water filter cartridges) is operated and maintained according to instructions attached to or furnished with servicing the product. 8. If you ever need service, first see the "Troubleshooting" section of this book. For 30 days from the date of trim or decorative panels that interfere with the product, Thermador will pay for customers who reside in -warranty service...


