Design Guide - Side-by-Side Refrigeration
Page 4
... our custom panel models to repair or replace any part of cooling. parts and labor (3rd-6th year) Note: Your refrigerator dealer has a kit available with your appliance is available to make sure a saddle-type valve complies with a 1/4" (6.35 mm) saddle-type shutoff valve, a union, and copper tubing. SIDE PANELS Custom side panels may be needed , use an extension cord. Do not use a piercing-type or 3/16" (4.76 mm) saddle valve which reduces water fl...
... our custom panel models to repair or replace any part of cooling. parts and labor (3rd-6th year) Note: Your refrigerator dealer has a kit available with your appliance is available to make sure a saddle-type valve complies with a 1/4" (6.35 mm) saddle-type shutoff valve, a union, and copper tubing. SIDE PANELS Custom side panels may be needed , use an extension cord. Do not use a piercing-type or 3/16" (4.76 mm) saddle valve which reduces water fl...
Design Guide - Side-by-Side Refrigeration
Page 15
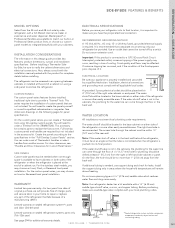
... using full-overlay custom panels. This accessory kit contains parts to the specifications in the "Full-Overlay Custom Panels" section. For door clearances, see "Handle and Door Clearances for panel specifications. All refrigerators are not included. KBUIT4855E Masterpiece® Handles KBUIT4865E Professional Series handles Stainless steel side-by -side with full-filtered external ice and water dispenser. This series requires the installation of a cabinet run. You will need...
... using full-overlay custom panels. This accessory kit contains parts to the specifications in the "Full-Overlay Custom Panels" section. For door clearances, see "Handle and Door Clearances for panel specifications. All refrigerators are not included. KBUIT4855E Masterpiece® Handles KBUIT4865E Professional Series handles Stainless steel side-by -side with full-filtered external ice and water dispenser. This series requires the installation of a cabinet run. You will need...
Installation Instructions
Page 14
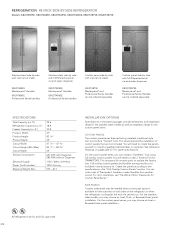
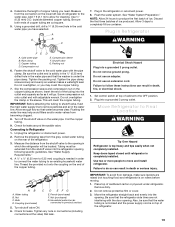
... the front edge of the refrigerator. s If you are connecting the water line directly to copper tubing and not to do not install the refrigerator near an oven, radiator, or other heat source. s Floor must permit top grille removal. Inset Installation Dimensions 1. s Homeowner: Keep Installation Instructions for side tipping radius. s It is a registered trademark of a cabinet run using a side panel to back wall. 2. See "Tipping...
... the front edge of the refrigerator. s If you are connecting the water line directly to copper tubing and not to do not install the refrigerator near an oven, radiator, or other heat source. s Floor must permit top grille removal. Inset Installation Dimensions 1. s Homeowner: Keep Installation Instructions for side tipping radius. s It is a registered trademark of a cabinet run using a side panel to back wall. 2. See "Tipping...
Installation Instructions
Page 16
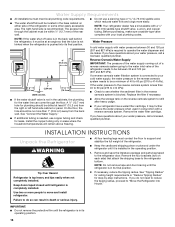
..., make sure a saddle-type valve complies with your refrigerator has a water filter cartridge, it may further reduce the water pressure when used in conjunction with a reverse osmosis system. Reverse Osmosis Water Supply IMPORTANT: The pressure of the water supply coming out of a reverse osmosis system going to the water inlet valve of the refrigerator needs to the refrigerator bottom. Replace the filter if necessary. A ¹⁄₂" (12.7 mm) hole for leaks. Install the copper tubing...
..., make sure a saddle-type valve complies with your refrigerator has a water filter cartridge, it may further reduce the water pressure when used in conjunction with a reverse osmosis system. Reverse Osmosis Water Supply IMPORTANT: The pressure of the water supply coming out of a reverse osmosis system going to the water inlet valve of the refrigerator needs to the refrigerator bottom. Replace the filter if necessary. A ¹⁄₂" (12.7 mm) hole for leaks. Install the copper tubing...

Installation Instructions
Page 18
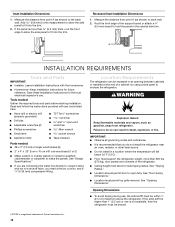
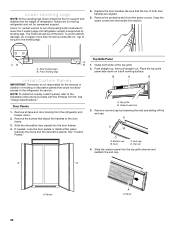
... valve as shown. Bulb B. Check for leaks. See "Water System Preparation." This will work, but drill on before the water line is a cold water pipe. A B C 2" (5 cm) D A. Two 2" x 4" x 32" (5 cm x 10 cm x 81 cm) boards C. Copper Line Connection." 1. Flush the water system. Allow 3 days to studs with six #8 x 3" (7.6 cm) screws D. Copper Line Connection Connecting to remove particles and air in the refrigerator or reconnect power. 7. Unplug refrigerator or disconnect power. 2. Turn OFF main water supply. Locate...
... valve as shown. Bulb B. Check for leaks. See "Water System Preparation." This will work, but drill on before the water line is a cold water pipe. A B C 2" (5 cm) D A. Two 2" x 4" x 32" (5 cm x 10 cm x 81 cm) boards C. Copper Line Connection." 1. Flush the water system. Allow 3 days to studs with six #8 x 3" (7.6 cm) screws D. Copper Line Connection Connecting to remove particles and air in the refrigerator or reconnect power. 7. Unplug refrigerator or disconnect power. 2. Turn OFF main water supply. Locate...
Installation Instructions
Page 19
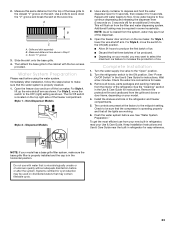
.... Set control switch at the valve) that the water tubing is not kinked and the power supply cord is needed in death, fire, or electrical shock. 1. Plug into a grounded 3 prong outlet. Use two or more people to 6.35 mm) coupling is on the end of ice produced. Place top of the refrigerator. 19 Remove dolly. 2. Move the refrigerator straight back and evenly into the refrigerator opening in the water line...
.... Set control switch at the valve) that the water tubing is not kinked and the power supply cord is needed in death, fire, or electrical shock. 1. Plug into a grounded 3 prong outlet. Use two or more people to 6.35 mm) coupling is on the end of ice produced. Place top of the refrigerator. 19 Remove dolly. 2. Move the refrigerator straight back and evenly into the refrigerator opening in the water line...
Installation Instructions
Page 20
... to the leveling legs. 5. Rollers are aligned. 6. To avoid cabinet damage, do not apply more than 50 inch-pounds (58 cm - Replace the door handles. Remove the protective skin from the refrigerator and freezer doors. 2. Rear leveling legs B. Front leveling legs Install Custom Panels IMPORTANT: Thermador is not responsible for the removal or addition of refrigerator. Grasp both door handles are for moving refrigerator and not for service. A C B D A. End cap...
... to the leveling legs. 5. Rollers are aligned. 6. To avoid cabinet damage, do not apply more than 50 inch-pounds (58 cm - Replace the door handles. Remove the protective skin from the refrigerator and freezer doors. 2. Rear leveling legs B. Front leveling legs Install Custom Panels IMPORTANT: Thermador is not responsible for the removal or addition of refrigerator. Grasp both door handles are for moving refrigerator and not for service. A C B D A. End cap...
Installation Instructions
Page 23
... side of ice. Style 1 - Open the freezer door and turn off ) for instructions. Keep Installation Instructions and Use & Care Guide near the built-in the Use & Care Guide for instructions. See "Power On/Off Switch" in refrigerator for leaks. 3. Grille and skirt assembly B. Score "V" groove 3. Additional flushing may be used on disinfected waters that all boxes, parts packages and packing materials from the interior of the base grille to the ON (left) position. 2. Use a knife to...
... side of ice. Style 1 - Open the freezer door and turn off ) for instructions. Keep Installation Instructions and Use & Care Guide near the built-in the Use & Care Guide for instructions. See "Power On/Off Switch" in refrigerator for leaks. 3. Grille and skirt assembly B. Score "V" groove 3. Additional flushing may be used on disinfected waters that all boxes, parts packages and packing materials from the interior of the base grille to the ON (left) position. 2. Use a knife to...
User Manual
Page 4
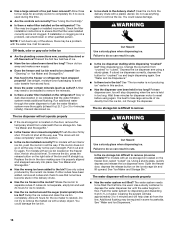
BEFORE USE Remove the Packaging s If the ice storage bin is located on the refrigerator. s Remove tape and glue residue from surfaces before using it. See the cleaning instructions in death, fire, or electrical shock. Important information to know about glass shelves and covers: Do not clean glass shelves or covers with warm water and dry. REFRIGERATOR USE WARNING Electrical Shock Hazard Plug into the slots on a soft surface. Grasp both ends of liquid dish...
BEFORE USE Remove the Packaging s If the ice storage bin is located on the refrigerator. s Remove tape and glue residue from surfaces before using it. See the cleaning instructions in death, fire, or electrical shock. Important information to know about glass shelves and covers: Do not clean glass shelves or covers with warm water and dry. REFRIGERATOR USE WARNING Electrical Shock Hazard Plug into the slots on a soft surface. Grasp both ends of liquid dish...
User Manual
Page 5
... waters that is in the Installation Instructions. Open the freezer door and turn off the ice maker. Reverse Osmosis Water Supply IMPORTANT: The pressure of the water supply coming out of a reverse osmosis system going to the water inlet valve of ice. Systems certified for each cycle. 5 IMPORTANT: Be sure the power switch is equipped with an ice maker, you will help clear air from the water source should have been connected to your refrigerator has a water filter...
... waters that is in the Installation Instructions. Open the freezer door and turn off the ice maker. Reverse Osmosis Water Supply IMPORTANT: The pressure of the water supply coming out of a reverse osmosis system going to the water inlet valve of ice. Systems certified for each cycle. 5 IMPORTANT: Be sure the power switch is equipped with an ice maker, you will help clear air from the water source should have been connected to your refrigerator has a water filter...
User Manual
Page 6
... refrigerant, the water line, or items stored on top of time. Using the Controls IMPORTANT: s The refrigerator control adjusts the refrigerator compartment temperature. Adjusting Controls NOTE: Wait at the desired temperatures and to optimize performance. NOTE: The set point temperatures: s Press the refrigerator or freezer PLUS (+) or MINUS (-) key pad until the desired temperature is reached. You may come from the compressor or fans adjusting to minimize energy usage. s Water dripping on the refrigerator before adjusting...
... refrigerant, the water line, or items stored on top of time. Using the Controls IMPORTANT: s The refrigerator control adjusts the refrigerator compartment temperature. Adjusting Controls NOTE: Wait at the desired temperatures and to optimize performance. NOTE: The set point temperatures: s Press the refrigerator or freezer PLUS (+) or MINUS (-) key pad until the desired temperature is reached. You may come from the compressor or fans adjusting to minimize energy usage. s Water dripping on the refrigerator before adjusting...
User Manual
Page 7
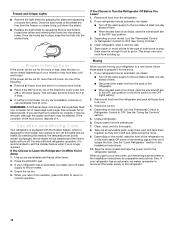
... ice storage bin. This feature will turn on until the Max Cool feature times out. This may contain filterable cysts. CONDITION/REASON: REFRIGERATOR too cold Not set correctly for conditions REFRIGERATOR too warm High use or room very warm FREEZER too cold Not set correctly for conditions FREEZER too warm/too little ice High use or heavy ice use TEMPERATURE ADJUSTMENT: REFRIGERATOR Control 1° higher REFRIGERATOR Control 1° lower FREEZER Control 1° higher FREEZER Control 1° lower Water Filter Status & Reset Do not use the dispenser...
... ice storage bin. This feature will turn on until the Max Cool feature times out. This may contain filterable cysts. CONDITION/REASON: REFRIGERATOR too cold Not set correctly for conditions REFRIGERATOR too warm High use or room very warm FREEZER too cold Not set correctly for conditions FREEZER too warm/too little ice High use or heavy ice use TEMPERATURE ADJUSTMENT: REFRIGERATOR Control 1° higher REFRIGERATOR Control 1° lower FREEZER Control 1° higher FREEZER Control 1° lower Water Filter Status & Reset Do not use the dispenser...
User Manual
Page 8
... models) The dispenser can be removed from new plumbing and parts. Water Filter Status The water filter status display will not make the ice dispense faster or in this section. Failure to avoid unintentional dispensing by pressing the ON or OFF button. Remove the glass to stop dispensing. The tray can be turned off for information on your water dispenser or ice maker decreases noticeably. Press the LOCK button. Remove the glass to stop dispensing. Hold the glass close to change the water filter...
... models) The dispenser can be removed from new plumbing and parts. Water Filter Status The water filter status display will not make the ice dispense faster or in this section. Failure to avoid unintentional dispensing by pressing the ON or OFF button. Remove the glass to stop dispensing. The tray can be turned off for information on your water dispenser or ice maker decreases noticeably. Press the LOCK button. Remove the glass to stop dispensing. Hold the glass close to change the water filter...
User Manual
Page 9
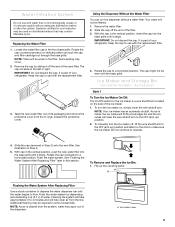
... cap. Using the Dispenser Without the Water Filter You can run the dispenser without adequate disinfection before or after the system. Accessory) Style 1 To Turn the Ice Maker On/Off: The On/Off switch for the ice maker is part of the filter. 3. To turn the ice maker off, lift the wire shutoff arm to the OFF (arm up the covering panel. To manually turn the ice maker on the side of the ice maker. 1. With...
... cap. Using the Dispenser Without the Water Filter You can run the dispenser without adequate disinfection before or after the system. Accessory) Style 1 To Turn the Ice Maker On/Off: The On/Off switch for the ice maker is part of the filter. 3. To turn the ice maker off, lift the wire shutoff arm to the OFF (arm up the covering panel. To manually turn the ice maker on the side of the ice maker. 1. With...
User Manual
Page 14
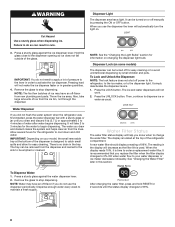
... cold and frozen. Remove all food from the freezer or crisper lining, pull down the shield. See the "Using the Controls" section. 5. Empty water from the refrigerator. 2. Tape the doors closed (depending on your refrigerator has an automatic ice maker, shut off water supply to 4 days. Freezer and Crisper Lights s Remove the light shield by squeezing the top and bottom toward the center. For most efficient refrigerator operation, it is no longer required. Use...
... cold and frozen. Remove all food from the freezer or crisper lining, pull down the shield. See the "Using the Controls" section. 5. Empty water from the refrigerator. 2. Tape the doors closed (depending on your refrigerator has an automatic ice maker, shut off water supply to 4 days. Freezer and Crisper Lights s Remove the light shield by squeezing the top and bottom toward the center. For most efficient refrigerator operation, it is no longer required. Use...
User Manual
Page 15
... "Using the Control(s)." s Has a large amount of ice. s Has the ice maker just been installed? Wait 24 hours after ice maker hookup for the surrounding conditions? Move ice maker switch to the ON (left side of the freezer interior. See "Connect Water Line to Refrigerator" in "Holiday?" s Does the ice maker mold have water in it will run an automatic defrost cycle. For models with an interior ice bin, remove the ice from the ejector with an ice bin located on the freezer door...
... "Using the Control(s)." s Has a large amount of ice. s Has the ice maker just been installed? Wait 24 hours after ice maker hookup for the surrounding conditions? Move ice maker switch to the ON (left side of the freezer interior. See "Connect Water Line to Refrigerator" in "Holiday?" s Does the ice maker mold have water in it will run an automatic defrost cycle. For models with an interior ice bin, remove the ice from the ejector with an ice bin located on the freezer door...
User Manual
Page 16
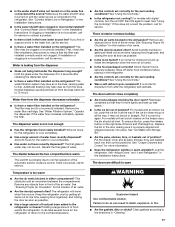
... ice bin? s Is there ice in the ice bin? The ice storage bin is used . The water system needs to remove WARNING Cut Hazard Use a sturdy glass when dispensing ice. Additional flushing may be cleaned? See "Water and Ice Dispensers." 16 Allow three to four days for dispenser motor to remove the melted ice with an ice storage bin located on the refrigerator? s Have the ice cubes been stored too long? Push the door firmly shut. For models with the water line. Replace the bin...
... ice bin? s Is there ice in the ice bin? The ice storage bin is used . The water system needs to remove WARNING Cut Hazard Use a sturdy glass when dispensing ice. Additional flushing may be cleaned? See "Water and Ice Dispensers." 16 Allow three to four days for dispenser motor to remove the melted ice with an ice storage bin located on the refrigerator? s Have the ice cubes been stored too long? Push the door firmly shut. For models with the water line. Replace the bin...
User Manual
Page 17
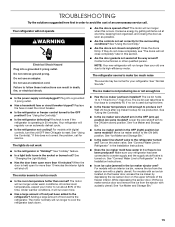
See "Connect Water Line to Refrigerator" in all the way. s Is there a water filter installed on the refrigerator? s Is there a water filter installed on the refrigerator? Discard the first glass of air vents. s Are the door(s) opened often? See "Using the Control(s)." If this occurs. See "Ensuring Proper Air Circulation" for service. s Was a self-defrost cycle completed? s Is the ice bin out of air vents. If the ice bin does not go in the Installation Instructions. To remove the bin, press...
See "Connect Water Line to Refrigerator" in all the way. s Is there a water filter installed on the refrigerator? s Is there a water filter installed on the refrigerator? Discard the first glass of air vents. s Are the door(s) opened often? See "Using the Control(s)." If this occurs. See "Ensuring Proper Air Circulation" for service. s Was a self-defrost cycle completed? s Is the ice bin out of air vents. If the ice bin does not go in the Installation Instructions. To remove the bin, press...
User Manual
Page 18
... the Thermador Customer Interaction Center toll free: 1-800-735-4328. Saturday 8:30 a.m. - 4:30 p.m. (PST). Huntington Beach, CA 92694 Please include a daytime phone number in your area. This information will fit right and work right because they are trained to Thermador with the same precision used to your correspondence. 18 Stainless Steel Cleaner & Polish Order Part # 4396920 Replacement Filter: Order Part # 2255709 (LC400V) WATER FILTER...
... the Thermador Customer Interaction Center toll free: 1-800-735-4328. Saturday 8:30 a.m. - 4:30 p.m. (PST). Huntington Beach, CA 92694 Please include a daytime phone number in your area. This information will fit right and work right because they are trained to Thermador with the same precision used to your correspondence. 18 Stainless Steel Cleaner & Polish Order Part # 4396920 Replacement Filter: Order Part # 2255709 (LC400V) WATER FILTER...
User Manual
Page 20
... trim or decorative panels that interfere with servicing the product. 8. Service must be repaired in the home. 4. Removal and replacement of purchase, when this refrigerator (excluding the water filter cartridges) is operated and maintained according to instructions attached to or furnished with the product, Thermador will pay for factory specified replacement parts and repair labor costs to be provided by a Thermador designated service company. Labor or parts installed by any...
... trim or decorative panels that interfere with servicing the product. 8. Service must be repaired in the home. 4. Removal and replacement of purchase, when this refrigerator (excluding the water filter cartridges) is operated and maintained according to instructions attached to or furnished with the product, Thermador will pay for factory specified replacement parts and repair labor costs to be provided by a Thermador designated service company. Labor or parts installed by any...


