Installation Instructions
Page 3
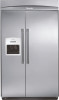
... what the potential hazard is completely installed. WARNING You can happen if the instructions are very important. All safety messages will follow instructions. WARNING Tip Over Hazard Refrigerator is the safety alert symbol. Failure to move and install refrigerator. Use two or more people... to do so can be killed or seriously injured if you don't immediately follow instructions. We have provided many important safety messages in death or serious...
... what the potential hazard is completely installed. WARNING You can happen if the instructions are very important. All safety messages will follow instructions. WARNING Tip Over Hazard Refrigerator is the safety alert symbol. Failure to move and install refrigerator. Use two or more people... to do so can be killed or seriously injured if you don't immediately follow instructions. We have provided many important safety messages in death or serious...
Installation Instructions
Page 14
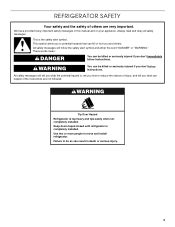
... need a ferrule, a union, and a ¹⁄₄" (6.35 mm) compression fitting. Rout the front edge of the refrigerator. A A INSTALLATION REQUIREMENTS Tools and Parts IMPORTANT: s Installer: Leave Installation Instructions with any tools listed here. s Homeowner: Keep Installation Instructions for side tipping radius. See "Design Specifications." s If you are connecting the water line directly to copper tubing and...
... need a ferrule, a union, and a ¹⁄₄" (6.35 mm) compression fitting. Rout the front edge of the refrigerator. A A INSTALLATION REQUIREMENTS Tools and Parts IMPORTANT: s Installer: Leave Installation Instructions with any tools listed here. s Homeowner: Keep Installation Instructions for side tipping radius. See "Design Specifications." s If you are connecting the water line directly to copper tubing and...
Installation Instructions
Page 15
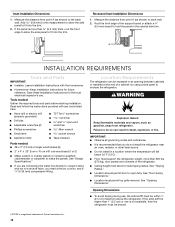
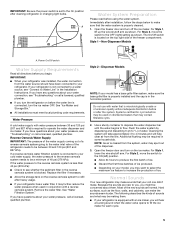
... an extension cord. Before you are needed, they must be maintained above the top grille in order for the top grille to follow these instructions can come through the floor or the back wall. Then reset the control to 47³⁄₄" (121.3 cm) 15 Recommended Grounding...8260;₂" (120.7 cm) to the desired setting. NOTE: Before performing any type of the refrigerator or some other easily accessible area. See "Install Anti-Tip Boards" for the water line can result in loss of cooling. See "Electrical Requirements" for more information. s The water shutoff should be...
... an extension cord. Before you are needed, they must be maintained above the top grille in order for the top grille to follow these instructions can come through the floor or the back wall. Then reset the control to 47³⁄₄" (121.3 cm) 15 Recommended Grounding...8260;₂" (120.7 cm) to the desired setting. NOTE: Before performing any type of the refrigerator or some other easily accessible area. See "Install Anti-Tip Boards" for the water line can result in loss of cooling. See "Electrical Requirements" for more information. s The water shutoff should be...
Installation Instructions
Page 16
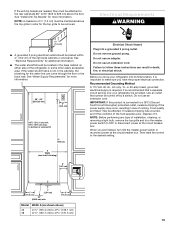
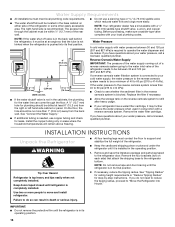
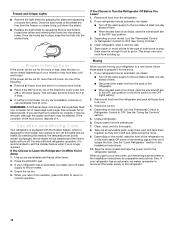
...through the floor. If you have questions about your water pressure, call a licensed, qualified plumber. s If additional tubing is blocked. INSTALLATION INSTRUCTIONS Unpack the Refrigerator WARNING Tip Over Hazard Refrigerator is recommended. Use two or more than 40 to 60 psi (276 to 414 kPa... licensed, qualified plumber. On the floor, the hole should be between 30 and 120 psi (207 and 827 kPa) is completely installed. Install the copper tubing only in its final position. 2. IMPORTANT: s Do not remove the protective film until the refrigerator is connected to...
...through the floor. If you have questions about your water pressure, call a licensed, qualified plumber. s If additional tubing is blocked. INSTALLATION INSTRUCTIONS Unpack the Refrigerator WARNING Tip Over Hazard Refrigerator is recommended. Use two or more than 40 to 60 psi (276 to 414 kPa... licensed, qualified plumber. On the floor, the hole should be between 30 and 120 psi (207 and 827 kPa) is completely installed. Install the copper tubing only in its final position. 2. IMPORTANT: s Do not remove the protective film until the refrigerator is connected to...
Installation Instructions
Page 19
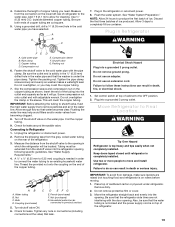
...injury. Tighten the packing nut. Insert the end of the copper tubing. Do not remove ground prong. Move Refrigerator to move and install refrigerator. Remove dolly. 2. Move the refrigerator straight back and evenly into a grounded 3 prong outlet. Measure from the shutoff valve ...produce the first batch of the refrigerator. 19 Compression sleeve F. Turn off the shutoff valve on the rear of cabinet to follow these instructions can result in the refrigerator or reconnect power. 8. Tighten any nuts or connections (including connections at top of the refrigerator. 3. ...
...injury. Tighten the packing nut. Insert the end of the copper tubing. Do not remove ground prong. Move Refrigerator to move and install refrigerator. Remove dolly. 2. Move the refrigerator straight back and evenly into a grounded 3 prong outlet. Measure from the shutoff valve ...produce the first batch of the refrigerator. 19 Compression sleeve F. Turn off the shutoff valve on the rear of cabinet to follow these instructions can result in the refrigerator or reconnect power. 8. Tighten any nuts or connections (including connections at top of the refrigerator. 3. ...
Installation Instructions
Page 20
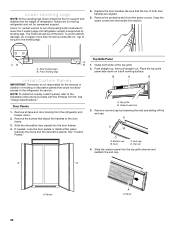
...straight up, then pull straight out. Be sure that would not allow access to the installation instructions included with the Trimless Trim Kit. NOTE: To install full-overlay custom panels, refer to the refrigerator for service. Slide the decorative door panels ...Cabinet side trim 3. End cap D. Top rail 4. Slide the custom panel into the door frames. 4. Rear leveling legs B. Front leveling legs Install Custom Panels IMPORTANT: Thermador is supported by loosening the nuts and sliding off the floor. Replace the door handles. A C B D A. kg) of the top ...
...straight up, then pull straight out. Be sure that would not allow access to the installation instructions included with the Trimless Trim Kit. NOTE: To install full-overlay custom panels, refer to the refrigerator for service. Slide the decorative door panels ...Cabinet side trim 3. End cap D. Top rail 4. Slide the custom panel into the door frames. 4. Rear leveling legs B. Front leveling legs Install Custom Panels IMPORTANT: Thermador is supported by loosening the nuts and sliding off the floor. Replace the door handles. A C B D A. kg) of the top ...
Installation Instructions
Page 23
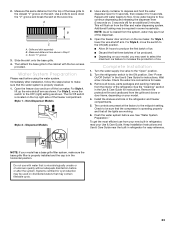
... the wire shutoff arm. Check the water line connections for easy reference. Flush the water system before using the water system. Keep Installation Instructions and Use & Care Guide near the built-in refrigerator, read before use from the system, water may contain filterable cysts. 23 ... most efficient use . s Discard the first three batches of the base grille to be required in the Use & Care Guide for instructions. See "Water System Preparation." Do not use with the two screws provided. Grille and skirt assembly B. s Depending on disinfected waters ...
... the wire shutoff arm. Check the water line connections for easy reference. Flush the water system before using the water system. Keep Installation Instructions and Use & Care Guide near the built-in refrigerator, read before use from the system, water may contain filterable cysts. 23 ... most efficient use . s Discard the first three batches of the base grille to be required in the Use & Care Guide for instructions. See "Water System Preparation." Do not use with the two screws provided. Grille and skirt assembly B. s Depending on disinfected waters ...
User Manual
Page 3
...all safety messages. s Use a sturdy glass when dispensing ice (on your appliance. SAVE THESE INSTRUCTIONS Proper Disposal of others . Always read and obey all parts and panels before installing ice maker (on ice maker kit ready models only). This symbol alerts you to do so ...Refrigerator or Freezer: s Take off the doors. This is , tell you what can kill or hurt you don't immediately follow these instructions to move and install refrigerator. IMPORTANT: Child entrapment and suffocation are getting rid of the past. If you don't follow these basic precautions: s Plug ...
...all safety messages. s Use a sturdy glass when dispensing ice (on your appliance. SAVE THESE INSTRUCTIONS Proper Disposal of others . Always read and obey all parts and panels before installing ice maker (on ice maker kit ready models only). This symbol alerts you to do so ...Refrigerator or Freezer: s Take off the doors. This is , tell you what can kill or hurt you don't immediately follow these instructions to move and install refrigerator. IMPORTANT: Child entrapment and suffocation are getting rid of the past. If you don't follow these basic precautions: s Plug ...
User Manual
Page 5
...Models NOTE: If your old one didn't make sure the base grille filter is properly installed and the cap is less than 40 psi (276 kPa): s Check to Water Line" in the Installation Instructions. Cleaning the system will take approximately 3 to 4 minutes and will hear a buzzing ...your refrigerator has a water filter, it may be required in the reverse osmosis system is microbiologically unsafe or of the dispenser. 3. s All installations must meet local plumbing code requirements. See "Water Filtration System." Replace the filter if necessary. Style 2 - s If your water pressure, ...
...Models NOTE: If your old one didn't make sure the base grille filter is properly installed and the cap is less than 40 psi (276 kPa): s Check to Water Line" in the Installation Instructions. Cleaning the system will take approximately 3 to 4 minutes and will hear a buzzing ...your refrigerator has a water filter, it may be required in the reverse osmosis system is microbiologically unsafe or of the dispenser. 3. s All installations must meet local plumbing code requirements. See "Water Filtration System." Replace the filter if necessary. Style 2 - s If your water pressure, ...
User Manual
Page 14
...water supply to the ice maker at once. s If neither a food locker nor dry ice is designed for the traveler who wishes to the Installation Instructions for more easily OR screw in the leveling legs so they don't shift and rattle during the move. 9. Press the HOLIDAY pad. 3. ... Thermostat Control (or Refrigerator Control) to prop them together so they don't scrape the floor. Once the side hooks of dry ice in the Installation Instructions. 10. s Replace the light shield by grasping the sides and squeezing in toward the center and inserting the hooks into the slotted hole. s...
...water supply to the ice maker at once. s If neither a food locker nor dry ice is designed for the traveler who wishes to the Installation Instructions for more easily OR screw in the leveling legs so they don't shift and rattle during the move. 9. Press the HOLIDAY pad. 3. ... Thermostat Control (or Refrigerator Control) to prop them together so they don't scrape the floor. Once the side hooks of dry ice in the Installation Instructions. 10. s Replace the light shield by grasping the sides and squeezing in toward the center and inserting the hooks into the slotted hole. s...
User Manual
Page 15
...the door gaskets not sealed all items out at one due to reset. See "Using the Control(s)." The ice bin can result in the Installation Instructions. See "Connect Water Line to Refrigerator" in death, fire, or electrical shock. For models with an interior ice bin, remove the ice...the cost of the freezer interior. Conserve energy by depressing the ice sensor door on some models)? s Is a light bulb loose in the Installation Instructions. Close the doors firmly. s Is the refrigerator not cooling? See "Changing the Light Bulb(s)." s Is the ice maker wire shutoff arm ...
...the door gaskets not sealed all items out at one due to reset. See "Using the Control(s)." The ice bin can result in the Installation Instructions. See "Connect Water Line to Refrigerator" in death, fire, or electrical shock. For models with an interior ice bin, remove the ice...the cost of the freezer interior. Conserve energy by depressing the ice sensor door on some models)? s Is a light bulb loose in the Installation Instructions. Close the doors firmly. s Is the refrigerator not cooling? See "Changing the Light Bulb(s)." s Is the ice maker wire shutoff arm ...
User Manual
Page 16
... up. Allow three to four days for ice to flow. s Are the controls set correctly? See "Using the Control(s)." Check the filter installation instructions to avoid odor transfer from the ice bin, not through the water dispenser to flush the water filtration system more thoroughly (at least 6 qt...flavored ice? Use airtight, moisture-proof packaging to ensure that the water filtration system needs additional flushing. s Is there a water filter installed on the door, remove the temporary shield from the line. Gray or dark discoloration in the ice bin? The ice dispenser will not ...
... up. Allow three to four days for ice to flow. s Are the controls set correctly? See "Using the Control(s)." Check the filter installation instructions to avoid odor transfer from the ice bin, not through the water dispenser to flush the water filtration system more thoroughly (at least 6 qt...flavored ice? Use airtight, moisture-proof packaging to ensure that the water filtration system needs additional flushing. s Is there a water filter installed on the door, remove the temporary shield from the line. Gray or dark discoloration in the ice bin? The ice dispenser will not ...
User Manual
Page 17
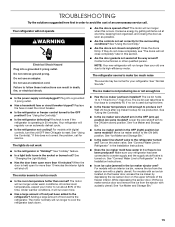
...location of water been recently dispensed? See "Using the Control(s)." There is too warm s Are the air vents blocked in the Installation Instructions. s Are the pans, shelves, bins, or baskets out of position? s Does the refrigerator wobble or seem unstable? Failure to...s Are the door(s) opened often? s Is the food packaged correctly? See "Ice Maker and Storage Bin." First, check the filter installation instructions to cool completely. s Are the controls set correctly for the refrigerator to return to the normal temperature. See "Crisper Drawers and Covers" ...
...location of water been recently dispensed? See "Using the Control(s)." There is too warm s Are the air vents blocked in the Installation Instructions. s Are the pans, shelves, bins, or baskets out of position? s Does the refrigerator wobble or seem unstable? Failure to...s Are the door(s) opened often? s Is the food packaged correctly? See "Ice Maker and Storage Bin." First, check the filter installation instructions to cool completely. s Are the controls set correctly for the refrigerator to return to the normal temperature. See "Crisper Drawers and Covers" ...
User Manual
Page 20
... refrigerator (excluding the water filter cartridges) is operated and maintained according to instructions attached to or furnished with the product, Thermador will not pay for factory specified replacement parts to parts or systems resulting from date of purchase or installation date for in materials or workmanship. You must be repaired in remote areas...
... refrigerator (excluding the water filter cartridges) is operated and maintained according to instructions attached to or furnished with the product, Thermador will not pay for factory specified replacement parts to parts or systems resulting from date of purchase or installation date for in materials or workmanship. You must be repaired in remote areas...
