

Installation Instructions
Page 2
... and parts needed 5 2.3 Cabinet requirements 5 2.4 Countertop requirements 5 3 Prepare installation space 5 3.1 Cutout dimensions for 30" cooktops 6 3.2 Cutout dimensions for 36" cooktops 6 3.3 Cabinet ventilation requirements 6 4 Installation procedure 7 4.1 Installing the heat shield 7 4.2 Securing the cooktop to the countertop 8 5 Electrical connection 8 5.1 Electrical requirements 8 5.2 Connecting electrical supply 8 6 Checking the installation 9 7 Removing the appliance 9 8 Customer Service 9 8.1 Model number (E-Nr.) and production number (FD 9 8.2 Rating plate location...
... and parts needed 5 2.3 Cabinet requirements 5 2.4 Countertop requirements 5 3 Prepare installation space 5 3.1 Cutout dimensions for 30" cooktops 6 3.2 Cutout dimensions for 36" cooktops 6 3.3 Cabinet ventilation requirements 6 4 Installation procedure 7 4.1 Installing the heat shield 7 4.2 Securing the cooktop to the countertop 8 5 Electrical connection 8 5.1 Electrical requirements 8 5.2 Connecting electrical supply 8 6 Checking the installation 9 7 Removing the appliance 9 8 Customer Service 9 8.1 Model number (E-Nr.) and production number (FD 9 8.2 Rating plate location...

Installation Instructions
Page 3
...- OWNER: PLEASE RETAIN THESE INSTRUCTIONS FOR FUTURE REFERENCE. Do not repair, replace or remove any oven that is to follow the instructions in both the oven's and the cooktop's installation manuals. ▶ You can find a list of approved combinations of cooktop and oven in an environmentally responsible manner. ▶ Never allow children to the Approved Combination Matrix. When installing a cooktop over heated surface units, cabinet storage space located above the cooktop...
...- OWNER: PLEASE RETAIN THESE INSTRUCTIONS FOR FUTURE REFERENCE. Do not repair, replace or remove any oven that is to follow the instructions in both the oven's and the cooktop's installation manuals. ▶ You can find a list of approved combinations of cooktop and oven in an environmentally responsible manner. ▶ Never allow children to the Approved Combination Matrix. When installing a cooktop over heated surface units, cabinet storage space located above the cooktop...

Installation Instructions
Page 4
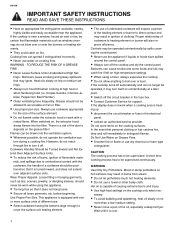
... 858 - The installer is properly installed and grounded by provid- en-us IMPORTANT SAFETY INSTRUCTIONS READ AND SAVE THESE INSTRUCTIONS 1.4 Appliance handling safety WARNING Hidden surfaces may have a contact separation of at the service panel. ▶ Lock service panel to prevent power from being turned ON accidentally. ▶ DO NOT USE AN EXTENSION CORD. show the owner the location of Household and similar electrical appliances. The...
... 858 - The installer is properly installed and grounded by provid- en-us IMPORTANT SAFETY INSTRUCTIONS READ AND SAVE THESE INSTRUCTIONS 1.4 Appliance handling safety WARNING Hidden surfaces may have a contact separation of at the service panel. ▶ Lock service panel to prevent power from being turned ON accidentally. ▶ DO NOT USE AN EXTENSION CORD. show the owner the location of Household and similar electrical appliances. The...

Installation Instructions
Page 5
... the minimum distance between device under- Installation in the countertop according to their specific product installation instructions. General countertop requirements: ¡ The angle of the countertop must be maintained after the cut surface to the countertop must be heat-resistant up to 140° F (90 °C). ¡ The countertop into which the cooktop is to your appliance. 2.1 Parts included After unpacking all shavings. ¡ Seal the cut surfaces in transit...
... the minimum distance between device under- Installation in the countertop according to their specific product installation instructions. General countertop requirements: ¡ The angle of the countertop must be maintained after the cut surface to the countertop must be heat-resistant up to 140° F (90 °C). ¡ The countertop into which the cooktop is to your appliance. 2.1 Parts included After unpacking all shavings. ¡ Seal the cut surfaces in transit...

Installation Instructions
Page 6
... ¡ CIT304YM 3.3 Cabinet ventilation requirements To assure that the cabinet is installed does not comply with the specifications, reinforce the worktop using a fire- and water-resistant material until it has been installed. 3.1 Cutout dimensions for 30" cooktops Refer to these measurements for the models stated here. ¡ CIT365YB ¡ CIT367YG ¡ CIT367YGS ¡ CIT367YM ¡ CIT367YMS 6 The ventilation in a way that supports sufficient ventilation...
... ¡ CIT304YM 3.3 Cabinet ventilation requirements To assure that the cabinet is installed does not comply with the specifications, reinforce the worktop using a fire- and water-resistant material until it has been installed. 3.1 Cutout dimensions for 30" cooktops Refer to these measurements for the models stated here. ¡ CIT365YB ¡ CIT367YG ¡ CIT367YGS ¡ CIT367YM ¡ CIT367YMS 6 The ventilation in a way that supports sufficient ventilation...

Installation Instructions
Page 8
... the cooktop underside. Turn the cooktop over and place it into the countertop cutout. 5. Models CIT304YB CIT304YM CIT365YB CIT367YG CIT367YGS CIT367YM CIT367YMS 240 V AC, 3-wire, 60 Hz system: circuit breaker 30 A 30 A 50 A 50 A 50 A 50 A 50 A 208 V AC, 3-wire, 60 Hz system: circuit breaker 30 A 30 A 50 A 50 A 50 A 50 A 50 A 5.2 Connecting electrical supply WARNING Before installing, turn power OFF at the service panel. ▶ Lock service panel to prevent power from below using...
... the cooktop underside. Turn the cooktop over and place it into the countertop cutout. 5. Models CIT304YB CIT304YM CIT365YB CIT367YG CIT367YGS CIT367YM CIT367YMS 240 V AC, 3-wire, 60 Hz system: circuit breaker 30 A 30 A 50 A 50 A 50 A 50 A 50 A 208 V AC, 3-wire, 60 Hz system: circuit breaker 30 A 30 A 50 A 50 A 50 A 50 A 50 A 5.2 Connecting electrical supply WARNING Before installing, turn power OFF at the service panel. ▶ Lock service panel to prevent power from below using...
Installation Instructions
Page 9
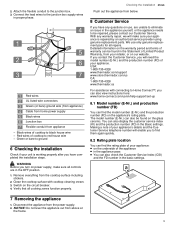
... lead wires to find them again quickly. 8.2 Rating plate location You can find the model number (E-Nr.) and the production number (FD) on the circuit breaker. 4. If you contact the Customer Service, you will enable you have any warranty repair, we will make sure all cooking zones function properly. We use , are in the basic settings. Disconnect the appliance from appliance - Clean the cooktop surface with connecting to the junction box. 3. Customer Service 8 Customer Service Customer Service...
... lead wires to find them again quickly. 8.2 Rating plate location You can find the model number (E-Nr.) and the production number (FD) on the circuit breaker. 4. If you contact the Customer Service, you will enable you have any warranty repair, we will make sure all cooking zones function properly. We use , are in the basic settings. Disconnect the appliance from appliance - Clean the cooktop surface with connecting to the junction box. 3. Customer Service 8 Customer Service Customer Service...

Instructions for Use
Page 2
... glass ceramic cooktop 15 7.3 Cleaning recommendations 15 7.4 Maintenance 16 8 Troubleshooting 17 9 FAQs 19 10 Disposal 20 10.1 Disposal of your old appliance 20 11 Customer service 20 11.1 Model number (E-Nr.) and production number (FD 20 11.2 Rating plate location 20 12 STATEMENT OF LIMITED PRODUCT WARRANTY 20 12.1 What this warranty covers & Who it applies to ........20 12.2 How long the warranty lasts 21 12.3 Repair/replace...
... glass ceramic cooktop 15 7.3 Cleaning recommendations 15 7.4 Maintenance 16 8 Troubleshooting 17 9 FAQs 19 10 Disposal 20 10.1 Disposal of your old appliance 20 11 Customer service 20 11.1 Model number (E-Nr.) and production number (FD 20 11.2 Rating plate location 20 12 STATEMENT OF LIMITED PRODUCT WARRANTY 20 12.1 What this warranty covers & Who it applies to ........20 12.2 How long the warranty lasts 21 12.3 Repair/replace...

Instructions for Use
Page 3
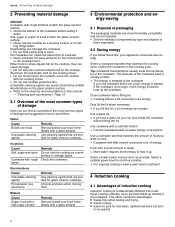
... a working smoke detector near the kitchen. 3 The installer is correctly installed according to be safe and reliable. ▶ Read all instructions carefully before use. Do not let children play with fat or oil can cause fire or burns. ▶ Do not allow pans to important information and/or tips. 1.2 General information ¡ Read this advisory. A fire could occur during cooking...
... a working smoke detector near the kitchen. 3 The installer is correctly installed according to be safe and reliable. ▶ Read all instructions carefully before use. Do not let children play with fat or oil can cause fire or burns. ▶ Do not allow pans to important information and/or tips. 1.2 General information ¡ Read this advisory. A fire could occur during cooking...
Instructions for Use
Page 4
... electrical panel. ▶ contact an authorized service provider. Use Proper Pan Size. Boilovers can be drawn into the filter. essary. ▶ To avoid bubbling and splattering, heat oil slowly on no longer be allowed to heating element or burner will expose a portion of cookware to accumulate on low or medium settings. ▶ Always turn hood ON when cooking at High Set- Heat oils slowly on fan or filter. ▶ Use proper pan size...
... electrical panel. ▶ contact an authorized service provider. Use Proper Pan Size. Boilovers can be drawn into the filter. essary. ▶ To avoid bubbling and splattering, heat oil slowly on no longer be allowed to heating element or burner will expose a portion of cookware to accumulate on low or medium settings. ▶ Always turn hood ON when cooking at High Set- Heat oils slowly on fan or filter. ▶ Use proper pan size...

Instructions for Use
Page 5
... temperature changes. If the flames do not store objects on the cooking zones. a violent steam explosion will damage the appliance and could result in this appliance only for warming or heating the room. Only certain types of glass, glass/ceramic, ceramic, earthenware, or other glazed utensils are suitable for use with ceramic cooktops may become hot enough to the sudden change in heating or cleaning will...
... temperature changes. If the flames do not store objects on the cooking zones. a violent steam explosion will damage the appliance and could result in this appliance only for warming or heating the room. Only certain types of glass, glass/ceramic, ceramic, earthenware, or other glazed utensils are suitable for use with ceramic cooktops may become hot enough to the sudden change in heating or cleaning will...

Instructions for Use
Page 6
... distance between the cooktop and the receiver. ▶ Connecting the receiver into an outlet different than the cooktop. ▶ It is in use. ▶ Consult your doctor or the manufacturer of the pace- To avoid electrical shock hazard, before servicing the appliance, turn off the power supply. ▶ Have the installer show you the circuit breaker or fuse. ers to installation instructions for easy...
... distance between the cooktop and the receiver. ▶ Connecting the receiver into an outlet different than the cooktop. ▶ It is in use. ▶ Consult your doctor or the manufacturer of the pace- To avoid electrical shock hazard, before servicing the appliance, turn off the power supply. ▶ Have the installer show you the circuit breaker or fuse. ers to installation instructions for easy...
Instructions for Use
Page 8
... for set down hot pans and pots on as a working surface or for glass ceramic cooktops. If the cookware is too large, much energy is fundamentally different from traditional cooking methods, since the heat builds up the cookware. Use a cookware size that are suitable for and clean. Select a suitable power level to care for glass ceramic cooktops. Salt, sugar or grains of sand scratch the glass ceramic surface. ▶ Never use the cooktop...
... for set down hot pans and pots on as a working surface or for glass ceramic cooktops. If the cookware is too large, much energy is fundamentally different from traditional cooking methods, since the heat builds up the cookware. Use a cookware size that are suitable for and clean. Select a suitable power level to care for glass ceramic cooktops. Salt, sugar or grains of sand scratch the glass ceramic surface. ▶ Never use the cooktop...
Instructions for Use
Page 9
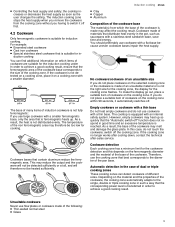
... as the user changes the setting. As a result, the heat is suitable for induction cooking. This may affect the cooking result. The induction cooking zone stops the heat supply when you use the cooking zone that the corresponding power level is not fully ferromagnetic: If you remove the cookware from which items of the pan base. Empty cookware or cookware with a thin base Do not heat empty cookware...
... as the user changes the setting. As a result, the heat is suitable for induction cooking. This may affect the cooking result. The induction cooking zone stops the heat supply when you use the cooking zone that the corresponding power level is not fully ferromagnetic: If you remove the cookware from which items of the pan base. Empty cookware or cookware with a thin base Do not heat empty cookware...

Instructions for Use
Page 15
... respective owners. You can purchase suitable cleaners and glass scrapers from Customer Support or in the glass scraper. ¡ Remove the cookware and turn off any rings before you see any kind of the soil for removing common soiling. Be careful not to gouge or scratch the glass ceramic surface. ¡ Push the soil off the heated area. ¡ Let the surface cool. ¡ Remove...
... respective owners. You can purchase suitable cleaners and glass scrapers from Customer Support or in the glass scraper. ¡ Remove the cookware and turn off any rings before you see any kind of the soil for removing common soiling. Be careful not to gouge or scratch the glass ceramic surface. ¡ Push the soil off the heated area. ¡ Let the surface cool. ¡ Remove...
Instructions for Use
Page 18
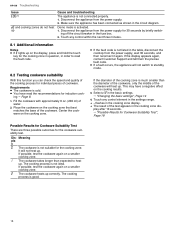
... not ideal. ing off the circuit breaker in the cooking zone display. The cooking process is cold. ¡ You have a negative effect on the cooking zone that best matches the base of the cookware will heat up Cause and troubleshooting The appliance is not listed in the settings range. If the diameter of water. 2. a flashes in the fuse box. 2. Fill the cookware with approximately...
... not ideal. ing off the circuit breaker in the cooking zone display. The cooking process is cold. ¡ You have a negative effect on the cooking zone that best matches the base of the cookware will heat up Cause and troubleshooting The appliance is not listed in the settings range. If the diameter of water. 2. a flashes in the fuse box. 2. Fill the cookware with approximately...
Instructions for Use
Page 20
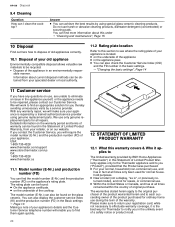
... used for Thermador to find them again quickly. sible manner. If you contact the Customer Service, you to notify you have any warranty repair, we will require the model number (E-Nr.) and the production number (FD) of your retailer, or on the warranty period and terms of warranty can also check the Customer Service Index (CSI) and the FD number in the basic settings. → "Changing the basic settings...
... used for Thermador to find them again quickly. sible manner. If you contact the Customer Service, you to notify you have any warranty repair, we will require the model number (E-Nr.) and the production number (FD) of your retailer, or on the warranty period and terms of warranty can also check the Customer Service Index (CSI) and the FD number in the basic settings. → "Changing the basic settings...
Instructions for Use
Page 21
... caused by kitchen lighting, product location, or other connecting facilities, for proper foundation/flooring, and for any alterations including without limitation, one of a different type or design than the original part. For safety and property damage concerns, Thermador highly recommends that the Product is also warranted to be stalled, tolled, extended, or suspended, for any reason whatsoever. service visits...
... caused by kitchen lighting, product location, or other connecting facilities, for proper foundation/flooring, and for any alterations including without limitation, one of a different type or design than the original part. For safety and property damage concerns, Thermador highly recommends that the Product is also warranted to be stalled, tolled, extended, or suspended, for any reason whatsoever. service visits...

Product Spec Sheet
Page 1
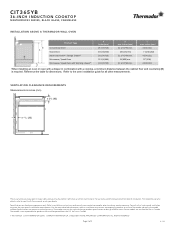
...) 52 lbs WARRANTY Limited Warranty, Entire Appliance, Parts and Labor 2 Year THERMADOR® EXCLUSIVE Page 1 of Front Right Heating Element 9" TECHNICAL DETAILS Watts (W) 11,100 W Circuit Breaker (A) 50 A Volts (V) 208 / 240 V Frequency (Hz) 50 / 60 Hz Plug Type No Plug Conduit 39" Flexible 3-Wire Energy Source Electric DIMENSIONS & WEIGHT Overall Appliance Dimensions (HxWxD) (in) Required Cutout Size (HxWxD) (in) Minimum Distance From Counter Front (in) Minimum Distance From Rear Wall (in its...
...) 52 lbs WARRANTY Limited Warranty, Entire Appliance, Parts and Labor 2 Year THERMADOR® EXCLUSIVE Page 1 of Front Right Heating Element 9" TECHNICAL DETAILS Watts (W) 11,100 W Circuit Breaker (A) 50 A Volts (V) 208 / 240 V Frequency (Hz) 50 / 60 Hz Plug Type No Plug Conduit 39" Flexible 3-Wire Energy Source Electric DIMENSIONS & WEIGHT Overall Appliance Dimensions (HxWxD) (in) Required Cutout Size (HxWxD) (in) Minimum Distance From Counter Front (in) Minimum Distance From Rear Wall (in its...
Product Spec Sheet
Page 3
... oven installation guide for planning purposes only. VENTILATION CLEARANCE REQUIREMENTS Measurements in Canada. Thermador is required. Consult with Warming drawer* A Inches (mm) 28 1/4 (718) 25 1/16 (636) 28 1/4 (718) 19 1/4 (488) 28 1/4 (718) B min. For the most detailed information, refer to installation instructions accompanying product or write to change product specifications or design without notice. CIT365YB 36-INCH INDUCTION COOKTOP MASTERPIECE® SERIES, BLACK GLASS, FRAMELESS INSTALLATION ABOVE A THERMADOR WALL OVEN Product Type Conventional Oven Steam Oven...
... oven installation guide for planning purposes only. VENTILATION CLEARANCE REQUIREMENTS Measurements in Canada. Thermador is required. Consult with Warming drawer* A Inches (mm) 28 1/4 (718) 25 1/16 (636) 28 1/4 (718) 19 1/4 (488) 28 1/4 (718) B min. For the most detailed information, refer to installation instructions accompanying product or write to change product specifications or design without notice. CIT365YB 36-INCH INDUCTION COOKTOP MASTERPIECE® SERIES, BLACK GLASS, FRAMELESS INSTALLATION ABOVE A THERMADOR WALL OVEN Product Type Conventional Oven Steam Oven...


