
Design Guide - Induction Cooktops
Page 4
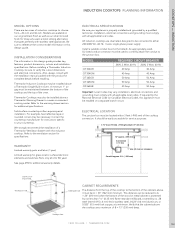
... OPTIONS There are a maximum of the oven. Also, always consult with the installation manual packed with this design guide. WARRANTY Limited warranty parts and labor (1 year) Limited warranty for service purposes. 3 1/8" max (79 mm) + Fitting/Conduit 0.9" (23 mm) 12" ...Thermador Warming Drawer to reference the correct model information in this appliance must be located within 3 feet (~900 mm) of the cabinets above it must be installed on a separate branch circuit. Contact the countertop manufacturer for additional warranty details. MODEL CIT304GB CIT304GM CIT365GB CIT365GM...
... OPTIONS There are a maximum of the oven. Also, always consult with the installation manual packed with this design guide. WARRANTY Limited warranty parts and labor (1 year) Limited warranty for service purposes. 3 1/8" max (79 mm) + Fitting/Conduit 0.9" (23 mm) 12" ...Thermador Warming Drawer to reference the correct model information in this appliance must be located within 3 feet (~900 mm) of the cabinets above it must be installed on a separate branch circuit. Contact the countertop manufacturer for additional warranty details. MODEL CIT304GB CIT304GM CIT365GB CIT365GM...
Installation Instructions
Page 2
Table of contents Important Safety Instructions 4 Before you begin 5 Tools and parts needed 5 Parts included 5 Preparation 6 Installation procedure 9 Installing the heat shield 9 Secure the cooktop to countertop 10 Electrical installation 11 Test the installation 12 Technical service 13 3
Table of contents Important Safety Instructions 4 Before you begin 5 Tools and parts needed 5 Parts included 5 Preparation 6 Installation procedure 9 Installing the heat shield 9 Secure the cooktop to countertop 10 Electrical installation 11 Test the installation 12 Technical service 13 3
Installation Instructions
Page 3
... A QUALIFIED TECHNICIAN LEAVE THESE INSTRUCTIONS WITH THE APPLIANCE AFTER INSTALLATION IS COMPLETE. ř WARNING:ĄIf the information in this manual is responsible for any part of Canada for Household Cooking Ranges. Never modify or alter the construction of at the service panel. Refer to determine if additional requirements and standards...
... A QUALIFIED TECHNICIAN LEAVE THESE INSTRUCTIONS WITH THE APPLIANCE AFTER INSTALLATION IS COMPLETE. ř WARNING:ĄIf the information in this manual is responsible for any part of Canada for Household Cooking Ranges. Never modify or alter the construction of at the service panel. Refer to determine if additional requirements and standards...
Installation Instructions
Page 4
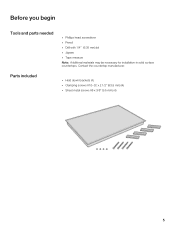
D Hold down brackets (4) D Clamping screws #10-32 x 2 1/2" (63.8 mm) (4) D Sheet metal screws #8 x 3/8" (9.5 mm) (4) 5 Before you begin Tools and parts needed Parts included D Phillips head screwdriver D Pencil D Drill with 1/4" (6.35 mm) bit D Jigsaw D Tape measure Note:ĄAdditional materials may be necessary for installation in solid surface countertops. Contact the countertop manufacturer.
D Hold down brackets (4) D Clamping screws #10-32 x 2 1/2" (63.8 mm) (4) D Sheet metal screws #8 x 3/8" (9.5 mm) (4) 5 Before you begin Tools and parts needed Parts included D Phillips head screwdriver D Pencil D Drill with 1/4" (6.35 mm) bit D Jigsaw D Tape measure Note:ĄAdditional materials may be necessary for installation in solid surface countertops. Contact the countertop manufacturer.

