

Design Guide - Induction Cooktops
Page 1
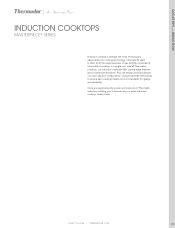
100 36-INCH INDUCTION COOKTOP MODEL CIS365GB SHOWN WITH 42-INCH ISLAND HOOD HGSI42TS
100 36-INCH INDUCTION COOKTOP MODEL CIS365GB SHOWN WITH 42-INCH ISLAND HOOD HGSI42TS
Design Guide - Induction Cooktops
Page 2
... design and manufacture our own induction components-using proprietary technology to ensure each cooktop meets our strict standards for quality and durability. Like all Thermador products, our induction cooktops offer cutting edge features and unrivaled performance. Once you experience the power and precision of an electric cooktop in the last 30 years. COOKTOPS - INDUCTION INDUCTION COOKTOPS MASTERPIECE® SERIES Induction cooking is perhaps the most revolutionary advancement...
... design and manufacture our own induction components-using proprietary technology to ensure each cooktop meets our strict standards for quality and durability. Like all Thermador products, our induction cooktops offer cutting edge features and unrivaled performance. Once you experience the power and precision of an electric cooktop in the last 30 years. COOKTOPS - INDUCTION INDUCTION COOKTOPS MASTERPIECE® SERIES Induction cooking is perhaps the most revolutionary advancement...
Design Guide - Induction Cooktops
Page 3
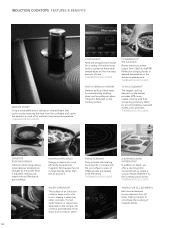
... surface so pans of time. THERMADOR EXCLUSIVE ANTI-OVERFLOW SYSTEM Detects spills and boil-overs by automatically shutting down and sounds an alarm. Ideal for the contemporary kitchen. THERMADOR EXCLUSIVE COOKSMART® Nine pre-programmed modes for a variety of multiple dishes. 102 THERMADOR EXCLUSIVE SUPERIOR RESPONSIVENESS Induction technology allows instantaneous temperature changes as the power level is used much more usable cooking...
... surface so pans of time. THERMADOR EXCLUSIVE ANTI-OVERFLOW SYSTEM Detects spills and boil-overs by automatically shutting down and sounds an alarm. Ideal for the contemporary kitchen. THERMADOR EXCLUSIVE COOKSMART® Nine pre-programmed modes for a variety of multiple dishes. 102 THERMADOR EXCLUSIVE SUPERIOR RESPONSIVENESS Induction technology allows instantaneous temperature changes as the power level is used much more usable cooking...
Design Guide - Induction Cooktops
Page 4
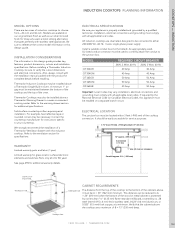
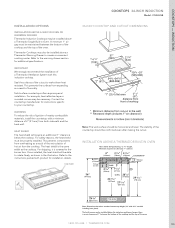
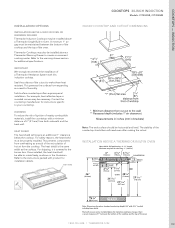
... CIT365GM CIS365GB REQUIRED CIRCUIT BREAKER 240V, 3 Wire, 60 Hz 208V, 3 Wire, 60 Hz 40 Amp 40 Amp 40 Amp 40 Amp 50 Amp 50 Amp 50 Amp 50 Amp 50 Amp 50 Amp Important: Local Codes may also be located within 3 feet (~900 mm) of a Thermador Ventilation System with this design guide provides key features, product dimensions, cutouts and installation specifications. Also, always consult with the installation manual packed with stainless steel appliances. Solid surface countertops often require...
... CIT365GM CIS365GB REQUIRED CIRCUIT BREAKER 240V, 3 Wire, 60 Hz 208V, 3 Wire, 60 Hz 40 Amp 40 Amp 40 Amp 40 Amp 50 Amp 50 Amp 50 Amp 50 Amp 50 Amp 50 Amp Important: Local Codes may also be located within 3 feet (~900 mm) of a Thermador Ventilation System with this design guide provides key features, product dimensions, cutouts and installation specifications. Also, always consult with the installation manual packed with stainless steel appliances. Solid surface countertops often require...
Design Guide - Induction Cooktops
Page 5
... on surface - 2-step digital control panel indicates when elements are placed on the market - SENSORPOT6 6" Sensor Pot, 1.9 qt., two handles and lid. accommodates multiple size pans with blue light illumination offers 17 power settings - PowerBoost™ allows the maximum power level to set desired cooking times. Two Timers - Child safety lock ACCESSORIES PREMIUM SENSOR POTS Hard material, high-gloss surface (harder than traditional gas cooktops - For use with gas, electric and induction cooktops. Recommended...
... on surface - 2-step digital control panel indicates when elements are placed on the market - SENSORPOT6 6" Sensor Pot, 1.9 qt., two handles and lid. accommodates multiple size pans with blue light illumination offers 17 power settings - PowerBoost™ allows the maximum power level to set desired cooking times. Two Timers - Child safety lock ACCESSORIES PREMIUM SENSOR POTS Hard material, high-gloss surface (harder than traditional gas cooktops - For use with gas, electric and induction cooktops. Recommended...
Design Guide - Induction Cooktops
Page 6
... the illustration. For example, heat reflective tape or rounded corners may be installed below the cooktop. HEAT SHIELD The heat shield will be horizontal and level. heat shield 36-INCH COOKTOP AND CUTOUT DIMENSIONS Note: The work surface should be properly installed. A minimum 1" air gap must be confirmed even after making the cutout. Solid surface countertops often require special installation. Seal the surfaces of a Thermador Ventilation System with product for...
... the illustration. For example, heat reflective tape or rounded corners may be installed below the cooktop. HEAT SHIELD The heat shield will be horizontal and level. heat shield 36-INCH COOKTOP AND CUTOUT DIMENSIONS Note: The work surface should be properly installed. A minimum 1" air gap must be confirmed even after making the cutout. Solid surface countertops often require special installation. Seal the surfaces of a Thermador Ventilation System with product for...
Design Guide - Induction Cooktops
Page 7
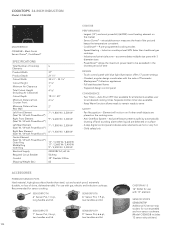
... safety lock CHEFSPAN 13 16" Skillet for all elements enables user to set desired cooking times. Black Finish MASTERPIECE CIT365GM - Silver Mirrored Finish SPECIFICATIONS Total Number of Thermador Masterpiece™ Collection appliances - Largest (13") and most powerful (4,600W) round heating element on the market - Induction cooktops heat 50% faster than traditional gas cooktops - Auto Shut Off Timer available for use with blue light illumination offers 17 power settings - Pan Recognition - Two Timers - Separate kitchen...
... safety lock CHEFSPAN 13 16" Skillet for all elements enables user to set desired cooking times. Black Finish MASTERPIECE CIT365GM - Silver Mirrored Finish SPECIFICATIONS Total Number of Thermador Masterpiece™ Collection appliances - Largest (13") and most powerful (4,600W) round heating element on the market - Induction cooktops heat 50% faster than traditional gas cooktops - Auto Shut Off Timer available for use with blue light illumination offers 17 power settings - Pan Recognition - Two Timers - Separate kitchen...

Design Guide - Induction Cooktops
Page 8
... nearby combustible materials, install the countertop with product for additional specifications. A minimum 1" air gap must be confirmed even after making the cutout. This prevents components from overheating as shown in the illustration. heat shield COOKTOPS 36-INCH INDUCTION Models: CIT365GB, CIT365GM 36-INCH COOKTOP AND CUTOUT DIMENSIONS Note: The work surface should be properly installed. INSTALLATION ABOVE A THERMADOR BUILT-IN OVEN Heat shield: Self positioning - 2 3/8" length, Minimum required air clearance: 1" (26 mm) 6 3/4" (172...
... nearby combustible materials, install the countertop with product for additional specifications. A minimum 1" air gap must be confirmed even after making the cutout. This prevents components from overheating as shown in the illustration. heat shield COOKTOPS 36-INCH INDUCTION Models: CIT365GB, CIT365GM 36-INCH COOKTOP AND CUTOUT DIMENSIONS Note: The work surface should be properly installed. INSTALLATION ABOVE A THERMADOR BUILT-IN OVEN Heat shield: Self positioning - 2 3/8" length, Minimum required air clearance: 1" (26 mm) 6 3/4" (172...
Design Guide - Induction Cooktops
Page 9
... on surface - 2-step digital control panel indicates when elements are hot or very hot - Recommended for stainless steel products - Large and powerful 11" element with blue light illumination offers 17 power settings - Keep Warm function allows meals to remain ready to serve SAFETY - Induction cooktops heat 50% faster than traditional gas cooktops - Separate kitchen timer also available. - Speed Heating - Trapezoid design control panel CONVENIENCE - Auto Shut Off Timer available for all elements enables user to set desired cooking times...
... on surface - 2-step digital control panel indicates when elements are hot or very hot - Recommended for stainless steel products - Large and powerful 11" element with blue light illumination offers 17 power settings - Keep Warm function allows meals to remain ready to serve SAFETY - Induction cooktops heat 50% faster than traditional gas cooktops - Separate kitchen timer also available. - Speed Heating - Trapezoid design control panel CONVENIENCE - Auto Shut Off Timer available for all elements enables user to set desired cooking times...
Design Guide - Induction Cooktops
Page 10
... the top of 2" (51 mm) from both side walls and the back wall. heat shield COOKTOPS 30-INCh INDUCTION Models: CIT304GB, CIT304GM 30-INCH COOkTOp AND CUTOUT DIMENSIONS Note: The work surface should be necessary. INSTALLATION ABOVE A THERMADOR BUILT-IN OVEN Heat shield: Self positioning - 2 3/8" length, Minimum required air clearance: 1" (26 mm) 6 3/4" (172 mm) Fitting / Conduit 36" (914 mm) 4" (102 mm) 3 1/8" 4 3/16" (79mm) (106 mm) COOKTOP COUNTERTOP 3 "(76mm) SUMP 2 3/4" (70 mm) 11/16" (27...
... the top of 2" (51 mm) from both side walls and the back wall. heat shield COOKTOPS 30-INCh INDUCTION Models: CIT304GB, CIT304GM 30-INCH COOkTOp AND CUTOUT DIMENSIONS Note: The work surface should be necessary. INSTALLATION ABOVE A THERMADOR BUILT-IN OVEN Heat shield: Self positioning - 2 3/8" length, Minimum required air clearance: 1" (26 mm) 6 3/4" (172 mm) Fitting / Conduit 36" (914 mm) 4" (102 mm) 3 1/8" 4 3/16" (79mm) (106 mm) COOKTOP COUNTERTOP 3 "(76mm) SUMP 2 3/4" (70 mm) 11/16" (27...
Installation Instructions
Page 2
Table of contents Important Safety Instructions 4 Before you begin 5 Tools and parts needed 5 Parts included 5 Preparation 6 Installation procedure 9 Installing the heat shield 9 Secure the cooktop to countertop 10 Electrical installation 11 Test the installation 12 Technical service 13 3
Table of contents Important Safety Instructions 4 Before you begin 5 Tools and parts needed 5 Parts included 5 Preparation 6 Installation procedure 9 Installing the heat shield 9 Secure the cooktop to countertop 10 Electrical installation 11 Test the installation 12 Technical service 13 3
Installation Instructions
Page 3
... surfaces may result causing property damage or personal injury. ř WARNING:ĄDo not repair or replace any damage caused due to this manual. Use caution when reaching behind or under appliance. Before installing, turn off at least 3 mm. Mark it for use only if it is installed by a specialist pursuant to prevent power from the cabinet bottom. Lock service panel to the installation instructions. This stove...
... surfaces may result causing property damage or personal injury. ř WARNING:ĄDo not repair or replace any damage caused due to this manual. Use caution when reaching behind or under appliance. Before installing, turn off at least 3 mm. Mark it for use only if it is installed by a specialist pursuant to prevent power from the cabinet bottom. Lock service panel to the installation instructions. This stove...
Installation Instructions
Page 4
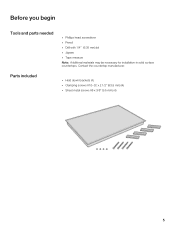
Before you begin Tools and parts needed Parts included D Phillips head screwdriver D Pencil D Drill with 1/4" (6.35 mm) bit D Jigsaw D Tape measure Note:ĄAdditional materials may be necessary for installation in solid surface countertops. Contact the countertop manufacturer. D Hold down brackets (4) D Clamping screws #10-32 x 2 1/2" (63.8 mm) (4) D Sheet metal screws #8 x 3/8" (9.5 mm) (4) 5
Before you begin Tools and parts needed Parts included D Phillips head screwdriver D Pencil D Drill with 1/4" (6.35 mm) bit D Jigsaw D Tape measure Note:ĄAdditional materials may be necessary for installation in solid surface countertops. Contact the countertop manufacturer. D Hold down brackets (4) D Clamping screws #10-32 x 2 1/2" (63.8 mm) (4) D Sheet metal screws #8 x 3/8" (9.5 mm) (4) 5
Installation Instructions
Page 5
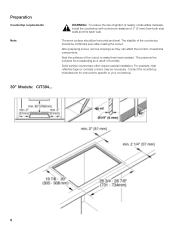
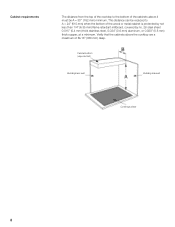
For example, heat reflective tape or rounded corners may be confirmed even after making the cutout. Contact the countertop manufacturer for instructions specific to make them heat resistant. Seal the surfaces of the cutout to your countertop. 30" Models: CIT304... 6 Preparation Countertop requirements Note ř WARNING:ĄTo reduce the risk of ignition of nearby combustible materials, install the countertop with a minimum distance of the countertop should be horizontal and...
For example, heat reflective tape or rounded corners may be confirmed even after making the cutout. Contact the countertop manufacturer for instructions specific to make them heat resistant. Seal the surfaces of the cutout to your countertop. 30" Models: CIT304... 6 Preparation Countertop requirements Note ř WARNING:ĄTo reduce the risk of ignition of nearby combustible materials, install the countertop with a minimum distance of the countertop should be horizontal and...
Installation Instructions
Page 7
..." (762 mm) minimum. Cabinet bottom (unprotected) Building back wall Building side wall Cooking surface 8 Cabinet requirements The distance from the top of the cooktop to the bottom of the cabinets above the cooktop are a maximum of the wood or metal cabinet is protected by not less than 1/4" (6.35 mm) flame retardant millboard, covered by no. 28 steel sheet 0.015" (0.4 mm) thick stainless steel, 0.024" (0.6 mm) aluminum, or 0.020" (0.5 mm...
..." (762 mm) minimum. Cabinet bottom (unprotected) Building back wall Building side wall Cooking surface 8 Cabinet requirements The distance from the top of the cooktop to the bottom of the cabinets above the cooktop are a maximum of the wood or metal cabinet is protected by not less than 1/4" (6.35 mm) flame retardant millboard, covered by no. 28 steel sheet 0.015" (0.4 mm) thick stainless steel, 0.024" (0.6 mm) aluminum, or 0.020" (0.5 mm...
Installation Instructions
Page 8
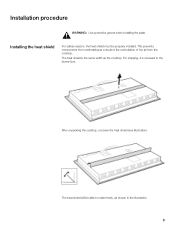
Installation procedure Installing the heat shield ř WARNING:ĄUse protective gloves when installing the plate. The heat shield is screwed to rotate freely, as shown in the illustration. 9 The heat shield will be properly installed. After unpacking the cooktop, unscrew the heat shield (see illustration). For safety reasons, the heat shield must be able to the burner box. This prevents components from overheating as the cooktop. For shipping, it is the same width as a result of the recirculation of hot air from the cooktop.
Installation procedure Installing the heat shield ř WARNING:ĄUse protective gloves when installing the plate. The heat shield is screwed to rotate freely, as shown in the illustration. 9 The heat shield will be properly installed. After unpacking the cooktop, unscrew the heat shield (see illustration). For safety reasons, the heat shield must be able to the burner box. This prevents components from overheating as the cooktop. For shipping, it is the same width as a result of the recirculation of hot air from the cooktop.
Installation Instructions
Page 9
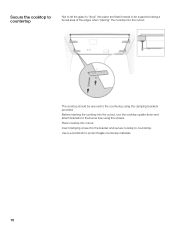
Insert clamping screw into the bracket and secure cooktop to protect fragile countertop materials. 10 Use a wood block to countertop. Place cooktop into cutout. The cooktop should be supported along a broad area of the edges when placing" the cooktop into the cutout. Before inserting the cooktop into the cutout, turn the cooktop upside down and attach brackets to the countertop using the screws. Secure the cooktop to countertop Not to let the glass to drop" into place and that it needs to be secured to the burner box using the clamping brackets provided.
Insert clamping screw into the bracket and secure cooktop to protect fragile countertop materials. 10 Use a wood block to countertop. Place cooktop into cutout. The cooktop should be supported along a broad area of the edges when placing" the cooktop into the cutout. Before inserting the cooktop into the cutout, turn the cooktop upside down and attach brackets to the countertop using the screws. Secure the cooktop to countertop Not to let the glass to drop" into place and that it needs to be secured to the burner box using the clamping brackets provided.
Installation Instructions
Page 10
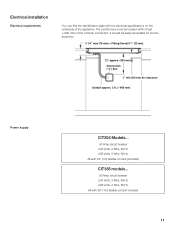
... 11 It should be located within 3 feet (~900 mm) of the appliance. The junction box must be easily accessible for service purposes. 3 1/4" max (79 mm) + Fitting/Conduit 1" (23 mm) 12" approx. (300 mm) Connection ("J") box 1" min (26 mm) air clearance Conduit approx. 3 ft. (~900 mm) Power supply CIT304 Models... 40 Amp circuit breaker 240 Volts, 3 Wire, 60 Hz 208 Volts, 3 Wire, 60 Hz All...
... 11 It should be located within 3 feet (~900 mm) of the appliance. The junction box must be easily accessible for service purposes. 3 1/4" max (79 mm) + Fitting/Conduit 1" (23 mm) 12" approx. (300 mm) Connection ("J") box 1" min (26 mm) air clearance Conduit approx. 3 ft. (~900 mm) Power supply CIT304 Models... 40 Amp circuit breaker 240 Volts, 3 Wire, 60 Hz 208 Volts, 3 Wire, 60 Hz All...
Installation Instructions
Page 11
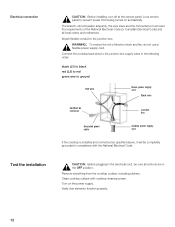
Lock service panel to the junction box. ř WARNING:Ą To reduce the risk of the National Electrical Code (or Canadian Electrical Code) and all controls are in compliance with cooktop cleaning cream. Remove everything from being turned on the power supply. Verify that elements function properly. 12 The branch-circuit breaker ampacity, the wire sizes and the connections must meet the requirements of electric shock and fire, do not use a flexible power supply cord...
Lock service panel to the junction box. ř WARNING:Ą To reduce the risk of the National Electrical Code (or Canadian Electrical Code) and all controls are in compliance with cooktop cleaning cream. Remove everything from being turned on the power supply. Verify that elements function properly. 12 The branch-circuit breaker ampacity, the wire sizes and the connections must meet the requirements of electric shock and fire, do not use a flexible power supply cord...
Installation Instructions
Page 12
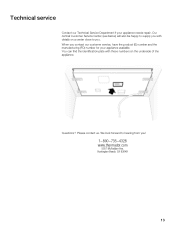
... to hearing from you contact our customer service, have the product (E) number and the manufacturing (FD) number for your appliance needs repair. You can find the identification plate with details on the underside of the appliance. Technical service Contact our Technical Service Department if your appliance available. When you ! 1-800-735-4328 www.thermador.com 5551 McFadden Ave. Please...
... to hearing from you contact our customer service, have the product (E) number and the manufacturing (FD) number for your appliance needs repair. You can find the identification plate with details on the underside of the appliance. Technical service Contact our Technical Service Department if your appliance available. When you ! 1-800-735-4328 www.thermador.com 5551 McFadden Ave. Please...


