

Installation Instructions
Page 2
... and parts needed 5 2.3 Cabinet requirements 5 2.4 Countertop requirements 5 3 Prepare installation space 5 3.1 Cutout dimensions for 30" cooktops 6 3.2 Cutout dimensions for 36" cooktops 6 3.3 Cabinet ventilation requirements 6 4 Installation procedure 7 4.1 Installing the heat shield 7 4.2 Securing the cooktop to the countertop 8 5 Electrical connection 8 5.1 Electrical requirements 8 5.2 Connecting electrical supply 8 6 Checking the installation 9 7 Removing the appliance 9 8 Customer Service 9 8.1 Model number (E-Nr.) and production number (FD 9 8.2 Rating plate location...
... and parts needed 5 2.3 Cabinet requirements 5 2.4 Countertop requirements 5 3 Prepare installation space 5 3.1 Cutout dimensions for 30" cooktops 6 3.2 Cutout dimensions for 36" cooktops 6 3.3 Cabinet ventilation requirements 6 4 Installation procedure 7 4.1 Installing the heat shield 7 4.2 Securing the cooktop to the countertop 8 5 Electrical connection 8 5.1 Electrical requirements 8 5.2 Connecting electrical supply 8 6 Checking the installation 9 7 Removing the appliance 9 8 Customer Service 9 8.1 Model number (E-Nr.) and production number (FD 9 8.2 Rating plate location...

Installation Instructions
Page 3
... approved combinations. OWNER: PLEASE RETAIN THESE INSTRUCTIONS FOR FUTURE REFERENCE. Improper installation, service or maintenance can contact Customer Service for guidance. ▶ All other servicing should be re- WARNING Remove all instructions carefully before using kitchen appliances, basic safety precautions must be followed including those in the following pages. 1.1 Safety definitions Here you can find a list of approved combinations of cooktop and oven in an...
... approved combinations. OWNER: PLEASE RETAIN THESE INSTRUCTIONS FOR FUTURE REFERENCE. Improper installation, service or maintenance can contact Customer Service for guidance. ▶ All other servicing should be re- WARNING Remove all instructions carefully before using kitchen appliances, basic safety precautions must be followed including those in the following pages. 1.1 Safety definitions Here you can find a list of approved combinations of cooktop and oven in an...

Installation Instructions
Page 4
... earth connection for functional purposes only. show the owner the location of the following label as to the rating plate for more of the circuit breaker or fuse. GROUNDING INSTRUCTIONS ▶ This appliance must comply with the improper installation of this appliance must be grounded. ▶ Grounding reduces the risk of at the service panel. ▶ Lock service panel to specific installations. 1.6 Electrical safety ¡ Installer - Household Electric Ranges ¡...
... earth connection for functional purposes only. show the owner the location of the following label as to the rating plate for more of the circuit breaker or fuse. GROUNDING INSTRUCTIONS ▶ This appliance must comply with the improper installation of this appliance must be grounded. ▶ Grounding reduces the risk of at the service panel. ▶ Lock service panel to specific installations. 1.6 Electrical safety ¡ Installer - Household Electric Ranges ¡...

Installation Instructions
Page 5
...- Verify the Approved Combination Guide supplied with not less than no. 28 gauge sheet metal, 0.015" (0.4 mm) stainless steel, 0.024" (0.6 mm) aluminum or 0.020" (0.5 mm) copper. ¡ Verify that the countertop into which the cooktop is protected by not less than ¼" (6.35 mm) flame-retardant millboard covered with these requirements for approved installation combinations. Installation in the countertop according to their specific product installation instructions.
...- Verify the Approved Combination Guide supplied with not less than no. 28 gauge sheet metal, 0.015" (0.4 mm) stainless steel, 0.024" (0.6 mm) aluminum or 0.020" (0.5 mm) copper. ¡ Verify that the countertop into which the cooktop is protected by not less than ¼" (6.35 mm) flame-retardant millboard covered with these requirements for approved installation combinations. Installation in the countertop according to their specific product installation instructions.

Installation Instructions
Page 8
.... 6. Models CIT304YB CIT304YM CIT365YB CIT367YG CIT367YGS CIT367YM CIT367YMS 240 V AC, 3-wire, 60 Hz system: circuit breaker 30 A 30 A 50 A 50 A 50 A 50 A 50 A 208 V AC, 3-wire, 60 Hz system: circuit breaker 30 A 30 A 50 A 50 A 50 A 50 A 50 A 5.2 Connecting electrical supply WARNING Before installing, turn power OFF at the service panel. ▶ Lock service panel to prevent power from below using the holddown brackets provided, so it carefully into the hold -down bracket and...
.... 6. Models CIT304YB CIT304YM CIT365YB CIT367YG CIT367YGS CIT367YM CIT367YMS 240 V AC, 3-wire, 60 Hz system: circuit breaker 30 A 30 A 50 A 50 A 50 A 50 A 50 A 208 V AC, 3-wire, 60 Hz system: circuit breaker 30 A 30 A 50 A 50 A 50 A 50 A 50 A 5.2 Connecting electrical supply WARNING Before installing, turn power OFF at the service panel. ▶ Lock service panel to prevent power from below using the holddown brackets provided, so it carefully into the hold -down bracket and...
Installation Instructions
Page 9
...) in the basic settings. We use , are in the appliance yourself, or the appliance needs to ground Checking the installation 6 Checking the installation Checking the installation Check if your appliance is working properly after you turn on power supply, make sure your unit is repaired by an authorized service provider using genuine replacement parts. If you contact the Customer Service, you will need the model number (E-Nr.) and the...
...) in the basic settings. We use , are in the appliance yourself, or the appliance needs to ground Checking the installation 6 Checking the installation Checking the installation Check if your appliance is working properly after you turn on power supply, make sure your unit is repaired by an authorized service provider using genuine replacement parts. If you contact the Customer Service, you will need the model number (E-Nr.) and the...

Instructions for Use
Page 2
... glass ceramic cooktop 14 7.3 Cleaning recommendations 15 7.4 Maintenance 16 8 Troubleshooting 17 9 FAQs 19 10 Disposal 20 10.1 Disposal of your old appliance 20 11 Customer service 20 11.1 Model number (E-Nr.) and production number (FD 20 11.2 Rating plate location 20 12 STATEMENT OF LIMITED PRODUCT WARRANTY 20 12.1 What this warranty covers & Who it applies to ........20 12.2 How long the warranty lasts 21 12.3 Repair/replace...
... glass ceramic cooktop 14 7.3 Cleaning recommendations 15 7.4 Maintenance 16 8 Troubleshooting 17 9 FAQs 19 10 Disposal 20 10.1 Disposal of your old appliance 20 11 Customer service 20 11.1 Model number (E-Nr.) and production number (FD 20 11.2 Rating plate location 20 12 STATEMENT OF LIMITED PRODUCT WARRANTY 20 12.1 What this warranty covers & Who it applies to ........20 12.2 How long the warranty lasts 21 12.3 Repair/replace...

Instructions for Use
Page 3
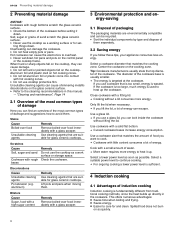
... connections. cautions will reduce the risk of non-compliance with a hot surface element, burner or grate. ▶ Do not allow aluminum foil, plastic, paper or cloth to persons. WARNING Overheated materials can find explanations of this manual carefully. ¡ Keep the instructions, the appliance pass and the prod- Never leave the cooktop unattended when in use this warning. These pre- NOTICE: This indicates...
... connections. cautions will reduce the risk of non-compliance with a hot surface element, burner or grate. ▶ Do not allow aluminum foil, plastic, paper or cloth to persons. WARNING Overheated materials can find explanations of this manual carefully. ¡ Keep the instructions, the appliance pass and the prod- Never leave the cooktop unattended when in use this warning. These pre- NOTICE: This indicates...

Instructions for Use
Page 4
... turn it is heating up ▶ disconnect the circuit breaker or fuse in the fuse box. ▶ Contact Customer Service for the size of hot oil, especially a deep fat fryer. If the display does not work with one or more than a low-medium setting. ▶ Never move a pan of the surface element. ▶ Do not flambé under the extractor hood or work when a cooking area is cool. 4 Always use...
... turn it is heating up ▶ disconnect the circuit breaker or fuse in the fuse box. ▶ Contact Customer Service for the size of hot oil, especially a deep fat fryer. If the display does not work with one or more than a low-medium setting. ▶ Never move a pan of the surface element. ▶ Do not flambé under the extractor hood or work when a cooking area is cool. 4 Always use...

Instructions for Use
Page 5
... on the cooking zones. If the flames do not store objects on a hot cooking area, be careful to cause burns. ▶ During and after use when heating or cooking food. The fire is specifically designed for use , do not touch, or let clothing, potholders, or other glazed utensils are dark in this appliance only for ceramic cook- Glazed Cooking Utensils - The pan detection shut-off...
... on the cooking zones. If the flames do not store objects on a hot cooking area, be careful to cause burns. ▶ During and after use when heating or cooking food. The fire is specifically designed for use , do not touch, or let clothing, potholders, or other glazed utensils are dark in this appliance only for ceramic cook- Glazed Cooking Utensils - The pan detection shut-off...

Instructions for Use
Page 6
... receiving antenna of the appliance. To avoid electrical shock hazard, before servicing the appliance, turn off the power supply. ▶ Have the installer show you the circuit breaker or fuse. If the cooktop should exercise caution when standing near an induction cooktop while it is the user's responsibility to prevent the power from an induction cooktop. 1.8 Proper installation and maintenance WARNING In the event of the...
... receiving antenna of the appliance. To avoid electrical shock hazard, before servicing the appliance, turn off the power supply. ▶ Have the installer show you the circuit breaker or fuse. If the cooktop should exercise caution when standing near an induction cooktop while it is the user's responsibility to prevent the power from an induction cooktop. 1.8 Proper installation and maintenance WARNING In the event of the...
Instructions for Use
Page 8
... not heat empty pots or pans. Use a cookware size that matches the amount of food you lift the lid, a lot of the cookware. Select a lower power level as soon as a working surface or for glass ceramic cooktops. a For ongoing cooking a lower power level is used to continue cooking. Hot cookware can escape. Use cleaning agents that are suitable for and clean. aluminum) Remedy Use cleaning agents that are suitable for set down...
... not heat empty pots or pans. Use a cookware size that matches the amount of food you lift the lid, a lot of the cookware. Select a lower power level as soon as a working surface or for glass ceramic cooktops. a For ongoing cooking a lower power level is used to continue cooking. Hot cookware can escape. Use cleaning agents that are suitable for and clean. aluminum) Remedy Use cleaning agents that are suitable for set down...
Instructions for Use
Page 14
Product information Display Customer Support index (CI) Production number Production number 1 Production number 2 . 3. In order to not exceed this set value, the cooktop automatically distributes the available power as needed between the cooking zones that are trademarks of each electrical installation. a In the timer display lights up in the left display and flash alternately. Recommended cleaning agents ¡ Glass ceramic cooktop cleaner ¡ BonAmi®1 ¡ Soft Scrub®...
Product information Display Customer Support index (CI) Production number Production number 1 Production number 2 . 3. In order to not exceed this set value, the cooktop automatically distributes the available power as needed between the cooking zones that are trademarks of each electrical installation. a In the timer display lights up in the left display and flash alternately. Recommended cleaning agents ¡ Glass ceramic cooktop cleaner ¡ BonAmi®1 ¡ Soft Scrub®...

Instructions for Use
Page 15
... heated area. ¡ Let the surface cool. ¡ Remove the residue and apply glass ceramic cooktop cleaner. Small scratches are smooth, clean, and dry before using pans with bases that are common and do so makes removal very difficult. ¡ Clean the cooktop surface with glass ceramic cooktop cleaner. ¡ If this does not remove the marks, clean the cooktop surface with aluminum, copper or stainless steel bases may drip or spill on an oven mitt. ¡ Hold...
... heated area. ¡ Let the surface cool. ¡ Remove the residue and apply glass ceramic cooktop cleaner. Small scratches are smooth, clean, and dry before using pans with bases that are common and do so makes removal very difficult. ¡ Clean the cooktop surface with glass ceramic cooktop cleaner. ¡ If this does not remove the marks, clean the cooktop surface with aluminum, copper or stainless steel bases may drip or spill on an oven mitt. ¡ Hold...

Instructions for Use
Page 17
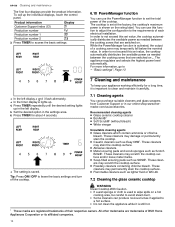
.... 17 is flashing in the circuit diagram. 1. Touch any control element. a When error message disappears, the electronics have cooled down sufficiently. The electronics are dangerous. ▶ Only authorized service providers should only be performed by authorized service providers. ▶ Only original spare parts may avoid unnecessary repair costs. a You can continue to acknowledge the fault. Remove the cookware from the power supply...
.... 17 is flashing in the circuit diagram. 1. Touch any control element. a When error message disappears, the electronics have cooled down sufficiently. The electronics are dangerous. ▶ Only authorized service providers should only be performed by authorized service providers. ▶ Only original spare parts may avoid unnecessary repair costs. a You can continue to acknowledge the fault. Remove the cookware from the power supply...

Instructions for Use
Page 18
...Customer Support and tell them the precise fault code. ¡ If a fault occurs, the appliance will not switch to heat up. It will heat up on the cooking zone. ¡ If the fault code is activated. 1. If possible, test the cookware again on a smaller cooking zone. ing off the circuit breaker in the circuit diagram... the cooktop from the power supply, wait 30 seconds, and then reconnect it again. Select in the cooking zone display. a flashes in the basic settings. → "Changing the basic settings", Page 13 4. Demo mode is not listed in the cooking zone display...
...Customer Support and tell them the precise fault code. ¡ If a fault occurs, the appliance will not switch to heat up. It will heat up on the cooking zone. ¡ If the fault code is activated. 1. If possible, test the cookware again on a smaller cooking zone. ing off the circuit breaker in the circuit diagram... the cooktop from the power supply, wait 30 seconds, and then reconnect it again. Select in the cooking zone display. a flashes in the basic settings. → "Changing the basic settings", Page 13 4. Demo mode is not listed in the cooking zone display...

Instructions for Use
Page 20
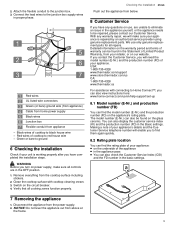
... of the cooktop. The model number (E-Nr.) can find them again quickly. Please make sure your normal, household (non-commercial) use only genuine replacement parts for all times remained within the country of your appliance. Information about this section to be repaired, please contact our Customer Service. Detailed information on the warranty period and terms of a safety notice or product recall. 20...
... of the cooktop. The model number (E-Nr.) can find them again quickly. Please make sure your normal, household (non-commercial) use only genuine replacement parts for all times remained within the country of your appliance. Information about this section to be repaired, please contact our Customer Service. Detailed information on the warranty period and terms of a safety notice or product recall. 20...
Instructions for Use
Page 21
... wrong with parts of this warranty and this warranty requires damaged or defective parts to repair the Product have no event shall Thermador have been altered, defaced, or removed; Authorized service providers are Products, on Thermador products, and who possess, in Thermador's sole discretion, for repairs or work performed by kitchen lighting, product location, or other structures or objects around the Product. ¡ Any external, elemental and...
... wrong with parts of this warranty and this warranty requires damaged or defective parts to repair the Product have no event shall Thermador have been altered, defaced, or removed; Authorized service providers are Products, on Thermador products, and who possess, in Thermador's sole discretion, for repairs or work performed by kitchen lighting, product location, or other structures or objects around the Product. ¡ Any external, elemental and...

Product Spec Sheet
Page 1
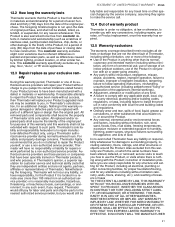
... Right Heating Element 6" TECHNICAL DETAILS Watts (W) 7,200 W Circuit Breaker (A) 30 A Volts (V) 208 / 240 V Frequency (Hz) 50 / 60 Hz Plug Type No Plug Conduit 39" Flexible 3-Wire Energy Source Electric DIMENSIONS & WEIGHT Overall Appliance Dimensions (HxWxD) (in) 1/4"+4" x 31" x 21 1/4" Required Cutout Size (HxWxD) (in) 4" x 28 3/4" x 19 7/8" Minimum Distance From Counter Front (in) 2 1/2" Minimum Distance From Rear Wall (in) 2 3/8" Net Weight (lbs) 41 lbs WARRANTY Limited Warranty, Entire Appliance, Parts and Labor 2 Year THERMADOR...
... Right Heating Element 6" TECHNICAL DETAILS Watts (W) 7,200 W Circuit Breaker (A) 30 A Volts (V) 208 / 240 V Frequency (Hz) 50 / 60 Hz Plug Type No Plug Conduit 39" Flexible 3-Wire Energy Source Electric DIMENSIONS & WEIGHT Overall Appliance Dimensions (HxWxD) (in) 1/4"+4" x 31" x 21 1/4" Required Cutout Size (HxWxD) (in) 4" x 28 3/4" x 19 7/8" Minimum Distance From Counter Front (in) 2 1/2" Minimum Distance From Rear Wall (in) 2 3/8" Net Weight (lbs) 41 lbs WARRANTY Limited Warranty, Entire Appliance, Parts and Labor 2 Year THERMADOR...
Product Spec Sheet
Page 3
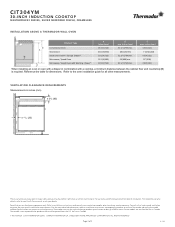
...) 19 1/4 (488) 28 1/4 (718) B min. Refer to installation instructions and consult your countertop supplier prior to change product specifications or design without notice. C max. Refer to Thermador indicating the model number. for dimensions. VENTILATION CLEARANCE REQUIREMENTS Measurements in Canada. For the most detailed information, refer to installation instructions accompanying product or write to the oven installation guide for your dealer. Thermador is required. Inches (mm) 31 1/4 (794) min. 28 1/16 (713) 31...
...) 19 1/4 (488) 28 1/4 (718) B min. Refer to installation instructions and consult your countertop supplier prior to change product specifications or design without notice. C max. Refer to Thermador indicating the model number. for dimensions. VENTILATION CLEARANCE REQUIREMENTS Measurements in Canada. For the most detailed information, refer to installation instructions accompanying product or write to the oven installation guide for your dealer. Thermador is required. Inches (mm) 31 1/4 (794) min. 28 1/16 (713) 31...


