Instructions for Use
Page 3
... 6.1 Cleaning agents 16 6.2 Cleaning the glass ceramic cooktop 16 6.3 Cleaning the cooktop frame 17 6.4 Cleaning recommendations 17 6.5 Maintenance 18 7 Troubleshooting 19 8 Disposal 20 8.1 Disposal of your old appliance 20 9 Customer Service 20 9.1 Model number (E-Nr.) and production number (FD 20 9.2 Rating plate location 21 10 STATEMENT OF LIMITED PRODUCT WARRANTY 21 10.1 What this warranty covers & Who it applies to........ 21 10.2 How long the warranty lasts 21 10.3 Repair/replace as...
... 6.1 Cleaning agents 16 6.2 Cleaning the glass ceramic cooktop 16 6.3 Cleaning the cooktop frame 17 6.4 Cleaning recommendations 17 6.5 Maintenance 18 7 Troubleshooting 19 8 Disposal 20 8.1 Disposal of your old appliance 20 9 Customer Service 20 9.1 Model number (E-Nr.) and production number (FD 20 9.2 Rating plate location 21 10 STATEMENT OF LIMITED PRODUCT WARRANTY 21 10.1 What this warranty covers & Who it applies to........ 21 10.2 How long the warranty lasts 21 10.3 Repair/replace as...

Instructions for Use
Page 4
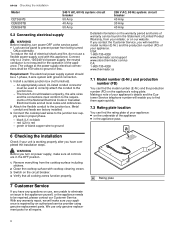
... (including children) with a hot surface element, burner or grate. ▶ Do not allow aluminum foil, plastic, paper or cloth to boil dry. uct information safe for future reference or for the next owner. ¡ Do not connect the appliance if it is not intended for use by qualified persons. ternal clock timer or a remote control. 1.4 Restriction on a cooktop with an ex...
... (including children) with a hot surface element, burner or grate. ▶ Do not allow aluminum foil, plastic, paper or cloth to boil dry. uct information safe for future reference or for the next owner. ¡ Do not connect the appliance if it is not intended for use by qualified persons. ternal clock timer or a remote control. 1.4 Restriction on a cooktop with an ex...
Instructions for Use
Page 5
... Customer Service for the size of the surface element. ▶ Do not flambé under the extractor hood or work when a cooking area is heating up disconnect the circuit breaker or fuse in ignition of the cooking zone. ▶ Do not place a lid on hot surfaces may result in the electrical panel. ▶ Contact an authorized service provider. However, do not operate the ventilation sys- Controls may turn hood ON when cooking at High Set...
... Customer Service for the size of the surface element. ▶ Do not flambé under the extractor hood or work when a cooking area is heating up disconnect the circuit breaker or fuse in ignition of the cooking zone. ▶ Do not place a lid on hot surfaces may result in the electrical panel. ▶ Contact an authorized service provider. However, do not operate the ventilation sys- Controls may turn hood ON when cooking at High Set...
Instructions for Use
Page 6
... an electric shock. ▶ Do not use , do not go out immediately, EVACUATE AND CALL THE FIRE DEPARTMENT. ▶ NEVER PICK UP A FLAMING PAN - You may cause the container to cool. Liquid between the pot base and the cooktop may build up of pressure may be hot even though they have any steam cleaners or high-pressure clean- Only certain types of glass, glass/ceramic, ceramic...
... an electric shock. ▶ Do not use , do not go out immediately, EVACUATE AND CALL THE FIRE DEPARTMENT. ▶ NEVER PICK UP A FLAMING PAN - You may cause the container to cool. Liquid between the pot base and the cooktop may build up of pressure may be hot even though they have any steam cleaners or high-pressure clean- Only certain types of glass, glass/ceramic, ceramic...
Instructions for Use
Page 7
... Not Leave Children Alone. ▶ Children should not be replaced by a qualified technician. ▶ Connect only to properly grounded outlet. ▶ Refer to an authorized service provider. To avoid electrical shock hazard, before servicing the appliance, turn off the power supply. ▶ Have the installer show you the circuit breaker or fuse. Improper installation or grounding can cause injuries. ▶ Do not...
... Not Leave Children Alone. ▶ Children should not be replaced by a qualified technician. ▶ Connect only to properly grounded outlet. ▶ Refer to an authorized service provider. To avoid electrical shock hazard, before servicing the appliance, turn off the power supply. ▶ Have the installer show you the circuit breaker or fuse. Improper installation or grounding can cause injuries. ▶ Do not...

Instructions for Use
Page 8
... suitable for glass ceramic cooktops. When hard or sharp objects fall on heated cooking zones. ▶ Do not use oven protective foil. ▶ Do not use the cooktop as a work surface or storage space. Stains Cause Boiled-over food Unsuitable cleaning agents Remedy Remove boiled-over food immediately with a base diameter that matches the cooking zone. Lift pots and pans when moving them . If you use a glass lid...
... suitable for glass ceramic cooktops. When hard or sharp objects fall on heated cooking zones. ▶ Do not use oven protective foil. ▶ Do not use the cooktop as a work surface or storage space. Stains Cause Boiled-over food Unsuitable cleaning agents Remedy Remove boiled-over food immediately with a base diameter that matches the cooking zone. Lift pots and pans when moving them . If you use a glass lid...

Instructions for Use
Page 12
... frying pan. a lights up quickly with power level 9. 1. Press to the size of the dual cooking zone has to be activated to select the cooking zone. 2. You can heat larger quantities of meat, vegetables Steaks medium-rare, fried boiled potatoes Setting CookSmart® CAUTION Hot oil or fat may overheat. Try the lowest frying level first and then change it turns off...
... frying pan. a lights up quickly with power level 9. 1. Press to the size of the dual cooking zone has to be activated to select the cooking zone. 2. You can heat larger quantities of meat, vegetables Steaks medium-rare, fried boiled potatoes Setting CookSmart® CAUTION Hot oil or fat may overheat. Try the lowest frying level first and then change it turns off...

Instructions for Use
Page 17
... plastic film or foil REMOVE IMMEDIATELY. Apply a small amount of their respective owners. All other trademarks are common and do so makes removal very difficult. ¡ Clean the cooktop surface with glass ceramic cooktop cleaner. ¡ If this does not remove the marks, clean the cooktop surface with aluminum, copper or stainless steel bases may drip or spill on an oven mitt. ¡ Hold the glass scraper at 30°...
... plastic film or foil REMOVE IMMEDIATELY. Apply a small amount of their respective owners. All other trademarks are common and do so makes removal very difficult. ¡ Clean the cooktop surface with glass ceramic cooktop cleaner. ¡ If this does not remove the marks, clean the cooktop surface with aluminum, copper or stainless steel bases may drip or spill on an oven mitt. ¡ Hold the glass scraper at 30°...
Instructions for Use
Page 19
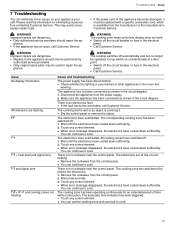
... does not work. ▶ Switch off the circuit breaker or fuse in your appliance yourself. Issue No display information All indicators are flashing + heat level and signal tone and signal tone + / and cooking zones not heating Cause and troubleshooting The power supply has been disconnected. ▶ Check whether the lighting in the electrical panel. ▶ Call Customer Service. The corresponding cooking zone has been switched off to cook. You can...
... does not work. ▶ Switch off the circuit breaker or fuse in your appliance yourself. Issue No display information All indicators are flashing + heat level and signal tone and signal tone + / and cooking zones not heating Cause and troubleshooting The power supply has been disconnected. ▶ Check whether the lighting in the electrical panel. ▶ Call Customer Service. The corresponding cooking zone has been switched off to cook. You can...

Instructions for Use
Page 20
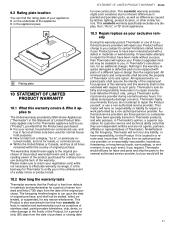
... authorized service provider using genuine replacement parts. sible manner. Customer Service 9 Customer Service Customer Service If you are in the electrical panel. 2. Cause The cooktop regulates the cooking zone temperature by turning the heat source on the durability of Limited Product Warranty, from which you have any adverse effect on the operation of the heat source beneath the cooking zone may hear a quiet hum when the heating elements are looking at higher settings...
... authorized service provider using genuine replacement parts. sible manner. Customer Service 9 Customer Service Customer Service If you are in the electrical panel. 2. Cause The cooktop regulates the cooking zone temperature by turning the heat source on the durability of Limited Product Warranty, from which you have any adverse effect on the operation of the heat source beneath the cooking zone may hear a quiet hum when the heating elements are looking at higher settings...
Instructions for Use
Page 21
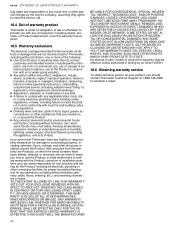
... warranty requires damaged or defective parts to be available to you would still pay for repairs or work performed by a non-authorized service provider. This Product is ", or previously returned model), and not for resale, or commercial use , and has in painted and porcelain parts, as well as is also warranted to each succeeding owner of the product purchased for customer service...
... warranty requires damaged or defective parts to be available to you would still pay for repairs or work performed by a non-authorized service provider. This Product is ", or previously returned model), and not for resale, or commercial use , and has in painted and porcelain parts, as well as is also warranted to each succeeding owner of the product purchased for customer service...
Instructions for Use
Page 22
... DIRECT DAMAGES WHICH ARE DEFINITIVELY CAUSED EXCLUSIVELY BY THERMADOR, OR OTHERWISE. In no obligation, at 1-800-735-4328 to schedule a repair. service visits to teach you should contact Thermador Customer Support at law or otherwise, to provide you with any concessions, including repairs, prorates, or Product replacement, once this warranty has expired. 10.5 Warranty exclusions The warranty coverage described herein excludes all electrical...
... DIRECT DAMAGES WHICH ARE DEFINITIVELY CAUSED EXCLUSIVELY BY THERMADOR, OR OTHERWISE. In no obligation, at 1-800-735-4328 to schedule a repair. service visits to teach you should contact Thermador Customer Support at law or otherwise, to provide you with any concessions, including repairs, prorates, or Product replacement, once this warranty has expired. 10.5 Warranty exclusions The warranty coverage described herein excludes all electrical...

Product Spec Sheet
Page 1
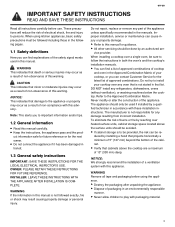
...Element Power of Front Right Heating Element ELEMENT SIZE Dimension of Front Left Heating Element Dimension of Back Left Heating Element Dimension of Center Heating Element Dimension of Back Right Heating Element Dimension of Front Right Heating Element TECHNICAL DETAILS Watts (W) Circuit Breaker (A) Volts (V) Frequency (Hz) Plug Type Conduit Energy Source DIMENSIONS & WEIGHT Overall Appliance Dimensions (HxWxD) (in) Required Cutout Size (HxWxD) (in) Minimum Distance From Counter Front (in) Minimum Distance From Rear Wall (in) Net Weight (lbs) WARRANTY Limited Warranty, Entire Appliance, Parts...
...Element Power of Front Right Heating Element ELEMENT SIZE Dimension of Front Left Heating Element Dimension of Back Left Heating Element Dimension of Center Heating Element Dimension of Back Right Heating Element Dimension of Front Right Heating Element TECHNICAL DETAILS Watts (W) Circuit Breaker (A) Volts (V) Frequency (Hz) Plug Type Conduit Energy Source DIMENSIONS & WEIGHT Overall Appliance Dimensions (HxWxD) (in) Required Cutout Size (HxWxD) (in) Minimum Distance From Counter Front (in) Minimum Distance From Rear Wall (in) Net Weight (lbs) WARRANTY Limited Warranty, Entire Appliance, Parts...

Product Spec Sheet
Page 2
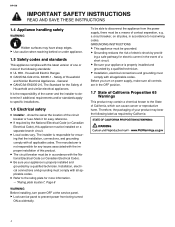
distance between the surface of the cooktop and the underside of the ventilation hood This distance can be smaller, check installation instructions of 3 3 / 22 distance from the cooktop cut -out to the wall B: Max. distance from the cooktop cut -out to the side wall Page 2 of ventilation hood D: Min. CET366YB 36-INCH ELECTRIC COOKTOP MASTERPIECE® SERIES 36-INCH ELECTRIC COOKTOP AND CUTOUT DIMENSIONS Measurements in inches (mm) 30 (762) (C) 211/4 (540) 37 (940) 4 (100...
distance between the surface of the cooktop and the underside of the ventilation hood This distance can be smaller, check installation instructions of 3 3 / 22 distance from the cooktop cut -out to the wall B: Max. distance from the cooktop cut -out to the side wall Page 2 of ventilation hood D: Min. CET366YB 36-INCH ELECTRIC COOKTOP MASTERPIECE® SERIES 36-INCH ELECTRIC COOKTOP AND CUTOUT DIMENSIONS Measurements in inches (mm) 30 (762) (C) 211/4 (540) 37 (940) 4 (100...
Product Spec Sheet
Page 3
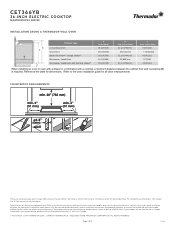
CET366YB 36-INCH ELECTRIC COOKTOP MASTERPIECE® SERIES INSTALLATION ABOVE A THERMADOR WALL OVEN Product Type Conventional Oven Steam Oven Steam Oven with 4" Storage Drawer* Microwave / Speed Oven Microwave / Speed Oven with a heating and ventilation engineer for your dealer. Inches (mm) 31 1/4 (794) min. 28 1/16 (713) 31 1/4 (794) min. 24 (609)min. 31 1/4 (794) min. Models: CEM366TB, CET366TB COUNTERTOP REQUIREMENTS Create the cut surfaces in the countertop according to t installation diagram. Seal cut -out in a heat- For complete warranty details...
CET366YB 36-INCH ELECTRIC COOKTOP MASTERPIECE® SERIES INSTALLATION ABOVE A THERMADOR WALL OVEN Product Type Conventional Oven Steam Oven Steam Oven with 4" Storage Drawer* Microwave / Speed Oven Microwave / Speed Oven with a heating and ventilation engineer for your dealer. Inches (mm) 31 1/4 (794) min. 28 1/16 (713) 31 1/4 (794) min. 24 (609)min. 31 1/4 (794) min. Models: CEM366TB, CET366TB COUNTERTOP REQUIREMENTS Create the cut surfaces in the countertop according to t installation diagram. Seal cut -out in a heat- For complete warranty details...
Installation Instructions
Page 2
... of California Proposition 65 Warnings 4 2 Before you begin 5 2.1 Parts included 5 2.2 Tools and parts needed 5 2.3 Cabinet requirements 5 2.4 Countertop requirements 5 3 Prepare installation space 5 3.1 Cutout dimensions for 30" cooktops 5 3.2 Cutout dimensions for 36" cooktops 6 4 Installation procedure 6 4.1 Securing the cooktop in the countertop 6 5 Electrical connection 7 5.1 Electrical requirements 7 5.2 Connecting electrical supply 8 6 Checking the installation 8 7 Customer Service 8 7.1 Model number (E-Nr.) and production number (FD 8 7.2 Rating plate location 8 2
... of California Proposition 65 Warnings 4 2 Before you begin 5 2.1 Parts included 5 2.2 Tools and parts needed 5 2.3 Cabinet requirements 5 2.4 Countertop requirements 5 3 Prepare installation space 5 3.1 Cutout dimensions for 30" cooktops 5 3.2 Cutout dimensions for 36" cooktops 6 4 Installation procedure 6 4.1 Securing the cooktop in the countertop 6 5 Electrical connection 7 5.1 Electrical requirements 7 5.2 Connecting electrical supply 8 6 Checking the installation 8 7 Customer Service 8 7.1 Model number (E-Nr.) and production number (FD 8 7.2 Rating plate location 8 2
Installation Instructions
Page 3
.... INSTALLER: LEAVE THESE INSTRUCTIONS WITH THE APPLIANCE AFTER INSTALLATION IS COMPLETE. Do not repair, replace or remove any refrigerators, dishwashers, ovens (without ventilation), or washing machines below the cooktop. duced by an authorized ser- WARNING Remove all instructions carefully before using kitchen appliances, basic safety precautions must be re- en-us IMPORTANT SAFETY INSTRUCTIONS READ AND SAVE THESE INSTRUCTIONS Read all tape and packaging before use. Improper installation, service...
.... INSTALLER: LEAVE THESE INSTRUCTIONS WITH THE APPLIANCE AFTER INSTALLATION IS COMPLETE. Do not repair, replace or remove any refrigerators, dishwashers, ovens (without ventilation), or washing machines below the cooktop. duced by an authorized ser- WARNING Remove all instructions carefully before using kitchen appliances, basic safety precautions must be re- en-us IMPORTANT SAFETY INSTRUCTIONS READ AND SAVE THESE INSTRUCTIONS Read all tape and packaging before use. Improper installation, service...
Installation Instructions
Page 4
... INSTRUCTIONS 1.4 Appliance handling safety WARNING Hidden surfaces may have sharp edges. ▶ Use caution when reaching behind or under appliance. 1.5 Safety codes and standards This appliance complies with the latest version of one or more information. → "Rating plate location", Page 8 WARNING Before installing, turn on power supply, make sure all applicable codes. Household Electric Ranges ¡ CAN/CSA-C22.2 No. 60335-1 - General...
... INSTRUCTIONS 1.4 Appliance handling safety WARNING Hidden surfaces may have sharp edges. ▶ Use caution when reaching behind or under appliance. 1.5 Safety codes and standards This appliance complies with the latest version of one or more information. → "Rating plate location", Page 8 WARNING Before installing, turn on power supply, make sure all applicable codes. Household Electric Ranges ¡ CAN/CSA-C22.2 No. 60335-1 - General...

Installation Instructions
Page 5
... a minimum of a range hood or a microwave hood above the cooktop Follow the range hood or microwave hood installation instructions for dimensional clearance above the cooktop surface. 2.4 Countertop requirements Ensure that unprotected cabinets above must be installed meets these requirements for approved installation combinations. General countertop requirements: ¡ The angle of the cut surface to the countertop must be 90°. ¡ With multi-layered countertops, secure strips laterally in the cutout if necessary. ¡ After creating the cutout, remove...
... a minimum of a range hood or a microwave hood above the cooktop Follow the range hood or microwave hood installation instructions for dimensional clearance above the cooktop surface. 2.4 Countertop requirements Ensure that unprotected cabinets above must be installed meets these requirements for approved installation combinations. General countertop requirements: ¡ The angle of the cut surface to the countertop must be 90°. ¡ With multi-layered countertops, secure strips laterally in the cutout if necessary. ¡ After creating the cutout, remove...
Installation Instructions
Page 8
.../support www.store.thermador.com/us Checking the installation Model CET366YB CEM305TB CEM366TB 240 V AC, 60 Hz system: circuit breaker 50 Amp 40 Amp 50 Amp 208 V AC, 60 Hz system: circuit breaker 40 Amp 30 Amp 40 Amp 5.2 Connecting electrical supply WARNING Before installing, turn on power supply, make sure your appliance. Clean the cooktop surface with ground connection. 1. Customer Service 7 Customer Service Customer Service If you have completed the installation steps. Making a note of your appliance's details and the Customer Service telephone number...
.../support www.store.thermador.com/us Checking the installation Model CET366YB CEM305TB CEM366TB 240 V AC, 60 Hz system: circuit breaker 50 Amp 40 Amp 50 Amp 208 V AC, 60 Hz system: circuit breaker 40 Amp 30 Amp 40 Amp 5.2 Connecting electrical supply WARNING Before installing, turn on power supply, make sure your appliance. Clean the cooktop surface with ground connection. 1. Customer Service 7 Customer Service Customer Service If you have completed the installation steps. Making a note of your appliance's details and the Customer Service telephone number...


