
Installation Instructions
Page 2
... of California Proposition 65 Warnings 4 2 Before you begin 5 2.1 Parts included 5 2.2 Tools and parts needed 5 2.3 Cabinet requirements 5 2.4 Countertop requirements 5 3 Prepare installation space 5 3.1 Cutout dimensions for 30" cooktops 5 3.2 Cutout dimensions for 36" cooktops 6 4 Installation procedure 6 4.1 Securing the cooktop in the countertop 6 5 Electrical connection 7 5.1 Electrical requirements 7 5.2 Connecting electrical supply 8 6 Checking the installation 8 7 Customer Service 8 7.1 Model number (E-Nr.) and production number (FD 8 7.2 Rating plate location 8 2
... of California Proposition 65 Warnings 4 2 Before you begin 5 2.1 Parts included 5 2.2 Tools and parts needed 5 2.3 Cabinet requirements 5 2.4 Countertop requirements 5 3 Prepare installation space 5 3.1 Cutout dimensions for 30" cooktops 5 3.2 Cutout dimensions for 36" cooktops 6 4 Installation procedure 6 4.1 Securing the cooktop in the countertop 6 5 Electrical connection 7 5.1 Electrical requirements 7 5.2 Connecting electrical supply 8 6 Checking the installation 8 7 Customer Service 8 7.1 Model number (E-Nr.) and production number (FD 8 7.2 Rating plate location 8 2
Installation Instructions
Page 3
... repair, replace or remove any damage resulting from incorrect installation. vice provider. The manufacturer is to this warning. NOTICE: We strongly recommend the installation of approved combinations. CAUTION This indicates that cabinets above the surface units should be sure to follow the instructions in both the oven's and the cooktop's installation manuals. ▶ You can find a list of approved combinations of the appliance unless specifically...
... repair, replace or remove any damage resulting from incorrect installation. vice provider. The manufacturer is to this warning. NOTICE: We strongly recommend the installation of approved combinations. CAUTION This indicates that cabinets above the surface units should be sure to follow the instructions in both the oven's and the cooktop's installation manuals. ▶ You can find a list of approved combinations of the appliance unless specifically...
Installation Instructions
Page 4
...; Installation, electrical connections and grounding must comply with the latest version of one or more information. → "Rating plate location", Page 8 WARNING Before installing, turn on power supply, make sure all controls are in accordance with the improper installation of contact separation, e.g. To be a means of this appliance must comply with all applicable codes. Before you turn power OFF at the service panel. ▶ Lock service panel to...
...; Installation, electrical connections and grounding must comply with the latest version of one or more information. → "Rating plate location", Page 8 WARNING Before installing, turn on power supply, make sure all controls are in accordance with the improper installation of contact separation, e.g. To be a means of this appliance must comply with all applicable codes. Before you turn power OFF at the service panel. ▶ Lock service panel to...

Installation Instructions
Page 5
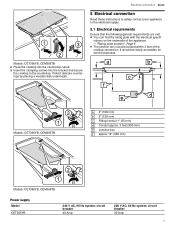
...Contact the countertop manufacturer for instructions specific to your countertop. Installation of a range hood or a microwave hood above the cooktop Follow the range hood or microwave hood installation instructions for approved installation combinations. Prepare installation space 3 Prepare installation space Prepare installation space Create the cutout in solid surface countertops. side and cabinet surfaces of ⅜" (10 mm). 3.1 Cutout dimensions for 30" cooktops Refer to these instructions for dimensional clearance above the cooktop surface. 2.4 Countertop requirements Ensure that...
...Contact the countertop manufacturer for instructions specific to your countertop. Installation of a range hood or a microwave hood above the cooktop Follow the range hood or microwave hood installation instructions for approved installation combinations. Prepare installation space 3 Prepare installation space Prepare installation space Create the cutout in solid surface countertops. side and cabinet surfaces of ⅜" (10 mm). 3.1 Cutout dimensions for 30" cooktops Refer to these instructions for dimensional clearance above the cooktop surface. 2.4 Countertop requirements Ensure that...
Installation Instructions
Page 7
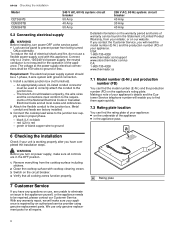
.... 5.1 Electrical requirements Ensure that the following general requirements are met. ¡ You can find the rating plate with the electrical specifi- It should be located within 3 feet of the cooktop connection. Models: CET305YB, CEM305TB 4" (100 mm) 5" (125 mm) Fitting/conduit 1" (25 mm) Conduit approx. 3 feet (900 mm) Junction box approx 12" (300 mm) Models: CET366YB, CEM366TB Power supply Model CET305YB 240 V AC, 60 Hz system: circuit breaker 40 Amp...
.... 5.1 Electrical requirements Ensure that the following general requirements are met. ¡ You can find the rating plate with the electrical specifi- It should be located within 3 feet of the cooktop connection. Models: CET305YB, CEM305TB 4" (100 mm) 5" (125 mm) Fitting/conduit 1" (25 mm) Conduit approx. 3 feet (900 mm) Junction box approx 12" (300 mm) Models: CET366YB, CEM366TB Power supply Model CET305YB 240 V AC, 60 Hz system: circuit breaker 40 Amp...
Installation Instructions
Page 8
... required for all cooking zones function properly. Install a suitable junction box (not furnished). - The branch-circuit breakers ampacity, the wire sizes and the connections must be repaired, please contact our Customer Service. Rating plate 8 en-us CA: 1-800-735-4328 www.thermador.ca 7.1 Model number (E-Nr.) and production number (FD) You can be a 1-phase, 3-wire system with ground connection. 1. Making a note of the National Electrical Code or Canadian Electrical Code and all local codes...
... required for all cooking zones function properly. Install a suitable junction box (not furnished). - The branch-circuit breakers ampacity, the wire sizes and the connections must be repaired, please contact our Customer Service. Rating plate 8 en-us CA: 1-800-735-4328 www.thermador.ca 7.1 Model number (E-Nr.) and production number (FD) You can be a 1-phase, 3-wire system with ground connection. 1. Making a note of the National Electrical Code or Canadian Electrical Code and all local codes...
Instructions for Use
Page 3
...9 4.1 Control panel 9 4.2 Residual heat indicator 9 4.3 Cooking zones 10 5 Operation 10 5.1 Turning the cooktop on 10 5.2 Turning the cooktop off 10 5.3 Cooking zone settings 10 5.4 Recommended cooking settings 11 5.5 CookSmart 12 5.6 Kitchen timer 14 5.7 Panel lock 15 5.8 Wipe protection 15 5.9 Basic settings 15 6 Cleaning and maintenance 16 6.1 Cleaning agents 16 6.2 Cleaning the glass ceramic cooktop 16 6.3 Cleaning recommendations 17 6.4 Maintenance 17 7 Troubleshooting 18 8 Disposal 19 8.1 Disposal of your old appliance 19 9 Customer Service 19 9.1 Model number (E-Nr...
...9 4.1 Control panel 9 4.2 Residual heat indicator 9 4.3 Cooking zones 10 5 Operation 10 5.1 Turning the cooktop on 10 5.2 Turning the cooktop off 10 5.3 Cooking zone settings 10 5.4 Recommended cooking settings 11 5.5 CookSmart 12 5.6 Kitchen timer 14 5.7 Panel lock 15 5.8 Wipe protection 15 5.9 Basic settings 15 6 Cleaning and maintenance 16 6.1 Cleaning agents 16 6.2 Cleaning the glass ceramic cooktop 16 6.3 Cleaning recommendations 17 6.4 Maintenance 17 7 Troubleshooting 18 8 Disposal 19 8.1 Disposal of your old appliance 19 9 Customer Service 19 9.1 Model number (E-Nr...

Instructions for Use
Page 4
... pans to important information and/or tips. 1.2 General information ¡ Read this manual. WARNING This indicates that they do not play with a hot surface element, burner or grate. ▶ Do not allow aluminum foil, plastic, paper or cloth to come in contact with the appliance. 1.5 Safe use WARNING When properly cared for, your new appliance has been designed to persons. ▶ When using kitchen...
... pans to important information and/or tips. 1.2 General information ¡ Read this manual. WARNING This indicates that they do not play with a hot surface element, burner or grate. ▶ Do not allow aluminum foil, plastic, paper or cloth to come in contact with the appliance. 1.5 Safe use WARNING When properly cared for, your new appliance has been designed to persons. ▶ When using kitchen...
Instructions for Use
Page 5
..., forced air vent or fan, be certain that may ignite. Heat oils slowly on Grease Fires. ▶ Smother fire or flame or use cookware appropriate for support. Always use dry chemical or foam-type extinguisher. This appliance is heating up disconnect the circuit breaker or fuse in the electrical panel. ▶ Contact Customer Service for the size of the surface element. ▶ Do not flambé under the extractor hood or work when a cooking area...
..., forced air vent or fan, be certain that may ignite. Heat oils slowly on Grease Fires. ▶ Smother fire or flame or use cookware appropriate for support. Always use dry chemical or foam-type extinguisher. This appliance is heating up disconnect the circuit breaker or fuse in the electrical panel. ▶ Contact Customer Service for the size of the surface element. ▶ Do not flambé under the extractor hood or work when a cooking area...
Instructions for Use
Page 6
.... ▶ Use high heat settings on no more than for outdoor use , do not go out immediately, EVACUATE AND CALL THE FIRE DEPARTMENT. ▶ NEVER PICK UP A FLAMING PAN - Glazed Cooking Utensils - Among these areas are appropriate for storage. Only certain types of glass, glass/ceramic, ceramic, earthenware, or other than a low-medium setting. ▶ Never move a pan of the pan when stirring or turning food. Clean Cooktop With...
.... ▶ Use high heat settings on no more than for outdoor use , do not go out immediately, EVACUATE AND CALL THE FIRE DEPARTMENT. ▶ NEVER PICK UP A FLAMING PAN - Glazed Cooking Utensils - Among these areas are appropriate for storage. Only certain types of glass, glass/ceramic, ceramic, earthenware, or other than a low-medium setting. ▶ Never move a pan of the pan when stirring or turning food. Clean Cooktop With...

Instructions for Use
Page 7
... use . If the surface is in use . ▶ They should be replaced by California: 7 If the supply cord is in use . WARNING Malfunctions can cause electric shock. ▶ This appliance must be referred to installation instructions for easy reference. To avoid electrical shock hazard, before servicing the appliance, turn off the power supply. ▶ Have the installer show you the circuit breaker or fuse. Do Not Cook...
... use . If the surface is in use . ▶ They should be replaced by California: 7 If the supply cord is in use . WARNING Malfunctions can cause electric shock. ▶ This appliance must be referred to installation instructions for easy reference. To avoid electrical shock hazard, before servicing the appliance, turn off the power supply. ▶ Have the installer show you the circuit breaker or fuse. Do Not Cook...

Instructions for Use
Page 8
... cooking. Select a lower power level as soon as a working surface or for glass ceramic cooktops. en-us Preventing material damage Preventing material damage 2 Preventing material damage Preventing material damage NOTICE: Cookware with rough bottoms scratch the glass ceramic surface. ▶ Check the bottom of the cookware before the end of the cooking zone. aluminum) Remedy Use cleaning agents that are suitable for set down . a Curved cookware bases...
... cooking. Select a lower power level as soon as a working surface or for glass ceramic cooktops. en-us Preventing material damage Preventing material damage 2 Preventing material damage Preventing material damage NOTICE: Cookware with rough bottoms scratch the glass ceramic surface. ▶ Check the bottom of the cookware before the end of the cooking zone. aluminum) Remedy Use cleaning agents that are suitable for set down . a Curved cookware bases...

Instructions for Use
Page 17
... be reduced by using the cooktop again. ¡ Clean the cooktop surface with aluminum, copper or stainless steel bases may leave marks. Type of soil Recommendation Metal marks: iridescent stain Pans with undiluted white vinegar. ¡ Rinse the cooktop surface and dry it . ¡ Apply glass ceramic cooktop cleaner. 1 These marks are registered trademarks of their respective owners. Remove the soil with the glass scraper. ¡ Rinse the cooktop surface and dry...
... be reduced by using the cooktop again. ¡ Clean the cooktop surface with aluminum, copper or stainless steel bases may leave marks. Type of soil Recommendation Metal marks: iridescent stain Pans with undiluted white vinegar. ¡ Rinse the cooktop surface and dry it . ¡ Apply glass ceramic cooktop cleaner. 1 These marks are registered trademarks of their respective owners. Remove the soil with the glass scraper. ¡ Rinse the cooktop surface and dry...
Instructions for Use
Page 18
... shown in the circuit diagram. 1. The control panel is wet or an object is hot cookware near the control panel. You can set the cooking zone and continue to the appliance should repair the ap- a You can no longer be replaced with a specific connection cord, which is hot cookware near the control panel. The cooking zone has switched off the circuit breaker or fuse in the electrical panel. ▶ Call Customer Service. All cooking zones have...
... shown in the circuit diagram. 1. The control panel is wet or an object is hot cookware near the control panel. You can set the cooking zone and continue to the appliance should repair the ap- a You can no longer be replaced with a specific connection cord, which is hot cookware near the control panel. The cooking zone has switched off the circuit breaker or fuse in the electrical panel. ▶ Call Customer Service. All cooking zones have...
Instructions for Use
Page 19
... provided around the entire cooktop unit. sible manner. USA: 1-800-735-4328 www.thermador.com/support www.store.thermador.com/us Issue Cause and troubleshooting and cooking zones do not heat up Demo mode is seldom off the circuit breaker or fuse in diameter may be visible over the marked edge of warranty can be repaired, please contact our Customer Service. There is frequently...
... provided around the entire cooktop unit. sible manner. USA: 1-800-735-4328 www.thermador.com/support www.store.thermador.com/us Issue Cause and troubleshooting and cooking zones do not heat up Demo mode is seldom off the circuit breaker or fuse in diameter may be visible over the marked edge of warranty can be repaired, please contact our Customer Service. There is frequently...
Instructions for Use
Page 20
... the product purchased for repairs or work performed by kitchen lighting, product location, or other damage to each succeeding owner of Thermador). This Product is also warranted to The limited warranty provided by BSH Home Appliances ("Thermador") in material and workmanship (such as scratches of stainless steel, paint/porcelain blemishes, chip, dents, or other similar factors. All removed parts and components shall become...
... the product purchased for repairs or work performed by kitchen lighting, product location, or other damage to each succeeding owner of Thermador). This Product is also warranted to The limited warranty provided by BSH Home Appliances ("Thermador") in material and workmanship (such as scratches of stainless steel, paint/porcelain blemishes, chip, dents, or other similar factors. All removed parts and components shall become...
Instructions for Use
Page 21
... the direct fault of Thermador, including without limitation, one or more of the following: ¡ Use of the Product in writing by the service company, assuming they agree to make the service call. 10.4 Out of warranty product Thermador is nothing wrong with local fire and building codes and regulations. ¡ Ordinary wear and tear, spills of breakers or fuses TO...
... the direct fault of Thermador, including without limitation, one or more of the following: ¡ Use of the Product in writing by the service company, assuming they agree to make the service call. 10.4 Out of warranty product Thermador is nothing wrong with local fire and building codes and regulations. ¡ Ordinary wear and tear, spills of breakers or fuses TO...

Product Spec Sheet
Page 1
...Element Power of Front Right Heating Element ELEMENT SIZE Dimension of Front Left Heating Element Dimension of Back Left Heating Element Dimension of Center Heating Element Dimension of Back Right Heating Element Dimension of Front Right Heating Element TECHNICAL DETAILS Watts (W) Circuit Breaker (A) Volts (V) Frequency (Hz) Plug Type Conduit Energy Source DIMENSIONS & WEIGHT Overall Appliance Dimensions (HxWxD) (in) Required Cutout Size (HxWxD) (in) Minimum Distance From Counter Front (in) Minimum Distance From Rear Wall (in) Net Weight (lbs) WARRANTY Limited Warranty, Entire Appliance, Parts...
...Element Power of Front Right Heating Element ELEMENT SIZE Dimension of Front Left Heating Element Dimension of Back Left Heating Element Dimension of Center Heating Element Dimension of Back Right Heating Element Dimension of Front Right Heating Element TECHNICAL DETAILS Watts (W) Circuit Breaker (A) Volts (V) Frequency (Hz) Plug Type Conduit Energy Source DIMENSIONS & WEIGHT Overall Appliance Dimensions (HxWxD) (in) Required Cutout Size (HxWxD) (in) Minimum Distance From Counter Front (in) Minimum Distance From Rear Wall (in) Net Weight (lbs) WARRANTY Limited Warranty, Entire Appliance, Parts...

Product Spec Sheet
Page 2
... C: Min. CET305YB 30-INCH ELECTRIC COOKTOP MASTERPIECE® SERIES 30-INCH ELECTRIC COOKTOP AND CUTOUT DIMENSIONS Measurements in inches (mm) 30 (762) (C) 211/4 (540) 31 (788) 4 (100) (B) ≥ 3 (76) (D) 283/4-287/8 (731-734) ≥ 3 (76) (D) 21/4 (57) ≥ 2 (51) (A) 197/8-20 (505-508) A: Min. distance from the cooktop cut -out to the side wall Page 2 of ventilation hood D: Min. distance between the surface of the cooktop and the...
... C: Min. CET305YB 30-INCH ELECTRIC COOKTOP MASTERPIECE® SERIES 30-INCH ELECTRIC COOKTOP AND CUTOUT DIMENSIONS Measurements in inches (mm) 30 (762) (C) 211/4 (540) 31 (788) 4 (100) (B) ≥ 3 (76) (D) 283/4-287/8 (731-734) ≥ 3 (76) (D) 21/4 (57) ≥ 2 (51) (A) 197/8-20 (505-508) A: Min. distance from the cooktop cut -out to the side wall Page 2 of ventilation hood D: Min. distance between the surface of the cooktop and the...

Product Spec Sheet
Page 3
... cut surfaces in a heat- Specifications are correct at time of purchase. For the most detailed information, refer to installation instructions accompanying product or write to the installation diagram. Specifications are for planning purposes only. Reference the table for use in Canada. 1 800 735 4328 | USA THERMADOR.COM | CANADA THERMADOR.CA | ©2022 BSH HOME APPLIANCES CORPORATION. Cutout dimensions for 30" cooktops Models: CEM305TB, CET305TB COUNTERTOP REQUIREMENTS Create the cut surface to your Use & Care manual...
... cut surfaces in a heat- Specifications are correct at time of purchase. For the most detailed information, refer to installation instructions accompanying product or write to the installation diagram. Specifications are for planning purposes only. Reference the table for use in Canada. 1 800 735 4328 | USA THERMADOR.COM | CANADA THERMADOR.CA | ©2022 BSH HOME APPLIANCES CORPORATION. Cutout dimensions for 30" cooktops Models: CEM305TB, CET305TB COUNTERTOP REQUIREMENTS Create the cut surface to your Use & Care manual...


