Data Sheet
Page 2
...:50~16000Hz • Codec: PCM • IEEE 802.3u 10/100Mbps Fast Ethernet, Auto-MDIX • Power, Link/Act • Restore to factory default • 6 Watts (max.) • 5V, 2.5A external power adapter • 70 x 100 x 57mm (2.7 x 3.9 x 3.0 in.) •...(32/64-bit) • Channel: supports up to 32 cameras • Record/Playback/Motion Detection • TCP/IP, UDP, ICMP, DHCP, NTP, DNS, DDNS, SMTP, FTP, HTTP, PPPoE and UPnP • Based on ...Recording type: continuous, schedule or motion detection with software • HTTP port: 80 (default) • 3x TV-IP121WN rev: 02.02.2011
...:50~16000Hz • Codec: PCM • IEEE 802.3u 10/100Mbps Fast Ethernet, Auto-MDIX • Power, Link/Act • Restore to factory default • 6 Watts (max.) • 5V, 2.5A external power adapter • 70 x 100 x 57mm (2.7 x 3.9 x 3.0 in.) •...(32/64-bit) • Channel: supports up to 32 cameras • Record/Playback/Motion Detection • TCP/IP, UDP, ICMP, DHCP, NTP, DNS, DDNS, SMTP, FTP, HTTP, PPPoE and UPnP • Based on ...Recording type: continuous, schedule or motion detection with software • HTTP port: 80 (default) • 3x TV-IP121WN rev: 02.02.2011
User's Guide
Page 16
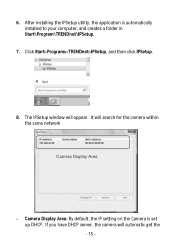
The IPSetup window will search for the camera within the same network Camera Display Area - It will appear. 6. Click Start>Programs>TRENDnet>IPSetup, and then click IPSetup. 8. If you have DHCP server, the camera will automatic get the - 15 - After installing the IPSetup utility, the application is set up DHCP. Camera Display Area: By default, the IP setting on the Camera is automatically installed to your computer, and creates a folder in Start\Program\TRENDnet\IPSetup. 7.
The IPSetup window will search for the camera within the same network Camera Display Area - It will appear. 6. Click Start>Programs>TRENDnet>IPSetup, and then click IPSetup. 8. If you have DHCP server, the camera will automatic get the - 15 - After installing the IPSetup utility, the application is set up DHCP. Camera Display Area: By default, the IP setting on the Camera is automatically installed to your computer, and creates a folder in Start\Program\TRENDnet\IPSetup. 7.
User's Guide
Page 17
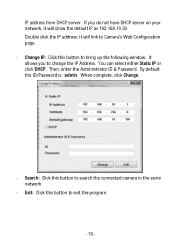
... DHCP server. Double click the IP address; When complete, click Change. - If you to change the IP Address. By default the ID/Password is: admin. You can select either Static IP or click DHCP. It allows you do not have DHCP server on your network, it will show the default IP as 192.168.10.30.
... DHCP server. Double click the IP address; When complete, click Change. - If you to change the IP Address. By default the ID/Password is: admin. You can select either Static IP or click DHCP. It allows you do not have DHCP server on your network, it will show the default IP as 192.168.10.30.
User's Guide
Page 18
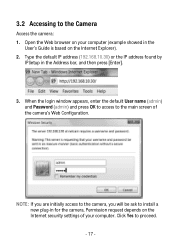
Click Yes to the Camera Access the camera: 1. When the login window appears, enter the default User name (admin) and Password (admin) and press OK to access to install a new plug-in the Address bar, and then press [Enter]. 3. NOTE: If ... camera, you will be ask to the main screen of your computer. Permission request depends on the Internet Explorer). 2. Type the default IP address (192.168.10.30) or the IP address found by IPSetup in for the camera. Open the Web browser on your computer (example showed in the User's Guide is...
Click Yes to the Camera Access the camera: 1. When the login window appears, enter the default User name (admin) and Password (admin) and press OK to access to install a new plug-in the Address bar, and then press [Enter]. 3. NOTE: If ... camera, you will be ask to the main screen of your computer. Permission request depends on the Internet Explorer). 2. Type the default IP address (192.168.10.30) or the IP address found by IPSetup in for the camera. Open the Web browser on your computer (example showed in the User's Guide is...

User's Guide
Page 21
... of the PC If you are finished, click OK. - 20 - Then, enter an IP address into the empty field. The TV-IP121WN default IP address is 255.255.255.0. Double-click Network Connection to open the Control Panel window. 2. When the Local Area Connection Properties ... shortcut menu. 4. When you failed to open the Network Connection window. 3. Select Internet Protocol [TCP/IP] and then click Properties to communicate. On your computer's IP address. 1. To configure a fixed IP address that is the procedure to change your computer, click Start > Control Panel to access the camera,...
... of the PC If you are finished, click OK. - 20 - Then, enter an IP address into the empty field. The TV-IP121WN default IP address is 255.255.255.0. Double-click Network Connection to open the Control Panel window. 2. When the Local Area Connection Properties ... shortcut menu. 4. When you failed to open the Network Connection window. 3. Select Internet Protocol [TCP/IP] and then click Properties to communicate. On your computer's IP address. 1. To configure a fixed IP address that is the procedure to change your computer, click Start > Control Panel to access the camera,...
User's Guide
Page 30
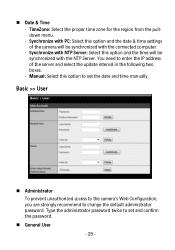
...option and the date & time settings of the server and select the update interval in the following two boxes. - You need to change the default administrator password. Type the administrator password twice to set and confirm the password. General User - 29 - Basic >> User ... Administrator To prevent unauthorized access to the camera's Web Configuration, you are strongly recommend to enter the IP address of the camera will be synchronized with the NTP Server. TimeZone: Select the proper time zone for the region from the pulldown menu. ...
...option and the date & time settings of the server and select the update interval in the following two boxes. - You need to change the default administrator password. Type the administrator password twice to set and confirm the password. General User - 29 - Basic >> User ... Administrator To prevent unauthorized access to the camera's Web Configuration, you are strongly recommend to enter the IP address of the camera will be synchronized with the NTP Server. TimeZone: Select the proper time zone for the region from the pulldown menu. ...

User's Guide
Page 33
You can use IP Setup to assign the IP address for the camera directly. Network >> Network IP Setting This item allows you to select the IP Address mode and set up , it will be assigned an IP address from the DHCP server automatically. - IP Enter the IP address of the camera. The default setting is 192.168.10.30. - 32 - When the camera starts up the related configuration. - DHCP: Select this option to obtain the related setting values. Static IP: Select this option when your network uses the DHCP server.
You can use IP Setup to assign the IP address for the camera directly. Network >> Network IP Setting This item allows you to select the IP Address mode and set up , it will be assigned an IP address from the DHCP server automatically. - IP Enter the IP address of the camera. The default setting is 192.168.10.30. - 32 - When the camera starts up the related configuration. - DHCP: Select this option to obtain the related setting values. Static IP: Select this option when your network uses the DHCP server.

User's Guide
Page 34
Enter the Default Gateway of the camera. PPPoE: Select this option when you can assign a fixed host and domain name to -device interoperability. DNS (Domain Name System) translates domain names into IP addresses. The camera will get an IP address from the pulldown list and enter the ...function so that enable the device-to a dynamic Internet IP address. Select the Enable option to enable this feature. Ports Number - Subnet Mask Default Gateway Primary/ Secondary DNS Enter the Subnet Mask of the camera. The default setting is 255.255.255.0. You should have a...
Enter the Default Gateway of the camera. PPPoE: Select this option when you can assign a fixed host and domain name to -device interoperability. DNS (Domain Name System) translates domain names into IP addresses. The camera will get an IP address from the pulldown list and enter the ...function so that enable the device-to a dynamic Internet IP address. Select the Enable option to enable this feature. Ports Number - Subnet Mask Default Gateway Primary/ Secondary DNS Enter the Subnet Mask of the camera. The default setting is 255.255.255.0. You should have a...

User's Guide
Page 35
...setting allows the administrator of the camera to access the camera by entering the Start IP address and End IP address. - For example, when you are not allowed to limit the users within the network. The default RTSP (Real Time Streaming Protocol) port is from 1024 to assign multiple ranges ...for the camera. NOTE: If the camera is behind an NAT router of IP addresses that are finished, click Add to access the camera. - ...
...setting allows the administrator of the camera to access the camera by entering the Start IP address and End IP address. - For example, when you are not allowed to limit the users within the network. The default RTSP (Real Time Streaming Protocol) port is from 1024 to assign multiple ranges ...for the camera. NOTE: If the camera is behind an NAT router of IP addresses that are finished, click Add to access the camera. - ...

User's Guide
Page 36
...'s ESS- 35 - Network ID (SSID}: Keep the default setting of this feature. - To connect the camera to a specified access point, set a SSID for the camera to any access point under the infrastructure network mode. Deny IP List The list displays the range setting(s) of IP addresses from the list and click Delete.
...'s ESS- 35 - Network ID (SSID}: Keep the default setting of this feature. - To connect the camera to a specified access point, set a SSID for the camera to any access point under the infrastructure network mode. Deny IP List The list displays the range setting(s) of IP addresses from the list and click Delete.
Quick Installation Guide
Page 6
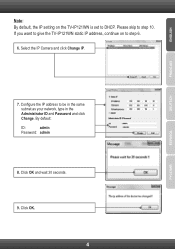
Select the IP Camera and click Change IP. 7. Click OK. 4 Please skip to be in the same subnet as your network, type in the Administrator ID and Password and click Change. By default: ID: admin Password: admin 8. Configure the IP address to step 10. Click OK and wait 30 seconds. 9. If you want to give the TV-IP121WN static IP address, continue on the TV-IP121WN is set to step 6. 6. Note: By default, the IP setting on to DHCP.
Select the IP Camera and click Change IP. 7. Click OK. 4 Please skip to be in the same subnet as your network, type in the Administrator ID and Password and click Change. By default: ID: admin Password: admin 8. Configure the IP address to step 10. Click OK and wait 30 seconds. 9. If you want to give the TV-IP121WN static IP address, continue on the TV-IP121WN is set to step 6. 6. Note: By default, the IP setting on to DHCP.

Quick Installation Guide
Page 9
...Search in "D:\autorun.exe" is the letter assigned to your CD-ROM Drive, and then press the ENTER key on your network, the default IP address is 192.168.10.30, do ? 1. What should I do not have a DHCP server on your keyboard . 2. The ...TV-IP121WN, please contact TRENDnet's Technical Support Department. 7 Open Internet Explorer and enter http://192.168.10.30 into my computer's CD-ROM Drive but the installation menu does not appear automatically. After I successfully configured the TV-IP121WN to match my wireless network settings, I am unable to detect my camera. The default...
...Search in "D:\autorun.exe" is the letter assigned to your CD-ROM Drive, and then press the ENTER key on your network, the default IP address is 192.168.10.30, do ? 1. What should I do not have a DHCP server on your keyboard . 2. The ...TV-IP121WN, please contact TRENDnet's Technical Support Department. 7 Open Internet Explorer and enter http://192.168.10.30 into my computer's CD-ROM Drive but the installation menu does not appear automatically. After I successfully configured the TV-IP121WN to match my wireless network settings, I am unable to detect my camera. The default...


