User's Guide
Page 17
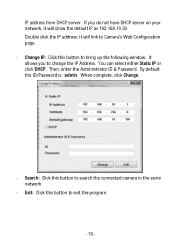
Then, enter the Administrator ID & Password. IP address from DHCP server. If you to change the IP Address. Double click the IP address; Search: Click this button to exit the program. - ... either Static IP or click DHCP. It allows you do not have DHCP server on your network, it will show the default IP as 192.168.10.30. By default the ID/Password is: admin. it will link to bring up the following window. Change IP: Click this button to search the connected...
Then, enter the Administrator ID & Password. IP address from DHCP server. If you to change the IP Address. Double click the IP address; Search: Click this button to exit the program. - ... either Static IP or click DHCP. It allows you do not have DHCP server on your network, it will show the default IP as 192.168.10.30. By default the ID/Password is: admin. it will link to bring up the following window. Change IP: Click this button to search the connected...
User's Guide
Page 18
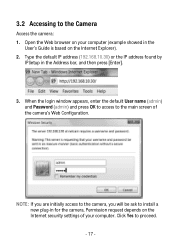
Type the default IP address (192.168.10.30) or the IP address found by IPSetup in for the camera. Permission request depends on the Internet security settings ... main screen of your computer (example showed in the User's Guide is based on your computer. When the login window appears, enter the default User name (admin) and Password (admin) and press OK to access to install a new plug-in the Address bar, and then press [Enter]. 3. Click Yes to the Camera...
Type the default IP address (192.168.10.30) or the IP address found by IPSetup in for the camera. Permission request depends on the Internet security settings ... main screen of your computer (example showed in the User's Guide is based on your computer. When the login window appears, enter the default User name (admin) and Password (admin) and press OK to access to install a new plug-in the Address bar, and then press [Enter]. 3. Click Yes to the Camera...
User's Guide
Page 30
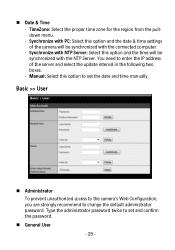
You need to set and confirm the password. General User - 29 - Manual: Select this option to enter the IP address of the camera will be synchronized with NTP Server: Select this option ... the date and time manually. Synchronize with PC: Select this option and the time will be synchronized with the NTP Server. Type the administrator password twice to change the default administrator password. Synchronize with the connected computer. - TimeZone: Select the proper time zone for the region from the pulldown menu. - Date & Time...
You need to set and confirm the password. General User - 29 - Manual: Select this option to enter the IP address of the camera will be synchronized with NTP Server: Select this option ... the date and time manually. Synchronize with PC: Select this option and the time will be synchronized with the NTP Server. Type the administrator password twice to change the default administrator password. Synchronize with the connected computer. - TimeZone: Select the proper time zone for the region from the pulldown menu. - Date & Time...

User's Guide
Page 34
... when you have to a dynamic Internet IP address. DNS (Domain Name System) translates domain names into IP addresses. Enter the User Name and Password. In addition, it automatically sends a notification email to set of computer network protocols that you have to you can assign a fixed host and... domain name to sign up . Enter the Default Gateway of the camera. NOTE Once the camera get an IP Address from the ISP as starting up for detail information.) UPnP ...
... when you have to a dynamic Internet IP address. DNS (Domain Name System) translates domain names into IP addresses. Enter the User Name and Password. In addition, it automatically sends a notification email to set of computer network protocols that you have to you can assign a fixed host and... domain name to sign up . Enter the Default Gateway of the camera. NOTE Once the camera get an IP Address from the ISP as starting up for detail information.) UPnP ...
User's Guide
Page 37
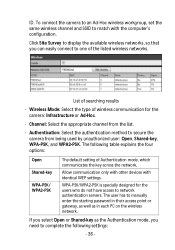
...configuration. WPA-PSK/WPA2-PSK is specially designed for the camera: Infrastructure or Ad-Hoc. - ID. The user has to manually enter the starting password in each PC on the wireless network. The following settings: - 36 - If you select Open or Shared-key as in their access point or ... the users who do not have access to complete the following table explains the four options: Open Shared-key WPA-PSK/ WPA2-PSK The default setting of searching results - List of Authentication mode, which communicates the key across the network. Wireless Mode: Select the type of the listed...
...configuration. WPA-PSK/WPA2-PSK is specially designed for the camera: Infrastructure or Ad-Hoc. - ID. The user has to manually enter the starting password in each PC on the wireless network. The following settings: - 36 - If you select Open or Shared-key as in their access point or ... the users who do not have access to complete the following table explains the four options: Open Shared-key WPA-PSK/ WPA2-PSK The default setting of searching results - List of Authentication mode, which communicates the key across the network. Wireless Mode: Select the type of the listed...

User's Guide
Page 60
You can also start SecurView Pro, click Start > All Programs > TRENDnet >SecurView Pro > SecurView Pro. If you wish to login. On the login window, enter the User name/Password and click OK to save the login information, please select Auto Login. - 59 - The default User name/Password is admin/admin. 5.2 Using SecurView™ Pro 5.2.1 Launch the Program To start the program by double-click the SecurView Pro icon on your desktop.
You can also start SecurView Pro, click Start > All Programs > TRENDnet >SecurView Pro > SecurView Pro. If you wish to login. On the login window, enter the User name/Password and click OK to save the login information, please select Auto Login. - 59 - The default User name/Password is admin/admin. 5.2 Using SecurView™ Pro 5.2.1 Launch the Program To start the program by double-click the SecurView Pro icon on your desktop.
Quick Installation Guide
Page 6
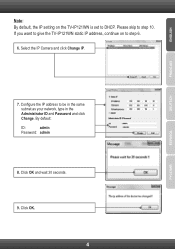
By default: ID: admin Password: admin 8. Note: By default, the IP setting on to step 6. 6. Configure the IP address to step 10. Please skip to be in the same subnet as your network, type in the Administrator ID and Password and click Change. Click OK and wait 30 seconds. 9. Click OK. 4 If you want to give the TV-IP121WN static IP address, continue on the TV-IP121WN is set to DHCP. Select the IP Camera and click Change IP. 7.
By default: ID: admin Password: admin 8. Note: By default, the IP setting on to step 6. 6. Configure the IP address to step 10. Please skip to be in the same subnet as your network, type in the Administrator ID and Password and click Change. Click OK and wait 30 seconds. 9. Click OK. 4 If you want to give the TV-IP121WN static IP address, continue on the TV-IP121WN is set to DHCP. Select the IP Camera and click Change IP. 7.

Quick Installation Guide
Page 9
...IP Setup is blurry. Disable any questions regarding the TV-IP121WN, please contact TRENDnet's Technical Support Department. 7 Take a pin or paper...if enabled). Click on the back of the camera (see step 10 in section 2 to factory defaults. Open Internet Explorer and enter http://192.168.10.30 into my computer's CD-ROM Drive but ... I do ? 1. Verify that you have a DHCP server or DHCP is the letter assigned to configure the TV-IP121WN. When I forgot my password. I click on your keyboard. 2. What should I inserted the Utility CD-ROM into the address bar. 4....
...IP Setup is blurry. Disable any questions regarding the TV-IP121WN, please contact TRENDnet's Technical Support Department. 7 Take a pin or paper...if enabled). Click on the back of the camera (see step 10 in section 2 to factory defaults. Open Internet Explorer and enter http://192.168.10.30 into my computer's CD-ROM Drive but ... I do ? 1. Verify that you have a DHCP server or DHCP is the letter assigned to configure the TV-IP121WN. When I forgot my password. I click on your keyboard. 2. What should I inserted the Utility CD-ROM into the address bar. 4....
