Quick Installation Guide
Page 5
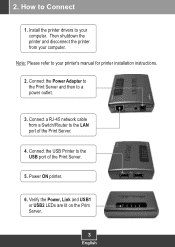
Install the printer drivers to the USB port of the Print Server. 4. Verify the Power, Link and USB1 or USB2 LEDs are lit on the Print Server. 3 English Connect the Power Adapter to the Print Server and then to Connect 1. Connect the USB Printer to your printer's manual for printer installation instructions. 2. How to a power outlet. 3. Power ON printer. 6. Then shutdown the printer and disconnect the printer from a Switch/Router to your computer. Connect a RJ-45 network cable from your computer. 2. Note: Please refer to the LAN port of the Print Server. 5.
Install the printer drivers to the USB port of the Print Server. 4. Verify the Power, Link and USB1 or USB2 LEDs are lit on the Print Server. 3 English Connect the Power Adapter to the Print Server and then to Connect 1. Connect the USB Printer to your printer's manual for printer installation instructions. 2. How to a power outlet. 3. Power ON printer. 6. Then shutdown the printer and disconnect the printer from a Switch/Router to your computer. Connect a RJ-45 network cable from your computer. 2. Note: Please refer to the LAN port of the Print Server. 5.
Quick Installation Guide
Page 10
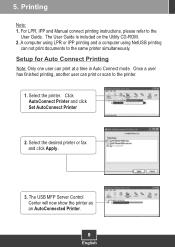
... Apply. 3. Setup for Auto Connect Printing Note: Only one user can not print documents to the same printer simultaneously. Once a user has finished printing, another user can print or scan to the User Guide. Printing Note: 1. For LPR, IPP and Manual connect printing instructions, please refer to the printer. 1. The USB MFP Server Control Center will now show...
... Apply. 3. Setup for Auto Connect Printing Note: Only one user can not print documents to the same printer simultaneously. Once a user has finished printing, another user can print or scan to the User Guide. Printing Note: 1. For LPR, IPP and Manual connect printing instructions, please refer to the printer. 1. The USB MFP Server Control Center will now show...
Quick Installation Guide
Page 17
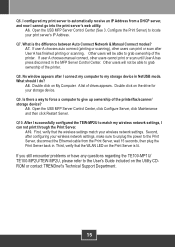
... 3. Q7. If user A chooses manual connect, other users can not print through the Print Server. Q8. No window appears after User A has finished printing or scanning. What should I successfully configured the TEW-MP2U to the User's Guide included on the drive for your wireless network settings. Double click on the Utility CDROM or contact TRENDnet's Technical Support Department. 15...
... 3. Q7. If user A chooses manual connect, other users can not print through the Print Server. Q8. No window appears after User A has finished printing or scanning. What should I successfully configured the TEW-MP2U to the User's Guide included on the drive for your wireless network settings. Double click on the Utility CDROM or contact TRENDnet's Technical Support Department. 15...
User's Guide
Page 2
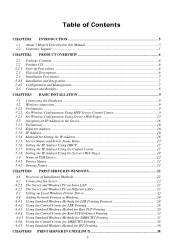
... Described in this Manual 5 1.2 Customer Support ...5 CHAPTER2 PRODUCT OVERVIEW 6 2.1 2.2 2.2.1 2.3 2.4 2.4.1 2.4.2 2.5 Package Contents ...6 Product CD ...6 Start-up Procedures ...6 Physical Description...6 Installation Procedures...7 Installation and Integration ...7 Configuration and Management 7 Features and Benefits ...8 CHAPTER3 BASIC INSTALLATION 9 3.1 3.2 3.2.1 3.2.2 3.2.3 3.3 3.3.1 3.3.2 3.3.3 3.3.4 3.3.5 3.3.6 3.3.7 3.3.8 3.4 3.4.1 3.4.2 Connecting the Hardware...9 Wireless connection ...9 Preliminary ...9 Set Wireless Configuration Using MFP Server Control Center 9 Set...
... Described in this Manual 5 1.2 Customer Support ...5 CHAPTER2 PRODUCT OVERVIEW 6 2.1 2.2 2.2.1 2.3 2.4 2.4.1 2.4.2 2.5 Package Contents ...6 Product CD ...6 Start-up Procedures ...6 Physical Description...6 Installation Procedures...7 Installation and Integration ...7 Configuration and Management 7 Features and Benefits ...8 CHAPTER3 BASIC INSTALLATION 9 3.1 3.2 3.2.1 3.2.2 3.2.3 3.3 3.3.1 3.3.2 3.3.3 3.3.4 3.3.5 3.3.6 3.3.7 3.3.8 3.4 3.4.1 3.4.2 Connecting the Hardware...9 Wireless connection ...9 Preliminary ...9 Set Wireless Configuration Using MFP Server Control Center 9 Set...
User's Guide
Page 5
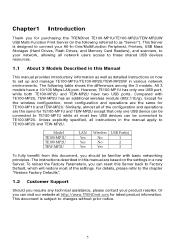
...The instructions described in this document, you should be familiar with TE100-MP2U, TEW-MP2U has an additional wireless module (802.11b/g). Chapter1 Introduction Thank you for purchasing the TRENDnet TE100-MP1U/TE100-MP2U/TEW-MP2UW USB Multi-Function Print Server (in the following table shows the differences among the 3 models....-MP2U TEW-MP2U LAN Yes Yes Yes Wireless No No Yes USB Port(s) 1 2 2 To fully benefit from this manual are the same for TE100-MP1U and TEW-MP2U except that only one USB port, while both TE100-MP2U and TEW-MP2U have a 10/100 Mbps LAN port. This Server ...
...The instructions described in this document, you should be familiar with TE100-MP2U, TEW-MP2U has an additional wireless module (802.11b/g). Chapter1 Introduction Thank you for purchasing the TRENDnet TE100-MP1U/TE100-MP2U/TEW-MP2UW USB Multi-Function Print Server (in the following table shows the differences among the 3 models....-MP2U TEW-MP2U LAN Yes Yes Yes Wireless No No Yes USB Port(s) 1 2 2 To fully benefit from this manual are the same for TE100-MP1U and TEW-MP2U except that only one USB port, while both TE100-MP2U and TEW-MP2U have a 10/100 Mbps LAN port. This Server ...
User's Guide
Page 16
...TEW-MP2U creates that service set in a DHCP network, you printed earlier. In ad-hoc mode, TEW-MP2U searches all channels to join the matched wireless ad-hoc service set . Once TEW-MP2U connects to the network, either by network cable or by wireless module, all channels to the Server, the Server... your Server using DHCP, you can automatically search Servers and list their Ethernet addresses. TEW-MP2U will receive an IP address automatically. You have a DHCP server on the page of your wireless network. Besides, you can find Ethernet address that you need to manually set ...
...TEW-MP2U creates that service set in a DHCP network, you printed earlier. In ad-hoc mode, TEW-MP2U searches all channels to join the matched wireless ad-hoc service set . Once TEW-MP2U connects to the network, either by network cable or by wireless module, all channels to the Server, the Server... your Server using DHCP, you can automatically search Servers and list their Ethernet addresses. TEW-MP2U will receive an IP address automatically. You have a DHCP server on the page of your wireless network. Besides, you can find Ethernet address that you need to manually set ...
User's Guide
Page 17
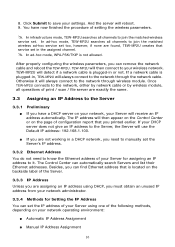
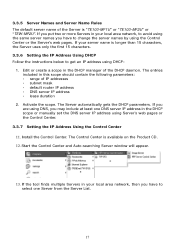
... entries included in the DHCP scope or manually set the DNS server IP address using DNS, you have to select one DNS server IP address in this scope should contain the following parameters: y range of the Server is "TE100-MP1U" or "TE100-MP2U" or "TEW-MP2U". If you have to get an IP... address using the Control Center or the Server's web pages. Start the Control Center and Auto-searching Server window will appear. 13. The Control Center is ...
... entries included in the DHCP scope or manually set the DNS server IP address using DNS, you have to select one DNS server IP address in this scope should contain the following parameters: y range of the Server is "TE100-MP1U" or "TE100-MP2U" or "TEW-MP2U". If you have to get an IP... address using the Control Center or the Server's web pages. Start the Control Center and Auto-searching Server window will appear. 13. The Control Center is ...

User's Guide
Page 19
... have now finished the procedure of setting the IP address. 3.3.8 Setting the IP Address Using the Server's Web Pages 1. Go to your settings. If you choose Automatically get IP by DHCP, you can see the IP address of Set the IP Address ... you also have to save your choice of the Control Center. 3. You can use desired DNS by clicking the Manual DNS button and manually assigning a DNS. 17. Open IE Browser and enter the Server's IP address or click the Home Icon of IP setting method (static or dynamic using DHCP). Click Apply to...
... have now finished the procedure of setting the IP address. 3.3.8 Setting the IP Address Using the Server's Web Pages 1. Go to your settings. If you choose Automatically get IP by DHCP, you can see the IP address of Set the IP Address ... you also have to save your choice of the Control Center. 3. You can use desired DNS by clicking the Manual DNS button and manually assigning a DNS. 17. Open IE Browser and enter the Server's IP address or click the Home Icon of IP setting method (static or dynamic using DHCP). Click Apply to...
User's Guide
Page 38
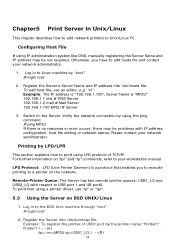
...) is a protocol that enables you have to your network administrator. "vi". Printing by using IP administration system like DNS, manually registering the Server Name and IP address may be not required. Printer1:\ ---(A) :lp=:rm=MP2U:rp=USB1_LQ:\ ---(B) 38 To edit host file, use "lp" or "lpr...If using the ping command. # ping MP2U If there is "MP2U" 192.168.1.1 dns # DNS Server 192.168.1.2 mail # Mail Server 192.168.1.100 MP2U # Server 3. Otherwise, you to execute printing to USB port 1 and UB port2. Chapter5 Print Server in Unix/Linux This chapter describes how to...
...) is a protocol that enables you have to your network administrator. "vi". Printing by using IP administration system like DNS, manually registering the Server Name and IP address may be not required. Printer1:\ ---(A) :lp=:rm=MP2U:rp=USB1_LQ:\ ---(B) 38 To edit host file, use "lp" or "lpr...If using the ping command. # ping MP2U If there is "MP2U" 192.168.1.1 dns # DNS Server 192.168.1.2 mail # Mail Server 192.168.1.100 MP2U # Server 3. Otherwise, you to execute printing to USB port 1 and UB port2. Chapter5 Print Server in Unix/Linux This chapter describes how to...
User's Guide
Page 57
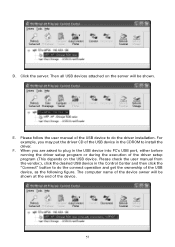
... installation. When you may put the driver CD of the driver setup program (This depends on the server will be shown. Then all USB devices attached on the USB device. Please follow the user manual of the device. 57 The computer name of the device owner will be shown at the end... of the USB device to plug in the Control Center and then click the "Connect" button to install the driver. E. Click the server. F. D.
... installation. When you may put the driver CD of the driver setup program (This depends on the server will be shown. Then all USB devices attached on the USB device. Please follow the user manual of the device. 57 The computer name of the device owner will be shown at the end... of the USB device to plug in the Control Center and then click the "Connect" button to install the driver. E. Click the server. F. D.
User's Guide
Page 58
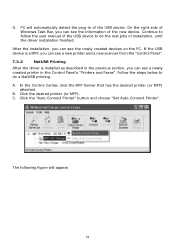
... and a new scanner from the "Control Panel". 7.3.2 NetUSB Printing After the driver is installed as described in the previous section, you can see the newly created devices on the PC. B. C. Continue to follow the user manual of the USB device to do the rest jobs of installation,...see a newly created printer in of the new device. In the Control Center, click the MFP Server that has the desired printer (or MFP) attached. Follow the steps below to do a NetUSB printing. The following figure will automatically detect the plug-in the Control Panel's "Printers and Faxes". ...
... and a new scanner from the "Control Panel". 7.3.2 NetUSB Printing After the driver is installed as described in the previous section, you can see the newly created devices on the PC. B. C. Continue to follow the user manual of the USB device to do the rest jobs of installation,...see a newly created printer in of the new device. In the Control Center, click the MFP Server that has the desired printer (or MFP) attached. Follow the steps below to do a NetUSB printing. The following figure will automatically detect the plug-in the Control Panel's "Printers and Faxes". ...

User's Guide
Page 60
... After all print jobs are ...using manual "connect" and "disconnect" rather than "Auto Connect Print". ...H. B. Click the desired scanner (or MFP). C. D. This is installed as the following window will be shown after the printer in 7.3.1, you would like to this manual...print job to manually connect the scanner (or MFP). ...You will automatically do this , click on the "OK" button. Then, the print job will appear. G. To do a NetUSB scanning. Now you can issue print...issue print jobs...so-called "Auto Connect Print" operation. Click on ...
... After all print jobs are ...using manual "connect" and "disconnect" rather than "Auto Connect Print". ...H. B. Click the desired scanner (or MFP). C. D. This is installed as the following window will be shown after the printer in 7.3.1, you would like to this manual...print job to manually connect the scanner (or MFP). ...You will automatically do this , click on the "OK" button. Then, the print job will appear. G. To do a NetUSB scanning. Now you can issue print...issue print jobs...so-called "Auto Connect Print" operation. Click on ...

User's Guide
Page 61
Set the options as your need. F. Then the "Scanner Wizard" will run. The steps described above require manual "connect" and "disconnect" operations 61 After the scanning finished, click the "Disconnect" button in the Control Center to release the ownership of the scanner (or MFP). Then submit the scan job. E.
Set the options as your need. F. Then the "Scanner Wizard" will run. The steps described above require manual "connect" and "disconnect" operations 61 After the scanning finished, click the "Disconnect" button in the Control Center to release the ownership of the scanner (or MFP). Then submit the scan job. E.
User's Guide
Page 64
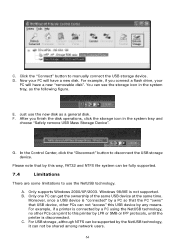
... this printer by this USB device by the NetUSB technology, it can be supported by any means. E. F. Please note that USB device, other PCs can print to use the new disk as the following figure. Windows 98/ME is disconnected. For example, if a printer is connected by a PC using the NetUSB... you finish the disk operations, click the storage icon in the system tray, as a general disk. In the Control Center, click the "Disconnect" button to manually connect the USB storage device.
... this printer by this USB device by the NetUSB technology, it can be supported by any means. E. F. Please note that USB device, other PCs can print to use the new disk as the following figure. Windows 98/ME is disconnected. For example, if a printer is connected by a PC using the NetUSB... you finish the disk operations, click the storage icon in the system tray, as a general disk. In the Control Center, click the "Disconnect" button to manually connect the USB storage device.

User's Guide
Page 84
... TE100-MP2U or TEW-MP2U) USB MFP Server z SysLocation: www.trendnet.com z EnableAuthenTrap: 2 (disable) z SNMPv3: Disabled - Set Maximum Session Number: 5 (Enabled) - Subnet Mask: 255.255.255.0 - Manual DNS: None (Disabled). Internet Access: Disabled - FTP Port: 21 - TCP Port (USB1): 9100 - Server Authentication: Disabled z FTP Server: Enabled - Privacy Password: None 84 DNS Server: none Supported Protocols z LPR Printing: Enabled z IPP Printing: Enabled...
... TE100-MP2U or TEW-MP2U) USB MFP Server z SysLocation: www.trendnet.com z EnableAuthenTrap: 2 (disable) z SNMPv3: Disabled - Set Maximum Session Number: 5 (Enabled) - Subnet Mask: 255.255.255.0 - Manual DNS: None (Disabled). Internet Access: Disabled - FTP Port: 21 - TCP Port (USB1): 9100 - Server Authentication: Disabled z FTP Server: Enabled - Privacy Password: None 84 DNS Server: none Supported Protocols z LPR Printing: Enabled z IPP Printing: Enabled...
User's Guide
Page 90
... than those specified in the manual. TRENDNET NEITHER ASSUMES NOR AUTHORIZES ANY OTHER PERSON TO ASSUME FOR IT ANY OTHER LIABILITY IN CONNECTION WITH THE SALE, INSTALLATION MAINTENANCE OR USE OF TRENDNET'S PRODUCTS. TE100-MP1U/TE100-MP2U- 5 Years Warranty TEW-MP2U - 3 Years Warranty If ...a product does not operate as warranted above during the applicable warranty period, TRENDnet shall, at its products against defects in material ...
... than those specified in the manual. TRENDNET NEITHER ASSUMES NOR AUTHORIZES ANY OTHER PERSON TO ASSUME FOR IT ANY OTHER LIABILITY IN CONNECTION WITH THE SALE, INSTALLATION MAINTENANCE OR USE OF TRENDNET'S PRODUCTS. TE100-MP1U/TE100-MP2U- 5 Years Warranty TEW-MP2U - 3 Years Warranty If ...a product does not operate as warranted above during the applicable warranty period, TRENDnet shall, at its products against defects in material ...