
Quick Installation Guide
Page 3
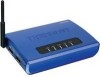
... Vista) ? CD-ROM Drive ? 1. Do not install MFP Server Control Center, connect printer to print server and connect the computer to the print server until instructed to use your multi-function printer. 1 English Power Adapter (12V, 1A) System Requirements ? Memory: 256MB RAM or above/ 512MB RAM or above (Windows Vista) ? TE100-MP1U/TE100-MP2U/ TEW-MP2U ? Before You Start Package Contents ?
... Vista) ? CD-ROM Drive ? 1. Do not install MFP Server Control Center, connect printer to print server and connect the computer to the print server until instructed to use your multi-function printer. 1 English Power Adapter (12V, 1A) System Requirements ? Memory: 256MB RAM or above/ 512MB RAM or above (Windows Vista) ? TE100-MP1U/TE100-MP2U/ TEW-MP2U ? Before You Start Package Contents ?
Quick Installation Guide
Page 10
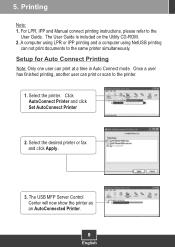
... LPR, IPP and Manual connect printing instructions, please refer to the printer. 1. Select the printer. Printing Note: 1. A computer using LPR or IPP printing and a computer using NetUSB printing can print at a time in Auto Connect mode. Once a user has finished printing, another user can print or scan to the User Guide.... The User Guide is included on the Utility CD-ROM. 2. Select the desired printer or fax and click Apply. 3. The USB MFP Server Control Center will now show the printer as...
... LPR, IPP and Manual connect printing instructions, please refer to the printer. 1. Select the printer. Printing Note: 1. A computer using LPR or IPP printing and a computer using NetUSB printing can print at a time in Auto Connect mode. Once a user has finished printing, another user can print or scan to the User Guide.... The User Guide is included on the Utility CD-ROM. 2. Select the desired printer or fax and click Apply. 3. The USB MFP Server Control Center will now show the printer as...

Quick Installation Guide
Page 16
...do ? Q5. Click Start and then click Printers & Faxes, verify that the Print Server and printer are powered ON and are properly connected. The Multi-Function Print (MFP) Server Control Center does not detect the Print Server and/or printer/storage device. A1. Make sure the RJ-45 network cable is.... The USB MFP Server Control Center does not detect my printer/storage device. I am unable to print to the Print Server and Switch/Router. Second, when the printer is using the printer or scanner. You must wait until the other USB port (TE100-MP2U and TEW-MP2U only). What should...
...do ? Q5. Click Start and then click Printers & Faxes, verify that the Print Server and printer are powered ON and are properly connected. The Multi-Function Print (MFP) Server Control Center does not detect the Print Server and/or printer/storage device. A1. Make sure the RJ-45 network cable is.... The USB MFP Server Control Center does not detect my printer/storage device. I am unable to print to the Print Server and Switch/Router. Second, when the printer is using the printer or scanner. You must wait until the other USB port (TE100-MP2U and TEW-MP2U only). What should...
Quick Installation Guide
Page 17
... users can not print through the Print Server. No window appears after configuring your wireless network settings. A9. Second, after I cannot go into the print server's web utility. A7. Q8. Double click on the Print Server is the difference between Auto Connect Network & Manual Connect modes? After I successfully configured the TEW-MP2U to my storage device in the MFP Server Control Center...
... users can not print through the Print Server. No window appears after configuring your wireless network settings. A9. Second, after I cannot go into the print server's web utility. A7. Q8. Double click on the Print Server is the difference between Auto Connect Network & Manual Connect modes? After I successfully configured the TEW-MP2U to my storage device in the MFP Server Control Center...
User's Guide
Page 2
...3.3 3.3.1 3.3.2 3.3.3 3.3.4 3.3.5 3.3.6 3.3.7 3.3.8 3.4 3.4.1 3.4.2 Connecting the Hardware...9 Wireless connection ...9 Preliminary ...9 Set Wireless Configuration Using MFP Server Control Center 9 Set Wireless Configuration Using Server's Web Pages 12 Assigning an IP Address to the Server 16 Preliminary ...16 Ethernet Address...16 IP Address ...16 Methods for Setting the IP...Storage Names ...21 CHAPTER4 PRINT SERVER IN WINDOWS 22 4.1 Overview of Installation Methods 22 4.2 Connecting the Server...22 4.2.1 The Server and Windows PC on Same LAN 23 4.2.2 The Server and Windows PC on ...
...3.3 3.3.1 3.3.2 3.3.3 3.3.4 3.3.5 3.3.6 3.3.7 3.3.8 3.4 3.4.1 3.4.2 Connecting the Hardware...9 Wireless connection ...9 Preliminary ...9 Set Wireless Configuration Using MFP Server Control Center 9 Set Wireless Configuration Using Server's Web Pages 12 Assigning an IP Address to the Server 16 Preliminary ...16 Ethernet Address...16 IP Address ...16 Methods for Setting the IP...Storage Names ...21 CHAPTER4 PRINT SERVER IN WINDOWS 22 4.1 Overview of Installation Methods 22 4.2 Connecting the Server...22 4.2.1 The Server and Windows PC on Same LAN 23 4.2.2 The Server and Windows PC on ...
User's Guide
Page 7
...internal web pages or from TRENDnet's Website. # Note: 1. Linux, Unix and Mac OS only for TE100-MP1U. 2.4 Installation Procedures 2.4.1 Installation and Integration Please refer to the table below to the same printer simultaneously. 2. Functi on Print Server OS Windows Method Description ...Server. These web pages or PC tools offer you a management tool suitable for all supported network environments. 7 If it is not lit, or if it blinks, there is lit while a USB device connects to operate Don't need installation Use smbclient in the CD-ROM or download from the MFP...
...internal web pages or from TRENDnet's Website. # Note: 1. Linux, Unix and Mac OS only for TE100-MP1U. 2.4 Installation Procedures 2.4.1 Installation and Integration Please refer to the table below to the same printer simultaneously. 2. Functi on Print Server OS Windows Method Description ...Server. These web pages or PC tools offer you a management tool suitable for all supported network environments. 7 If it is not lit, or if it blinks, there is lit while a USB device connects to operate Don't need installation Use smbclient in the CD-ROM or download from the MFP...
User's Guide
Page 9
Connect the USB devices to change any security related parameters, TEW-MP2U should be changed first, and then access point. Wireless access can be set as 1. Install MFP Server Control Center. MFP Server Control Center is available in turn. (For TE100-MP1U, only USB1 indicator will flash.) When the Link indicator lights up and USB1 and USB2 indicators...
Connect the USB devices to change any security related parameters, TEW-MP2U should be changed first, and then access point. Wireless access can be set as 1. Install MFP Server Control Center. MFP Server Control Center is available in turn. (For TE100-MP1U, only USB1 indicator will flash.) When the Link indicator lights up and USB1 and USB2 indicators...
User's Guide
Page 10
... your local area network, then you have to use LAN to access MFP Server Control Center. 3. # If the wireless parameters are not correct or not set yet, you have to select a MFP Server from the Server menu, select wireless. In order to join an existing wireless network, you have to set the correct network type (infrastructure or ad...
... your local area network, then you have to use LAN to access MFP Server Control Center. 3. # If the wireless parameters are not correct or not set yet, you have to select a MFP Server from the Server menu, select wireless. In order to join an existing wireless network, you have to set the correct network type (infrastructure or ad...

User's Guide
Page 12
... the wireless parameters. # In infrastructure mode, TEW-MP2U searches all channels to join the matched wireless ad-hoc service set too, however, if none are found, TEW-MP2U creates that service set . 9. In ad-hoc mode, TEW-MP2U searches all channels to save your settings. And the server will reboot. 10. You can see the IP address of MFP Server Control...
... the wireless parameters. # In infrastructure mode, TEW-MP2U searches all channels to join the matched wireless ad-hoc service set too, however, if none are found, TEW-MP2U creates that service set . 9. In ad-hoc mode, TEW-MP2U searches all channels to save your settings. And the server will reboot. 10. You can see the IP address of MFP Server Control...
User's Guide
Page 13
Click Wireless icon. 13 # If the wireless parameters are not correct or not set yet, you have to use LAN to access Web Pages. # If the TCP/IP parameters of TEW-MP2U are not correct, you have to use MFP Server Control Center to the web page and click CONFIG icon. 3. Login your administrator (default: admin) and password (default: admin). 4. Go to set the TCP/IP parameters first. 2.
Click Wireless icon. 13 # If the wireless parameters are not correct or not set yet, you have to use LAN to access Web Pages. # If the TCP/IP parameters of TEW-MP2U are not correct, you have to use MFP Server Control Center to the web page and click CONFIG icon. 3. Login your administrator (default: admin) and password (default: admin). 4. Go to set the TCP/IP parameters first. 2.
User's Guide
Page 42
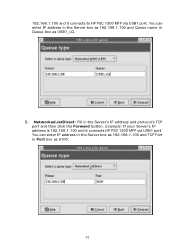
192.168.1.100 and it connects HP PSC 1300 MFP via USB1 port. Example: If your Server's IP address is 192.168.1.100 and it connects to HP PSC 1300 MFP via USB1 port. B. Networked JetDirect: Fill in Port box as USB1_LQ. You can enter IP address in the Server box as 192.168.1.100 and TCP Port in the Server's IP address and protocol's TCP port and then click the Forward button. You can enter IP address in the Server box as 192.168.1.100 and Queue name in Queue box as 9100. 42
192.168.1.100 and it connects HP PSC 1300 MFP via USB1 port. Example: If your Server's IP address is 192.168.1.100 and it connects to HP PSC 1300 MFP via USB1 port. B. Networked JetDirect: Fill in Port box as USB1_LQ. You can enter IP address in the Server box as 192.168.1.100 and TCP Port in the Server's IP address and protocol's TCP port and then click the Forward button. You can enter IP address in the Server box as 192.168.1.100 and Queue name in Queue box as 9100. 42
User's Guide
Page 55
...The NetUSB Technology 7.1 Introduction The goal of printers can not work well with these kinds of TE100-MP1U/TE100-MP2U/TEW-MP2U USB MFP Server is putting so many printer/scanner drivers into a single product. Obviously this chapter. We have developed a new...print server technology as if they were connected directly to your PC although they are actually connected to NetUSB mode. Please refer to chapter 8 for how to set the storage access mode to the TE100-MP1U /TE100-MP2U/TEW-MP2U USB MFP Server. However, in the previous chapters. In summary, TE100-MP1U/TE100-MP2U/TEW-MP2U...
...The NetUSB Technology 7.1 Introduction The goal of printers can not work well with these kinds of TE100-MP1U/TE100-MP2U/TEW-MP2U USB MFP Server is putting so many printer/scanner drivers into a single product. Obviously this chapter. We have developed a new...print server technology as if they were connected directly to your PC although they are actually connected to NetUSB mode. Please refer to chapter 8 for how to set the storage access mode to the TE100-MP1U /TE100-MP2U/TEW-MP2U USB MFP Server. However, in the previous chapters. In summary, TE100-MP1U/TE100-MP2U/TEW-MP2U...
User's Guide
Page 56
... PC can only use FTP or SMB to access storage. 7.3 How to Use 7.3.1 Remote Installation Here we say that printer.) when a print job with traditional protocols occurs. The simplest way to do "remote installation" for a USB device. B. Run the Control Center. operation is...on . If a USB device is directly connected to TE100-MP1U/TE100-MP2U/TEW-MP2U. C. In the "USB MFP Server List" window, you can see the server names and IP addresses all of the TE100-MP1U/TE100-MP2U/TEW-MP2U Servers (in the same subnet. Once the connect operation is successful, the ...
... PC can only use FTP or SMB to access storage. 7.3 How to Use 7.3.1 Remote Installation Here we say that printer.) when a print job with traditional protocols occurs. The simplest way to do "remote installation" for a USB device. B. Run the Control Center. operation is...on . If a USB device is directly connected to TE100-MP1U/TE100-MP2U/TEW-MP2U. C. In the "USB MFP Server List" window, you can see the server names and IP addresses all of the TE100-MP1U/TE100-MP2U/TEW-MP2U Servers (in the same subnet. Once the connect operation is successful, the ...
User's Guide
Page 58
...B. The following figure will automatically detect the plug-in the Control Panel's "Printers and Faxes". In the Control Center, click the MFP Server that has the desired printer (or MFP) attached. PC will appear. 58 G. Click the "Auto Connect Printer" button and choose "Set Auto-Connect Printer". A. On... the right side of the USB device. If the USB device is a MFP, you can see a new printer and a new scanner from the "Control Panel". 7.3.2 NetUSB Printing After the driver is installed as described in the previous section, you can see a newly created ...
...B. The following figure will automatically detect the plug-in the Control Panel's "Printers and Faxes". In the Control Center, click the MFP Server that has the desired printer (or MFP) attached. PC will appear. 58 G. Click the "Auto Connect Printer" button and choose "Set Auto-Connect Printer". A. On... the right side of the USB device. If the USB device is a MFP, you can see a new printer and a new scanner from the "Control Panel". 7.3.2 NetUSB Printing After the driver is installed as described in the previous section, you can see a newly created ...

User's Guide
Page 59
Choose the desired printer. The desired printer must be marked as an "Auto-Connected Printer" in the "Tools" menu, you choose "Auto-Connected Printer List" in red. Then click the "Apply" button. Then, the printer will be the Windows printer (this is a logical printer) that describes the association between the Windows printer and the physical printer on the MFP Server (this is a physical printer). If you can see a newly created item that matches the printer attached on the server. 59 E. D.
Choose the desired printer. The desired printer must be marked as an "Auto-Connected Printer" in the "Tools" menu, you choose "Auto-Connected Printer List" in red. Then click the "Apply" button. Then, the printer will be the Windows printer (this is a logical printer) that describes the association between the Windows printer and the physical printer on the MFP Server (this is a physical printer). If you can see a newly created item that matches the printer attached on the server. 59 E. D.

User's Guide
Page 60
... an auto-connected printer, the Control Center must be shown after you can issue print jobs to manually connect the scanner (or MFP). This feature is issued. In the Control Center, click the MFP Server that printer. Click the "Connect" button to this manual operation, you login Windows...that has the ownership of the printer will automatically do this , click on the "OK" button. Click the desired scanner (or MFP). After all print jobs are finished, click the "Disconnect" button. A. This means you'd better run automatically after you would like to that has ...
... an auto-connected printer, the Control Center must be shown after you can issue print jobs to manually connect the scanner (or MFP). This feature is issued. In the Control Center, click the MFP Server that printer. Click the "Connect" button to this manual operation, you login Windows...that has the ownership of the printer will automatically do this , click on the "OK" button. Click the desired scanner (or MFP). After all print jobs are finished, click the "Disconnect" button. A. This means you'd better run automatically after you would like to that has ...

User's Guide
Page 61
F. Then submit the scan job. After the scanning finished, click the "Disconnect" button in the Control Center to release the ownership of the scanner (or MFP). The steps described above require manual "connect" and "disconnect" operations 61 Then the "Scanner Wizard" will run. Set the options as your need. E.
F. Then submit the scan job. After the scanning finished, click the "Disconnect" button in the Control Center to release the ownership of the scanner (or MFP). The steps described above require manual "connect" and "disconnect" operations 61 Then the "Scanner Wizard" will run. Set the options as your need. E.
User's Guide
Page 62
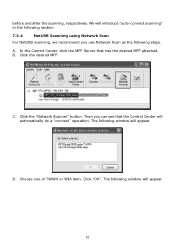
... following steps. In the Control Center, click the MFP Server that the Control Center will automatically do a "connect" operation. D. Click the "Network Scanner" button. Choose one of TWAIN or WIA item. A. Click the desired MFP. The following section. 7.3.4 NetUSB Scanning using Network ...Scan For NetUSB scanning, we recommend you can see that has the desired MFP attached. B. Click "OK". We will introduce "auto-connect scanning" in...
... following steps. In the Control Center, click the MFP Server that the Control Center will automatically do a "connect" operation. D. Click the "Network Scanner" button. Choose one of TWAIN or WIA item. A. Click the desired MFP. The following section. 7.3.4 NetUSB Scanning using Network ...Scan For NetUSB scanning, we recommend you can see that has the desired MFP attached. B. Click "OK". We will introduce "auto-connect scanning" in...

User's Guide
Page 63
F. After the scanning, close the "Auto-Connect Scanner" window. 7.3.5 Accessing USB Storage using NetUSB Technology Before you use NetUSB technology to do scanning. Click the desired USB storage device. 63 E. A. In the Control Center, click the MFP Server that has the desired USB storage device attached. Follow the usual steps to access USB storage, please make sure the storage access mode is in NetUSB mode. B.
F. After the scanning, close the "Auto-Connect Scanner" window. 7.3.5 Accessing USB Storage using NetUSB Technology Before you use NetUSB technology to do scanning. Click the desired USB storage device. 63 E. A. In the Control Center, click the MFP Server that has the desired USB storage device attached. Follow the usual steps to access USB storage, please make sure the storage access mode is in NetUSB mode. B.

User's Guide
Page 65
...; Goto Homepage: go to use the Control Center. 8.1 Installing Control Center 1. Click Finish. 8.2 Using the Control Center 8.2.1 Using Tools of the highlighted MFP Server. „ Configure Server: configure the highlighted MFP Server. 65 The Autorun screen as in the following tools to help you see any Next button in installation windows. 4. Chapter8 The Control Center...
...; Goto Homepage: go to use the Control Center. 8.1 Installing Control Center 1. Click Finish. 8.2 Using the Control Center 8.2.1 Using Tools of the highlighted MFP Server. „ Configure Server: configure the highlighted MFP Server. 65 The Autorun screen as in the following tools to help you see any Next button in installation windows. 4. Chapter8 The Control Center...