
Quick Installation Guide
Page 2
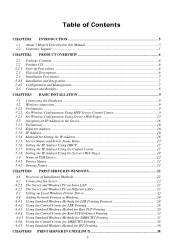
Storage ...12 Troubleshooting ...14 Version 09.26.08 Configure the Print Server ...4 4. Configure Wireless Settings (TEW-MP2U only 6 5. TTaablbe olef CoonfteCntos ntents English ...1 1. Faxing ...10 7. Printing ...8 6. Scanning ...11 8. How to Connect ...3 3. Before You Start ...1 2.
Storage ...12 Troubleshooting ...14 Version 09.26.08 Configure the Print Server ...4 4. Configure Wireless Settings (TEW-MP2U only 6 5. TTaablbe olef CoonfteCntos ntents English ...1 1. Faxing ...10 7. Printing ...8 6. Scanning ...11 8. How to Connect ...3 3. Before You Start ...1 2.

Quick Installation Guide
Page 7
.../TE100-MP2U configuration and advanced settings, please refer to the User's Guide on the Utility CD-ROM or TRENDnet's website at www.trendnet.com Register Your Product To ensure the highest level of customer service and support, please take a moment to register your computer. 6. Note: For the TEW-MP2U, proceed to restart the Print Server. 7. Assign the Print Server a Static...
.../TE100-MP2U configuration and advanced settings, please refer to the User's Guide on the Utility CD-ROM or TRENDnet's website at www.trendnet.com Register Your Product To ensure the highest level of customer service and support, please take a moment to register your computer. 6. Note: For the TEW-MP2U, proceed to restart the Print Server. 7. Assign the Print Server a Static...

Quick Installation Guide
Page 8
... know your encryption key, contact your network administrator or logon to restart the Print Server. 6 English Click Wireless. Enter the SSID of your encryption key. Click Yes to your country's regulations. Then click Apply. Click the Print Server and click Configure Server. 2. Configure Wireless Settings (TEW-MP2U only) 1. User Name: admin Password: admin 3. Enter the User name and Password, and...
... know your encryption key, contact your network administrator or logon to restart the Print Server. 6 English Click Wireless. Enter the SSID of your encryption key. Click Yes to your country's regulations. Then click Apply. Click the Print Server and click Configure Server. 2. Configure Wireless Settings (TEW-MP2U only) 1. User Name: admin Password: admin 3. Enter the User name and Password, and...

Quick Installation Guide
Page 9
... now complete. Print Server wireless configuration is lit on the Utility CD-ROM or TRENDnet's website at : www.TRENDnet.com/register Thank you for choosing TRENDnet 7 English For detailed information regarding the TEW-MP2U configuration and advanced settings, please refer to the User's Guide on the Print Server. Unplug the power to the Print Server, disconnect the Ethernet cable to the Print Server, wait 15...
... now complete. Print Server wireless configuration is lit on the Utility CD-ROM or TRENDnet's website at : www.TRENDnet.com/register Thank you for choosing TRENDnet 7 English For detailed information regarding the TEW-MP2U configuration and advanced settings, please refer to the User's Guide on the Print Server. Unplug the power to the Print Server, disconnect the Ethernet cable to the Print Server, wait 15...
Quick Installation Guide
Page 10
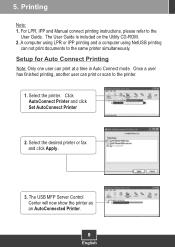
... 2. Click AutoConnect Printer and click Set AutoConnect Printer 2. Once a user has finished printing, another user can not print documents to the User Guide. Select the desired printer or fax and click Apply. 3. Printing Note: 1. Select the printer. The USB MFP Server Control Center will now show the ...printer as an AutoConnected Printer. 8 English Setup for Auto Connect Printing Note: Only one user can print at a time in Auto Connect mode. For ...
... 2. Click AutoConnect Printer and click Set AutoConnect Printer 2. Once a user has finished printing, another user can not print documents to the User Guide. Select the desired printer or fax and click Apply. 3. Printing Note: 1. Select the printer. The USB MFP Server Control Center will now show the ...printer as an AutoConnected Printer. 8 English Setup for Auto Connect Printing Note: Only one user can print at a time in Auto Connect mode. For ...

Quick Installation Guide
Page 16
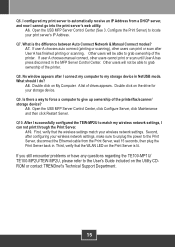
...print to the Print Server and Switch/Router. First, verify that the Print Server and printer are powered ON and are properly connected. Second, when the printer is securely connected to my print server. Make sure to set as a LPR printer. The Multi-Function Print (MFP) Server Control Center does not detect the Print Server...click Refresh Server List. Q3. A2. Click Ports, select a different port (e.g. You must wait until the other USB port (TE100-MP2U and TEW-MP2U only). Fifth, power cycle the Print Server. A3. Troubleshooting Q1. Once the user has finished printing or ...
...print to the Print Server and Switch/Router. First, verify that the Print Server and printer are powered ON and are properly connected. Second, when the printer is securely connected to my print server. Make sure to set as a LPR printer. The Multi-Function Print (MFP) Server Control Center does not detect the Print Server...click Refresh Server List. Q3. A2. Click Ports, select a different port (e.g. You must wait until the other USB port (TE100-MP2U and TEW-MP2U only). Fifth, power cycle the Print Server. A3. Troubleshooting Q1. Once the user has finished printing or ...
Quick Installation Guide
Page 17
.... First, verify that the WLAN LED on the Utility CDROM or contact TRENDnet's Technical Support Department. 15 Third, verify that the wireless settings match your print server's IP Address. If you still encounter problems or have any questions regarding the TE100-MP1U/ TE100-MP2U/TEW-MP2U, please refer to grab ownership of the printer/fax/scanner/ storage device...
.... First, verify that the WLAN LED on the Utility CDROM or contact TRENDnet's Technical Support Department. 15 Third, verify that the wireless settings match your print server's IP Address. If you still encounter problems or have any questions regarding the TE100-MP1U/ TE100-MP2U/TEW-MP2U, please refer to grab ownership of the printer/fax/scanner/ storage device...
User's Guide
Page 2
... the Hardware...9 Wireless connection ...9 Preliminary ...9 Set Wireless Configuration Using MFP Server Control Center 9 Set Wireless Configuration Using Server's Web Pages 12 Assigning an IP Address to the Server 16 Preliminary ...16 Ethernet Address...16 IP Address ...16 Methods for Setting the IP Address 16 Server Names and Server Name Rules 17 Setting the IP Address...PRINT SERVER IN WINDOWS 22 4.1 Overview of Installation Methods 22 4.2 Connecting the Server...22 4.2.1 The Server and Windows PC on Same LAN 23 4.2.2 The Server and Windows PC on Different LANs 23 4.3 Setting...
... the Hardware...9 Wireless connection ...9 Preliminary ...9 Set Wireless Configuration Using MFP Server Control Center 9 Set Wireless Configuration Using Server's Web Pages 12 Assigning an IP Address to the Server 16 Preliminary ...16 Ethernet Address...16 IP Address ...16 Methods for Setting the IP Address 16 Server Names and Server Name Rules 17 Setting the IP Address...PRINT SERVER IN WINDOWS 22 4.1 Overview of Installation Methods 22 4.2 Connecting the Server...22 4.2.1 The Server and Windows PC on Same LAN 23 4.2.2 The Server and Windows PC on Different LANs 23 4.3 Setting...

User's Guide
Page 3
... 5.2 Printing by LPD/LPR ...38 5.3 Using the Server on BSD UNIX/Linux 38 5.4 Using the Server on RedHat Linux (Fedora Core 39 CHAPTER6 FILE SERVER ...46 6.1 6.2 6.3 6.4 6.5 6.5.1 6.5.2 6.5.3 6.5.4 Preliminary ...46 Storage Names ...46 Connecting USB Mass Storage to the Server 46 Supported Codepages ...47 Adding Your USB Mass Storages to Network with Security 49 Setting up File Server Using...
... 5.2 Printing by LPD/LPR ...38 5.3 Using the Server on BSD UNIX/Linux 38 5.4 Using the Server on RedHat Linux (Fedora Core 39 CHAPTER6 FILE SERVER ...46 6.1 6.2 6.3 6.4 6.5 6.5.1 6.5.2 6.5.3 6.5.4 Preliminary ...46 Storage Names ...46 Connecting USB Mass Storage to the Server 46 Supported Codepages ...47 Adding Your USB Mass Storages to Network with Security 49 Setting up File Server Using...
User's Guide
Page 5
...website at most two USB devices can be familiar with TE100-MP2U, TEW-MP2U has an additional wireless module (802.11b/g). This Server is subject to as detailed instructions on the settings in a new Server. However, TE100-MP1U has only one USB device can ..., to TE100-MP1U while at http://www.TRENDnet.com for TE100-MP1U and TEW-MP2U. Chapter1 Introduction Thank you for purchasing the TRENDnet TE100-MP1U/TE100-MP2U/TEW-MP2UW USB Multi-Function Print Server (in the following table shows the differences among the 3 models. Similarly, almost all of the settings.
...website at most two USB devices can be familiar with TE100-MP2U, TEW-MP2U has an additional wireless module (802.11b/g). This Server is subject to as detailed instructions on the settings in a new Server. However, TE100-MP1U has only one USB device can ..., to TE100-MP1U while at http://www.TRENDnet.com for TE100-MP1U and TEW-MP2U. Chapter1 Introduction Thank you for purchasing the TRENDnet TE100-MP1U/TE100-MP2U/TEW-MP2UW USB Multi-Function Print Server (in the following table shows the differences among the 3 models. Similarly, almost all of the settings.
User's Guide
Page 9
... same SSID (Service Set ID). Wireless access can be secured by specification. 3.2.2 Set Wireless Configuration Using MFP Server Control Center 1. You have to the network with the USB cables. 3. The power indicator will appear. 9 When USB1 and USB2 indicators do not flash, the Server starts to work normally. 3.2 Wireless connection This section only applies to TEW-MP2U. 3.2.1 „ „...
... same SSID (Service Set ID). Wireless access can be secured by specification. 3.2.2 Set Wireless Configuration Using MFP Server Control Center 1. You have to the network with the USB cables. 3. The power indicator will appear. 9 When USB1 and USB2 indicators do not flash, the Server starts to work normally. 3.2 Wireless connection This section only applies to TEW-MP2U. 3.2.1 „ „...
User's Guide
Page 10
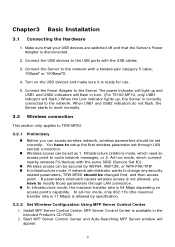
...index, and WEP key must be set Wireless dialog appears. 6. In order to join an existing wireless network, you have to use LAN to access MFP Server Control Center. 3. Double click the highlighted server (or click the "Configure MFP Server" button) and type the server's administrator (default: admin) and ...default: admin). 5. If the tool finds MFP Servers in your local area network, then you have to select a MFP Server from the Server menu, select wireless. # If the wireless parameters are not correct or not set yet, you have to set the correct network type (infrastructure or ad-hoc),...
...index, and WEP key must be set Wireless dialog appears. 6. In order to join an existing wireless network, you have to use LAN to access MFP Server Control Center. 3. Double click the highlighted server (or click the "Configure MFP Server" button) and type the server's administrator (default: admin) and ...default: admin). 5. If the tool finds MFP Servers in your local area network, then you have to select a MFP Server from the Server menu, select wireless. # If the wireless parameters are not correct or not set yet, you have to set the correct network type (infrastructure or ad-hoc),...

User's Guide
Page 11
8. If the wireless network is secured by WPA-PSK/TKIP, the shared key must be set correctly. 11
8. If the wireless network is secured by WPA-PSK/TKIP, the shared key must be set correctly. 11

User's Guide
Page 12
.... In ad-hoc mode, TEW-MP2U searches all channels to save your settings. Open IE Browser and type server's IP address or click the Home Icon of setting the wireless parameters. # In infrastructure mode, TEW-MP2U searches all channels to join the matched wireless ad-hoc service set too, however, if none are found, TEW-MP2U creates that service set . 9. You can see...
.... In ad-hoc mode, TEW-MP2U searches all channels to save your settings. Open IE Browser and type server's IP address or click the Home Icon of setting the wireless parameters. # In infrastructure mode, TEW-MP2U searches all channels to join the matched wireless ad-hoc service set too, however, if none are found, TEW-MP2U creates that service set . 9. You can see...
User's Guide
Page 13
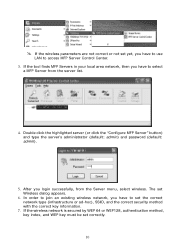
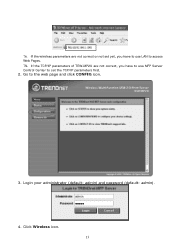
Login your administrator (default: admin) and password (default: admin). 4. Click Wireless icon. 13 Go to set yet, you have to use LAN to access Web Pages. # If the TCP/IP parameters of TEW-MP2U are not correct or not set the TCP/IP parameters first. 2. # If the wireless parameters are not correct, you have to use MFP Server Control Center to the web page and click CONFIG icon. 3.
Login your administrator (default: admin) and password (default: admin). 4. Click Wireless icon. 13 Go to set yet, you have to use LAN to access Web Pages. # If the TCP/IP parameters of TEW-MP2U are not correct or not set the TCP/IP parameters first. 2. # If the wireless parameters are not correct, you have to use MFP Server Control Center to the web page and click CONFIG icon. 3.

User's Guide
Page 14
In order to join an existing wireless network, you have to set correctly. 14 5. If the wireless network is secured by WEP64 or WEP128, key index and WEP key must be set the correct network type (infrastructure or ad-hoc), SSID, and the correct security method with the correct key information. 6.
In order to join an existing wireless network, you have to set correctly. 14 5. If the wireless network is secured by WEP64 or WEP128, key index and WEP key must be set the correct network type (infrastructure or ad-hoc), SSID, and the correct security method with the correct key information. 6.

User's Guide
Page 15
If the wireless network is secured by WPA-PSK/TKIP, the shared key must be set correctly. 15 7.
If the wireless network is secured by WPA-PSK/TKIP, the shared key must be set correctly. 15 7.
User's Guide
Page 16
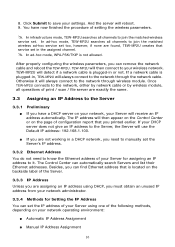
... is plugged-in , TEW-MP2U will always connect to your settings. In ad-hoc mode, TEW-MP2U searches all channels to join the matched wireless service set the IP address of your Server using one of the Server. 3.3.3 IP Address Unless you are assigning an IP address using DHCP, you printed earlier. Click Submit to the Server, the Server will detect if...
... is plugged-in , TEW-MP2U will always connect to your settings. In ad-hoc mode, TEW-MP2U searches all channels to join the matched wireless service set the IP address of your Server using one of the Server. 3.3.3 IP Address Unless you are assigning an IP address using DHCP, you printed earlier. Click Submit to the Server, the Server will detect if...
User's Guide
Page 17
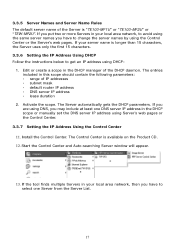
... address using DHCP: 1. Install the Control Center. The Control Center is "TE100-MP1U" or "TE100-MP2U" or "TEW-MP2U". If the tool finds multiple Servers in your server name is longer than 15 characters, the Server uses only the first 15 characters. 3.3.6 Setting the IP Address Using DHCP Follow the instructions below to avoid using the same...
... address using DHCP: 1. Install the Control Center. The Control Center is "TE100-MP1U" or "TE100-MP2U" or "TEW-MP2U". If the tool finds multiple Servers in your server name is longer than 15 characters, the Server uses only the first 15 characters. 3.3.6 Setting the IP Address Using DHCP Follow the instructions below to avoid using the same...

User's Guide
Page 18
Double click the highlight list and enter the Server's administrator (default: admin) and password (default: admin). 15. 14. After you have logged in successfully, select TCP/IP from the Server's menu. The Set IP Address dialog appears. 18
Double click the highlight list and enter the Server's administrator (default: admin) and password (default: admin). 15. 14. After you have logged in successfully, select TCP/IP from the Server's menu. The Set IP Address dialog appears. 18