

User Guide
Page 4
... Login to the WLAN Router ...13 Using the Web Browser ...13 Setup Wizard ...14 Advanced configuration ...23 Main ...23 LAN & DHCP Server...23 WAN ...24 Password...28 Time ...30 Dynamic DNS...31 Wireless...31 Basic ...31 iv
... Login to the WLAN Router ...13 Using the Web Browser ...13 Setup Wizard ...14 Advanced configuration ...23 Main ...23 LAN & DHCP Server...23 WAN ...24 Password...28 Time ...30 Dynamic DNS...31 Wireless...31 Basic ...31 iv

User Guide
Page 12
... RESET Use a pin‐shaped item to push to reset this device to default settings. 7 It will be a useful tool when the manager forgot the password to login, and needs to restore the device back to factory default settings. LAN (1‐4) Four RJ‐45 10/100Mbps Auto‐MDIX ports... is an RJ‐45 10/100Mbps Auto‐MDIX port for wireless connection. Rear Panel The figure below shows the rear panel of the TEW‐651BR Wireless Home Router. WAN In the four port broadband Router, there is one 2dBi gain antenna on the rear panel for the WAN that...
... RESET Use a pin‐shaped item to push to reset this device to default settings. 7 It will be a useful tool when the manager forgot the password to login, and needs to restore the device back to factory default settings. LAN (1‐4) Four RJ‐45 10/100Mbps Auto‐MDIX ports... is an RJ‐45 10/100Mbps Auto‐MDIX port for wireless connection. Rear Panel The figure below shows the rear panel of the TEW‐651BR Wireless Home Router. WAN In the four port broadband Router, there is one 2dBi gain antenna on the rear panel for the WAN that...
User Guide
Page 18
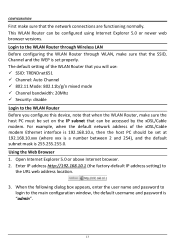
...the WLAN Router, make sure that the network connections are functioning normally. When the following dialog box appears, enter the user name and password to login to the WLAN Router through Wireless LAN Before configuring the WLAN Router through WLAN, make sure that the SSID, Channel and... or newer web browser versions. Open Internet Explorer 5.0 or above Internet browser. 2. Login to the main configuration window, the default username and password is set properly. Enter IP address http://192.168.10.1 (the factory‐default IP address setting) to the WLAN Router Before you will ...
...the WLAN Router, make sure that the network connections are functioning normally. When the following dialog box appears, enter the user name and password to login to the WLAN Router through Wireless LAN Before configuring the WLAN Router through WLAN, make sure that the SSID, Channel and... or newer web browser versions. Open Internet Explorer 5.0 or above Internet browser. 2. Login to the main configuration window, the default username and password is set properly. Enter IP address http://192.168.10.1 (the factory‐default IP address setting) to the WLAN Router Before you will ...

User Guide
Page 19
Please click "Next" to continue. 14 Step 1: Set your new password Setting the new admin password of the web configuration utility. Please click "Next" to continue. The following screen will appear. Setup Wizard Setup wizard is provided as part of the WLAN Router. User can simply follow the step‐by‐step process to get the wireless Router configuration ready to run in 6 easy steps by clicking on` the "Wizard" button on the function menu.
Please click "Next" to continue. 14 Step 1: Set your new password Setting the new admin password of the web configuration utility. Please click "Next" to continue. The following screen will appear. Setup Wizard Setup wizard is provided as part of the WLAN Router. User can simply follow the step‐by‐step process to get the wireless Router configuration ready to run in 6 easy steps by clicking on` the "Wizard" button on the function menu.

User Guide
Page 22
PPPoE to obtain IP automatically: If connected to the Internet using a PPPoE (Dial‐up xDSL) connection, and the ISP provides a User Name and Password, then choose this option and enter the assigned WAN IP Address, WAN Subnet Mask, WAN Gateway Address and DNS Server Addresses for the WLAN Router. If the Internet Service Provider (ISP) assigns a fixed IP address, choose this option and enter the required information. 17
PPPoE to obtain IP automatically: If connected to the Internet using a PPPoE (Dial‐up xDSL) connection, and the ISP provides a User Name and Password, then choose this option and enter the assigned WAN IP Address, WAN Subnet Mask, WAN Gateway Address and DNS Server Addresses for the WLAN Router. If the Internet Service Provider (ISP) assigns a fixed IP address, choose this option and enter the required information. 17

User Guide
Page 23
PPPoE with a fixed IP address: If connected to the Internet using a PPPoE (Dial‐up xDSL) connection and the ISP provides a User Name, Password and a Fixed IP Address, choose this option and enter the required information. 18
PPPoE with a fixed IP address: If connected to the Internet using a PPPoE (Dial‐up xDSL) connection and the ISP provides a User Name, Password and a Fixed IP Address, choose this option and enter the required information. 18

User Guide
Page 24
PPTP: If connected to the Internet using a PPTP xDSL connection, enter your IP, Subnet Mask, Gateway, Server IP, PPTP Account and PPTP Password. 19
PPTP: If connected to the Internet using a PPTP xDSL connection, enter your IP, Subnet Mask, Gateway, Server IP, PPTP Account and PPTP Password. 19

User Guide
Page 25
L2TP: If connected to the Internet using a L2TP (Dial‐up xDSL) connection and the ISP provides a Server IP, Account and Password information, choose this option and enter the required information. 20
L2TP: If connected to the Internet using a L2TP (Dial‐up xDSL) connection and the ISP provides a Server IP, Account and Password information, choose this option and enter the required information. 20

User Guide
Page 26
Choose this option and enter the required information. 21 Big Pond Cable(Australia): If your ISP is BigPond Cable, the ISP will provide a User Name, Password, Authentication Server and Login Server IP (Optional).
Choose this option and enter the required information. 21 Big Pond Cable(Australia): If your ISP is BigPond Cable, the ISP will provide a User Name, Password, Authentication Server and Login Server IP (Optional).
User Guide
Page 28
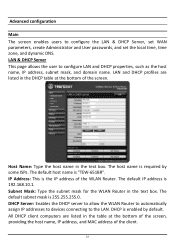
... & DHCP Server This page allows the user to the LAN. Host Name: Type the host name in the text box. IP Address: This is "TEW‐651BR". Subnet Mask: Type the subnet mask for the WLAN Router in the text box. DHCP Server: Enables the DHCP server to allow the WLAN Router... subnet mask, and domain name. Advanced configuration Main The screen enables users to configure the LAN & DHCP Server, set WAN parameters, create Administrator and User passwords, and set the local time, time zone, and dynamic DNS. The default host name is the IP address of the WLAN Router. DHCP is 255...
... & DHCP Server This page allows the user to the LAN. Host Name: Type the host name in the text box. IP Address: This is "TEW‐651BR". Subnet Mask: Type the subnet mask for the WLAN Router in the text box. DHCP Server: Enables the DHCP server to allow the WLAN Router... subnet mask, and domain name. Advanced configuration Main The screen enables users to configure the LAN & DHCP Server, set WAN parameters, create Administrator and User passwords, and set the local time, time zone, and dynamic DNS. The default host name is the IP address of the WLAN Router. DHCP is 255...

User Guide
Page 31
WAN IP: Select the WAN IP address Obtain from ISP. User Name: Enter the user name provided by ISP. Retype Password: Enter the password again. Idle Time Out: Enter the idle time out for Always‐on, Manual or Connect‐on Daemon, when no Internet access ...during the idle time, the PPPoE connection will provide a Password and User Name, and then the ISP uses PPPoE. Password: Enter the password provided by ISP. Choose this option and enter the required information. PPPoE If connected to the Internet using a PPPoE ...
WAN IP: Select the WAN IP address Obtain from ISP. User Name: Enter the user name provided by ISP. Retype Password: Enter the password again. Idle Time Out: Enter the idle time out for Always‐on, Manual or Connect‐on Daemon, when no Internet access ...during the idle time, the PPPoE connection will provide a Password and User Name, and then the ISP uses PPPoE. Password: Enter the password provided by ISP. Choose this option and enter the required information. PPPoE If connected to the Internet using a PPPoE ...

User Guide
Page 32
... to the Internet using a PPTP/L2TP (Dial‐up xDSL) with dynamic IP connection, enter the your Server IP, PPTP/L2TP Account and PPTP/L2TP Password, if your ISP has provided you with static IP connection, enter the your IP Address, Subnet Mask, Gateway IP address, DNS IP address, Server IP... address, PPTP Account and PPTP Password. 27 PPTP/L2TP with Dynamic IP If connected to the Internet using a PPTP/L2TP (Dial‐up xDSL) with a DNS IP address, enter it in...
... to the Internet using a PPTP/L2TP (Dial‐up xDSL) with dynamic IP connection, enter the your Server IP, PPTP/L2TP Account and PPTP/L2TP Password, if your ISP has provided you with static IP connection, enter the your IP Address, Subnet Mask, Gateway IP address, DNS IP address, Server IP... address, PPTP Account and PPTP Password. 27 PPTP/L2TP with Dynamic IP If connected to the Internet using a PPTP/L2TP (Dial‐up xDSL) with a DNS IP address, enter it in...

User Guide
Page 33
BigPond Cable If your ISP is Big Pond Cable, the ISP will provide a User Name, Password, Authentication Server and Login Server IP (Optional). These passwords are used to gain access to set administrative and user passwords. Choose this option and enter the required information. Password This screen enables users to the WLAN Router interface. 28
BigPond Cable If your ISP is Big Pond Cable, the ISP will provide a User Name, Password, Authentication Server and Login Server IP (Optional). These passwords are used to gain access to set administrative and user passwords. Choose this option and enter the required information. Password This screen enables users to the WLAN Router interface. 28

User Guide
Page 34
The password must be typed again for confirmation. 29 The password must be typed again for confirmation. Administrator: Type the password the Administrator will use to log into the system. The Administrator can also authorize users the ability to the system. User: Type the password the User will use to log in to configure the WLAN Router.
The password must be typed again for confirmation. 29 The password must be typed again for confirmation. Administrator: Type the password the Administrator will use to log into the system. The Administrator can also authorize users the ability to the system. User: Type the password the User will use to log in to configure the WLAN Router.

User Guide
Page 36
Basic This page allow user to enable and disable the wireless LAN function, create a SSID, and select the channel for the WLAN Router. Wireless This section enables users to register your preferred DNS with your current Public IP address when you are online. Then, please select the DDNS address in the Server Address and fill the related information in the below fields: Host Name, User Name and Password. First, you need to configuration the wireless communications parameters for wireless communications. 31 Dynamic DNS This synchronizes the DDNS server with the DDNS provider.
Basic This page allow user to enable and disable the wireless LAN function, create a SSID, and select the channel for the WLAN Router. Wireless This section enables users to register your preferred DNS with your current Public IP address when you are online. Then, please select the DDNS address in the Server Address and fill the related information in the below fields: Host Name, User Name and Password. First, you need to configuration the wireless communications parameters for wireless communications. 31 Dynamic DNS This synchronizes the DDNS server with the DDNS provider.

User Guide
Page 44
SMTP Account: If the SMTP Authentication enabled, fill in the password of traffic. To Email address: Type an email address for the log to be sent from. The log will be sent when the log is ... will depend on the specified day. 39 From Email address: Type an email address for authentication, fill in account name and password in SMTP Account field and SMTP Password field. SMTP Password: If the SMTP Authentication enabled, fill in the SMTP account name here. E‐mail Logs: Email the logs to set Router...
SMTP Account: If the SMTP Authentication enabled, fill in the password of traffic. To Email address: Type an email address for the log to be sent from. The log will be sent when the log is ... will depend on the specified day. 39 From Email address: Type an email address for authentication, fill in account name and password in SMTP Account field and SMTP Password field. SMTP Password: If the SMTP Authentication enabled, fill in the SMTP account name here. E‐mail Logs: Email the logs to set Router...

User Guide
Page 57
... Play that is a networking architecture that provides compatibility among networking equipment, software, and peripherals. The WLAN Router is short for remote management. A user name and password are required to increase the priority of Router IP addresses that can be pinged from the list and click "Priority Up" to perform remote management.
... Play that is a networking architecture that provides compatibility among networking equipment, software, and peripherals. The WLAN Router is short for remote management. A user name and password are required to increase the priority of Router IP addresses that can be pinged from the list and click "Priority Up" to perform remote management.
Quick Installation Guide
Page 5
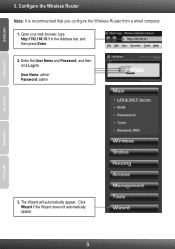
Configure the Wireless Router Note: It is recommended that you configure the Wireless Router from a wired computer. 1. Enter the User Name and Password, and then click Log In. User Name: admin Password: admin 3. Click Wizard if the Wizard does not automatically appear. 3 ESPAÑOL The Wizard will automatically appear. Open your web browser, type http://192.168.10.1 in the Address bar, and then press Enter. 2. ENGLISH FRANÇAIS DEUTSCH 3.
Configure the Wireless Router Note: It is recommended that you configure the Wireless Router from a wired computer. 1. Enter the User Name and Password, and then click Log In. User Name: admin Password: admin 3. Click Wizard if the Wizard does not automatically appear. 3 ESPAÑOL The Wizard will automatically appear. Open your web browser, type http://192.168.10.1 in the Address bar, and then press Enter. 2. ENGLISH FRANÇAIS DEUTSCH 3.

Quick Installation Guide
Page 6
By default, the Password is conflicting with your existing hardware. 8. Click Next. Note: Each Internet Connection type may have different options. 9. Follow the wizard instructions to complete the configuration. Select your ISP. Configure the settings based on information provided by your Time Zone and then click Next. 7. ENGLISH FRANÇAIS DEUTSCH ESPAÑOL 4. Enter a Password, verify the Password and then click Next. Click Next. 5. Click Next. 4 Note: Do not change default settings unless it is admin. 6.
By default, the Password is conflicting with your existing hardware. 8. Click Next. Note: Each Internet Connection type may have different options. 9. Follow the wizard instructions to complete the configuration. Select your ISP. Configure the settings based on information provided by your Time Zone and then click Next. 7. ENGLISH FRANÇAIS DEUTSCH ESPAÑOL 4. Enter a Password, verify the Password and then click Next. Click Next. 5. Click Next. 4 Note: Do not change default settings unless it is admin. 6.

