
User Guide
Page 5
...Panel...6 Hardware connections ...7 Connecting the WLAN Router...7 Check the installation ...7 PC NETWORK TCP/IP SETTING 8 Windows 95/98/ME...8 Windows 2000 ...9 Windows XP ...10 CONFIGURATION 11 Login to the WLAN Router through Wireless LAN ...11 Login to the WLAN Router...11 Using the Web Browser...11 Setup ...Wizard...12 Advanced configuration...22 Main ...22 LAN & DHCP Server...22 WAN ...23 Password ...
...Panel...6 Hardware connections ...7 Connecting the WLAN Router...7 Check the installation ...7 PC NETWORK TCP/IP SETTING 8 Windows 95/98/ME...8 Windows 2000 ...9 Windows XP ...10 CONFIGURATION 11 Login to the WLAN Router through Wireless LAN ...11 Login to the WLAN Router...11 Using the Web Browser...11 Setup ...Wizard...12 Advanced configuration...22 Main ...22 LAN & DHCP Server...22 WAN ...23 Password ...

User Guide
Page 7
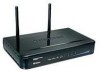
... sharing, and it is easy to install the router with web-based configuration. 1 Purpose This manual discusses how to your xDSL/Cable Modem. Helps you can connect the IEEE 802.11b/g/n Wireless Home Router to install the IEEE 802.11b/g/n Wireless Home Router. Tells how you get started with wireless LAN and Fast Ethernet switch. Technical Specifications...
... sharing, and it is easy to install the router with web-based configuration. 1 Purpose This manual discusses how to your xDSL/Cable Modem. Helps you can connect the IEEE 802.11b/g/n Wireless Home Router to install the IEEE 802.11b/g/n Wireless Home Router. Tells how you get started with wireless LAN and Fast Ethernet switch. Technical Specifications...
User Guide
Page 8
...can be easily setup. Networking technology is moving out of the exclusive domain of IP addresses and using a shared Internet connection through wireless or wired (WLAN, LAN and WAN-Internet). However, allowing more than two computers to access the Internet at any of broadband ...least two computers. This integrated access device combines Internet gateway functions with a wide range of features, but also can be installed and configured right out of installing a separate modem and ISP line for each computer, while providing ready connection for most people. This device ...
...can be easily setup. Networking technology is moving out of the exclusive domain of IP addresses and using a shared Internet connection through wireless or wired (WLAN, LAN and WAN-Internet). However, allowing more than two computers to access the Internet at any of broadband ...least two computers. This integrated access device combines Internet gateway functions with a wide range of features, but also can be installed and configured right out of installing a separate modem and ISP line for each computer, while providing ready connection for most people. This device ...

User Guide
Page 9
... filtering. ¾ Protocol/IP filtering ¾ Domain/URL filtering ¾ DDNS ¾ Upgradeable firmware for future function. ¾ Simple installation using Setup Wizard. ¾ Easy configuration via Web Browser.
... filtering. ¾ Protocol/IP filtering ¾ Domain/URL filtering ¾ DDNS ¾ Upgradeable firmware for future function. ¾ Simple installation using Setup Wizard. ¾ Easy configuration via Web Browser.

User Guide
Page 15
..." window opens, open the "Control Panel" and then open the "Network dialup connection" applet. Select "None" for the "Gateway address" field. 6. Select "Properties" to Automatic configuration. Set both "IP address" and "DNS" to enter the TCP/IP setting window. 1.
..." window opens, open the "Control Panel" and then open the "Network dialup connection" applet. Select "None" for the "Gateway address" field. 6. Select "Properties" to Automatic configuration. Set both "IP address" and "DNS" to enter the TCP/IP setting window. 1.
User Guide
Page 17
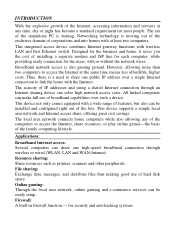
... address setting) to the WLAN Router Before you will use: 9 SSID: TRENDnet 9 Channel: 6 9 Security: disable Login to the URL web address location. 3. For example, when the default network address of the WLAN Router that can be set on the IP subnet that you configure this device, note that when... enter the user name and password to login to the WLAN Router through Wireless LAN Before configuring the WLAN Router through WLAN, make sure the host PC must be accessed by the xDSL/Cable modem. Login to the main configuration window, the default username and password is 255.255.255.0. ...
... address setting) to the WLAN Router Before you will use: 9 SSID: TRENDnet 9 Channel: 6 9 Security: disable Login to the URL web address location. 3. For example, when the default network address of the WLAN Router that can be set on the IP subnet that you configure this device, note that when... enter the user name and password to login to the WLAN Router through Wireless LAN Before configuring the WLAN Router through WLAN, make sure the host PC must be accessed by the xDSL/Cable modem. Login to the main configuration window, the default username and password is 255.255.255.0. ...

User Guide
Page 18
User can simply follow the step-by clicking on` the "Wizard" button on the function menu. Step 2: Choose time zone Select the time zone from the drop down list. Step 1: Set your new password Setting the new admin password of the web configuration utility. Please click "Next" to run in 6 easy steps by -step process to get the wireless Router configuration ready to continue. Please click "Next" to continue. Please click "Next" to continue. The following screen will appear. Setup Wizard Setup wizard is provided as part of the WLAN Router.
User can simply follow the step-by clicking on` the "Wizard" button on the function menu. Step 2: Choose time zone Select the time zone from the drop down list. Step 1: Set your new password Setting the new admin password of the web configuration utility. Please click "Next" to run in 6 easy steps by -step process to get the wireless Router configuration ready to continue. Please click "Next" to continue. Please click "Next" to continue. The following screen will appear. Setup Wizard Setup wizard is provided as part of the WLAN Router.
User Guide
Page 28
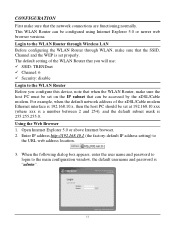
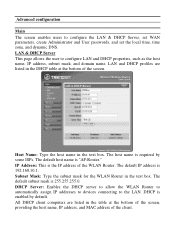
...screen enables users to configure LAN and DHCP properties, such as the host name, IP address, subnet mask, and domain name. The host name is 255.255.255.0. The default subnet mask is required by default. The default host name is enabled by some ISPs. DHCP is "AP-Router." LAN and DHCP...host name, IP address, and MAC address of the screen. Subnet Mask: Type the subnet mask for the WLAN Router in the text box. LAN & DHCP Server This page allows the user to configure the LAN & DHCP Server, set WAN parameters, create Administrator and User passwords, and set the local time, time...
...screen enables users to configure LAN and DHCP properties, such as the host name, IP address, subnet mask, and domain name. The host name is 255.255.255.0. The default subnet mask is required by default. The default host name is enabled by some ISPs. DHCP is "AP-Router." LAN and DHCP...host name, IP address, and MAC address of the screen. Subnet Mask: Type the subnet mask for the WLAN Router in the text box. LAN & DHCP Server This page allows the user to configure the LAN & DHCP Server, set WAN parameters, create Administrator and User passwords, and set the local time, time...
User Guide
Page 30
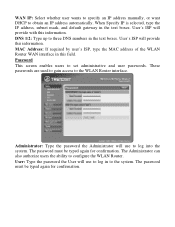
User's ISP will use to log in the text boxes. Password This screen enables users to the WLAN Router interface. These passwords are used to gain access to set administrative and user passwords. The Administrator can also authorize users the ability to three ... Type the password the Administrator will provide with this field. User: Type the password the User will provide this information. DNS 1/2: Type up to configure the WLAN Router. The password must be typed again for confirmation. WAN IP: Select whether user wants to specify an IP address manually, or want DHCP to...
User's ISP will use to log in the text boxes. Password This screen enables users to the WLAN Router interface. These passwords are used to gain access to set administrative and user passwords. The Administrator can also authorize users the ability to three ... Type the password the Administrator will provide with this field. User: Type the password the User will provide this information. DNS 1/2: Type up to configure the WLAN Router. The password must be typed again for confirmation. WAN IP: Select whether user wants to specify an IP address manually, or want DHCP to...

User Guide
Page 33
...Basic This page allow user to enable and disable the wireless LAN function, create a SSID, and select the channel for the wireless device to configuration the wireless communications parameters for the WLAN Router. The SSID of 802.11n, 11g, and 11b wireless clients. zMixed 802.11n, 802.11b, and 802....11g - Select if you are using both 802.11n and non-802.11n wireless devices. Select if...
...Basic This page allow user to enable and disable the wireless LAN function, create a SSID, and select the channel for the wireless device to configuration the wireless communications parameters for the WLAN Router. The SSID of 802.11n, 11g, and 11b wireless clients. zMixed 802.11n, 802.11b, and 802....11g - Select if you are using both 802.11n and non-802.11n wireless devices. Select if...

User Guide
Page 36
... the cipher type. This value stabilizes data flow. Fragmentation Threshold: Type the fragmentation threshold in the text box. User can specify a value from 25 to configure advanced wireless functions. The default beacon interval is 100. Advanced This screen enables users to 1000. RTS Threshold: Type the RTS (Request-To-Send) threshold in...
... the cipher type. This value stabilizes data flow. Fragmentation Threshold: Type the fragmentation threshold in the text box. User can specify a value from 25 to configure advanced wireless functions. The default beacon interval is 100. Advanced This screen enables users to 1000. RTS Threshold: Type the RTS (Request-To-Send) threshold in...

User Guide
Page 37
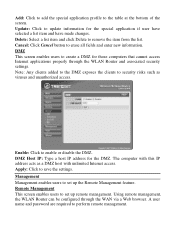
... specify a value between 1 and 255. Push Button Configuration: Clicking this button will invoke the Push Button Configuration (PBC) method of WPS. Status This selection enables users to view the status of the WLAN Router LAN, WAN and Wireless connections, and view logs and statistics pertaining to negotiate ...with WLAN Router via WPS protocol. Wi-Fi Protected...
... specify a value between 1 and 255. Push Button Configuration: Clicking this button will invoke the Push Button Configuration (PBC) method of WPS. Status This selection enables users to view the status of the WLAN Router LAN, WAN and Wireless connections, and view logs and statistics pertaining to negotiate ...with WLAN Router via WPS protocol. Wi-Fi Protected...

User Guide
Page 38
... Click "DHCP Renew" to reassign IP addresses to client stations connected to the WAN via the WLAN Router. Wireless: This section displays the wireless configuration information, including the MAC address, the Connection status, SSID, Channel and Authentication type. Firmware, check this ...to view the WLAN Router's LAN, Wireless and WAN configurations. Device Information This screen enables users to ensure that the firmware was successfully updated. LAN: This section displays the LAN interface configuration including the MAC address, IP Address, Subnet...
... Click "DHCP Renew" to reassign IP addresses to client stations connected to the WAN via the WLAN Router. Wireless: This section displays the wireless configuration information, including the MAC address, the Connection status, SSID, Channel and Authentication type. Firmware, check this ...to view the WLAN Router's LAN, Wireless and WAN configurations. Device Information This screen enables users to ensure that the firmware was successfully updated. LAN: This section displays the LAN interface configuration including the MAC address, IP Address, Subnet...

User Guide
Page 43
...the static IP address table at the bottom of the page. Metric: Select which the WLAN Router forwards data to its destination if the network has a static IP address. Add: Click to add the configuration to access the Internet. Network Mask: Type the network (subnet) mask of the network. ...Internet. Delete: Select one of the entries in the static IP address table at the bottom of the page and click "Delete" to this configuration. If this information. Contact the ISP or network administrator for this field is left blank, the network mask defaults to 255.255.255.0. ...
...the static IP address table at the bottom of the page. Metric: Select which the WLAN Router forwards data to its destination if the network has a static IP address. Add: Click to add the configuration to access the Internet. Network Mask: Type the network (subnet) mask of the network. ...Internet. Delete: Select one of the entries in the static IP address table at the bottom of the page and click "Delete" to this configuration. If this information. Contact the ISP or network administrator for this field is left blank, the network mask defaults to 255.255.255.0. ...
User Guide
Page 52
... Management enables users to update information for the DMZ. Update: Click to set up the Remote Management feature. Using remote management, the WLAN Router can be configured through the WLAN Router and associated security settings. Note: Any clients added to the DMZ exposes the clients to save the settings. DMZ Host IP: Type...
... Management enables users to update information for the DMZ. Update: Click to set up the Remote Management feature. Using remote management, the WLAN Router can be configured through the WLAN Router and associated security settings. Note: Any clients added to the DMZ exposes the clients to save the settings. DMZ Host IP: Type...
User Guide
Page 54
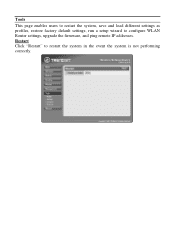
Tools This page enables users to restart the system, save and load different settings as profiles, restore factory default settings, run a setup wizard to restart the system in the event the system is not performing correctly. Restart Click "Restart" to configure WLAN Router settings, upgrade the firmware, and ping remote IP addresses.
Tools This page enables users to restart the system, save and load different settings as profiles, restore factory default settings, run a setup wizard to restart the system in the event the system is not performing correctly. Restart Click "Restart" to configure WLAN Router settings, upgrade the firmware, and ping remote IP addresses.

User Guide
Page 55
Settings This screen enables users to save the current configuration as a profile and load profiles for different circumstances. User can load when necessary. Click "Load" to restore the default settings. Restore Factory Default Settings: Click "... "Save" to save settings as a profile that can also load the factory default settings, and run a setup wizard to the location of a stored profile. All configuration changes will lost. Load Settings: Click "Browse" and go to configure the WLAN Router and Router interface.
Settings This screen enables users to save the current configuration as a profile and load profiles for different circumstances. User can load when necessary. Click "Load" to restore the default settings. Restore Factory Default Settings: Click "... "Save" to save settings as a profile that can also load the factory default settings, and run a setup wizard to the location of a stored profile. All configuration changes will lost. Load Settings: Click "Browse" and go to configure the WLAN Router and Router interface.

Quick Installation Guide
Page 6
Write down the new router information on the CD sleeve for your own reference and click Next. Select a encryption type and enter the security key for your wireless network and then click Next. 10. Note: For wireless clients, please make sure the SSID and the encryption information matches the router settings. 11. 9. When this screen appears, the router has been configured successfully, click Next. 4 English
Write down the new router information on the CD sleeve for your own reference and click Next. Select a encryption type and enter the security key for your wireless network and then click Next. 10. Note: For wireless clients, please make sure the SSID and the encryption information matches the router settings. 11. 9. When this screen appears, the router has been configured successfully, click Next. 4 English

Quick Installation Guide
Page 7
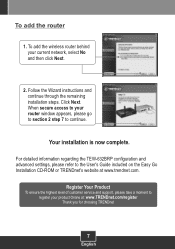
For detailed information regarding the TEW-632BRP configuration and advanced settings, please refer to the User's Guide included on the Easy Go Installation CD-ROM or TRENDnet's website at www.trendnet.com. 5 English Your installation is now complete. Select Exit Router Setup and then click Finish. 12.
For detailed information regarding the TEW-632BRP configuration and advanced settings, please refer to the User's Guide included on the Easy Go Installation CD-ROM or TRENDnet's website at www.trendnet.com. 5 English Your installation is now complete. Select Exit Router Setup and then click Finish. 12.
Quick Installation Guide
Page 9
... instructions and continue through the remaining installation steps. Click Next. For detailed information regarding the TEW-632BRP configuration and advanced settings, please refer to register your product Online at www.trendnet.com. To add the router 1. To add the wireless router behind your router window appears, please go to section 2 step 7 to continue. Register Your Product To ensure...
... instructions and continue through the remaining installation steps. Click Next. For detailed information regarding the TEW-632BRP configuration and advanced settings, please refer to register your product Online at www.trendnet.com. To add the router 1. To add the wireless router behind your router window appears, please go to section 2 step 7 to continue. Register Your Product To ensure...


